


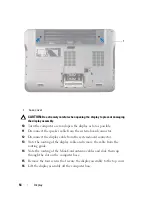


46
Power-Button Board
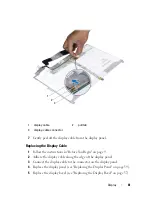
12
Lift the power-button board off the top cover.
Replacing the Power-Button Board
1
Follow the instructions in "Before You Begin" on page 9.
2
Use the alignment post to place the power-button board on the top cover.
3
Replace the screw that secures the power-button board to the top cover.
4
Connect the power button-board cable to the system-board connector.
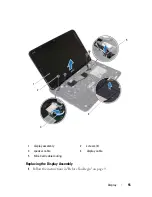
1
screw
2
power-button board
3
system-board connector
4
display cable
5
top cover
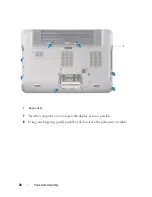
1
2
3
4
5
Summary of Contents for XPS L401X
Page 1: ...Dell XPS L401X Service Manual Regulatory model P12G series Regulatory type P12G001 ...
Page 8: ...8 Contents ...
Page 12: ...12 Before You Begin ...
Page 20: ...20 Memory Module s ...
Page 26: ...26 Wireless Mini Card s ...
Page 30: ...30 Hard Drive ...
Page 40: ...40 Palm Rest Assembly ...
Page 48: ...48 Power Button Board ...
Page 52: ...52 Coin Cell Battery ...
Page 64: ...64 Display ...
Page 68: ...68 Camera Module ...
Page 74: ...74 Top Cover ...
Page 78: ...78 Speakers ...
Page 83: ...Processor Fan and Heat Sink Assembly 83 ...
Page 84: ...84 Processor Fan and Heat Sink Assembly ...
Page 92: ...92 Daughter Board ...
Page 96: ...96 Internal Card With Bluetooth Wireless Technology ...
Page 100: ...100 AC Adapter Connector ...
Page 106: ...106 System Board ...


