background image


5.

Slide the drive-

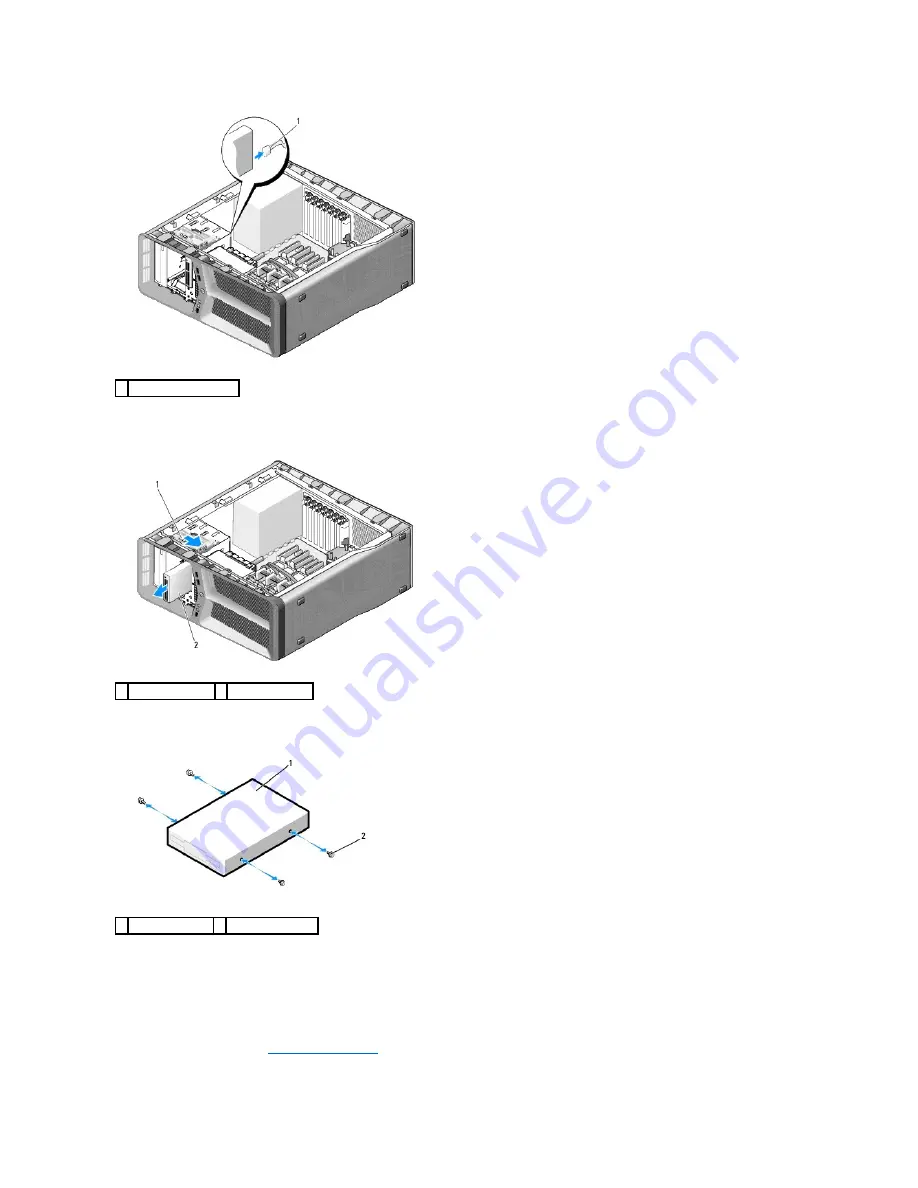
release latch towards the base of the computer to release the shoulder screw, and then slide the media card reader out of the drive bay. 


6.

If no screws are attached to the media card reader, check the inside of the drive panel for shoulder screws. If screws are present, attach the screws to 
the new card reader.  


7.

Slide the media card reader into the drive bay until it clicks into place.  


8.

Attach the media card reader cable to the back of the media card reader.  


9.

Check all cable connections and fold cables out of the way to avoid blocking airflow between the fan and cooling vents.  


10.

Replace the drive panel (see 

Replacing the Drive Panel

).  


1  media card reader cable 

1  drive-release latch  2  media card reader 

1  media card reader  2  shoulder screws (4) 

Summary of Contents for XPS 625

Page 1: ...the marks and names or their products Dell Inc disclaims any proprietary interest in trademarks and trade names other than its own November 2008 Rev A00 Technical Overview Before You Begin Replacing the Computer Cover Replacing Memory Module s Replacing PCI PCI Express Cards Replacing Drives Replacing Fans Replacing the Processor Heat Sink Replacing the Processor Replacing the System Board Replaci...

Page 2: ...wing safety guidelines to help protect your computer from potential damage and to help to ensure your own personal safety 1 Ensure that the work surface is flat and clean to prevent the computer cover from being scratched 2 Turn off your computer see Turning Off Your Computer CAUTION To avoid losing data save and close all open files and exit all open programs before you turn off your computer WAR...

Page 3: ...r button while the system is unplugged to ground the system board Back to Contents Page CAUTION Before touching anything inside your computer ground yourself by touching an unpainted metal surface such as the metal at the back of the computer While you work periodically touch an unpainted metal surface to dissipate static electricity which could harm internal components ...

Page 4: ...screw that secures the card to the chassis WARNING Before working inside your computer read the safety information that shipped with your computer For additional safety best practices information see the Regulatory Compliance Homepage at www dell com regulatory_compliance NOTE If a graphics card is installed in each of the PCI Express x16 card slots in the dual graphics configuration the PCI Expre...

Page 5: ...ard Installing PCI and PCI Express Cards 1 Follow the procedures in Before You Begin 1 release tab 2 card retainer 3 screw 4 alignment guide 5 fan cage 6 alignment guide release tab 1 PCI Express x16 card 2 securing tab 3 PCI Express x16 card slot NOTE Installing filler brackets over empty card slot openings is necessary to maintain FCC certification of the computer The brackets also keep dust and...

Page 6: ... devices to electrical outlets and then turn them on 13 To complete the installation see Configuring Your Computer After Removing or Installing a PCI PCI Express Card NOTE If the card is full length pull back on the alignment guide release tab to remove the alignment guide from the card fan cage NOTE If the card is full length insert the card guide into the alignment slot on the card fan cage CAUT...

Page 7: ...ual Configuration NOTE Follow the steps described in this section to remove PCI Express x16 graphics cards in dual configuration only For removal of any other type of PCI or PCI Express cards see Removing PCI and PCI Express Cards NOTE The graphics card bridge may not be present in all dual graphics configurations and is not necessary in a single graphics card configuration 1 graphics card bridge ...

Page 8: ...er 6 Connect any cables that should be attached to the card See the documentation that came with the card for information about the card s cable connections 7 Rotate the card retainer back into its original position push its tip so that its tab clicks into place 8 Attach the graphics card bridge if required for your dual graphics configuration pressing firmly so that it completely covers the conne...

Page 9: ... the sound card s connectors 1 Enter system setup see Entering System Setup 2 Go to Integrated Audio Controller and then change the setting to On 3 Connect the external audio devices to the computer s back panel connectors Network Card 1 Enter system setup see Entering System Setup 2 Go to Integrated NIC Controller and then change the setting to Off 3 Connect the network cable to the network card ...

Page 10: ...tem setup see Entering System Setup and restore the settings you recorded in step 1 Back to Contents Page WARNING Before working inside your computer read the safety information that shipped with your computer For additional safety best practices information see the Regulatory Compliance Homepage at www dell com regulatory_compliance WARNING A new battery can explode if it is incorrectly installed...

Page 11: ...efore working inside your computer read the safety information that shipped with your computer For additional safety best practices information see the Regulatory Compliance Homepage at www dell com regulatory_compliance WARNING To guard against electrical shock always unplug your computer from the electrical outlet before removing the cover WARNING Do not operate your equipment with any cover s i...

Page 12: ...the help of an assistant carefully set the computer upright 8 Connect your computer and devices to electrical outlets and turn them on Back to Contents Page 1 computer cover 2 cover hinge tabs 2 3 hinge slots ...

Page 13: ...e release position so that the socket is ready for the processor to be replaced 7 To replace the processor align the pin 1 corner of the processor and socket WARNING Before working inside your computer read the safety information that shipped with your computer For additional safety best practices information see the Regulatory Compliance Homepage at www dell com regulatory_compliance CAUTION Do n...

Page 14: ...ocessor Heat Sink 11 Reconnect the power cables to the POWER1 and 12V_ATXP connectors see System Board Components on the system board 12 Replace the computer cover see Replacing the Computer Cover 13 Connect your computer and devices to electrical outlets and then turn them on Back to Contents Page CAUTION Socket pins are delicate To avoid damage ensure that the processor is aligned properly with ...

Page 15: ...n them on Back to Contents Page WARNING Before working inside your computer read the safety information that shipped with your computer For additional safety best practices information see the Regulatory Compliance Homepage at www dell com regulatory_compliance CAUTION Do not perform the following steps unless you are familiar with hardware removal and replacement Performing these steps incorrectl...

Page 16: ... computer read the safety information that shipped with your computer For additional safety best practices information see the Regulatory Compliance Homepage at www dell com regulatory_compliance WARNING To guard against electrical shock always unplug your computer from the electrical outlet before removing the cover CAUTION If you are replacing a hard drive that contains data that you want to kee...

Page 17: ...ter and devices to electrical outlets and then turn them on See the documentation that came with the drive for instructions on installing any software required for drive operation Replacing the Drive Panel 1 black tabs 2 2 hard drive 3 hard drive bay NOTE If the hard drive you are installing does not have a hard drive bracket attached use your original hard drive bracket snap the bracket onto the ...

Page 18: ...n the drive panel tabs with the side door hinges 7 Rotate the drive panel toward the computer until it snaps into place 8 Replace the computer cover see Replacing the Computer Cover Replacing a Media Card Reader 1 Follow the procedures in Before You Begin 2 Remove the computer cover see Replacing the Computer Cover 3 Remove the drive panel see Replacing the Drive Panel 4 Disconnect the media card ...

Page 19: ...sent attach the screws to the new card reader 7 Slide the media card reader into the drive bay until it clicks into place 8 Attach the media card reader cable to the back of the media card reader 9 Check all cable connections and fold cables out of the way to avoid blocking airflow between the fan and cooling vents 10 Replace the drive panel see Replacing the Drive Panel 1 media card reader cable ...

Page 20: ...data cables from the back of the drive 5 Slide the drive release latch towards the base of the computer to release the shoulder screw and then slide the optical drive out of the drive bay 6 To replace the optical drive prepare the optical drive for installation and check the documentation that accompanied the drive to verify that the drive is configured for your computer 7 If no screws are attache...

Page 21: ... 12 Replace the computer cover see Replacing the Computer Cover 13 Connect your computer and devices to electrical outlets and then turn them on See the documentation that came with the drive for instructions on installing any software required for drive operation 14 Enter system setup see Entering System Setup and select the appropriate Drive option Back to Contents Page 1 optical drive 2 shoulde...

Page 22: ... chassis and then slide the card fan cage back and out of the chassis 6 In succession carefully pull on each corner of the card fan to detach the rubber grommets securing the card fan to the card fan cage WARNING Before working inside your computer read the safety information that shipped with your computer For additional safety best practices information see the Regulatory Compliance Homepage at ...

Page 23: ...fan cage into the corresponding slots on the chassis then slide the card fan cage forward until it snaps into place 1 card fan 2 rubber grommets 4 3 card fan cage 4 card fan power cable CAUTION Ensure that the fan power cable is correctly routed through the opening in the lower right corner of the fan cage NOTE Airflow direction and orientation are shown on the side of the fan 1 card fan 2 rubber ...

Page 24: ...er see Replacing the Computer Cover 14 Connect your computer and devices to electrical outlets and then turn them on Replacing the Hard Drive Fan 1 Follow the procedures in Before You Begin 2 Remove the computer cover see Replacing the Computer Cover 3 Remove the card fan cage see Replacing the Card Fan 4 Slide the hard drive fan cage out from behind the hard drive bays then lift it from the compu...

Page 25: ...ive fan cage into the corresponding slot on the chassis then slide the hard drive fan cage behind the hard drive bays until it snaps into place 9 Replace the card fan cage see Replacing the Card Fan 10 Replace the computer cover see Replacing the Computer Cover 11 Connect your computer and devices to electrical outlets and then turn them on Back to Contents Page 1 hard drive fan 2 rubber grommets ...

Page 26: ......

Page 27: ...ivot the front panel away from the computer to release it from the chassis c Disconnect the FRONT_LED cable from the front panel to remove the front panel 9 Remove the two screws that secure the front I O panel to the chassis then slide the front I O panel towards the chassis frame to remove it completely WARNING Before working inside your computer read the safety information that shipped with you...

Page 28: ...les to the front I O panel 15 Replace the card fan cage see Replacing the Card Fan 16 Connect all the cables to the master I O board see Master I O Board Components 17 Replace any expansion cards that you removed see Installing PCI and PCI Express Cards 18 Replace the computer cover see Replacing the Computer Cover 19 Connect your computer and devices to electrical outlets and then turn them on Ba...

Page 29: ...Disconnect the FRONT_LED cable from the front panel to remove the front panel along with the front panel light board 7 To replace the front LED board align the securing tabs on the front panel with the corresponding slots on the chassis connect the FRONT_LED cable to the front panel WARNING Before working inside your computer read the safety information that shipped with your computer For addition...

Page 30: ...2 Remove the computer cover see Replacing the Computer Cover 3 Remove the system board see Replacing the System Board 4 Disconnect the REAR_LED_SENSOR cable from the master I O board see Master I O Board Components 5 Gently push the release tab away from the chassis to release the rear LED board and then slide it up and away from the computer 6 To replace the rear LED board connect the REAR_LED_SE...

Page 31: ...lign the rear LED board with the metal tab on the chassis then slide the rear LED board into place 9 Replace the system board see Replacing the System Board 10 Replace the computer cover see Replacing the Computer Cover 11 Connect your computer and devices to electrical outlets and then turn them on Back to Contents Page ...

Page 32: ...tal tray 7 Replace the screw to secure the master I O board to the metal tray 8 Reconnect all cables to the master I O board see Master I O Board Components 9 Replace the card fan cage see Replacing the Card Fan 10 Replace the computer cover see Replacing the Computer Cover 11 Connect your computer and devices to electrical outlets and turn them on Back to Contents Page WARNING Before working insi...

Page 33: ...ith the tab in the connector 7 Insert the module into the connector until the module snaps into position If you insert the module correctly the securing clips snap into the cutouts at each end of the module 8 Replace the computer cover see Replacing the Computer Cover WARNING Before working inside your computer read the safety information that shipped with your computer For additional safety best ...

Page 34: ...ing that memory size has changed press F1 to continue 10 Log on to your computer 11 Right click the My Computer icon on your Microsoft Windows desktop and click Properties 12 Click the General tab 13 To verify that the memory is installed correctly check the amount of memory RAM listed Back to Contents Page ...

Page 35: ...he chassis 10 Lift the power supply up and out of the computer 11 To replace the power supply slide the power supply into place ensuring that the tabs on the rear wall of the computer chassis latch into place 12 Replace the four screws that secure the power supply to the back of the computer chassis 13 Replace the system board see Replacing the System Board WARNING Before working inside your compu...

Page 36: ... that were previously connected carefully rerouting them as you found them 15 Replace the computer cover see Replacing the Computer Cover 16 Connect your computer and devices to electrical outlets and then turn them on Back to Contents Page ...

Page 37: ...f time To avoid possible keyboard failure press and release F2 in even intervals until the system setup screen appears Menu Appears on top of the System Setup window This field provides a menu to access to the System Setup options Press the left and right arrow keys to navigate As a Menu option is highlighted the Options List lists the options that define the hardware installed on you computer Opt...

Page 38: ... option enables you to configure the voltage of the CPU core FSB memory voltage and chipset voltage Overclocked DIMM Configuration Allows you to enable or disable overclocked DIMM support on your system Security Setup Password Allows you to set a Setup password System Password Allows you to set a System password Power ACPI Suspend Type Specifies the ACPI suspend type The default is S3 AC Recovery ...

Page 39: ...mory key or CD RW drive 1 If you are booting to a USB device connect the USB device to a USB connector see the Back View Features in your Setup Guide 2 Turn on or restart your computer 3 When the DELL logo appears press F12 immediately If you wait too long and the operating system logo appears continue to wait until you see the Microsoft Windows desktop then shut down your computer and try again 4...

Page 40: ...Back to Contents Page ...

Page 41: ...oard to the chassis 12 Replace the processor heatsink see Replacing the Processor Heat Sink 13 Replace any expansion cards that you removed see Installing PCI and PCI Express Cards 14 Replace any additional components that you removed from the system board WARNING Before working inside your computer read the safety information that shipped with your computer For additional safety best practices in...

Page 42: ...ver see Replacing the Computer Cover 17 Connect your computer and devices to electrical outlets and then turn them on 18 Flash the system BIOS as needed Back to Contents Page NOTE For information on flashing the system BIOS see the Dell Support website at support dell com ...

Page 43: ...omputer read the safety information that shipped with your computer For additional safety best practices information see the Regulatory Compliance Homepage at www dell com regulatory_compliance 1 CD DVD drive bays 2 2 media card reader 3 card fan 4 hard drive bays 4 5 power supply 1 FlexBay connector FLEXBAY 2 power button PWR BTN 3 front LED 4 front panel USB connector FIO BD 5 floppy drive conne...

Page 44: ...rve fan connector RESERVE FAN 22 processor connector CPU1 23 processor fan connector CPU FAN 24 black memory module connectors DIMM3 and DIMM4 25 white memory module connectors DIMM1 and DIMM2 26 ACC controller jumper J56 27 CMOS reset jumper CMOS1 28 liquid cooling system pump connector LCS PUMP 29 main power connector POWER1 30 IDE drive connector IDE 31 SATA connectors SATA1 5 1 I O board reset...

Reviews: