background image

Back to Contents Page


 Battery  

Dell™ Vostro™ 1200 Service Manual 


Removing the Battery 


Replacing the Battery 


Coin Cell Battery 


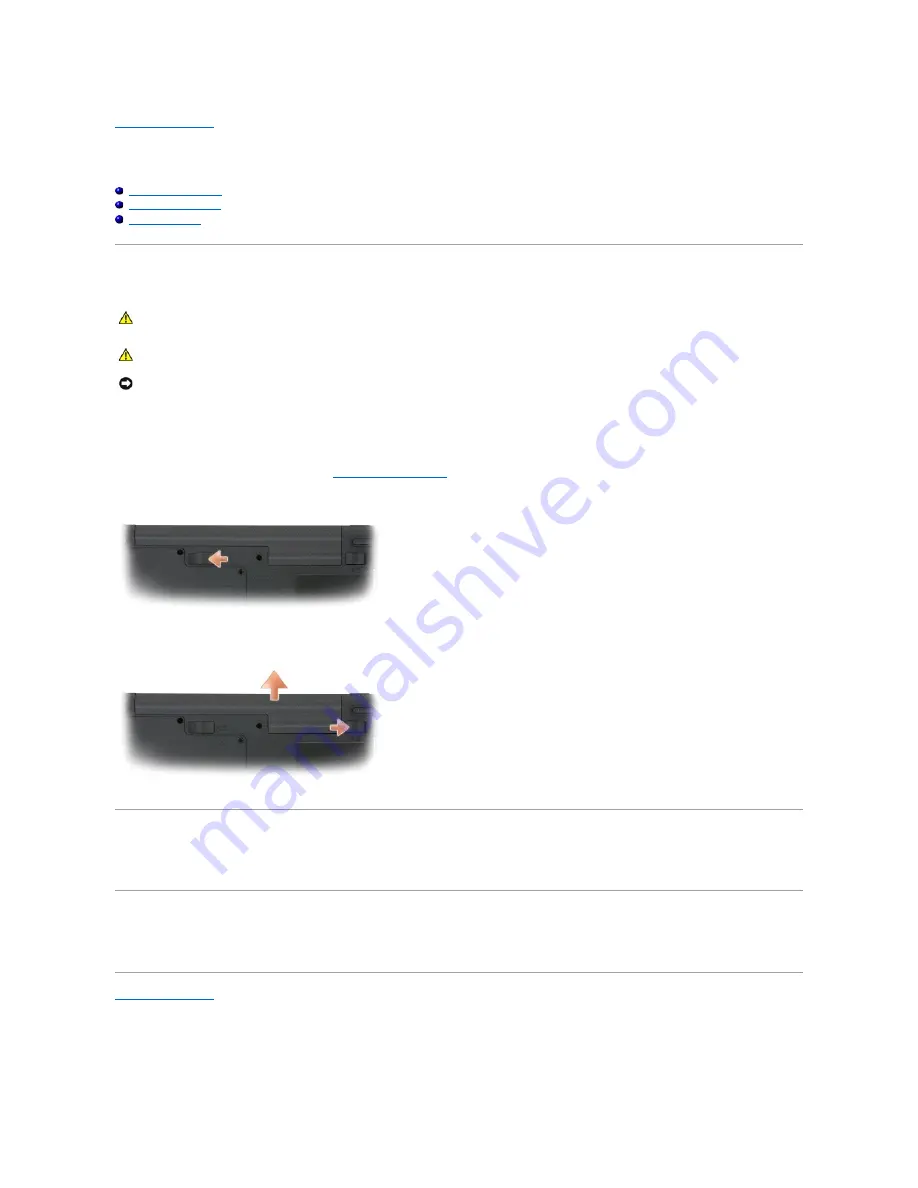
Removing the Battery  


To remove the battery: 


1.

If the computer is connected to a docking device (docked), undock it. See the documentation that came with your docking device for instructions.  


2.

Ensure that the computer is turned off (see 

Turning Off Your Computer

).  


3.

With the battery side of the computer facing away from you, slide the left latch to the unlock position.  


4.

Slide the right battery-bay latch release and slide the battery out of the battery bay.  


Replacing the Battery  

To replace the battery, follow the removal procedure in reverse order. 


Coin Cell Battery  

The coin cell battery is soldered to the system board and is not a replaceable part. 

Back to Contents Page


CAUTION: 

Using an incompatible battery may increase the risk of fire or explosion. Replace the battery only with a compatible battery purchased 

from Dell. The battery is designed to work with your Dell™ computer. Do not use a battery from other computers with your computer. 


CAUTION: 

Before performing these procedures, turn off the computer, disconnect the AC adapter from the electrical outlet and the computer, 

disconnect the modem from the wall connector and computer, and remove any other external cables from the computer.


NOTICE: 

You must remove all external cables from the computer to avoid possible connector damage.

Summary of Contents for Vostro 1200

Page 1: ...n this document to refer to either the entities claiming the marks and names or their products Dell Inc disclaims any proprietary interest in trademarks and trade names other than its own December 2007 Rev A00 Before You Begin Display Assembly Battery Palm Rest Internal Card With Bluetooth Wireless Technology Fan Hard Drive Processor Thermal Cooling Assembly Optical Drive Processor Module Memory S...

Page 2: ...eplace the battery follow the removal procedure in reverse order Coin Cell Battery The coin cell battery is soldered to the system board and is not a replaceable part Back to Contents Page CAUTION Using an incompatible battery may increase the risk of fire or explosion Replace the battery only with a compatible battery purchased from Dell The battery is designed to work with your Dell computer Do ...

Page 3: ...t down your operating system press and hold the power button for about four seconds to turn off Before Working Inside Your Computer Use the following safety guidelines to help protect your computer from potential damage and to help to ensure your own personal safety 1 Ensure that the work surface is flat and clean to prevent the computer cover from being scratched 2 Turn off your computer see Turn...

Page 4: ... turn the computer upside down on a flat work surface 4 Remove the battery see Removing the Battery 5 Turn the computer top side up open the display and press the power button to ground the system board Back to Contents Page ...

Page 5: ...Your Entry Method area select Enter a Service Tag 4 Locate your service tag from the bottom of your computer 5 Enter your service tag number in the Enter a service tag text area 6 Click the Go button 7 When the Drivers and Downloads Search Criteria page appears click the BIOS and download the BIOS utility 8 After the download completes double click the BIOS utility file 9 Follow the BIOS utility o...

Page 6: ...e card connector 2 Place the card into the compartment CAUTION Before performing the following procedures read the safety instructions in your Product Information Guide NOTICE To avoid electrostatic discharge ground yourself by using a wrist grounding strap or by periodically touching a connector on the back panel of the computer 1 card 2 connector 3 compartment 4 cover 5 screw NOTICE Be careful w...

Page 7: ...3 Screw the card cover back onto the compartment 4 Replace the battery see Replacing the Battery Back to Contents Page 1 card 2 connector 3 compartment 4 cover 5 screw ...

Page 8: ...rounding strap or by periodically touching an unpainted metal surface such as the back panel on the computer NOTICE Do not touch the processor die Press and hold the processor down on the substrate on which the die is mounted while turning the cam screw to prevent intermittent contact between the cam screw and processor NOTICE To avoid damage to the processor hold the screwdriver so that it is per...

Page 9: ...sure that the cam lock is in the fully open position before seating the processor module Seating the processor module properly in the ZIF socket does not require force NOTICE A processor module that is not properly seated can result in an intermittent connection or permanent damage to the processor and ZIF socket NOTE If a new microprocessor is installed you will receive either a new thermal cooli...

Page 10: ... 1 through 4 that secure the processor thermal cooling assembly to the system board 6 Lift the processor thermal cooling assembly and remove it from the system board CAUTION Before you begin the following procedure follow the safety instructions in the Product Information Guide NOTICE To avoid electrostatic discharge ground yourself by using a wrist grounding strap or by periodically touching an u...

Page 11: ...the battery see Replacing the Battery Back to Contents Page 1 processor thermal cooling assembly 2 screws 4 NOTE If you are replacing the thermal cooling assembly without removing and replacing a new processor you can place the new thermal pad directly on any existing thermal pad already installed on the thermal cooling assembly It is not necessary to remove an existing pad or to clean the surface...

Page 12: ... Hinge Cover 4 Remove the keyboard see Removing the Keyboard 5 Disconnect the display cable from the display cable connector on the system board 6 Disconnect the three Mini Card antenna cables see Mini Cards on the bottom of the computer pull the cables up through the system board and unroute the cables 7 Disconnect the left and right microphone cables CAUTION Before you begin the following proced...

Page 13: ... Replace the battery see Replacing the Battery Removing the Display Bezel 1 Remove the display assembly see Removing the Display Assembly 2 Remove the four rubber display bumpers 3 Remove the four M2 5x5 mm screws around the display bezel 3 left and right microphone cables NOTICE Ensure the antenna cables are not twisted and that they are lying flat in the antenna cable clip CAUTION Before you beg...

Page 14: ...out of the display back cover Removing the Inverter Board 1 Remove the display assembly see Removing the Display Assembly 3 display bezel NOTICE Removal of the bezel from the display back cover requires extreme care to avoid damage to the bezel CAUTION Before you begin the following procedure follow the safety instructions in the Product Information Guide NOTICE To avoid electrostatic discharge gr...

Page 15: ... the two M2 5x3 mm the two M2 5x5 mm and the four M2x3 mm screws in sequential order two on each side of the display panel Removing the Display Panel Bracket 1 Remove the display assembly see Removing the Display Assembly 2 Remove the display bezel see Removing the Display Bezel 3 Remove the display panel see Removing the Display Panel 4 Remove the M2x3 mm screws two per side from the display pane...

Page 16: ...urface 2 Align each bracket to the holes on the display panel 3 Replace the M2x3 mm screws two per side 4 Follow the procedures in Before You Begin 5 Replace the battery see Replacing the Battery Back to Contents Page 1 M2x3 mm screws 2 per side 2 display panel bracket 2 ...

Page 17: ...t cover and lift to remove the cover 5 Remove the M2 5x5 mm screw from the fan 6 Disconnect the fan cable from the connector on the system board CAUTION Before you begin the following procedure follow the safety instructions in the Product Information Guide NOTICE To avoid electrostatic discharge ground yourself by using a wrist grounding strap or by periodically touching an unpainted metal surfac...

Page 18: ... to the connector on the system board 2 Replace the M2 5x5 mm screw in the fan 3 Replace the component cover 4 Replace the battery see Replacing the Battery Back to Contents Page 1 connector on system board 2 fan cable 3 M2 5x5 mm screw 4 fan ...

Page 19: ...f the computer by pulling the tab CAUTION If you remove the hard drive from the computer when the drive is hot do not touch the metal housing of the hard drive CAUTION Before you begin the following procedure follow the safety instructions in the Product Information Guide NOTICE To prevent data loss turn off your computer before removing the hard drive Do not remove the hard drive while the comput...

Page 20: ... Battery Returning a Hard Drive to Dell Return your old hard drive to Dell in its original or comparable foam packaging Otherwise the hard drive may be damaged in transit Back to Contents Page 1 hard drive 2 M2 5x3 mm screws 2 3 tab NOTICE When the hard drive is not in the computer store it in protective antistatic packaging See Protecting Against Electrostatic Discharge in your Product Informatio...

Page 21: ...ide of the hinge cover to gently pry the hinge cover loose 6 Pulling up from left to right gently lift the hinge cover 7 Disconnect the cable and remove the hinge cover CAUTION Before you begin the following procedure follow the safety instructions in the Product Information Guide NOTICE To avoid electrostatic discharge ground yourself by using a wrist grounding strap or by periodically touching a...

Page 22: ...over 1 Connect the cable to the connector 2 Starting from left to right snap the cover back into place 3 Replace the screws on the bottom of the computer 4 Replace the battery see Replacing the Battery Back to Contents Page ...

Page 23: ...yboard slightly above the computer slide the keyboard cable into the connector on the system board and close the connector latch 2 Slide the tabs on the keyboard under the palm rest 3 Press lightly on the top edges of the keyboard to snap it into place 4 Replace the battery see Replacing the Battery CAUTION Before you begin the following procedure follow the safety instructions in the Product Info...

Page 24: ...Back to Contents Page ...

Page 25: ...he component cover and lift to remove the cover 5 If you are replacing a memory module remove the existing module a Use your fingertips to carefully spread the securing clips apart on each end of the memory module connector until the module pops up b Remove the module from the connector CAUTION Before you begin any of the procedures in this section follow the safety instructions located in the Pro...

Page 26: ...ndows XP operating system right click the My Computer icon on your desktop Click Properties General l In the Microsoft Windows Vista operating system click the Windows Vista Start button and right click Computer Properties Back to Contents Page 1 securing clips 2 2 memory module NOTICE If you need to install memory modules in two connectors install a memory module in the connector labeled DIMMA be...

Page 27: ...2 5x8 mm screws 4 Insert a plastic scribe into the notch on the component cover and lift to remove the cover 5 Ground yourself by touching one of the metal connectors on the back of the computer Removing a WLAN Card CAUTION Before you begin any of the procedures in this section follow the safety instructions located in the Product Information Guide NOTICE To prevent damage to the system board remo...

Page 28: ...AN card 4 Replace the screws on the WLAN card 5 Replace the cover 1 WLAN card 2 screws 2 3 antenna cables 2 1 WLAN card NOTICE The connectors are keyed to ensure correct insertion If you feel resistance check the connectors and realign the card NOTICE To avoid damaging a card never place cables on top of or under the card NOTE The card may have two or three connectors depending on the type of card...

Page 29: ...n the FCM card 4 Connect the cables to the FCM card 5 Replace the cover 6 Replace the Battery see Removing the Battery Back to Contents Page NOTE If you leave the area ground yourself again when you return to the computer NOTE Depending on the type of card not all cables may be in use 1 FCM card 2 connector 3 screws 2 NOTICE The connectors are keyed to ensure correct insertion If you feel resistan...

Page 30: ...M2 5x5 mm screw from the system board 12 Pull out slightly on the back right side of the computer to release the connectors on the system board from the base 13 Lift the front of the system board and slowly ease the connectors out of the computer base and remove the system board 14 Place the system board upside down on a clean flat surface 15 Using a 1 Phillips type screwdriver remove the two M2x3...

Page 31: ... display assembly see Replacing the Display Assembly 7 Replace the keyboard see Replacing the Keyboard 8 Replace the hinge cover see Replacing the Hinge Cover 9 Replace the hard drive see Replacing the Hard Drive 10 If removed replace the system fan see Replacing the Fan 11 Replace the optical drive see Replacing the Optical Drive 12 Replace the battery see Replacing the Battery and turn the compu...

Page 32: ...tom of the computer 4 Using a plastic scribe push the notch to release the optical drive from the bay 5 Slide the optical drive out of the bay Replacing the Optical Drive 1 Slide the optical drive into the bay 2 Replace and tighten the device security screw 3 Replace the battery see Replacing the Battery Back to Contents Page CAUTION Before you begin the following procedure follow the safety instr...

Page 33: ... Fan 7 Remove the optical drive see Removing the Optical Drive 8 Remove the hard drive see Removing the Hard Drive 9 Remove the five M2 5x8 mm screws and the two M2 5x3 mm screws on the bottom of the computer 10 Turn the computer top side up and remove the M2 5x5 mm screw on the palm rest CAUTION Before you begin the following procedure follow the safety instructions in the Product Information Gui...

Page 34: ...ard see Replacing the Keyboard 6 Replace the hinge cover see Replacing the Hinge Cover 7 Replace the hard drive see Replacing the Hard Drive 8 Replace the fan see Replacing the Fan 9 Connect the Mini Card cables to the WLAN card see Replacing a WLAN Card 10 Replace the nine M2 5x8 mm screws and the M2 5x5 mm screw on the component cover on the bottom of the computer 11 Replace the five M2 5x8 mm a...

Page 35: ...Back to Contents Page ...

Page 36: ...ice Manual USB Connector Video Connector USB Connector Video Connector Back to Contents Page Pin Signal 1 USB5V 2 USBP 3 USBP 4 GND Pin Signal Pin Signal 1 CRT_R 9 5V 2 CRT_G 10 GND 3 CRT_B 11 MONITOR_DETECT 4 NC 12 DDC_DATA 5 GND 13 CRT_HS 6 GND 14 CRT_VS 7 GND 15 DDC_CLK 8 GND ...

Page 37: ...e the M2 5x5 mm screws from both speakers 9 Remove the speaker cables from the routing clips and remove the speakers Replacing the Speaker 1 Route the speaker cables back through the routing clips and connect the speaker cables to the system board CAUTION Before you begin the following procedure follow the safety instructions in the Product Information Guide NOTICE To avoid electrostatic discharge...

Page 38: ...n place 3 Replace the palm rest see Replacing the Palm Rest 4 Replace the display assembly see Replacing the Display Assembly 5 Replace the keyboard see Replacing the Keyboard 6 Replace the hinge cover see Replacing the Hinge Cover 7 Replace the battery see Replacing the Battery Back to Contents Page ...

Page 39: ... Remove the palm rest see Removing the Palm Rest 10 Remove the fan see Removing the Fan 11 Remove the processor thermal cooling assembly see Removing the Processor Thermal Cooling Assembly 12 Remove the processor see Removing the Processor Module 13 Remove the remaining M2 5x5 mm screw from the system board 14 Pull out slightly on the back right side of the computer to release the connectors on th...

Page 40: ...play assembly see Replacing the Display Assembly 8 Replace the Mini Card see Mini Cards 9 Replace the keyboard see Replacing the Keyboard 10 Replace the hinge cover see Replacing the Hinge Cover 11 Replace the memory module s see Replacing the Memory Module 12 Replace the hard drive see Replacing the Hard Drive 13 Replace the battery see Replacing the Battery 14 Turn the computer over and turn it ...

Page 41: ...e United States and or other countries Bluetooth is a trademark of Bluetooth SIG Inc Other trademarks and trade names may be used in this document to refer to either the entities claiming the marks and names or their products Dell Inc disclaims any proprietary interest in trademarks and trade names other than its own December 2007 Rev A00 Back to Contents Page NOTE A NOTE indicates important infor...

Reviews: