background image

32

S e t u p   a n d   Q u i c k R e f e r e n c e   G u i d e

www

.dell.com | support.dell.com

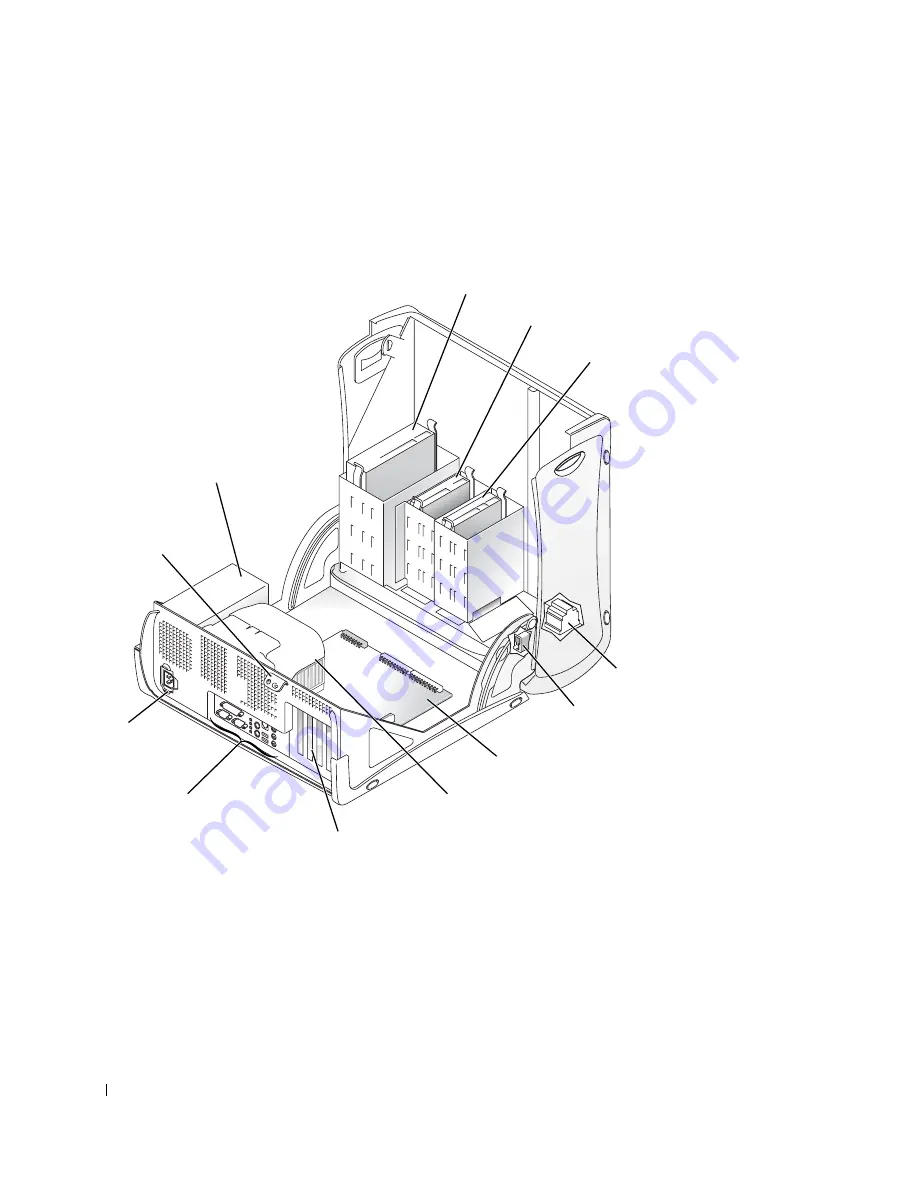
Inside Your Computer

M i n i -To w e r   C o m p u t e r

floppy drive

removable media drive

hard drive

power supply

system board

speaker

chassis intrusion 
switch

PCI expansion-card slots

back-panel 
connectors

AC power 
connector

padlock ring

microprocessor airflow shroud

Summary of Contents for Precision 0G475

Page 1: ...w w w d e l l c o m s u p p o r t d e l l c o m Dell Precision Workstations Setup and Quick Reference Guide ...

Page 2: ...r Corporation All rights reserved Reproduction in any manner whatsoever without the written permission of Dell Computer Corporation is strictly forbidden Trademarks used in this text Dell the DELL logo and Dell Precision are trademarks of Dell Computer Corporation Microsoft Windows and Windows NT are registered trademarks of Microsoft Corporation Other trademarks and trade names may be used in thi...

Page 3: ...ou and Your Computer 29 Opening the Computer Cover 29 Opening the Cover 30 Inside Your Computer 32 Removing and Installing Parts 33 Adding Devices and Software 34 Problems With Additional Devices and Software 34 Frequently Asked Questions 36 Solving Problems 39 Using the Dell Precision ResourceCD 40 When to Use the Dell Diagnostics 40 Starting the Dell Diagnostics 41 Messages and Codes 44 ...

Page 4: ...4 Contents ...

Page 5: ... Find it Here A diagnostic program for my computer Drivers for my computer My computer documentation My device documentation D r i v e r s a n d U t i l i t i e s C D a l s o k n o w n a s t h e Res o u r c eC D You can use this CD to access documentation reinstall drivers or run diagnostics tools How to set up my computer Troubleshooting information Tools and utilities S e t u p a n d Q u i c k R...

Page 6: ... C o d e a n d P r o d u c t Ke y The labels are located on your computer under the front panel door How to reinstall my operating system O p e r a t i n g S y s t e m C D a n d I n s t a l l a t i o n G u i d e If you reinstall your operating system use the Drivers and Utilities CD to reinstall drivers for the devices that came with your computer What Are You Looking For Find it Here ...

Page 7: ...nline tools including Knowledge Base Hints tips and online courses Customer Forum Online discussion with other Dell customers Upgrades Upgrade information for components such as memory the hard drive and the operating system Customer Care Contact information order status warranty and repair information Downloads Drivers patches and software updates Reference Computer documentation product specific...

Page 8: ...a t i o n G u i d e How to use Windows XP Documentation for my computer and devices W i n d o w s X P H e l p a n d S u p p o r t C e n t e r 1 Click the Start button and then click Help and Support 2 Type a word or phrase that describes your problem and click the arrow icon 3 Click the topic that describes your problem 4 Follow the instructions shown on the screen What Are You Looking For Find it...

Page 9: ...Guide 9 Setting Up Your Mini Tower Computer You must complete all steps to properly set up your computer NOTE The numbers in the figures correspond to the setup tasks M i n i To w e r C o m p u t e r Fea t u r e s 1 2 3 4 5 6 7 ...

Page 10: ...ect the keyboard and mouse as shown Do not connect a Universal Serial Bus USB mouse or keyboard to the USB connectors on the front of the computer NOTE Do not attempt to operate a PS 2 mouse and a USB mouse simultaneously Keyboard and Mouse 1 headphones speakers connector USB connectors 2 ...

Page 11: ...ansion card installed connect the network cable to the network card not to the connector on the computer back panel If you have an optional modem connect the phone line to the modem NOTICE Do not connect a modem cable to the network adapter Voltage from telephone communications can cause damage to the network adapter Network Adapter and Modem 2 ...

Page 12: ... the thumbscrews on the cable connectors Use the primary port if you are using one monitor with an optional dual monitor card NOTE Some flat panel displays and graphic cards support Digital Visual Interface DVI If your monitor and card have DVI connectors Dell recommends that you use DVI instead of VGA For setting up dual monitors see Dual Monitors on page 18 Monitor 3 ...

Page 13: ...speakers to the computer as shown on the instructions supplied with the speakers NOTE If your computer has an audio expansion card installed connect external audio devices to the sound card not to the connectors on the computer back panel Speakers 4 ...

Page 14: ...14 Setup and Quick Reference Guide w w w d e l l c o m s u p p o r t d e l l c o m Plug in the computer and the monitor to their electrical outlets Power Connection 5 ...

Page 15: ...Setup and Quick Reference Guide 15 Press the power button on your computer and monitor to turn them on Power On 6 power light hard drive access light ...

Page 16: ...computer The initial setup of the operating system is automatic and may take several minutes Additional setup time may be required depending on your system s internal and external devices Follow the operating system prompts to complete setup You may be prompted to enter the Windows Product Key also called the Product ID or COA to complete the registration You can find this above the service tag on...

Page 17: ... read the documentation that came with the software or device or contact the vendor to verify that the software or device is compatible with your computer and operating system See Adding Devices and Software on page 34 Congratulations You have completed the setup for your computer Additional Devices and Software 8 ...

Page 18: ...card have DVI connectors Dell recommends that you use DVI instead of VGA The dual monitor cable is color coded the blue connector is for the primary monitor and the black connector is for the secondary monitor Attach the appropriate monitor cable to the dual monitor cable To enable dual monitor support both monitors must be attached when the computer starts See Frequently Asked Questions on page 3...

Page 19: ...19 Setting Up Your Small Desktop Computer You must complete all steps to properly set up your computer NOTE The numbers in the figures correspond to the setup tasks S m a l l D e s k t o p C o m p u t e r Fe a t u r e s 1 2 3 4 5 6 7 ...

Page 20: ... c o m Connect the keyboard and mouse as shown Do not connect a USB mouse or keyboard to the USB connectors on the front of the computer NOTE Do not attempt to operate a PS 2 mouse and a USB mouse simultaneously Keyboard and Mouse 1 headphone speaker connector USB connectors 2 ...

Page 21: ...ansion card installed connect the network cable to the network card not to the connector on the computer back panel If you have an optional modem connect the phone line to the modem NOTICE Do not connect a modem cable to the network adapter Voltage from telephone communications can cause damage to the network adapter Network Adapter and Modem 2 ...

Page 22: ... the thumbscrews on the cable connectors Use the primary port if you are using one monitor with an optional dual monitor card NOTE Some flat panel displays and graphic cards support Digital Visual Interface DVI If your monitor and card have DVI connectors Dell recommends that you use DVI instead of VGA For setting up dual monitors see Dual Monitors on page 28 Monitor 3 ...

Page 23: ...speakers to the computer as shown on the instructions supplied with the speakers NOTE If your computer has an audio expansion card installed connect external audio devices to the sound card not to the connectors on the computer back panel Speakers 4 ...

Page 24: ...24 Setup and Quick Reference Guide w w w d e l l c o m s u p p o r t d e l l c o m Plug in the computer and the monitor to their electrical outlets Power Connection 5 ...

Page 25: ...Setup and Quick Reference Guide 25 Press the power button on your computer and monitor to turn them on Power On 6 power light hard drive access light ...

Page 26: ...computer The initial setup of the operating system is automatic and may take several minutes Additional setup time may be required depending on your system s internal and external devices Follow the operating system prompts to complete setup You may be prompted to enter the Windows Product Key also called the Product ID or COA to complete the registration You can find this above the service tag on...

Page 27: ...r read the documentation that came with the software or device or contact the vendor to verify that the software or device is compatible with your computer and operating system See Adding Devices and Software on page 34 Congratulations You have completed the setup of your computer Additional Devices and Software 8 ...

Page 28: ...ard have DVI connectors Dell recommends that you use DVI instead of VGA The dual monitor cable is color coded the blue connector is for the primary monitor and the black connector is for the secondary monitor Attach the appropriate monitor cables to the dual monitor cable To enable dual monitor support both monitors must be attached when the computer starts See Frequently Asked Questions on page 3...

Page 29: ...rical outlets Doing so reduces the potential for personal injury or shock Also disconnect any telephone or telecommunication lines from the computer NOTE Before disconnecting a device from the computer or removing a component from the system board verify that the standby power light on the system board has turned off See the interior service label located on the inside of the cover to locate the s...

Page 30: ...r remove the stand before you open the cover On the mini tower computer place the computer on its side before you open the cover a Press the two release buttons until the cover is free to swing up b Raise the back of the cover and pivot it toward the front of the computer NOTICE To prevent damage to the system board of the mini tower computer open the cover until it catches at a 45 degree angle Th...

Page 31: ...Setup and Quick Reference Guide 31 S m a l l D e s k t o p C o m p u t e r ...

Page 32: ... l c o m Inside Your Computer M i n i To w e r C o m p u t e r floppy drive removable media drive hard drive power supply system board speaker chassis intrusion switch PCI expansion card slots back panel connectors AC power connector padlock ring microprocessor airflow shroud ...

Page 33: ... the User s Guide You can replace such parts as memory hard drive or other externally accessible drive PCI expansion card floppy drive removable media drive hard drive power supply speaker chassis intrusion switch expansion card cage memory modules AC power connector PCI expansion card slots back panel connectors padlock ring system board microprocessor low profile AGP slot ...

Page 34: ...tware or device is compatible with your computer and operating system Problems With Additional Devices and Software If you have installed additional software or devices and are experiencing problems with your computer use the following procedures to solve the problem Remove or uninstall the device or software See the documentation that came with the device or software for information on removing a...

Page 35: ...on on your hard drive If the previous procedures did not work run a low level format of your hard drive See your operating system installation guide for more information Reinstall your operating system using the operating system installation guide and operating system CD NOTE Your operating system may have a compatibility mode which may help resolve issues between older applications and your opera...

Page 36: ...ge click Dell Documents Make selections appropriate for your computer to access your User s Guide Where can I find a warranty statement for my computer Depending on your operating system double click the User s Guides icon or click the Start button and select Help and Support See the Limited Warranty and Return Policy section in your User s Guide Go to the main menu on the Dell Precision ResourceC...

Page 37: ...er User s Guide Go to the main menu on the Dell Precision ResourceCD Click User s Guides in the Topic pull down menu and click the user s guide appropriate for your computer If I need a driver for my graphics card network adapter sound card small computer system interface SCSI software or some other device where do I locate it See Drivers for Your Computer on page 40 You may also have a CD specifi...

Page 38: ...n see Power Management Go to support dell com At the Welcome page click Dell Documents Make selections appropriate for your computer to access your User s Guide See Power Management in the User s Guide How do I install additional hardware on my computer See Removing and Installing Parts on page 33 Go to the main menu on the Dell Precision ResourceCD Click User s Guides in the Topic pull down menu ...

Page 39: ... tag numbers DELL DIAGNOSTICS The Dell Precision ResourceCD contains Dell Diagnostics that tests various components on your computer and helps identify the cause of computer problems For more information see When to Use the Dell Diagnostics on page 40 SYSTEM LIGHTS Located on the front of the computer these lights can indicate a computer problem For more information see System Lights on page 44 DI...

Page 40: ...ecision ResourceCD Guide click User s Guides in the Topic pull down menu and click Dell Precision ResourceCD Drivers for Your Computer To display a list of device drivers for your computer 1 Click My Drivers in the Topic pull down menu The ResourceCD scans your computer s hardware and operating system and then a list of device drivers for your system configuration is displayed on the screen 2 Clic...

Page 41: ...er system setup review your computer s configuration information and ensure that the device you want to test displays in system setup and is active Start the Dell Diagnostics from either your hard drive or from the Drivers and Utilities CD also known as the ResourceCD Starting the Dell Diagnostics From Your Hard Drive 1 Shut down and restart the computer 2 When the DELL logo appears press F12 imme...

Page 42: ...lect the Boot from CD ROM option from the menu that appears 6 Type 1 to start the ResourceCD menu 7 Type 2 to start the Dell Diagnostics 8 Select Run the 32 Bit Dell Diagnostics from the numbered list If multiple versions are listed select the version appropriate for your platform 9 When the Dell Diagnostics Main Menu appears select the test you want to run Dell Diagnostics Main Menu 1 After the D...

Page 43: ...elect a test based on the symptom of the problem you are having Tab Function Results Displays the results of the test and any error conditions encountered Errors Displays error conditions encountered error codes and problem description Help Describes the test and may indicate requirements for running the test Configuration Displays your hardware configuration for the selected device The Dell Diagn...

Page 44: ...ssage if you need to call technical support System Lights Your computer has a number of lights that can help you analyze and solve problems To locate these lights see Mini Tower Computer Features on page 9 or Small Desktop Computer Features on page 19 The following table lists the codes for the system lights gives probable causes and suggests corrective actions S y s t e m L i g h t C o d e s Powe...

Page 45: ...em is identified Also see System Board Problems in the User s Guide Solid green and a beep code during POST N A A problem was detected while the BIOS was executing See Beep Codes on page 49 for instructions on diagnosing the beep code Also check the diagnostic lights to see if the specific problem is identified Solid green power light and no beep code and no video during POST N A The monitor or th...

Page 46: ...the computer stopped responding These lights communicate problems encountered before and during POST only not during normal operation To locate the diagnostic lights see Back Panel on page 46 The following table lists the code for the diagnostic lights gives probable causes and suggests corrective actions The lights are labeled to help you match the pattern on your computer with ones shown in the ...

Page 47: ...lict yellow green yellow green Possible video card failure yellow green green yellow Possible floppy drive or hard drive failure green green green yellow After video initialization an alert was found Check the computer screen for an error message D i a g n o s t i c L i g h t C o d e s D u r i n g P O S T continued Light Pattern Cause y e l l o w g r e e n o f f A B C D A B C D A B C D A B C D A B...

Page 48: ...tem messages are listed alphabetically green yellow yellow green Possible system board resource and or hardware failure green yellow green green Possible system board resource and or hardware failure green green yellow yellow Possible expansion card failure or conflict yellow green green green Possible USB failure green green green green Normal operating condition after POST D i a g n o s t i c L ...

Page 49: ... and a recommended action Beep Codes If an error occurs during start up that cannot be reported on the monitor your computer may emit a beep code that identifies the problem The beep code is a pattern of sounds for example one beep followed by a second beep and then a burst of three beeps code 1 1 3 means that the computer was unable to read the data in nonvolatile random access memory NVRAM If a ...

Page 50: ...50 Setup and Quick Reference Guide w w w d e l l c o m s u p p o r t d e l l c o m ...

Page 51: ...w w w d e l l c o m s u p p o r t a p d e l l c o m Dell Precision 工作站 安裝和快速參考指南 ...

Page 52: ...著作權所有 2001 2002 Dell Computer Corporation 所有權利均予保留 未經 Dell Computer Corporation 的書面許可 不得以任何形式進行複製 本文件中使用的商標 Dell DELL 標誌和 Dell Precision 是 Dell Computer Corporation 的商標 Microsoft Windows 和 Windows NT 是 Microsoft Corporation 的註冊商標 本文件中述及的其他商標和商業名稱可能指擁有相應商標和名稱的公司實體或其產品 Dell Computer Corporation 對本公司之外的商標和產品名稱不擁有任何專利權 2002 年 12 月 P N 0G475 Rev A03 ...

Page 53: ...找資訊和援助 55 安裝迷你直立型電腦 59 雙監視器 68 安裝小型桌上型電腦 69 雙監視器 78 安全第一 79 打開主機蓋 79 打開主機蓋 80 電腦內部 82 卸下和安裝零件 83 新增裝置和軟體 84 附加裝置和軟體問題 84 常見問題 86 解決問題 89 使用 Dell Precision ResourceCD 90 何時使用 Dell 診斷程式 90 啟動 Dell 診斷程式 91 訊息和代碼 94 ...

Page 54: ...54 目錄 ...

Page 55: ...安裝和快速參考指南 55 尋找資訊和援助 下表列出了 Dell 作為支援工具而提供的資源 您的電腦可能隨附了附加 資源 要尋找的項目 所在位置 電腦的診斷程式 電腦的驅動程式 電腦說明文件 裝置說明文件 驅動程式和公用程式 CD 亦稱為 ResourceCD 您可以使用此 CD 存取說明文件 重新安裝驅動程式或執行診斷 工具 如何安裝電腦 故障排除資訊 工具和公用程式 安裝和快速參考指南 ...

Page 56: ...速參考指南 w w w d e l l c o m s u p p o r t a p d e l l c o m 快速服務代碼和服務標籤號碼 Microsoft Windows 授權標籤 快速服務代碼和產品識別碼 這些標籤位於電腦的前面板蓋下面 如何重新安裝作業系統 作業系統 CD 和安裝指南 如果重新安裝作業系統 請使用驅動程式和公用程式 CD 來重新安 裝用於電腦隨附的裝置之驅動程式 要尋找的項目 所在位置 ...

Page 57: ...dell com Dell 支援網站將提供幾種線上工具 其中包括 Knowledge Base 知識庫 提示和線上課程 Customer Forum 客戶論壇 與其他 Dell 客戶進行線上討論 Upgrades 升級 元件的升級資訊 例如記憶體 硬碟和作業 系統 Customer Care 客戶關懷中心 聯絡資訊 訂單狀態 保固 和維修資訊 Downloads 下載軟體 驅動程式 修補程式和軟體更新 Reference 參考 電腦說明文件 產品規格及白皮書 服務呼叫狀態 有關電腦的首要技術問題 常見問題 檔案下載 電腦組態的詳細資料 電腦的服務合約 Dell Premier Support Dell 優先支援 網站 premiersupport dell com Dell Premier Support 網站是專為公司 政府和教育機構的客戶量身 定做的 此網站可能不適用於所有地區 要尋找...

Page 58: ...南 w w w d e l l c o m s u p p o r t a p d e l l c o m 主機板接頭 系統資訊標籤 保固資訊 Dell 系統資訊指南 如何使用 Windows XP 電腦和裝置的說明文件 Windows XP 說明及支援中心 1 依次按一下開始按鈕和說明及支援 2 鍵入描述問題的字句或短語 然後按一下箭頭圖示 3 按一下描述問題的主題 4 按照螢幕上顯示的說明進行 要尋找的項目 所在位置 ...

Page 59: ...安裝和快速參考指南 59 安裝迷你直立型電腦 您必須完成以下所有步驟才能正確安裝電腦 註 圖中的編號與安裝工 作相對應 迷你直立型電腦配件 1 2 3 4 5 6 7 ...

Page 60: ...60 安裝和快速參考指南 w w w d e l l c o m s u p p o r t a p d e l l c o m 如圖所示連接鍵盤和滑鼠 請勿將通用序列匯流排 USB 滑鼠或鍵盤連 接至電腦正面的 USB 接頭 註 請勿嘗試同時操作 PS 2 滑鼠和 USB 滑鼠 鍵盤和滑鼠 1 耳機 揚聲器接頭 USB 接頭 2 ...

Page 61: ...安裝和快速參考指南 61 將網路纜線 非電話線 插入網路接頭 註 如果您的電腦安裝了 網路擴充卡 請將網路纜 線連接至網路卡 而不是 電腦背面板上的接頭 如果有選購的數據機 請將電話線連接至數據機 注意事項 切勿將數據機連接線連接至網路卡 電話通訊所產生的電壓 可能會損壞網路卡 網路卡和數據機 2 ...

Page 62: ... w d e l l c o m s u p p o r t a p d e l l c o m 對齊並輕輕地插入監視器連接線以免弄彎接頭插腳 然後轉緊其接頭上 的指旋螺絲 如果您使用選購的雙監視器卡連接一台監視器 請使用主連接埠 註 某些平面顯示器和圖 形卡支援數位視訊介面 DVI 如果您的監視器 和插卡配有 DVI 接頭 Dell 建議您使用 DVI 而 不是 VGA 要安裝雙監視器 請參閱第 68 頁的 雙監視器 監視器 3 ...

Page 63: ...安裝和快速參考指南 63 按照揚聲器隨附的說明將揚聲器連接至電腦 註 如果您的電腦安裝了 音效擴充卡 請將外接式 音效裝置連接至音效卡 而不是電腦背面板上的 接頭 揚聲器 4 ...

Page 64: ...64 安裝和快速參考指南 w w w d e l l c o m s u p p o r t a p d e l l c o m 將電腦和監視器的電源線插入電源插座 連接電源 5 ...

Page 65: ...安裝和快速參考指南 65 按下電腦和監視器上的電源按鈕以開啟電源 開啟電源 6 電源指示燈 硬碟機存取指示燈 ...

Page 66: ...代碼的訊息 您的電腦透過已安裝的作業系統預先組態 在第一次開啟電腦電源之 前 您必須完成之前的所有安裝步驟 並將所有裝置連接至電腦 作業系統會自動起始安裝 且可能需要幾分鐘的時間 依據系統內部和 外接式裝置的不同 您可能需要更久的安裝時間 請按照作業系統的提示完成安裝 系統可能會提示您輸入 Windows 產品 識別碼 亦稱為 COA 以完成註冊 您可以在電腦服務標籤的上部找到此 識別碼 註 若要獲得更多有關安 裝作業系統的資訊 請參 閱作業系統安裝指南 請在以下欄位寫下此識別碼 以備將來參考 產品識別碼 ID 或 COA ______________________________________ 作業系統 7 ...

Page 67: ...安裝和快速參考指南 67 在安裝電腦未隨附的任何裝置或軟體之前 請閱讀軟體或裝置隨附的說 明文件或與供應商聯絡 以確認軟體或裝置是否與電腦和作業系統相 容 請參閱第 84 頁的 新增裝置和軟體 恭喜您 您已完成電腦的安裝 附加裝置和軟體 8 ...

Page 68: ... 注意事項 請勿使用任何其他連接線 或將監視器連接線直接連接至雙 監視器圖形卡 註 某些平面顯示器和圖 形卡支援數位視訊介面 DVI 如果您的監視器 和插卡配有 DVI 接頭 Dell 建議您使用 DVI 而 不是 VGA 雙監視器連接線具有顏色標識 藍色接頭用於連接主監視器 而黑色接 頭用於連接第二個監視器 請將適當的監視器連接線連接至雙監視器連 接線 如果要啟用雙監視器支援功能 兩台監視器均必須在電腦啟動時 連接至電腦 請參閱第 86 頁的 常見問題 以獲得更多資訊 註 第二個監視器是選購 的 且需要多監視器圖形 配接卡 OR 或 ...

Page 69: ...安裝和快速參考指南 69 安裝小型桌上型電腦 您必須完成以下所有步驟才能正確安裝電腦 註 圖中的編號與安裝工 作相對應 小型桌上型電腦配件 1 2 3 4 5 6 7 ...

Page 70: ...70 安裝和快速參考指南 w w w d e l l c o m s u p p o r t a p d e l l c o m 如圖所示連接鍵盤和滑鼠 請勿將 USB 滑鼠或鍵盤連接至電腦正面的 USB 接頭 註 請勿嘗試同時操作 PS 2 滑鼠和 USB 滑鼠 鍵盤和滑鼠 1 耳機 揚聲器接頭 USB 接頭 2 ...

Page 71: ...安裝和快速參考指南 71 將網路纜線 而非電話線 插入網路接頭 註 如果您的電腦安裝了 網路擴充卡 請將網路纜 線連接至網路卡 而不是 電腦背面板上的接頭 如果您擁有選購的數據機 請將電話線連接至數據機 注意事項 切勿將數據機連接線連接至網路卡 電話通訊所產生的電壓 可能會損壞網路卡 網路卡和數據機 2 ...

Page 72: ... w d e l l c o m s u p p o r t a p d e l l c o m 對齊並輕輕地插入監視器連接線以免弄彎接頭插腳 然後轉緊其接頭上 的指旋螺絲 如果您使用可選的雙監視器卡連接一台監視器 請使用主連接埠 註 某些平面顯示器和圖 形卡支援數位視訊介面 DVI 如果您的監視器 和插卡配有 DVI 接頭 Dell 建議您使用 DVI 而 不是 VGA 要安裝雙監視器 請參閱第 78 頁的 雙監視器 監視器 3 ...

Page 73: ...安裝和快速參考指南 73 按照揚聲器隨附的說明將揚聲器連接至電腦 註 如果您的電腦安裝了 音效擴充卡 請將外接式 音效裝置連接至音效卡 而不是電腦背面板上的 接頭 揚聲器 4 ...

Page 74: ...74 安裝和快速參考指南 w w w d e l l c o m s u p p o r t a p d e l l c o m 將電腦和監視器的電源線插入電源插座 連接電源 5 ...

Page 75: ...安裝和快速參考指南 75 按下電腦和監視器上的電源按鈕以開啟電源 開啟電源 6 電源指示燈 硬碟機 存取指示燈 ...

Page 76: ...的訊息 您的電腦透過已安裝的作業系統預先組態 在第一次開啟電腦電源之 前 您必須完成之前的所有安裝步驟 並將所有裝置連接至電腦 作業系統的起始安裝會自動進行 並可能需要幾分鐘時間 依據系統的 內部和外接式裝置的不同 您可能需要更長的安裝時間 請按照作業系統的提示完成安裝 系統可能會提示您輸入 Windows 產品 識別碼 亦稱為 COA 以完成註冊 您可以在電腦服務標籤的上部找到此 識別碼 註 若要獲得更多有關安 裝作業系統的資訊 請參 閱作業系統安裝指南 請在以下欄位寫下此識別碼 以備將來參考 產品識別碼 ID 或 COA ______________________________________ 作業系統 7 ...

Page 77: ...安裝和快速參考指南 77 在安裝電腦未隨附的任何裝置或軟體之前 請閱讀軟體或裝置隨附的說 明文件或與供應商聯絡 以確認軟體或裝置是否與電腦和作業系統相 容 請參閱第 84 頁的 新增裝置和軟體 恭喜您 您已完成電腦的安裝 附加裝置和軟體 8 ...

Page 78: ... 注意事項 請勿使用任何其他連接線 或將監視器連接線直接連接至雙 監視器圖形卡 註 某些平面顯示器和圖 形卡支援數位視訊介面 DVI 如果您的監視器 和插卡配有 DVI 接頭 Dell 建議您使用 DVI 而 不是 VGA 雙監視器連接線具有顏色標識 藍色接頭用於連接主監視器 而黑色接 頭用於連接第二個監視器 請將適當的監視器連接線連接至雙監視器連 接線 如果要啟用雙監視器支援功能 兩台監視器均必須在電腦啟動時 連接至電腦 請參閱第 86 頁的 常見問題 以獲得更多資訊 註 第二個監視器是選購 的 並且需要多監視器圖 形配接卡 OR 或 ...

Page 79: ...1 關閉電腦和所有裝置的電源 2 在觸摸電腦內部的任何元件之前 請先觸摸電腦上未上漆的金屬表 面 例如電腦背面插槽開口周圍的金屬 3 從電源插座上拔下電腦和裝置的電源線 這樣可減少人身受傷或觸 電的潛在危險 另外 請從電腦上拔下所有電話或電傳通訊連線 註 在中斷裝置與電腦 的連接或從主機板上拆 除元件之前 請確認主 機板上的備用電源指示 燈已熄滅 請參閱位於 主機蓋內側的內部服務 標籤以瞭解備用電源指 示燈的位置 在您工作時 應經常觸摸電腦上未上漆的金屬表面 以導去可能損 壞內部元件的靜電 另外 Dell 建議您經常查閱電腦隨附的說明文件中的安全指示 打開主機蓋 如果要卸下或安裝零件 重設忘記的密碼或診斷電腦故障 您可能需要 打開主機蓋 注意 在執行此程序之前 請參閱第 79 頁的 安全第一 ...

Page 80: ... 1 關閉電腦和裝置的電源 然後從電源插座上拔下其電源線並等待 10 至 20 秒鐘 2 如果您在背面板上的掛鎖扣環中安裝了掛鎖 請取下掛鎖 3 打開主機蓋 註 在小型桌上型電腦 中 請先卸下腳架 然 後再打開主機蓋 在迷 你直立型電腦中 請先 將電腦側放 然後再打 開主機蓋 a 按下兩個釋放按鈕直至主機蓋鬆脫並打開 b 提起主機蓋背面 將它朝電腦正面掀起 注意事項 為防止損壞迷你直立型電腦的主機板 請打開主機蓋直至其 呈 45 度角 然後從主機板上拔下光碟機資料連接線和 或硬碟機資料連接 線 並將主機蓋打開至 90 度角 迷你直立型電腦 ...

Page 81: ...安裝和快速參考指南 81 小型桌上型電腦 ...

Page 82: ...82 安裝和快速參考指南 w w w d e l l c o m s u p p o r t a p d e l l c o m 電腦內部 迷你直立型電腦 軟碟機 抽取式媒體磁碟機 硬碟機 電源供應器 主機板 揚聲器 外殼侵入切換開關 PCI 擴充卡插槽 背面板接頭 掛鎖扣環 微處理器通風罩 交流 電源接頭 ...

Page 83: ...安裝和快速參考指南 83 小型桌上型電腦 卸下和安裝零件 有關卸下和安裝各種零件的說明位於使用者指南中 以下是您可以更換 的零件 記憶體 硬碟機或其他外部可抽換式磁碟機 PCI 擴充卡 軟碟機 抽取式媒體磁碟機 硬碟機 電源供應器 揚聲器 外殼侵入 切換開關 擴充卡固定框架 記憶體模組 交流電源接頭 PCI 擴充卡插槽 背面板接頭 掛鎖扣環 主機板 微處理器 初型 AGP 插槽 ...

Page 84: ...程序 若要透過 Internet Explorer 列印整份使用者指南 請在列印視窗中選擇 列印所有連結的文件 新增裝置和軟體 在安裝電腦未隨附的任何裝置或軟體之前 請閱讀軟體或裝置隨附的說 明文件或與供應商聯絡 以確認軟體或裝置是否與電腦和作業系統相容 附加裝置和軟體問題 如果您安裝了附加軟體或裝置並且遇到電腦問題 請使用以下程序解決 問題 卸下裝置或解除安裝軟體 請參閱裝置或軟體隨附的說明文件 以獲得有關卸下和解除安裝的 資訊 將電腦設定為上次的良好設定 對於 Windows NT 請在系統啟動期間螢幕上出現請現在按下空格 鍵以啟動硬體設定檔 設定復原功能表訊息時按下空格鍵 在硬體 設定檔 設定復原功能表中 按下 L 以切換至上次的良好設定 然後選擇作業系統 對於 Windows 2000 和 Windows XP 請重新啟動電腦 然後在螢 幕上出現請選取要啟動的作業系統訊息時按下 F...

Page 85: ...source CD 功能表 然後選擇 Start ZZTOP Imaging SW 啟動 ZZTOP 影像軟體 請參閱第 90 頁的 使用 Dell Precision ResourceCD 以獲得更多有 關使用 ResourceCD 的資訊 注意事項 以下程序將清除硬碟機上的所有資訊 如果前一程序無效 請為硬碟機製作低級格式 請參閱作業系統安裝指南以獲得更多資訊 使用作業系統安裝指南和作業系統 CD 重新安裝作業系統 註 您的作業系統可能具 有相容性模式 這可能有 助於解決舊的應用程式 與您的作業系統之間的 問題 請參閱作業系統說 明文件以獲得更多資訊 請參閱第 55 頁的 尋找資訊和援助 如果您已確認要安裝的裝置或軟體與您的電腦和作業系統相容 請重新 安裝裝置或軟體 ...

Page 86: ...指南 移至 Dell Precision ResourceCD 中的主功能表 在 Topic 下拉式功能表中按 一下 User s Guides 然後按 一下適用於您電腦的使用者 指南 瀏覽 support dell com 在 Welcome 歡迎光臨 網頁中 按 一下 Dell Documents Dell 文件 然後作出適合您電腦的選擇以存 取使用者指南 我可以從何處找到有 關電腦的保固聲明 取決於您的作業系統 連按 兩下 User s Guides 圖示 或 按一下開始按鈕然後選擇 說明及支援 請參閱使用者指南中的 有 限保固和退回規定 章節 移至 Dell Precision ResourceCD 中的主功能表 在 Topic 下拉式功能表中按 一下 User s Guides 接著按 一下適用於您電腦的使用者 指南 然後參閱 有限保固 和退回規定 瀏覽 support dell...

Page 87: ...User s Guide 中 移至 Dell Precision ResourceCD 中的主功能表 在 Topic 下拉式功能表中按 一下 User s Guides 然後按 一下適用於您電腦的使用者 指南 如果需要圖形卡 網 路卡 音效卡 小型 電腦系統介面 SCSI 軟體或其他裝置的驅 動程式 可以在何處 找到它們 請參閱第 90 頁的 用於您 電腦的驅動程式 您也可能擁有裝置專用的 CD 如果這樣 請搜尋 CD 的內容以找到說明文件和 適當的驅動程式 請參閱 Dell Precision ResourceCD Guide 以獲得更 多資訊 瀏覽 support dell com 在 Welcome 網頁中 按一下 Downloads for Your Dell 為您的 Dell 電腦下載 輸入您的系統 服務標籤號碼 或作出適合您電 腦和作業系統的選擇以尋找驅動 程式 我如何打開電腦...

Page 88: ...拉式功能表中按 一下 User s Guides 接著按一 下適用於您電腦的使用者指 南 然後參閱 電源管理 瀏覽 support dell com 在 Welcome 網頁中 按一下 Dell Documents 然後作出適合您電 腦的選擇以存取使用者指南 請 參閱使用者指南中的 電源管 理 我如何在電腦上安裝 附加硬體 請參閱第 83 頁的 卸下和 安裝零件 移至 Dell Precision ResourceCD 中的主功能表 在 Topic 下拉式功能表中按 一下 User s Guides 接著按 一下適用於您電腦的使用者 指南 然後參閱 卸下和安 裝零件 瀏覽 support dell com 在 Welcome 網頁中 按一下 Dell Documents 然後作出適合您電 腦的選擇以存取使用者指南 請 參閱使用者指南中的 卸下和安 裝零件 如何重新安裝作業 系統 請參閱作業...

Page 89: ...司聯絡 請參閱第 55 頁的 尋找資訊和援助 以獲得快速服務代碼和服務標 籤號碼的範例 DELL 診斷程式 Dell Precision ResourceCD 包含 Dell 診斷程式 該程式可 以測試電腦中的各種元件 並協助您識別電腦問題的原因 若要獲得更多資 訊 請參閱第 90 頁的 何時使用 Dell 診斷程式 系統指示燈 這些指示燈位於電腦正面 可指示電腦問題 若要獲得更多 資訊 請參閱第 94 頁的 系統指示燈 診斷指示燈 這些指示燈位於電腦正面 可指示電腦問題 若要獲得更多 資訊 請參閱第 95 頁的 診斷指示燈 系統訊息 電腦將報告這些訊息以警告您目前或可能會發生的故障 若要 獲得更多資訊 請參閱第 98 頁的 系統訊息 嗶聲代碼 電腦所發出的一系列嗶聲代碼可以協助您識別問題 若要獲得 更多資訊 請參閱第 98 頁的 嗶聲代碼 ...

Page 90: ...er 歡迎 Dell 系統擁有者 螢幕中 按一下 Next 下一步 4 選擇適當的 System Model 系統機型 Operating System 作業系 統 Device Type 裝置類型 和 Topic 主題 若要存取 Dell Precision ResourceCD Guide 請在 Topic 下拉式功能表中 按一下 User s Guides 使用者指南 然後按一下 Dell Precision ResourceCD 用於您電腦的驅動程式 若要顯示用於電腦的裝置驅動程式清單 請 1 在 Topic 下拉式功能表中按一下 My Drivers 我的驅動程式 ResourceCD 將會掃描您電腦的硬體和作業系統 然後螢幕上將會 顯示適用於您的系統組態之裝置驅動程式清單 2 按一下適當的驅動程式 然後按照說明下載用於您電腦的驅動程式 若要檢視可用於您電腦的所有驅動程式之清單 ...

Page 91: ...此程式 可能會導致出現錯誤訊息 進入系統設定程式 查閱電腦的組態資訊 並確定要測試的裝置在系統 設定程式中顯示且處於現用狀態 從硬碟機或驅動程式和公用程式 CD 亦稱為 ResourceCD 啟動 Dell 診斷 程式 從硬碟機啟動 Dell 診斷程式 1 關機並重新啟動電腦 2 在螢幕上出現 DELL 標誌時立即按下 F12 註 如果收到一則說明未 找到診斷公用程式分割 區的訊息 請按照說明以 從驅動程式和公用程式 CD 執行 Dell 診斷程式 如果您等待太久且螢幕上出現 Windows 標誌 請繼續等待 直至 您看到 Windows 桌面 然後透過開始功能表關機並再試一次 3 在啟動裝置清單出現時 反白顯示 Boot to Utility Partition 啟動至 公用程式分割區 然後按下 Enter 4 在 Dell Diagnostics Main Menu Dell 診斷程式...

Page 92: ...vice 選項 5 在出現的功能表中選擇 Boot from CD ROM 從 CD ROM 啟動 選項 6 鍵入 1 可啟動 ResourceCD 功能表 7 鍵入 2 可啟動 Dell 診斷程式 8 從編號清單中選擇 Run the 32 Bit Dell Diagnostics 執行 32 位元 Dell 診斷程式 如果列出了多個版本 請選擇適合您平台的版本 9 在 Dell Diagnostics Main Menu 出現時 選擇要執行的測試 Dell 診斷程式主功能表 1 在 Dell 診斷程式載入且 Main Menu 主功能表 螢幕出現後 按一 下代表所需選項的按鈕 註 您電腦的服務標籤號 碼將位於每個測試螢幕 的頂部 選項 功能 Express Test 快速 測試 快速測試裝置 本測試通常需要 10 至 20 分鐘 且無需 使用者作出回應 請先執行 Express Tes...

Page 93: ...試完成後 如果您是透過 驅動程式和公用程式 CD 執行 Dell 診 斷程式 請取出 CD 5 關閉測試螢幕以回到 Main Menu 螢幕 若要結束 Dell 診斷程式並 重新啟動電腦 請關閉 Main Menu 螢幕 標籤 功能 Results 結果 顯示測試結果和遇到的所有錯誤狀況 Errors 錯誤 顯示遇到的錯誤狀況 錯誤代碼和問題說明 Help 說明 對測試進行說明 同時還可能會指明測試執行要求 Configuration 組態 顯示所選裝置的硬體組態 Dell 診斷程式會從系統設定程式 記憶體和各種內部 測試中獲取所有裝置的組態資訊 並將其顯示在螢幕 左窗格的裝置清單中 裝置清單可能不會顯示電腦中 安裝的所有元件或連接至電腦的所有裝置之名稱 Parameters 參數 可讓您透過變更測試設定值來自訂測試 ...

Page 94: ...題 若要瞭解這些指 示燈的位置 請參閱第 59 頁的 迷你直立型電腦配件 或第 69 頁的 小型桌上型電腦配件 下表列出了系統指示燈的代碼 可能的原因和建議採取的更正措施 系統指示燈代碼 電源指示燈 硬碟機指示燈 原因 更正措施 呈綠色持續亮起 不適用 電源已開啟且電腦正常操作 無需採取任何更正措施 呈綠色閃爍 空白 電腦處於暫停狀態 Windows 2000 和 XP 按下電源按鈕 移動滑鼠或按下鍵 盤上的按鍵以喚醒電腦 請參閱使 用者指南中的 電源管理 以獲得 更多資訊 呈綠色閃爍幾次 然後熄滅 不適用 存在組態錯誤 檢查診斷指示燈以確定是否能識別 特定的問題 請參閱使用者指南以 獲得更多資訊 呈黃色持續亮起 不適用 Dell 診斷程式正在執行測試 或者 主機板上的裝置可能發生故障或未 正確安裝 如果 Dell 診斷程式正在執行測試 請讓測試完成 檢查診斷指示燈以確定是否能識別 特定的...

Page 95: ... 電源供應器或主機板發生故障 檢查診斷指示燈以確定是否能識別 特定的問題 請參閱使用者指南中的 電源問題 和 主機板問題 呈黃色閃爍 呈綠色持續亮起 主機板發生故障 檢查診斷指示燈以確定是否能識別 特定的問題 另請參閱使用者指南 中的 主機板問題 在 POST 期間呈綠 色持續亮起且發出 嗶聲代碼 不適用 電腦在 BIOS 執行時偵測到問題 請參閱第 98 頁的 嗶聲代碼 以獲 得有關對嗶聲代碼進行診斷的說明 另外 請檢查診斷指示燈以確定是否 能識別特定的問題 在 POST 期間 電源 指示燈呈綠色持續 亮起 未發出嗶聲代 碼且無影像顯示 不適用 監視器或圖形卡可能發生故障或未 正確安裝 檢查診斷指示燈以確定是否能識別 特定的問題 另請參閱使用者指南 中的 影像問題 在 POST 期間 電 源指示燈呈綠色持 續亮起 未發出嗶 聲代碼但電腦鎖定 不適用 內建的主機板裝置可能發生故障 檢查診斷...

Page 96: ... w w d e l l c o m s u p p o r t a p d e l l c o m 背面板 POST 期間的診斷指示燈代碼 指示燈樣式 原因 熄滅 熄滅 熄滅 熄滅 電腦電源未接通 黃色 黃色 綠色 黃色 微處理器可能發生故障 黃色 黃色 綠色 綠色 記憶體可能發生故障 黃色 綠色 黃色 黃色 擴充卡可能發生故障或衝突 診斷指示燈 A B C D A B C D A B C D A B C D 黃色 綠色 熄滅 ...

Page 97: ...生故障 黃色 綠色 綠色 黃色 軟碟機或硬碟機可能發生故障 綠色 綠色 綠色 黃色 起始影像後發現警報 檢查電腦螢幕以查看錯誤 訊息 綠色 黃色 黃色 綠色 主機板資源和 或硬體可能發生故障 綠色 黃色 綠色 綠色 主機板資源和 或硬體可能發生故障 綠色 綠色 黃色 黃色 擴充卡可能發生故障或衝突 POST 期間的診斷指示燈代碼 續 指示燈樣式 原因 黃色 綠色 熄滅 A B C D A B C D A B C D A B C D A B C D A B C D ...

Page 98: ...您收到的系統訊 息未在使用者指南中列 出 請查閱出現該訊息時 正在執行的應用程式之 說明文件和 或作業系統 說明文件 以獲得有關該 訊息的說明和建議採取 的措施 嗶聲代碼 如果在啟動期間發生的錯誤無法顯示在監視器上 則電腦可能會發出一 系列識別問題的嗶聲 嗶聲代碼是指一種聲音的模式 例如 先發出一 聲嗶聲 接著發出第二聲嗶聲 然後發出急促的三聲嗶聲 代碼為 1 1 3 這表示電腦無法讀取非揮發性隨機存取記憶體 NVRAM 中的 資料 如果電腦發出嗶聲代碼 請記下該代碼 然後在使用者指南的 系統嗶 聲代碼 中查找該代碼 黃色 綠色 綠色 綠色 USB 可能發生故障 綠色 綠色 綠色 綠色 完成 POST 後處於正常作業狀態 POST 期間的診斷指示燈代碼 續 指示燈樣式 原因 黃色 綠色 熄滅 A B C D A B C D ...

Page 99: ... ...

Page 100: ... 0 1 23 24 567 0 12 3 4 56 7 89 7 2 A B CD E F GH I CDJ K LMNO ...

Page 101: ...89 0 12 345 0 67 89 AB C DEF GH AB C DEF GH B IJ 1 4 1 A A1 BC KL E MN O KL E MN OP QO3 C R ...

Page 102: ... 89 ...

Page 103: ... B C ST UV WXY DEFG HI J EKL M 0 1 2345 NO PQ R ...

Page 104: ... B C ST UV WXY 67 89 1 89 9 ST RU VD 1 W A B CD EF G HIJK LM N XY Z1 R LM N O P QR 1 2345 S TU VW K XP O YOZ ...

Page 105: ...a O9b c 3 R F LM N K d ef gDB H hi j kl m kln o i kl D pK q W Cr st _ 89 1 uv woK xn yz rS _ uv F_ uv KP o A 89 V m 0 4 p LM N S A c 0 0 0 4 0 E G a 89 K xn s _ r _ P L B c B 89 a F_ 4 G uv P N VV _ 1 _ B K X i H i ª P u K P ...

Page 106: ... B C ST UV WXY O9b 0 b c dFe 0 0 b c R 1 Lfg h m kln o i kl YOZ P G i n o g H hi kl YOZ P µi kl YOZ gDK u i d YOZ ...

Page 107: ... B C ST UV WXY 0123 MZ O _ B P ab iQ ...

Page 108: ... B C ST UV WXY 456 789 AB 789 C 456 D EF 7 AB cdef cde gO Pg Oh3 ciOj k l emn no no ...

Page 109: ... B C ST UV WXY GHIJ EF DKL MN GHIJ O PQ AB pFqrsAt H Bu vd pFqr w x yz no 3 pFqr t iOj R ST U8 DKL RQ AB w x pFqr 3 ciOj 0 1 pFqr H ...

Page 110: ... B C ST UV WXY EF V W X Y O PQ Z 9 AB _ O P EF a bc Z AB de f6 ST g h i cj U8 k lH cj AB z e C M t 3 f t no H 6 z A de mno p qde r sZ AB ...

Page 111: ... B C ST UV WXY 9tE g u vw 9tE AB j j sA t H Bu vd A j j AB yz no 3 t iOj ...

Page 112: ... B C ST UV WXY D xyH z AB ...

Page 113: ... B C ST UV WXY D D Q AB O O ...

Page 114: ... B C ST UV WXY A A b b A 9 9 6 A g D b vw 23 A9 g vw A b b A vw Q 01 AB 4 C b U8 Y Q 01 AB ª 9 A B 0 X B WXY UV iOj b sZ Y ª AB 4 C ...

Page 115: ... B C ST UV WXY Xo b H D 2 H b g 5µb º 2 H b AB p q H r sZ AB 01 À ...

Page 116: ... B C ST UV WXY T w x 3 ciOj w x M t 3 ciOj z e C M t 3 f t no H 6 z A de O Po ÁÂ ÃÁ EF k j N ÄÁ EF 5Z j 2 O PQ de O P AB de A Å Å 3 Æh jo p q k Ç rQ sZ AB V B 6z M t H ª OR ...

Page 117: ... B C ST UV WXY 0123 MZ O _ B P ab iQ ...

Page 118: ... B C ST UV WXY 456 789 AB 789 C 456 D EF 7 AB cdef cde gO Pg Oh3 ciOj k l emn no no ...

Page 119: ... B C ST UV WXY GHIJ EF DKL MN GHIJ O PQ AB pFqrsAt H Bu vd pFqr w x yz no 3 pFqr t iOj R ST U8 DKLQ R AB w x pFqr 3 ciOj 0 1 pFqr H ...

Page 120: ... B C ST UV WXY EF V W X Y O PQ Z 9 AB _ O P EF a bc Z AB de f6 ST g h i cj U8 k lH cj AB z e C M t 3 f t no H 6 z A de mno p qde r sZ AB ...

Page 121: ... B C ST UV WXY 9tE g u vw 9tE AB j j sA t H Bu vd A j j AB yz no 3 t iOj ...

Page 122: ... B C ST UV WXY D xyH z AB ...

Page 123: ... B C ST UV WXY D D Q AB O O ...

Page 124: ... B C ST UV WXY A A b b A 9 9 6 A g D b vw 23 A9 g vw A b b A vw Q 01 AB 4 C b U8 Y Q 01 AB ª 9 B 0 X B WXY UV iOj b sZ Y ª AB 4 C ...

Page 125: ... B C ST UV WXY Xo b H D 2 H b g 5µb º 2 H b AB p q H r sZ AB 01 À ...

Page 126: ... B C ST UV WXY T w x 3 ciOj w x M t 3 ciOj z e C M t 3 f t no H 6 z A de O Po ÁÂ ÃÁ EF k j N ÄÁ EF 5Z j 2 O PQ de O P AB de A Å Å 3 Æh jo p q k Ç rQ sZ AB V B 6z M t H ª OR ...

Page 127: ... ÍD Ï D Ð Ñ Ï AB D Q Ò AB Ó D Ô f6 ÕÖ Á Xo Ø Q Ó AB D xyH Ù AB Â b ÚD cN Û Q ÜÝ Ch DKL Þ L Ù AB Y AB Oe Y Oe O 3 s iOj X X Yµe x Y O B UV iOj Í Á Xo Ø Q k ß Óà Q ÂAá D µ AB Ch ÍD uQ ß Ê â Q Ù µb C ão ä å µb æ çi è 3 U8 F j kl6 0m nF o 0 12 345 0 67pq PQ6rbs ...

Page 128: ... B C ST UV WXY D Q ÒN D xyH Ùh Ô Ù AB Ô éê ëì NÙ ëì h U8 ëì µ AB çi º AB D er vd iOj q vd º iOj çi íÇ î i Ù ï AB çi ð ñ ò ó ôõ AB q Oe H u3 _ 6z À ÁiOj M à Oe Y ÄÅ w x w x À ÁiOj ...

Page 129: ... B C ST UV WXY ...

Page 130: ... B C ST UV WXY m gÆ Ç È AB Oe emn ÉO e B sA t ÊË yz no no ÌÍ c r E Y ÎÏÐ ...

Page 131: ... B C ST UV WXY öh Q Ù N uo cj ø sZ AB o Q ù Ù 6 6w ú C ûü Û 6w ú f6 m gÆ Ç È AB emn ÉO e B sA t w 3 Q Ñ no sA t ÊË yz no ÌÍ Oe c r E Y d E Ò ÊË ...

Page 132: ... AB Xo b H D 2 H b g 5µb º 2 H b AB H C h Ô h U8 Ï º 2 2 5 AB C H Ù µb µ AB Ù µ mno C H g sZ AB AB U8 A9 Q A Í Press the spacebar NOW to invoke Hardware Profile Configuration Recovery Menu A b b 9p 9 ï AB 01Q ü 7 h D L AB 2 U8 åA º Please select the operating system to start A b b 31Q ï AB Q N 1 ï N 01Q ï L AB Æh jo sZ AB ...

Page 133: ...4 Q Ï AB Ã Ú9 ÛO Ü H 3qÝ 44 Ï 5 6 N È L h L AB 5 6 cj mno 3p q 6 5 6 cjrQ sZ AB Ã Þ Û z Ü H 3q ß D Ñ Ï X Q U8 6 6w ú Î l Q Ï AB Æh jo sZ AB Í cj º A AB à á E MNÞ â ãä0 1 a _å H Pg 0 X Y UV iOj p q 5 r sZ AB C H Û h h Ô C H å AB ...

Page 134: ... Â ÃS A P pK q G B _ À YOZ Á L ÀK kl Ç B kl YOZ YOZ uK kl YOZ Ç B Â Ã ÅÆ YOZ B 0 0P GÄK LM N K d H hi j kl kl i ÅÆ YOZ Â ÃB n 0 1 ÈÉ Ê µi YOZ B _ À YOZ Á L ÀK kl Ç B kln o n 0 1 ÈÉ Ê i YOZ YOZ uK kl YOZ Ç B Â Ã ÅÆ YOZ Â ÃB n 0 1 ÈÉ Ê i YOZ LM N ËÌO Í n ÎP GÄK ÏP 0 Ð B 1 u ÏP Ñ 9Ò Ó B 21 u YOZ Y OZ uK kl Product Key ÎÐ ÔÕ YOZ ...

Page 135: ...Ø IÙ Ú P 0 ÛD Gº LM N K d H hi j kl kl i ÅÆ dual monitor ÔÕ YOZ 8ÄZ Ü Ý Â ÃKP Ö P Þß G B _ À YOZ Á L ÀK kl Ç B kl YOZ IÙ Ú K àXA á ÐÒ Ú L Ú 3 3 3 3 G ÏP _ Í n P GÄK uB YOZ K XP ß VW QR S A QRKP µÌK S Ç ÔÕ 0YOZ r n A  à YOZ YOZ K i kl YOZ O9b 89 Ç S LM N ÅÆ B â ãH 0YOZ Gº ä 24 uB åæ ä_ YOZ B _ À YOZ Á L ÀK kl Ç B kln o 4 1 YOZ çè u A K Ç éêi YOZ A1 BC tu F3 F_ F3 ...

Page 136: ...Cv 4 K n r n A Â Ã YOZ LM N K d H hi j kl kl i ÅÆ YOZ B _ À YOZ Á L ÀK kl Ç B kln o Cv 4 YOZ YOZ uK kl YOZ Ç B Â Ã ÅÆ YOZ Â Ã K Cv 4 YOZ K m G P A ëû ü uB 4 1 YOZ B _ À YOZ Á L ÀK kl Ç B kln o 4 1 YOZ YOZ uK kl YOZ Ç B Â Ã ÅÆ YOZ Â Ã K 4 1 YOZ LM N ÛD Gº LM N P r n A LM N ý YOZ A1 BC tu F3 F_ F3 ...

Page 137: ...Ñh Æh jQ Y AB 9 6 9 ª Y AB 2 AB 9 6 9 ª p q 5 r sZ AB vw xyz KP þT G i B c Ô ÿ n r n A uB O_ YOZ b c b OËA CDK ÿ oi àÛ r n A 12 uB O9b OË i YOZ vw b OËA CDK ÿ oi àÛ r n A 11 uB OË i YOZ b c b ÿ Øci Q P Ou O r n A 16 uB O9b Ou YOZ K VD K 4P B Q o P P é r n A 14 uB Q o YOZ ...

Page 138: ... 6 6w ú AB 6 5 6 cj U8 èÙN 5 6 A h jQ A2 Ø ÿ AB b b A º 01 AB K ÿ AB 2 Q L AB 6 5 6 ø 5 L h ÿ AB 6w YQ A ÿ AB 5 6 6 Áh Ô A9 6w YQ K A2 2 6w ÿ N K u vw o 6w 6 AB È 2 cj Ûh YQ 5 ÿ AB 01 234 5 U8 Q D cj ø q T r c Q Ï N æ Q Ï AB æ Q Ï X cj Ø 2 U8 Ïh c 9 h 5 ...

Page 139: ...À k  A Ú U8 B A 01 234 56 Q A D È Q Ê â KL E MN è é iOj T Y E MN z jê QO3H ë 7 8 Q Ï º 5 å h c 7 8 A N K AB 6 6w ú C 6w Ù 5 6 wN æ Q Ï AB 1 N åA AB 00 N b b 0A 1 ï AB ì Ò Ø í QO3H z æ C ì Y KL E MN Û Á 3O îïiOj A N b b þ K A î Ù AB _ cj º 1h A A AB 1 Y A i L N 1 ï AB æ È b b Ï c L AB ...

Page 140: ...A A AB ð z ñ òYH 0 é óv u y ñ z E MN 3 AB òY ñô 1 Y A L N 1 ï AB 95 1 STQ L AB b b STQ L AB 1Q º 5 6 Ï AB 2 º æ Q Ï AB ª g Y L AB Y º D U8 cj 234 o DQ L AB æ È b b Ï c L AB æ 6 N K b b ST ÿ AB Yµe õ M _ À è z L Oô 78 9 Ô Ô P çè K 2 r æ u íH Øn t mè ÛD 78 9 YOZ 78 9 CNè Ô Ô P çè O rP _è K y ...

Page 141: ... U8 AB c C ST c Ï U8 ßj Ûh 6Q ÿ º 5 7 AB c 01 6w Ù æ Q Ï N U8 8 AB c K Q 9N K AB æ Q 1 N åA K Q 9 AB 9 6 Ô Ô r u 3 9 çè ÿ P i ä B K d Ô ÅÆ Ô 1 ÿ W Z O 7 ÿ W Z Z 1 i O Ô Ô K Í n i O ÅÆn K xn G ci A 3 3 4 1 Ô c 0 gDB J K P µÌK O µÌKP K W c K W O uP í Ô i zQ r Ô u ...

Page 142: ...UN 6 A 6 Ñh jQ A A jQ Y º Û cj ø 5 AB 23 U8 A k AB È 2 A jh A A p q I Zr C p q A9JB Zr sZ AB A9 A 6 ß h 2 Z b c b VD 0 b 6D DEF b BC Q îÕ 5 Cv è ñò Í îÕ ï ëÕ O u 2 Cv m ù R9 é ø Î0 Î i æ YOZ r n A Â ÃB Cv 4 YOZ îÕ ï 4 5 c Z OËi Ô 6ßn Pu YOZ r n A Â Ã Y OZ ...

Page 143: ...OZ  ÃB Cv 1 O9 b 0 YOZ Õ ïð îÕ O9b 0 Z ÿ OËi Ô 6ßn Pu YOZ Ïn  ÃB O9b 0 YOZ 39 îÕ u Q o ÿ 5 3 ÿ 14 uB Q o K Q o K xn i YOZ Ïn OËi Ô 6ßn Pu YOZ 39 îÕ C v OË u Q oA ÿ u í gD 0 u ío 5 ÏP IÙ Ú K T e u í OËi Ô 6ßn Pu YOZ Ïn  ÃB 8ÄZ YOZ 39 îÕ C v OË u Q oA ÿ u íu O9 b 5 Ñ O9b 0 K T P ì OËi Ô 6ßn Pu YOZ ß u í D K B _ uvi YOZ b c b VD ö 0 b 6D DEF b BC Q ...

Page 144: ...ST UV WXY ÝC æ c Ï 01A UN h ª Ù A9 Âß A DQ 01 Eh U8 ÝC A Q Þ2 éh c C X Q FG h A o ÝÌ b b X D b Í Ó h A2 æ A p qÔ éêrQ sZ AB æ A 6 Ö º 2 Z A o b éH b Ý vw b VD b K Cv V7 u í Õ Õ îÕ Õ Ò Z KL O A B C D A B C D ...

Page 145: ... ST UV WXY Õ Õ îÕ îÕ 4 Z Õ îÕ Õ Õ Ú K Z ÿ n ì Õ îÕ Õ îÕ 8ÄZ Ú Z Õ îÕ îÕ Õ p ÏP p Z îÕ îÕ îÕ Õ 8ÄZ _gn 0 Q ÿ gDK Z Ou YOZ îÕ Õ Õ îÕ O9b 0 rv 1 G Z vw b VD ö b A B C D A B C D A B C D A B C D A B C D A B C D ...

Page 146: ... B C ST UV WXY A Í B IJ A A A9 A b b cj ø qA9 A r 2 mÍQ sZ AB A9 A FK Ð îÕ Õ îÕ îÕ O9b 0 rv 1 G Z îÕ îÕ Õ Õ Ú K Z ÿ n ì Õ îÕ îÕ îÕ 3 Z îÕ îÕ îÕ îÕ 39 0K ñò vw b VD ö b A B C D A B C D A B C D A B C D ...

Page 147: ... B C ST UV WXY ø Oe QO3HÓ YÔ 8 í z QO3H ø Où Û úá E MN Y C Y Y ab QO3 0 Þ VB û UV iOj A A A B UN 6 UN éH ñ h ª UN ÙN Å ªL UN ò Ø Æ ª UN Ù 6 9 9 5 5 89 66 8 7 A Q ÊQ UN Y2 ÅÀ cj ø qA9 UN 6r AB ...

Page 148: ... B C ST UV WXY ...

Reviews: