background image

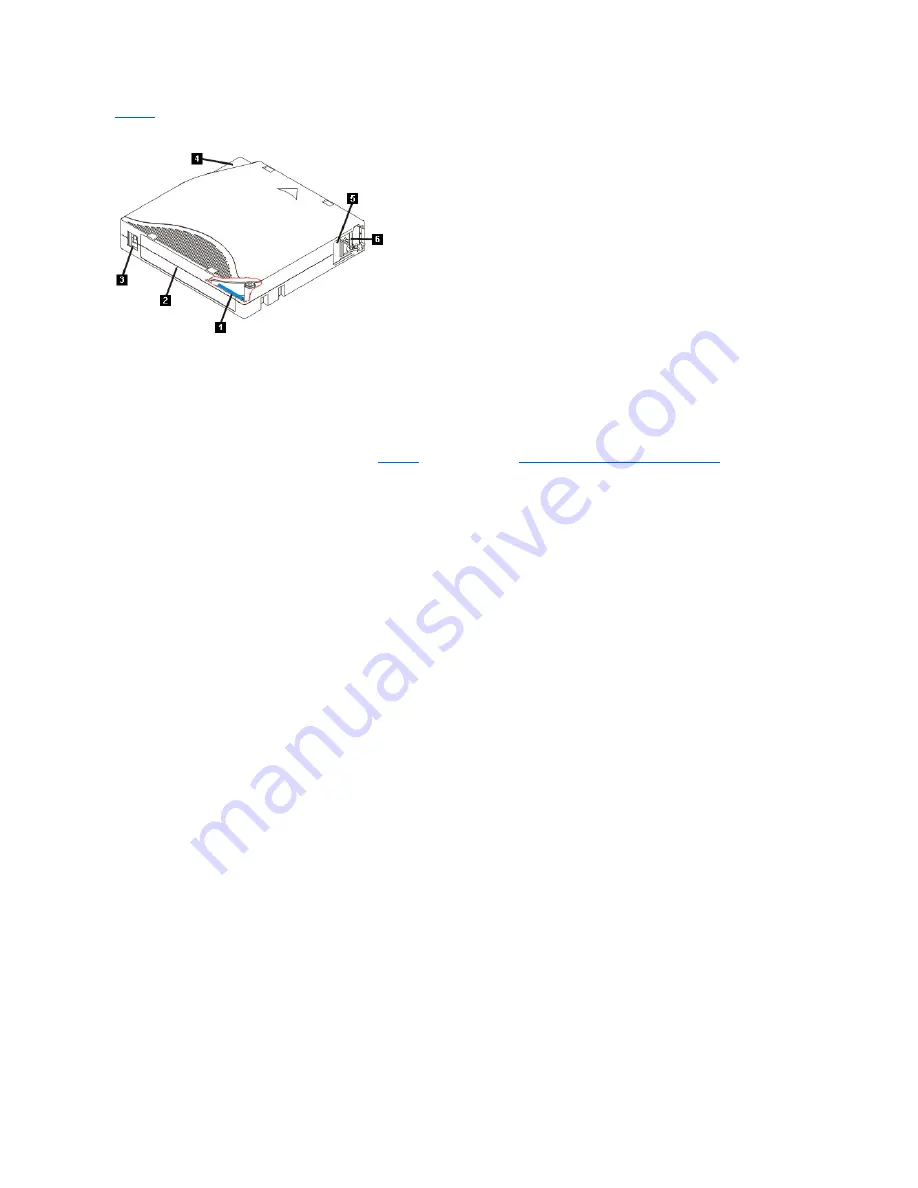
Figure 14

 shows the LTO Ultrium Data Cartridge and its components.  


Figure 14. LTO Ultrium Data Cartridge


1.

LTO cartridge memory  

2.

Label area  

3.

Write-protect switch  

4.

Insertion guide  

5.

Cartridge door  

6.

Leader pin  

Loading a Tape Cartridge 

1.

Ensure that the tape drive is powered on. (The ready/activity LED is solid green.)  

2.

Ensure that the write-protect switch (see number 3 in 

Figure 14

) is properly set. (See "

Setting the Write-Protect Switch on Cartridges

".)  

3.

Grasp the cartridge so that the write-protect switch faces you.  

4.

Slide the cartridge into the tape load compartment (see Figure 15). The tape drive automatically loads the cartridge.

¡

If the cartridge is already in the ejected position and you want to reinsert it, remove the cartridge and then insert it again.  

¡

If the cartridge is already loaded and you cycle the power (turn it off, then on), the cartridge does not automatically eject. When the drive powers 
back on, the cartridge is brought back to the loaded position.  

Summary of Contents for PowerVault LTO3-080

Page 1: ... interest in trademarks and trade names other than its own Internal Drive Model Numbers LTO Ultrium 5 H LTO Ultrium 4 H LTO Ultrium 3 H External Drive Model Numbers CSEH 001 LTO4 EH1 LTO3 EH1 Rack Mount Model Number 2U Storage Rack A Initial release December 2010 Introduction Setting Up the Tape Drive Using the Tape Drive Using the Tape Backup Software Troubleshooting Specifications Getting Help C...

Page 2: ...Back to Contents Page Appendix Regulatory Information DellTM PowerVaultTM Tape Drive User s Guide Regulatory Information for Taiwan Figure 17 Taiwan Contact Information Statement Back to Contents Page ...

Page 3: ...eral Support 1 800 805 5924 Argentina Buenos Aires International Access Code 00 Country Code 54 City Code 11 Website www dell com ar E mail us_latin_services dell com E mail for desktop and portable computers la techsupport dell com E mail for servers and EMC storage products la_enterprise dell com Customer Care toll free 0 800 444 0730 Technical Support toll free 0 800 444 0733 Technical Support ...

Page 4: ...rvice Sales 1 866 440 3355 Cayman Islands General Support 1 800 805 7541 Chile Santiago Country Code 56 City Code 2 Sales and Customer Support toll free 1230 020 4823 China Xiamen Country Code 86 City Code 592 Technical Support website support dell com cn Technical Support E mail cn_support dell com Customer Care E mail customer_cn dell com Technical Support Fax 592 818 1350 Technical Support Dell...

Page 5: ...7 533 533 Fax 0207 533 530 France Paris Montpellier International Access Code 00 Country Code 33 City Codes 1 4 Website support euro dell com Home and Small Business Technical Support for XPS 0825 387 129 Technical Support for all other Dell computers 0825 387 270 Customer Care 0825 823 833 Switchboard 0825 004 700 Switchboard calls from outside of France 04 99 75 40 00 Sales 0825 004 700 Fax 0825...

Page 6: ...Sales 01 204 4444 Dell Outlet 1850 200 778 Online Ordering HelpDesk 1850 200 778 Customer Care Home User Customer Care 01 204 4014 Small Business Customer Care 01 204 4014 Corporate Customer Care 1850 200 982 Technical Support Technical Support for XPS 1850 200 722 Technical Support for all other Dell computers 1850 543 543 At Home Service Technical Support Queries 1850 200 889 General Fax Sales F...

Page 7: ...3883 Sales Austin Texas U S A 512 728 4397 SalesFax Austin Texas U S A 512 728 4600 or 512 728 3772 Luxembourg International Access Code 00 Country Code 352 Website support euro dell com Support 342 08 08 075 Home Small Business Sales 32 0 2 713 15 96 Corporate Sales 26 25 77 81 Customer Care 32 0 2 481 91 19 Fax 26 25 77 82 Macao Country Code 853 Technical Support toll free 0800 105 Customer Serv...

Page 8: ...95 999 Portugal International Access Code 00 Country Code 351 Website support euro dell com Technical Support 707200149 Customer Care 800 300 413 Sales 800 300 410 or 800 300 411 or 800 300 412 or 21 422 07 10 Fax 21 424 01 12 Puerto Rico General Support 1 800 805 7545 St Kitts and Nevis General Support toll free 1 877 441 4731 St Lucia General Support 1 800 882 1521 St Vincent and the Grenadines ...

Page 9: ...t for XPS 0848 33 88 57 Technical Support Home and Small Business for all other Dell products 0844 811 411 Technical Support Corporate 0844 822 844 Customer Care Home and Small Business 0848 802 202 Customer Care Corporate 0848 821 721 Fax 022 799 01 90 Switchboard 022 799 01 01 Taiwan International Access Code 002 Country Code 886 Website support ap dell com E mail ap_support dell com Technical S...

Page 10: ...ee 1 800 232 8544 Consumer Home and Home Office Support for all other Dell products toll free 1 800 624 9896 Customer Service toll free 1 800 624 9897 Employee Purchase Program EPP Customers toll free 1 800 695 8133 Financial Services website www dellfinancialservices com Financial Services lease loans toll free 1 877 577 3355 Financial Services Dell Preferred Accounts DPA toll free 1 800 283 2210...

Page 11: ...nical support can assist you with any necessary procedures NOTE Dell s Express Service Code system may not be available in all countries When prompted by Dell s automated telephone system enter your Express Service Code to route the call directly to the proper support personnel If you do not have an Express Service Code open the Dell Accessories folder double click the Express Service Code icon an...

Page 12: ...m apmarketing dell com Asian Pacific countries only sales_canada dell com Canada only l Electronic Information Service info dell com AutoTech Service Dell s automated technical support serviceAutoTechprovides recorded answers to the questions most frequently asked by Dell customers about their portable and desktop computer systems When you call AutoTech use your touch tone telephone to select the ...

Page 13: ... and then see the contact information for your region Dell Enterprise Training and Certification Dell Enterprise Training and Certification is available see www dell com training for more information This service may not be offered in all locations Problems With Your Order If you have a problem with your order such as missing parts wrong parts or incorrect billing contact Dell for customer assista...

Page 14: ...re You Call NOTE Have your Express Service Code ready when you call The code helps Dell s automated support telephone system direct your call more efficiently Remember to fill out the Diagnostics Checklist If possible turn on your system before you call Dell for technical assistance and call from a telephone at or near the computer You may be asked to type some commands at the keyboard relay detai...

Page 15: ...which are treated as a unit and represent a character A byte is a fundamental unit of data C C See Celsius capacity The amount of data that can be contained on storage media and expressed in bytes cartridge See tape cartridge cartridge door On a tape cartridge the hinged barrier that can be opened to access or closed to protect the magnetic tape within the cartridge cartridge memory See LTO cartri...

Page 16: ...er as 32 degrees and the boiling point as 212 degrees at one atmosphere of pressure file A named set of records that are stored or processed as a unit firmware The proprietary code that is usually delivered as part of an operating system Firmware is more efficient than software that is loaded from an alterable medium and is more adaptable to change than pure hardware circuitry An example of firmwa...

Page 17: ...ttached to the tape in an LTO Ultrium Tape Cartridge Once engaged the leader pin block pulls the tape from the cartridge into the drive leader pin On the tape cartridge a small metal column that is attached to the end of the magnetic tape During tape processing the leader pin is grasped by a threading mechanism which pulls the pin and the tape out of the cartridge across the drive head and onto a ...

Page 18: ...on an adapter power connector Located at the rear of the tape drive the connector to which the internal power cable of an enclosure connects power cord A cable that connects a device to a source of electrical power power off To remove electrical power from a device power on powered on 1 To apply electrical power to a device 2 The state of a device when power has been applied to it R read To acquir...

Page 19: ...I standard that defines conditions and problems that are experienced by tape drives TapeAlert flags Status and error messages that are generated by the TapeAlert utility and display on the server s console tape cartridge A removable storage case that houses belt driven magnetic tape that is wound on a supply reel and a takeup reel tape drive A data storage device that controls the movement of the ...

Page 20: ...ult tape drives offer a formatted cartridge capacity of up to 1500 GB 3000 GB assuming 2 1 compression ratio and a maximum data transfer rate of 140 MB per second Figure 1 shows the internal model of the tape drive Figure 2 shows the separately purchased external model of the tape drive Figure 1 PowerVault Internal Model Figure 2 PowerVault External Model Figure 3 PowerVault Rack Mount Model Seria...

Page 21: ...cation Managed Encryption AME functionality AME is supported on Windows Server You must have an application that supports encryption to use the drives encryption capability For more details consult your application support documentation ...

Page 22: ...trium 4 and 5 media l Ethernet interface for transferring drive firmware and dumps only not an iSCSI interface Tape Backup Software You need backup software that supports the Dell PowerVault tape drive As a general rule native backup applications such as NTBackup and tar do not provide the required data streaming rate to get the full performance of your tape drive It is recommend that you use a ba...

Page 23: ...plays in the single character display needs cleaning Flashing once per second Off On or Off Off Off The tape drive is reading from the tape writing to the tape rewinding the tape locating data on the tape loading the tape or unloading the tape The Encryption LED will be On if all the data on the cartridge is encrypted during these drive operations The Ready Activity LED also flashes green if the t...

Page 24: ...for transferring firmware and dumps only 3 Feature switches on bottom 4 RS 422 Figure 6 Rear Panel of External SAS Tape Drive 1 Power connector 2 Fan enclosure 3 SAS connectors 4 Ethernet not iSCSI for transferring firmware and dumps only ...

Page 25: ...Figure 7 Rear Panel of the Rack Mount Tape Drive 1 Power connector 2 Fan enclosure 3 SAS connectors 4 Ethernet not iSCSI for transferring firmware and dumps only Back to Contents Page ...

Page 26: ...drives must be fixed in place with screws Installing the Drive Step By Step Instructions Step 1 Unpacking the Drive Unpack the tape drive and store the packaging You may need the packaging if you return the unit for service A period of time is required if the temperature of the drive when unpacked is different than the temperature of its operating environment measured at the front of the bezel nea...

Page 27: ...utlet and the system Step 3 Preparing the Mounting Bay in Your System Refer to your system s documentation for instructions on how to prepare the mounting bay to receive the tape drive CAUTION To avoid personal injury or damage to the system or tape drive ensure that the system power cord is disconnected before you install the drive ...

Page 28: ...es not require special mounting hardware proceed to step 5 Step 5 Installing the Drive Slide the tape drive into the open bay aligning the tray or rails with the slots in the bay as shown in Figure 7 Figure 7 Install the Drive If your system does not use mounting hardware check that the holes in the chassis are aligned with the holes in the side of the tape drive see Figure 8 ...

Page 29: ... screws at this point because you may have to move the drive to get the cables in place Step 6 Attaching SAS Cable Attach the system SAS cable to the drive SAS connector as shown in Figure 9 number 1 NOTE You do not need to connect a separate power cable Power is supplied through the SAS cable ...

Page 30: ...ites The SAS tape drive has a burst transfer rate of 600 MB per second It is recommended that a dedicated host bus adapter is used for the tape drive Your system must have a properly installed and configured SAS host adapter or a SAS controller on the motherboard if available with driver software that supports the tape drive Do not connect to a RAID controller channel RAID controller channels are ...

Page 31: ...Connecting the SAS Cable Attach one end of the SAS cable to the SAS host adapter card installed in the system Attach the other end of the SAS cable to the SAS connector on the rear panel of the tape drive The cable can be up to 5 m 16 4 ft long This configuration is shown in Figure 11 Figure 11 Connecting One SAS Device 1 System 2 SAS host adapter card 3 SAS cable 4 Drive SAS connector 5 Tape driv...

Page 32: ...e updated driver software The drive will appear under Tape Drives after the automatic update completes Ethernet Service Port Procedures To update the drive s firmware using the ethernet interface Note The drive uses a limited version of FTP protocol to communicate on the ethernet interface It is recommended to use a simple command line FTP session such as the DOS command prompt when communicating ...

Page 33: ...thernet interface Verifying Drive Operation After you install the drive hardware verify that it is functioning properly before you store your valuable data Turn on the system For external drives turn on the drive before you turn on the system The tape drive will run its POST which checks all hardware except for the drive head The single character display will present a series of random characters ...

Page 34: ... the User s Operating Guide supplied with your Tape Backup application for more information about using the Tape Backup software For the latest supported software versions go to the Dell support website at support dell com or visit the support site of your backup software vendor Back to Contents Page ...

Page 35: ...out bezel 146 0 mm 5 75 in Width with bezel 148 0 mm 5 83 in Length without bezel 205 0 mm 8 09 in Length with bezel 210 0 mm 8 29 in Height without bezel 41 0 mm 1 63 in without bezel Height with bezel 42 7 mm 1 69 in with bezel Weight without a cartridge 1 61 kg 3 lb 9 oz Power Supply Requirements Tolerance 5 VDC and 12 VDC plus or minus 10 Steady State Current for 5 VDC 1 9 A minimum 3 4 A maxi...

Page 36: ...External Drive Physical Specifications Width 22 2 cm 8 74 in Length 32 7 cm 12 87 in Height 6 5 cm 2 56 in Weight 4 4 kg 9 7 lb Power Requirements AC line voltage 100 240 VAC Line frequency 50 60 Hz auto ranging Line current at 100 VAC 0 48 A Line current at 240 VAC 0 20 A Performance Interface 6Gb SAS Recording format LTO Ultrium Generation Media LTO Ultrium Capacity LTO5 1500 GB native 3000 GB c...

Page 37: ...erformance Interface 6Gb SAS Recording format LTO Ultrium Generation Media LTO Ultrium Capacity LTO5 1500 GB native 3000 GB compressed assuming 2 1 compression LTO4 800 GB native 1600 GB compressed assuming 2 1 compression LTO3 400 GB native 800 GB compressed assuming 2 1 compression Data transfer rate maximum LTO5 140 MB sec Native LTO4 120 MB sec Native LTO3 80 MB sec Native Burst transfer rate ...

Page 38: ......

Page 39: ...ve Actions Fixing SAS Connectivity Problems Resolving Media Related Problems Removing an Internal SAS Drive TapeAlert Capturing a drive dump using the ethernet interface Recovering a Tape Cartridge Obtaining Drivers and Firmware Upgrades For information on the latest versions of firmware see the Dell support website at support dell com NOTICE When updating firmware do not power off the tape drive ...

Page 40: ... test press the eject button twice anytime during the test The drive acknowledges the request by slowing the flash rate of the on the single character display from twice per second to once per second The tape drive rewinds and unloads the cartridge and then exits maintenance mode NOTE If you wait longer than 60 seconds to load a cartridge the drive automatically exits maintenance mode If you inser...

Page 41: ...es solid amber which means that the drive is in maintenance mode 3 Press the eject button once per second until appears in the single character display If you cycle past continue to press the eject button until it reappears 4 To select the function press and hold the eject button for 3 seconds After you select the function flashes When flashes the drive is waiting for a cartridge Within 60 seconds...

Page 42: ...nance mode 3 Press the eject button once per second until appears in the single character display If you cycle past continue to press the eject button until it reappears 4 Press and hold the eject button for three or more seconds then release it to select the function The single character display changes to a flashing 5 Within 60 seconds insert a scratch data cartridge that is not write protected ...

Page 43: ...ee the Loading section in Loading Unloading and Write Protecting Cartridges l The tape cartridge may be defective Load another tape cartridge If the problem exists for multiple cartridges the tape drive is defective Contact Dell technical support l The tape drive has no power Connect power to the tape drive The tape drive does not unload the tape cartridge The tape cartridge is stuck or is broken ...

Page 44: ...or code clears when you power off the tape drive or place it in maintenance mode Power problem The tape drive detected that the externally supplied power is either approaching the specified voltage limits the drive is still operating or is outside the specified voltage limits the drive is not operating Perform the following action 1 Ensure that the power connector is properly seated 2 Ensure that ...

Page 45: ...place the drive in maintenance mode A high probability of media error The tape drive determined that an error occurred because of a faulty tape cartridge Try another tape cartridge If the problem occurs with multiple tape cartridges see Resolving Media Related Problems This error will also appear if you are loading an expired cleaner cartridge The error code clears when you remove the tape cartrid...

Page 46: ...tic fails replace the media If it runs successfully clean the tape drive and run the tape drive diagnostics see the Cleaning the Tape Mechanism section and Function Code 1 in Selecting a Diagnostic or Maintenance Function 3 If the tape drive diagnostics fail contact Dell technical support If the tape drive diagnostics run successfully perform the operation that produced the initial media error Rem...

Page 47: ...idge memory chip failure Set when a cartridge memory CM failure is detected on the loaded tape cartridge Replace the cartridge If this error occurs on multiple tapes see error code 6 in Descriptions and Corrective Actions 16 10h Forced eject Set when you manually unload the tape cartridge while the drive was reading or writing No action required 18 12h Tape directory corrupted in the cartridge mem...

Page 48: ...a Tape Cartridge If problem determination procedures identify the tape drive as the source of the problem and you are unable to eject the tape cartridge using the eject button perform the following steps to reset the drive to recover the cartridge 1 Press and hold the eject button for 10 seconds then release The fault LED turns on and the drive starts through its hardware test process When the har...

Page 49: ...ne more time If the tape cartridge still will not eject contact trained service personnel for assistance Back to Contents Page NOTICE If you are not a trained service person do not attempt to open the drive for repairs as this will void your warranty ...

Page 50: ...he Drive Turn on the external drive by pushing the power on off button on the front panel Figure 12 Turn on the rack mount drive by pushing the power on off button on the front panel Figure 13 The tape drive runs its Power On Self Test POST At the end of the hardware self test the ready activity LED must be solid green Figure 12 Turning on the External Drive 1 Power On Off Button Figure 13 Turning...

Page 51: ...l technical data to drive memory and overwrites the existing dump The drive then reboots to allow communication Figure 13 Resetting the Drive 1 Eject Button Loading Unloading and Write Protecting Cartridges Use only LTO Ultrium format cartridges with your drive as specified in the LTO Ultrium standard Ensure that only one label is stuck to the label area of the cartridge Do not use nonstandard lab...

Page 52: ... Capacity compressed2 GB1 Power Vault Generation LTO5 Power Vault Generation LTO4 Power Vault Generation LTO3 5 846 1500 3000 Yes No No 5 WORM 846 1500 3000 Yes No No 4 820 800 1600 Yes Yes No 4 WORM 820 800 1600 Yes Yes No 3 680 400 800 RO Yes Yes 3 WORM 680 400 800 RO Yes Yes 2 609 200 400 No RO Yes 1 609 100 200 No No RO 1 319 50 100 No No RO 1 203 30 60 No No RO 1 87 10 20 No No RO Notes 1 1 G...

Page 53: ...4 is properly set See Setting the Write Protect Switch on Cartridges 3 Grasp the cartridge so that the write protect switch faces you 4 Slide the cartridge into the tape load compartment see Figure 15 The tape drive automatically loads the cartridge If the cartridge is already in the ejected position and you want to reinsert it remove the cartridge and then insert it again If the cartridge is alre...

Page 54: ...the Write Protect Switch on Tape Cartridges The position of the write protect switch Figure 16 on the tape cartridge determines whether you can write to the tape l If the switch is set to locked locked padlock data cannot be written to the tape l If the switch is set to unlocked unlocked padlock or black void data can be written to the tape NOTICE Do not remove a tape cartridge while the drive act...

Page 55: ...tors users programmers archival services and shipping personnel l Ensure that any service or contract personnel who perform archiving are properly trained in media handling procedures l Include media handling procedures as part of any services contract l Define and make personnel aware of data recovery procedures NOTICE Always set the write protection tab prior to loading the cartridge into the dr...

Page 56: ...ridge l Review handling and shipping procedures Handle the Cartridge Carefully l Do not drop the cartridge If the cartridge drops slide the cartridge door back and ensure that the leader pin is properly seated in the pin retaining spring clips l Do not handle tape that is outside the cartridge Handling the tape can damage the tape s surface or edges which may interfere with read or write reliabili...

Reviews: