background image

Stand

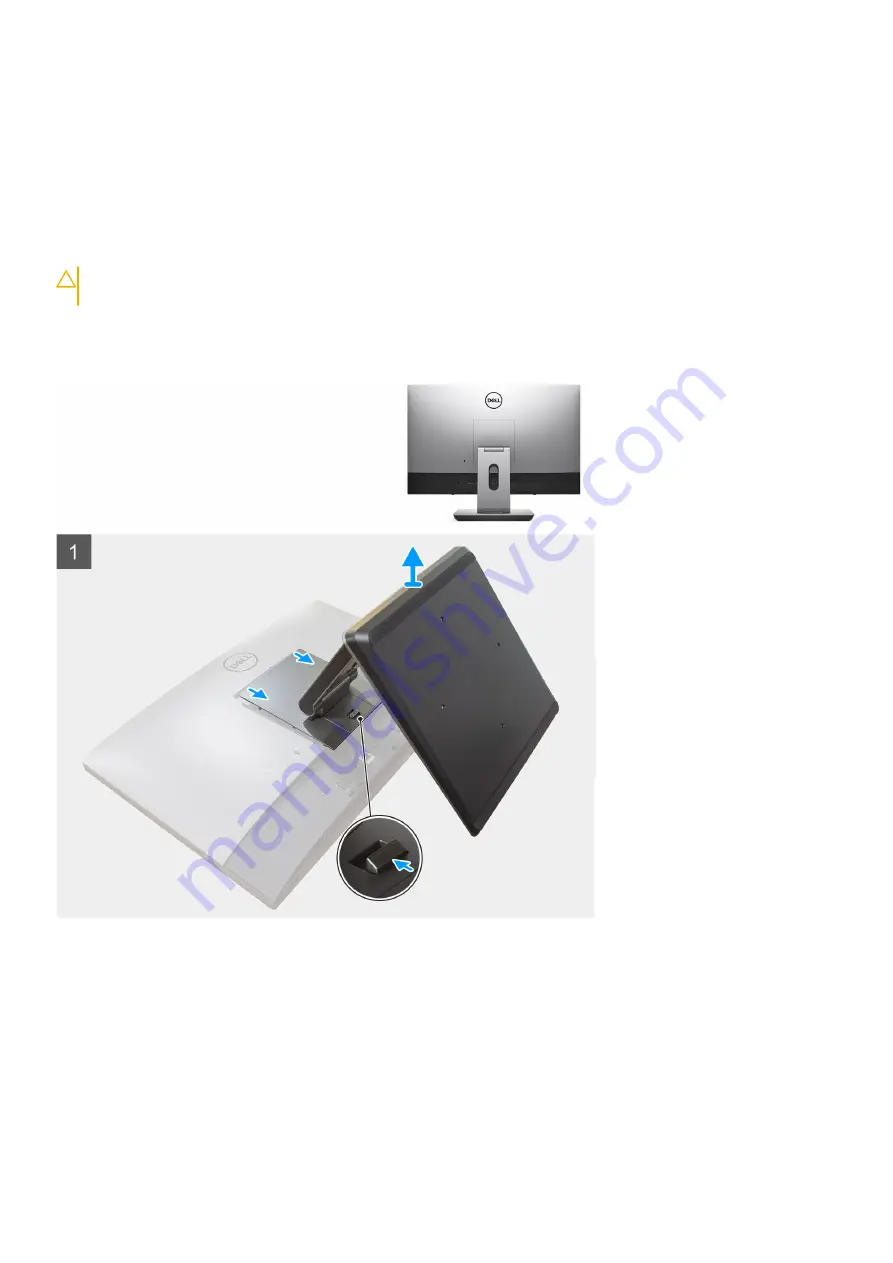
Removing the articulating stand

Prerequisites

1. Follow the procedure in 

Before working inside your computer

.

CAUTION:

 When servicing the system, place it on an elevated, clean, and flat surface. It is recommended to remove the

stand to avoid accidental damage to the system display during servicing.

About this task

The following image provides a visual representation of the articulating stand removal procedure.

12

Removing and installing components

Summary of Contents for OptiPlex 7780 All-In-One

Page 1: ...OptiPlex 7780 All In One Service Manual Regulatory Model W27C Regulatory Type W27C001 W27C002 May 2020 Rev A00 ...

Page 2: ...ential damage to hardware or loss of data and tells you how to avoid the problem WARNING A WARNING indicates a potential for property damage personal injury or death 2020 Dell Inc or its subsidiaries All rights reserved Dell EMC and other trademarks are trademarks of Dell Inc or its subsidiaries Other trademarks may be trademarks of their respective owners ...

Page 3: ...ack cover 20 Installing the back cover 22 Hard drive 23 Removing the hard drive 23 Installing the hard drive 24 Memory modules 25 Removing the memory modules 25 Installing the memory modules 26 System board shield 27 Removing the system board shield 27 Installing the system board shield 28 Solid state drive 29 Removing the M 2 2230 solid state drive 29 Installing the M 2 2230 solid state drive 30 ...

Page 4: ...ssor 54 Rear I O bracket 56 Removing the rear I O bracket 56 Installing the rear I O bracket 58 System board 59 Removing the system board 59 Installing the system board 62 Speakers 65 Removing the speakers 65 Installing the speakers 66 Power button board 67 Removing the power button board 67 Installing the power button board 68 Microphones 69 Removing the microphones 69 Installing the microphones ...

Page 5: ...ng a system setup password 94 Deleting or changing an existing system setup password 94 5 Troubleshooting 95 Dell SupportAssist Pre boot System Performance Check diagnostics 95 Running the SupportAssist Pre Boot System Performance Check 95 Display built in self test 95 Diagnostics 96 Recovering the operating system 97 Flashing BIOS USB key 97 Flashing the BIOS 97 WiFi power cycle 98 Flea power rel...

Page 6: ...pped with the product or at www dell com regulatory_compliance CAUTION Before touching anything inside your computer ground yourself by using a wrist grounding strap or by periodically touching an unpainted metal surface such as the metal at the back of the computer While you work periodically touch an unpainted metal surface to dissipate static electricity which could harm internal components CAU...

Page 7: ... memory integrity intermittent memory errors etc The more difficult type of damage to recognize and troubleshoot is the intermittent also called latent or walking wounded failure Perform the following steps to prevent ESD damage Use a wired ESD wrist strap that is properly grounded The use of wireless anti static straps is no longer allowed they do not provide adequate protection Touching the chas...

Page 8: ...hould be folded over and taped shut and all the same foam packing material should be used in the original box that the new part arrived in ESD sensitive devices should be removed from packaging only at an ESD protected work surface and parts should never be placed on top of the ESD bag because only the inside of the bag is shielded Always place parts in your hand on the ESD mat in the system or in...

Page 9: ...moved before working on your computer 3 Replace any media cards discs or any other parts that you removed before working on your computer 4 Connect your computer and all attached devices to their electrical outlets 5 Turn on your computer Safety instructions 9 ...

Page 10: ... when the component is replaced NOTE Some systems have magnetic surfaces Ensure that the screws are not left attached to such surface when replacing a component NOTE Screw color may vary with the configuration ordered Table 1 OptiPlex 7780 All in One screw list Component Screw type Quantity Screw image Cable cover optional M3x9 1 System board shield M3x5 5 Bottom cover M3x5 4 M 2 2230 solid state ...

Page 11: ...crete Captive screws 9 Power supply unit PSU M3x5 2 PSU fan M3x5 2 Rear I O bracket M3x5 4 System board M3x5 9 Speakers M3 4 7 1xZN 9 Power button board M3x5 1 Microphones M2x2 5 4 Side I O board shield M3x5 2 Side I O board M2 5x3 5 2 Antenna modules M2x2 5 2 Display panel M3x5 12 Middle frame M3x5 16 Audio board M3x5 1 Removing and installing components 11 ...

Page 12: ...en servicing the system place it on an elevated clean and flat surface It is recommended to remove the stand to avoid accidental damage to the system display during servicing About this task The following image provides a visual representation of the articulating stand removal procedure 12 Removing and installing components ...

Page 13: ...ver 4 Pry the rubber feet from the bottom cover and pull it out Installing the articulating stand Prerequisites If you are replacing a component remove the existing component before performing the installation procedure About this task The following image provides a visual representation of the articulating stand installation procedure Removing and installing components 13 ...

Page 14: ...Steps 1 Align the rubber feet with the slots on the bottom cover and push it firmly in place 14 Removing and installing components ...

Page 15: ...Before working inside your computer CAUTION When servicing the system place it on an elevated clean and flat surface Dell recommends removing the stand to avoid accidental damage to the system display during servicing About this task The following image provides a visual representation of the height adjustable stand removal procedure Steps 1 Press and slide the release button up 2 Hold the button ...

Page 16: ...all the Height Adjustable Stand with Optical Disk Drive About this task The following image provides a visual representation of the height adjustable stand installation procedure Steps 1 Align the tabs on the stand with the slots on the back cover 2 Snap the stand until it clicks into place Next steps 1 Follow the procedure in After working inside your computer 16 Removing and installing component...

Page 17: ... servicing the system place it on an elevated clean and flat surface It is recommended to remove the stand to avoid accidental damage to the system display during servicing 2 Remove the stand About this task The following image provides a visual representation of the cable cover removal procedure Removing and installing components 17 ...

Page 18: ...route the power cable from the slots on the cable cover 2 Remove the screw M3x9 that secures the cable cover to the bottom cover 3 Lift the cable cover from the bottom cover 18 Removing and installing components ...

Page 19: ...are replacing a component remove the existing component before performing the installation procedure About this task The following image provides a visual representation of the cable cover installation procedure Removing and installing components 19 ...

Page 20: ...r computer Back cover Removing the back cover Prerequisites 1 Follow the procedure in Before working inside your computer CAUTION When servicing the system place it on an elevated clean and flat surface It is recommended to remove the stand to avoid accidental damage to the system display during servicing 2 Remove the stand 3 Remove the cable cover optional About this task The following image prov...

Page 21: ...ack cover to release it from the latch on the system board shield 2 Slide the back cover up to release the tabs on the cover from the slots on the middle frame 3 Lift the back cover and remove it from the system Removing and installing components 21 ...

Page 22: ...are replacing a component remove the existing component before performing the installation procedure About this task The following image provides a visual representation of the back cover installation procedure 22 Removing and installing components ...

Page 23: ... 1 Install the cable cover optional 2 Install the stand 3 Follow the procedure in After working inside your computer Hard drive Removing the hard drive Prerequisites 1 Follow the procedure in Before working inside your computer 2 Remove the stand 3 Remove the cable cover optional 4 Remove the back cover About this task The following image provides a visual representation of the hard drive removal ...

Page 24: ... drive bracket from its slots on the hard drive 4 Remove the hard drive from the hard drive bracket Installing the hard drive Prerequisites If you are replacing a component remove the existing component before performing the installation procedure About this task The following image provides a visual representation of the hard drive installation procedure 24 Removing and installing components ...

Page 25: ... assembly base Next steps 1 Install the back cover 2 Install the cable cover optional 3 Install the stand 4 Follow the procedure in After working inside your computer Memory modules Removing the memory modules Prerequisites 1 Follow the procedure in Before working inside your computer 2 Remove the stand 3 Remove the cable cover optional 4 Remove the back cover About this task The following image p...

Page 26: ... memory module from the memory module slot NOTE Repeat step 2 and 3 if there are two memory modules Installing the memory modules Prerequisites If you are replacing a component remove the existing component before performing the installation procedure About this task The following image provides a visual representation of the memory modules installation procedure 26 Removing and installing compone...

Page 27: ...with the slots on the system board shield and snap into place Next steps 1 Install the back cover 2 Install the cable cover optional 3 Install the stand 4 Follow the procedure in After working inside your computer System board shield Removing the system board shield Prerequisites 1 Follow the procedure in Before working inside your computer 2 Remove the stand 3 Remove the cable cover optional 4 Re...

Page 28: ...he display assembly base Installing the system board shield Prerequisites If you are replacing a component remove the existing component before performing the installation procedure About this task The following image provides a visual representation of the system board shield installation procedure 28 Removing and installing components ...

Page 29: ...stall the back cover 2 Install the cable cover optional 3 Install the stand 4 Follow the procedure in After working inside your computer Solid state drive Removing the M 2 2230 solid state drive Prerequisites 1 Follow the procedure in Before working inside your computer 2 Remove the stand 3 Remove the cable cover optional 4 Remove the back cover 5 Remove the system board shield Removing and instal...

Page 30: ... the M 2 card slot on the system board Installing the M 2 2230 solid state drive Prerequisites CAUTION Solid state drives are fragile Exercise care when handling the solid state drive If you are replacing a component remove the existing component before performing the installation procedure About this task The following image provides a visual representation of the M 2 2230 solid state drive insta...

Page 31: ...r optional 4 Install the stand 5 Follow the procedure in After working inside your computer Removing the M 2 2280 solid state drive Intel Optane memory module Prerequisites 1 Follow the procedure in Before working inside your computer 2 Remove the stand 3 Remove the cable cover optional 4 Remove the back cover 5 Remove the system board shield About this task The following image provides a visual r...

Page 32: ...ptane memory module Prerequisites CAUTION Solid state drives are fragile Exercise care when handling the solid state drive If you are replacing a component remove the existing component before performing the installation procedure About this task The following image provides a visual representation of the M 2 2280 solid state drive Intel Optane memory module installation procedure 32 Removing and ...

Page 33: ...he back cover 3 Install the cable cover optional 4 Install the stand 5 Follow the procedure in After working inside your computer System fan Removing the system fan Prerequisites 1 Follow the procedure in Before working inside your computer 2 Remove the stand 3 Remove the cable cover optional 4 Remove the back cover 5 Remove the system board shield About this task The following image provides a vi...

Page 34: ...e system fan along with its cable off the display assembly base Installing the system fan Prerequisites If you are replacing a component remove the existing component before performing the installation procedure About this task The following image provides a visual representation of the system fan installation procedure 34 Removing and installing components ...

Page 35: ...king inside your computer Coin cell battery Removing the coin cell battery Prerequisites 1 Follow the procedure in Before working inside your computer 2 Remove the stand 3 Remove the cable cover optional 4 Remove the back cover 5 Remove the system board shield NOTE Removing the coin cell battery resets the CMOS and BIOS settings to default and results in data lose It is recommended that you note t...

Page 36: ...ttery from the coin cell battery holder Installing the coin cell battery Prerequisites If you are replacing a component remove the existing component before performing the installation procedure About this task The following image provides a visual representation of the coin cell battery installation procedure 36 Removing and installing components ...

Page 37: ... optional 4 Install the stand 5 Follow the procedure in After working inside your computer Wireless card Removing the wireless card Prerequisites 1 Follow the procedure in Before working inside your computer 2 Remove the stand 3 Remove the cable cover optional 4 Remove the back cover 5 Remove the system board shield About this task The following image provides a visual representation of the wirele...

Page 38: ...ess card bracket off the wireless card 6 Disconnect the antenna cables from the wireless card 7 Slide and remove the wireless card from the wireless card slot Installing the wireless card Prerequisites If you are replacing a component remove the existing component before performing the installation procedure CAUTION To avoid damage to the wireless card route the antenna cables accurately About thi...

Page 39: ...reless card at an angle into the wireless card slot 5 Replace the screw M2x2 5 to secure the wireless card bracket to the wireless card 6 Align and place the wireless card shield on the system board and wireless card 7 Replace the two screws M2x2 5 to secure the wireless card shield to the system board 8 Route the antenna cables through the routing guides on the wireless card shield Next steps 1 I...

Page 40: ... 4 Remove the back cover 5 Remove the system board shield About this task The following image provides a visual representation of the camera assembly removal procedure Steps 1 Remove the two screws M3x5 that secure the camera assembly door to the display assembly base 2 Disconnect the camera cable from the connector on the system board 40 Removing and installing components ...

Page 41: ... task The following image provides a visual representation of the camera assembly installation procedure Steps 1 Slide the camera assembly on the middle frame and align the screw holes on the camera assembly with the screw holes on the middle frame 2 Replace the two screws M3x5 to secure the camera assembly to the middle frame 3 Route the camera cable through the routing guides on the display asse...

Page 42: ...the procedure in After working inside your computer Bottom cover Removing the bottom cover Prerequisites 1 Follow the procedure in Before working inside your computer 2 Remove the stand 3 Remove the cable cover optional 4 Remove the back cover 5 Remove the system board shield About this task The following image provides a visual representation of the bottom cover removal procedure 42 Removing and ...

Page 43: ...he display assembly base Installing the bottom cover Prerequisites If you are replacing a component remove the existing component before performing the installation procedure About this task The following image provides a visual representation of the bottom cover installation procedure Removing and installing components 43 ...

Page 44: ...lay assembly base Next steps 1 Install the system board shield 2 Install the back cover 3 Install the cable cover optional 4 Install the stand 5 Follow the procedure in After working inside your computer Power supply unit Removing the power supply unit PSU Prerequisites 1 Follow the procedure in Before working inside your computer 44 Removing and installing components ...

Page 45: ...le cover optional 4 Remove the back cover 5 Remove the system board shield 6 Remove the bottom cover About this task The following image provides a visual representation of the PSU removal procedure Removing and installing components 45 ...

Page 46: ...ower supply cable from the connector on the system board 5 Remove the screw M3x5 that secures the PSU to the display assembly base 6 Lift the PSU out of the system Installing the power supply unit PSU Prerequisites If you are replacing a component remove the existing component before performing the installation procedure About this task The following image provides a visual representation of the P...

Page 47: ...connector on the system board 4 Route the power supply cable through the routing guides on the rear I O bracket and PSU fan 5 Align the screw hole on the power supply socket with the screw hole on the rear I O bracket and place it in the slot on the rear I O bracket 6 Replace the screw M3x5 to secure the power supply socket to the rear I O bracket Removing and installing components 47 ...

Page 48: ...move the stand 3 Remove the cable cover optional 4 Remove the back cover 5 Remove the system board shield 6 Remove the bottom cover About this task The following image provides a visual representation of the PSU fan removal procedure Steps 1 Remove the power supply cable from the routing guides on the PSU fan 2 Disconnect the PSU fan cable from the system board 3 Remove the two screws M3x5 that se...

Page 49: ... screws M3x5 to secure the PSU fan to the display assembly base 3 Connect the PSU fan cable to the connector on the system board 4 Route the power supply cable through the routing guides on the PSU fan Next steps 1 Install the bottom cover 2 Install the system board shield 3 Install the back cover 4 Install the cable cover optional 5 Install the stand 6 Follow the procedure in After working inside...

Page 50: ...stem board and the display assembly base 2 Slide and lift the heat sink off the system board and display assembly base Installing the heat sink UMA Prerequisites If you are replacing a component remove the existing component before performing the installation procedure NOTE If either the system board or the heat sink is replaced use the thermal pad paste provided in the kit to ensure that thermal ...

Page 51: ...eps 1 Install the system fan 2 Install the system board shield 3 Install the back cover 4 Install the cable cover optional 5 Install the stand 6 Follow the procedure in After working inside your computer Removing the heat sink discrete Prerequisites 1 Follow the procedure in Before working inside your computer 2 Remove the stand 3 Remove the cable cover optional 4 Remove the back cover 5 Remove th...

Page 52: ...nk off the system board and display assembly base Installing the heat sink discrete Prerequisites If you are replacing a component remove the existing component before performing the installation procedure NOTE If either the system board or the heat sink is replaced use the thermal pad paste provided in the kit to ensure that thermal conductivity is achieved About this task The following image pro...

Page 53: ...se Next steps 1 Install the system fan 2 Install the system board shield 3 Install the back cover 4 Install the cable cover optional 5 Install the stand 6 Follow the procedure in After working inside your computer Processor Removing the processor Prerequisites 1 Follow the procedure in Before working inside your computer 2 Remove the stand 3 Remove the cable cover optional 4 Remove the back cover ...

Page 54: ...essor cover CAUTION When removing the processor do not touch any of the pins inside the socket or allow any objects to fall on the pins in the socket 3 Gently lift the processor from the processor socket Installing the processor Prerequisites If you are replacing a component remove the existing component before performing the installation procedure About this task The following image provides a vi...

Page 55: ...eated properly 2 Align the notches on the processor with the tabs on the processor socket and place the processor in the processor socket CAUTION Ensure that the processor cover notch is positioned underneath the alignment post 3 When the processor is fully seated in the socket pivot the release lever down and place it under the tab on the processor cover Next steps 1 Install the heat sink 2 Insta...

Page 56: ...nside your computer 2 Remove the stand 3 Remove the cable cover optional 4 Remove the back cover 5 Remove the system board shield 6 Remove the bottom cover About this task The following image provides a visual representation of the rear I O bracket removal procedure 56 Removing and installing components ...

Page 57: ...y cable from the routing guide on the rear I O bracket 3 Slide and remove the power supply socket away from the rear I O bracket 4 Remove the three screws M3x5 that secure the rear I O bracket to the display assembly base 5 Lift the rear I O bracket off the display assembly base Removing and installing components 57 ...

Page 58: ...are replacing a component remove the existing component before performing the installation procedure About this task The following image provides a visual representation of the rear I O bracket installation procedure 58 Removing and installing components ...

Page 59: ...requisites 1 Follow the procedure in Before working inside your computer NOTE Your computer s Service Tag is stored in the system board You must enter the Service Tag in the BIOS setup program after you replace the system board NOTE Replacing the system board removes any changes you have made to the BIOS using the BIOS setup program You must make the appropriate changes again after you replace the...

Page 60: ... state drive PCIe connector 10 SIO signal cable connector 11 SIO power cable connector 12 Audio board cable connector 13 Microphone module cable connector 14 Speaker cable connector 15 Coin cell battery 16 Power button cable connector 17 Display cable connector 18 M 2 WLAN connector 19 PSU fan cable connector 20 Touchscreen cable connector 21 Processor The following image provides a visual represe...

Page 61: ...y back light cable from the connector on the system board 2 Disconnect the display cable from the connector on the system board 3 Disconnect the PSU cable from the connector on the system board Removing and installing components 61 ...

Page 62: ...onnect the touchscreen cable from the connector on the system board 13 Disconnect the camera cable from the connector on the system board 14 Remove the nine screws M3x5 that secure the system board to the display assembly base 15 Lift and remove the system board from the display assembly base Installing the system board Prerequisites If you are replacing a component remove the existing component b...

Page 63: ...odule cable connector 14 Speaker cable connector 15 Coin cell battery 16 Power button cable connector 17 Display cable connector 18 M 2 WLAN connector 19 PSU fan cable connector 20 Touchscreen cable connector 21 Processor The following image provides a visual representation of the system board installation procedure Removing and installing components 63 ...

Page 64: ...able to the system board 5 Connect the system fan cable to the system board 6 Connect the audio board cable to the system board 7 Connect the SIO power cable to the system board 8 Connect the SIO signal cable to the system board 9 Connect the microphone module cable to the system board 10 Connect the speaker cable to the system board 11 Connect the power button board cable to the system board and ...

Page 65: ...4 Install the stand 15 Follow the procedure in After working inside your computer NOTE Your computer s Service Tag is stored in the system board You must enter the Service Tag in the BIOS setup program after you replace the system board NOTE Replacing the system board removes any changes you have made to the BIOS using the BIOS setup program You must make the appropriate changes again after you re...

Page 66: ...outing guides on the display assembly base 4 Lift the speakers along with the cable off the display assembly base Installing the speakers Prerequisites If you are replacing a component remove the existing component before performing the installation procedure About this task The following image provides a visual representation of the speakers installation procedure 66 Removing and installing compo...

Page 67: ...se and connect the speaker cable to the system board Next steps 1 Install the rear I O bracket 2 Install the bottom cover 3 Install the system board shield 4 Install the back cover 5 Install the cable cover optional 6 Install the stand 7 Follow the procedure in After working inside your computer Power button board Removing the power button board Prerequisites 1 Follow the procedure in Before worki...

Page 68: ... 2 Unroute the power button board cable from the display assembly base then slide the power button board cable out from under the antenna cables 3 Remove the screw M3x5 that secures the power button board to the middle frame 4 Lift the power button board along with its cable off the middle frame Installing the power button board Prerequisites If you are replacing a component remove the existing co...

Page 69: ...Next steps 1 Install the speakers 2 Install the rear I O bracket 3 Install the bottom cover 4 Install the system board shield 5 Install the back cover 6 Install the cable cover optional 7 Install the stand 8 Follow the procedure in After working inside your computer Microphones Removing the microphones Prerequisites 1 Follow the procedure in Before working inside your computer 2 Remove the stand 3...

Page 70: ...ove the four screws M2x2 5 that secure the microphone modules to the middle frame 3 Lift the microphone modules off the slots on the middle frame Installing the microphones Prerequisites If you are replacing a component remove the existing component before performing the installation procedure About this task The following image provides a visual representation of the microphones installation proc...

Page 71: ...stem board Next steps 1 Install the speakers 2 Install the rear I O bracket 3 Install the bottom cover 4 Install the system board shield 5 Install the back cover 6 Install the cable cover optional 7 Install the stand 8 Follow the procedure in After working inside your computer Side I O board Removing the side I O board Prerequisites 1 Follow the procedure in Before working inside your computer 2 R...

Page 72: ...ay assembly base 2 Lift and remove the side I O board shield off the side I O board 3 Disconnect the SIO signal cable SIO power cable and audio board cable from the system board 4 Remove the SIO signal cable SIO power cable and audio board cable from the routing guides on the display assembly base 5 Remove the two screws M2 5x3 5 that secure the side I O board to the display assembly base 6 Lift a...

Page 73: ...he two screws M2 5x3 5 to secure the side I O board to the display assembly base 3 Route the SIO signal cable SIO power cable and audio board cable through the routing guides on the display assembly base 4 Connect the SIO signal cable SIO power cable and audio board cable to the connectors on the system board 5 Align the screw holes on the side I O board shield with the screw holes on the display ...

Page 74: ...ur computer 2 Remove the stand 3 Remove the cable cover optional 4 Remove the back cover 5 Remove the system board shield 6 Remove the wireless card 7 Remove the bottom cover 8 Remove the rear I O bracket 9 Remove the speakers 10 Remove the side I O board About this task The following image provides a visual representation of the audio board removal procedure Steps 1 Disconnect the audio board cab...

Page 75: ...ole on the audio board with the screw hole on the display assembly base 2 Replace the screw M3x5 to secure the audio board to the display assembly base 3 Connect the audio board cable to the system board Next steps 1 Install the side I O board 2 Install the speakers 3 Install the rear I O bracket 4 Install the bottom cover 5 Install the wireless card 6 Install the system board shield 7 Install the...

Page 76: ... rear I O bracket 9 Remove the speakers About this task The following image provides a visual representation of the antenna modules removal procedure Steps 1 Remove the antenna cables from the routing guides on the display assembly base 2 Remove the two screws M2x2 5 that secure the antenna modules to the middle frame 3 Carefully peel the copper foil that secures the antenna cables to the middle f...

Page 77: ...opper foil that secures the antenna cables to the middle frame 3 Replace the two screws M2x2 5 to secure the antenna modules to the middle frame 4 Route the antenna cables through the routing guides on the display assembly base Next steps 1 Install the speakers 2 Install the rear I O bracket 3 Install the bottom cover 4 Install the wireless card 5 Install the system board shield 6 Install the back...

Page 78: ...ck cover 5 Remove the system board shield 6 Remove the hard drive 7 Remove the bottom cover 8 Remove the rear I O bracket 9 Remove the speakers 10 Remove the camera assembly 11 Remove the system board 12 Remove the PSU 13 Remove the PSU fan About this task The following image provides a visual representation of the display panel removal procedure 78 Removing and installing components ...

Page 79: ...splay back light touch screen and display cable through the slots on the display assembly base 5 Lift the display panel up from the middle frame and display assembly base Installing the display panel Prerequisites If you are replacing a component remove the existing component before performing the installation procedure About this task The following image provides a visual representation of the di...

Page 80: ...the slots of the display assembly base 2 Route the display backlight touch screen and display cable through the slots on the display assembly base 3 Place the display assembly base on a clean and flat surface with the display panel facing down 80 Removing and installing components ...

Page 81: ...ional 12 Install the stand 13 Follow the procedure in After working inside your computer Middle frame Removing the middle frame Prerequisites 1 Follow the procedure in Before working inside your computer 2 Remove the stand 3 Remove the cable cover optional 4 Remove the back cover 5 Remove the system board shield 6 Remove the hard drive 7 Remove the wireless card 8 Remove the bottom cover 9 Remove ...

Page 82: ... 1 Remove the 16 screws M3x5 that secure the middle frame to the display assembly base 2 Remove the middle frame and lift the middle frame off the display assembly base 82 Removing and installing components ...

Page 83: ...are replacing a component remove the existing component before performing the installation procedure About this task The following image provides a visual representation of the middle frame installation procedure Removing and installing components 83 ...

Page 84: ... I O board 4 Install the PSU fan 5 Install the PSU 6 Install the microphones 7 Install the power button board 8 Install the system board 9 Install the camera assembly 10 Install the speakers 11 Install the rear I O bracket 12 Install the bottom cover 13 Install the wireless card 14 Install the hard drive 15 Install the system board shield 16 Install the back cover 17 Install the cable cover option...

Page 85: ...your computer starts to download and install SupportAssist NOTE Review on screen instructions for browser specific instructions 8 Click View Drivers for My System 9 Click Download and Install to download and install all driver updates detected for your computer 10 Select a location to save the files 11 If prompted approve requests from User Account Control to make changes on the system 12 The appl...

Page 86: ...e previous field Down arrow Moves to the next field Enter Selects a value in the selected field if applicable or follow the link in the field Spacebar Expands or collapses a drop down list if applicable Tab Moves to the next focus area Esc Moves to the previous page until you view the main screen Pressing Esc in the main screen displays a message that prompts you to save any unsaved changes and re...

Page 87: ... the express service code of the computer Signed Firmware Update is enabled Displays whether the Signed Firmware Update is enabled on your computer Memory Information Memory Installed Displays the total computer memory installed Memory Available Displays the total computer memory available Memory Speed Displays the memory speed Memory Channel Mode Displays single or dual channel mode Memory Techno...

Page 88: ...lays the native resolution of the computer Audio Controller Displays the audio controller information of the computer Wi Fi Device Displays the wireless device information of the computer Bluetooth Device Displays the bluetooth device information of the computer Boot Sequence Boot Sequence Displays the boot sequence Boot List Option Displays the available boot options UEFI Boot Path Security Displ...

Page 89: ...oller By default all the options are enabled OSD Button Management Disable OSD button Enable or disable OSD button By default the Disable OSD Buttons option is not enabled Touchscreen Touchscreen Enable or disable touchscreen only for touchscreen computers By default the Touchscreen option is enabled Miscellaneous Devices Enable or disable various onboard devices Enable Camera Enable or disable th...

Page 90: ...t Enable to prevent users from entering Setup when an Admin Password is set By default the option is not enabled Master Password Lockout Enable to prevent users from entering Setup when a Master Password is set By default the option is not enabled HDD Protection Support Enable or disable the HDD protection feature By default the option is not enabled SMM Security Mitigation Enable or disable SMM S...

Page 91: ...t AC Recovery Enables the system to turn on automatically when AC is inserted By default the Power Off option is enabled Enable Intel Speed Shift technology Enable disable Intel Speed Shift Technology support Setting this option to enable to allows the operating system to select the appropriate processor performance automatically By default the option is enabled Auto On Time Enable to set the comp...

Page 92: ...lt the option is disabled MEBx Hotkey Enable or disable the MEBx hotkey feature By default the option is disabled Table 12 System setup options Virtualization Support menu Virtualization Support Virtualization Specify whether a Virtual Machine Monitor VMM can utilize the additional hardware capabilities provided by Intel Virtualization Technology By default the option is enabled VT for Direct I O ...

Page 93: ... SupportAssist System Resolution Auto OS Recovery Threshold Control the automatic boot flow for SupportAssist System Resolution Console and for the Dell OS Recovery tool SupportAssist OS Recovery Enable or disable the boot flow for the SupportAssist OS Recovery tool when certain system errors By default the option is enabled BIOSConnect Enable or disable the cloud service OS upon absence of local ...

Page 94: ...Deleting or changing an existing system setup password Prerequisites Ensure that the Password Status is Unlocked in the System Setup before attempting to delete or change the existing System and Setup password You cannot delete or change an existing System or Setup password if the Password Status is Locked About this task To enter the System Setup press F2 immediately after a power on or reboot St...

Page 95: ...he computer terminal when the diagnostic tests are performed For more information see Resolve Hardware Issues With Built in and Online Diagnostics SupportAssist ePSA ePSA or PSA Error Codes Running the SupportAssist Pre Boot System Performance Check Steps 1 Turn on your computer 2 As the computer boots press the F12 key as the Dell logo appears 3 On the boot menu screen select the Diagnostics opti...

Page 96: ...on Failure Replace the system board 1 2 MBIST SPI flash Unrecoverable SPI flash failure Replace the system board 1 5 i Fuse Failure EC unable to program i Fuse Replace the system board 1 6 EC internal Failure Generic catch all for ungraceful EC code flow errors Disconnect all power source AC battery coin cell and press and hold the power button to drain flea power 2 1 Processor failure Run the Int...

Page 97: ... system It consists of tools to diagnose and troubleshoot issues that may occur before your computer boots to the operating system It enables you to diagnose hardware issues repair your computer back up your files or restore your computer to its factory state You can also download it from the Dell Support website to troubleshoot and fix your computer when it fails to boot into their primary operat...

Page 98: ...access the internet due to WiFi connectivity issues a WiFi power cycle procedure may be performed The following procedure provides the instructions on how to conduct a WiFi power cycle NOTE Some ISPs Internet Service Providers provide a modem router combo device Steps 1 Turn off your computer 2 Turn off the modem 3 Turn off the wireless router 4 Wait for 30 seconds 5 Turn on the wireless router 6 ...

Page 99: ...ications technical help blogs drivers software updates and so on www dell com support Dell knowledge base articles for a variety of computer concerns 1 Go to https www dell com support home app knowledgebase 2 Type the subject or keyword in the Search box 3 Click Search to retrieve the related articles Contacting Dell To contact Dell for sales technical support or customer service issues see www d...

Reviews: