background image

Memory Module, Modem, Optical Drive, and Floppy Drive: Dell Latitude V710/V740 Service Manual


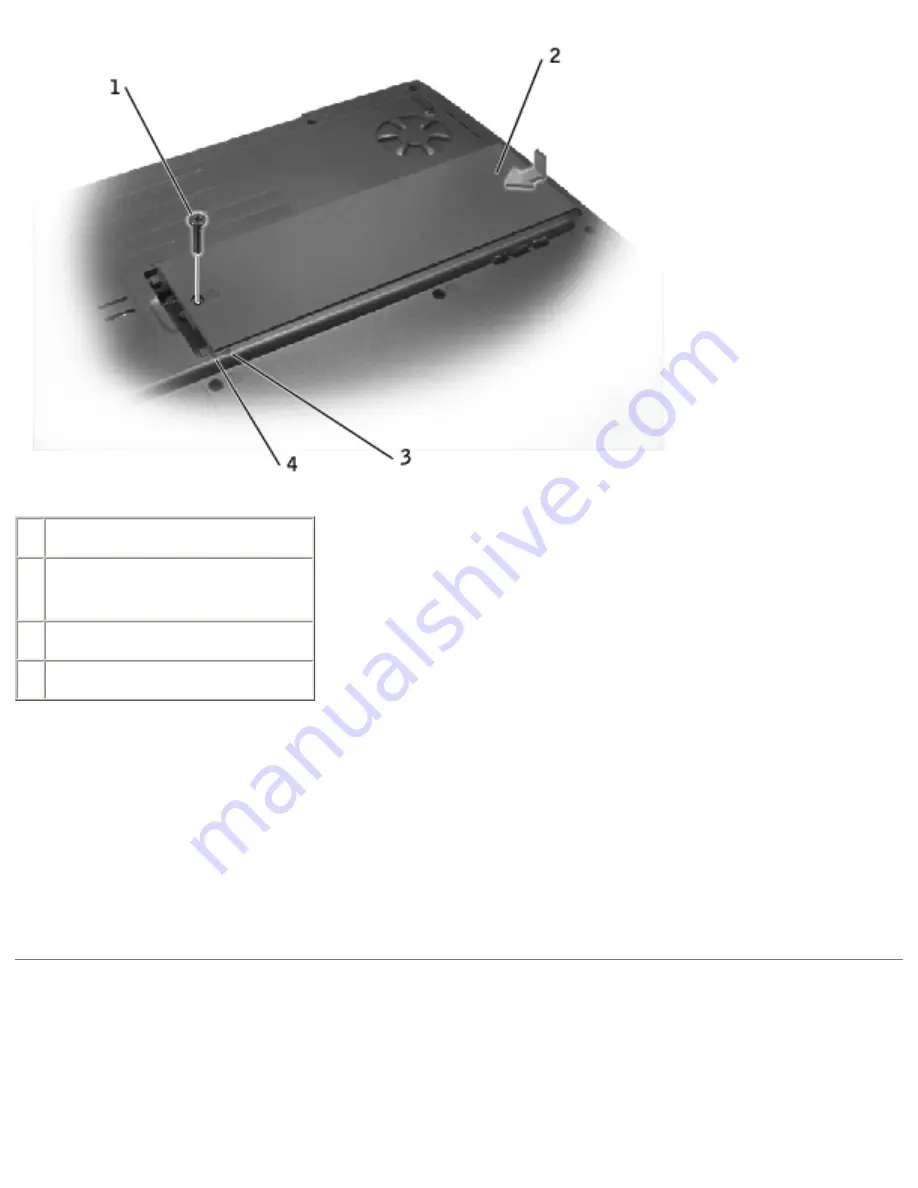
1 M2.5 x 5-mm screw

2 memory module/modem 

cover

3 arrows (2)

4 lines (2)

5.  Insert the battery into the battery bay, or connect the AC adapter to your 

computer and an electrical outlet. 

6.  Turn on the computer. 

As the computer boots, it detects the additional memory and automatically updates 

the system configuration information.

Modem

file:///F|/Service%20Manuals/Dell/Latitude/v710-740/upgrades.htm (5 of 18) [2/28/2004 8:22:11 AM]

Summary of Contents for Latitude V710

Page 1: ...e Memory Module Modem Optical Drive Floppy Drive Keyboard Display Assembly and Display Latch Display Assembly Display Latch EMI Shield Video Board and Palm Rest EMI Shield Video Board Palm Rest Microprocessor Thermal Cooling Assembly Microprocessor Module Flashing the BIOS Speakers System Board Base Plastics Battery Latch Assembly Pin Assignments for I O Connectors USB Connector PS 2 Connector Vid...

Page 2: ...demarks used in this text Dell the DELL logo and Latitude are trademarks of Dell Computer Corporation Intel is a registered trademarks of Intel Corporation Microsoft and Windows are registered trademarks of Microsoft Corporation Other trademarks and trade names may be used in this document to refer to either the entities claiming the marks and names or their products Dell Computer Corporation disc...

Page 3: ...nformation Guide that came with the computer NOTICE To avoid damaging the computer perform the following steps before you begin working inside the computer 1 Ensure that the work surface is flat and clean to prevent scratching the computer cover 2 Save any work in progress and exit all open programs 3 Turn off the computer and all attached devices NOTE Ensure that the computer is off and not in a ...

Page 4: ...damaging the system board you must remove the main battery before you service the computer CAUTION When you remove the battery ensure that the computer is upside down on a flat work surface so that the battery does not fall out of the computer 9 Remove the battery a Unlock the battery b Slide and hold the battery latch release all the way up until the left edge of the battery pops up c Remove the ...

Page 5: ...ents or contacts on a card Hold a card by its edges or by its metal mounting bracket Hold a component such as a microprocessor by its edges not by its pins Recommended Tools The procedures in this manual require the following tools 1 magnetized Phillips screwdriver inch flat blade screwdriver Nut driver Small plastic scribe Microprocessor extractor Flash BIOS update program floppy disk or CD Compu...

Page 6: ...ew Identification When you are removing and replacing components photocopy Screw Identification as a tool to lay out and keep track of the screws The placemat provides the number of screws and their sizes file F Service 20Manuals Dell Latitude v710 740 begin htm 4 of 8 2 28 2004 8 22 07 AM ...

Page 7: ... properly aligned with its corresponding hole and avoid overtightening NOTE All M2 5 x 4 screws are silver and all other screws are black Back Panel Fan 2 each Hard Drive Door 1 each Memory Module Modem Cover 1 each Modem to System Board 2 each Optical Drive 1 each Floppy Drive 2 each file F Service 20Manuals Dell Latitude v710 740 begin htm 5 of 8 2 28 2004 8 22 07 AM ...

Page 8: ...Keyboard to Bottom Case 4 each silver screws Display Assembly to Back Panel 2 each Display Feed Flex Cable to System Board 2 each Hinge Bracket to Bottom Case 4 each Display Bezel 5 each Screw Covers 5 each file F Service 20Manuals Dell Latitude v710 740 begin htm 6 of 8 2 28 2004 8 22 07 AM ...

Page 9: ...le to Display Assembly 1 each Display Latch 2 each EMI Shield 3 each Top of Palm Rest to Bottom Case 2 each Video Board to Bottom Case 1 each Palm Rest to Bottom Case 12 each Floppy Drive Cage to Bottom Case 2 each file F Service 20Manuals Dell Latitude v710 740 begin htm 7 of 8 2 28 2004 8 22 07 AM ...

Page 10: ...e Manual Hard Drive Cage to Bottom Case 2 each System Board to Bottom Case 6 each silver screws Battery Latch Assembly to Bottom Case 1 each Back to Contents Page file F Service 20Manuals Dell Latitude v710 740 begin htm 8 of 8 2 28 2004 8 22 07 AM ...

Page 11: ...hnician should perform repairs on your computer Damage due to servicing that is not authorized by Dell is not covered by your warranty NOTICE Unless otherwise noted each procedure in this document assumes that a part can be replaced by performing the removal procedure in reverse order file F Service 20Manuals Dell Latitude v710 740 system htm 1 of 3 2 28 2004 8 22 08 AM ...

Page 12: ...ive 5 video board 17 speaker 6 microprocessor 18 modem 7 system board 19 microprocessor thermal cooling assembly 8 battery connector cover 20 headphone microphone bridge 9 optical drive 21 palm rest 10 back panel fan V740 only 22 memory module modem cover 11 bottom case 23 EMI shield 12 battery Back to Contents Page file F Service 20Manuals Dell Latitude v710 740 system htm 2 of 3 2 28 2004 8 22 0...

Page 13: ...System Components Dell Latitude V710 V740 Service Manual file F Service 20Manuals Dell Latitude v710 740 system htm 3 of 3 2 28 2004 8 22 08 AM ...

Page 14: ...e that the work surface is flat and clean to prevent scratching the computer cover 2 Save and close any open files exit any open programs and shut down the computer NOTICE Disconnect the computer and any attached devices from electrical outlets and remove any installed batteries NOTICE To avoid ESD ground yourself by using a wrist grounding strap or by touching an unpainted metal surface on the co...

Page 15: ... screwdriver or plastic scribe to lift the scalloped left edge of the fan cover and pry the cover loose from the bottom case 5 Lift the fan cover up and away from the bottom case 6 Disconnect the fan cable connector from the system board 7 Lift the fan out of the bottom case file F Service 20Manuals Dell Latitude v710 740 fan htm 2 of 4 2 28 2004 8 22 09 AM ...

Page 16: ...l 1 fan 2 fan cable connector Replacing the Back Panel Fan 1 Slide the fan into the bottom case 2 Tuck the fan cable under the bottom case and connect the cable to the system board file F Service 20Manuals Dell Latitude v710 740 fan htm 3 of 4 2 28 2004 8 22 09 AM ...

Page 17: ... V740 Service Manual 1 fan cable 3 Replace the fan cover and reinstall the two M2 5 x 5 mm screws that secure the cover to the bottom case Back to Contents Page file F Service 20Manuals Dell Latitude v710 740 fan htm 4 of 4 2 28 2004 8 22 09 AM ...

Page 18: ...d Preparing to Work Inside the Computer before performing the following procedure 1 Ensure that the work surface is flat and clean to prevent scratching the computer cover 2 Save and close any open files exit any open programs and shut down the computer NOTICE Disconnect the computer and any attached devices from electrical outlets and remove any installed batteries NOTICE To avoid ESD ground your...

Page 19: ...computer 2 M2 5 x 5 mm screw 3 hard drive door 4 Lift the hard drive door to release it and slide the hard drive out of the computer Replacing the Hard Drive 1 Remove the new drive from its packaging Save the original packaging to use when storing or shipping the hard drive file F Service 20Manuals Dell Latitude v710 740 hdd htm 2 of 3 2 28 2004 8 22 09 AM ...

Page 20: ...rive into the bay and press down on the hard drive door until it is fully seated 3 Replace and tighten the M2 5 x 5 mm screw in the hard drive door 4 Use the Operating System CD to install the operating system for your computer 5 Use the Drivers and Utilities CD to install the drivers and utilities for your computer Back to Contents Page file F Service 20Manuals Dell Latitude v710 740 hdd htm 3 of...

Page 21: ...oard under the EMI shield To replace the memory module under the EMI shield perform the procedure for removing the EMI shield Then replace the memory module NOTICE Disconnect the computer and any attached devices from electrical outlets and remove any installed batteries NOTICE To avoid ESD ground yourself by using a wrist grounding strap or by touching an unpainted metal surface on the computer N...

Page 22: ...nnector do not use tools to spread the inner metal tabs that secure the memory module 2 If you are replacing a memory module remove the existing module NOTICE Handle memory modules by their edges and do not touch the components on a module a Use your fingertips to carefully spread apart the securing clips on each end of the memory module connector The module should pop up file F Service 20Manuals ...

Page 23: ...self and install the new memory module a Align the notch in the module with the slot in the center of the connector b Slide the edge of the module firmly into the connector and rotate the module down until you hear a click If you do not hear the click remove the module and reinstall it file F Service 20Manuals Dell Latitude v710 740 upgrades htm 3 of 18 2 28 2004 8 22 11 AM ...

Page 24: ...is lined up with the lines and arrows on the bottom of the computer b Press down on the center of the memory module modem cover and slide the cover until it is secured c Replace and tighten the M2 5 x 5 mm screw NOTICE If the memory module modem cover is difficult to close remove the module and reinstall it Forcing the cover to close may damage your computer file F Service 20Manuals Dell Latitude ...

Page 25: ...ines 2 5 Insert the battery into the battery bay or connect the AC adapter to your computer and an electrical outlet 6 Turn on the computer As the computer boots it detects the additional memory and automatically updates the system configuration information Modem file F Service 20Manuals Dell Latitude v710 740 upgrades htm 5 of 18 2 28 2004 8 22 11 AM ...

Page 26: ...o avoid ESD ground yourself by using a wrist grounding strap or by touching an unpainted metal surface on the computer NOTICE Read Preparing to Work Inside the Computer before performing the following procedure 1 Turn the computer over and remove the memory module modem cover a Remove the M2 5 x 5 mm screw from the memory module modem cover b Slide the cover out approximately 10 mm and lift it awa...

Page 27: ...e the two M2 x 3 mm screws that secure the modem to the system board and set them aside b Pull the modem straight up by the pull tab to lift the modem out of its connector and disconnect the modem cable 1 M2 x 3 mm screws 2 2 pull tab 3 modem cable connector 4 modem cable 3 Connect the modem cable to the new modem file F Service 20Manuals Dell Latitude v710 740 upgrades htm 7 of 18 2 28 2004 8 22 ...

Page 28: ...over the memory module modem compartment so that the end of the cover with the screw hole is lined up with the lines and arrows on the bottom of the computer b Press down on the center of the memory module modem cover and slide the cover until it is secured c Replace and tighten the M2 5 x 5 mm screw NOTICE Replace the memory module modem cover so that it is seated properly around the edges and do...

Page 29: ... Optical Drive Removing an Installed Optical Drive NOTICE To avoid ESD ground yourself by using a wrist grounding strap or by touching an unpainted metal surface on the computer NOTICE Read Preparing to Work Inside the Computer before performing the following procedure file F Service 20Manuals Dell Latitude v710 740 upgrades htm 9 of 18 2 28 2004 8 22 11 AM ...

Page 30: ...move the memory module modem cover a Remove the M2 5 x 5 mm screw from the memory module modem cover b Slide the cover out approximately 10 mm and lift it away from the computer 1 M2 5 x 5 mm screw 2 memory module modem cover 3 Remove the M2 5 x 8 mm screw from the optical drive 4 Press the optical drive release button and pull the optical drive out of the computer file F Service 20Manuals Dell La...

Page 31: ... 8 mm screw 2 optical drive release button 3 optical drive Installing an Optical Drive 1 Slide the optical drive into the bay until the optical drive is fully seated 2 Replace and tighten the M2 5 x 8 mm screw file F Service 20Manuals Dell Latitude v710 740 upgrades htm 11 of 18 2 28 2004 8 22 11 AM ...

Page 32: ...properly seated can damage your computer 3 Replace the memory module modem cover and screw a Place the memory module modem cover over the memory module compartment so that the end of the cover with the screw hole is lined up with the lines and arrows on the bottom of the computer b Press down on the center of the memory module modem cover and slide the memory module modem cover until it is secured...

Page 33: ... Installed Floppy Drive NOTICE To avoid ESD ground yourself by using a wrist grounding strap or by touching an unpainted metal surface on the computer NOTICE Read Preparing to Work Inside the Computer before performing the following procedure 1 If a disk is in the floppy drive remove the disk file F Service 20Manuals Dell Latitude v710 740 upgrades htm 13 of 18 2 28 2004 8 22 12 AM ...

Page 34: ...re that you disconnect the flex cable from the ZIF connector before you remove the floppy drive from the computer See step 3 for further instructions 2 Remove the two M2 5 x 5 mm screws from the floppy drive and partially pull the drive out of the computer 1 M2 5 x 5 mm screws 2 2 ZIF connector 3 floppy drive 4 flex cable file F Service 20Manuals Dell Latitude v710 740 upgrades htm 14 of 18 2 28 2...

Page 35: ...so can damage the ZIF connector 3 Disconnect the flex cable from the ZIF connector a Pull the securing tab away from the ZIF connector b Gently pull the flex cable out of the ZIF connector 1 ZIF connector 2 securing tab 3 flex cable Installing a Floppy Drive 1 Slide the floppy drive partially into the bay file F Service 20Manuals Dell Latitude v710 740 upgrades htm 15 of 18 2 28 2004 8 22 12 AM ...

Page 36: ...able to the ZIF connector a Pull and hold the securing tab away from the ZIF connector b While holding the securing tab insert the flex cable into the ZIF connector Ensure that you insert the flex cable into the ZIF connector and not below the ZIF connector c Hold the flex cable in place and push the securing tab toward the ZIF connector file F Service 20Manuals Dell Latitude v710 740 upgrades htm...

Page 37: ...ully seated 4 Replace and tighten the two M2 5 x 5 mm screws 5 Install the battery 6 Turn on the computer and try using the floppy drive If the computer does not detect the floppy drive you may have improperly inserted the flex cable If so disconnect the flex cable and reconnect it to the ZIF connector file F Service 20Manuals Dell Latitude v710 740 upgrades htm 17 of 18 2 28 2004 8 22 12 AM ...

Page 38: ...Memory Module Modem Optical Drive and Floppy Drive Dell Latitude V710 V740 Service Manual Back to Contents Page file F Service 20Manuals Dell Latitude v710 740 upgrades htm 18 of 18 2 28 2004 8 22 12 AM ...

Page 39: ...ve any installed batteries NOTICE To avoid ESD ground yourself by using a wrist grounding strap or by touching an unpainted metal surface on the computer NOTICE Read Preparing to Work Inside the Computer before performing the following procedure 1 Remove the center control cover a Remove the two M2 5 x 5 mm screws in the back of the hinges file F Service 20Manuals Dell Latitude v710 740 keyboard h...

Page 40: ...c Use a small flat blade screwdriver or plastic scribe to lift the scalloped right edge of the center control cover and pry the cover loose from the hinges and bottom case d Lift the center control cover up and away from the hinges and bottom case 1 scalloped edge of center control cover 2 center control cover 3 display assembly file F Service 20Manuals Dell Latitude v710 740 keyboard htm 2 of 6 2...

Page 41: ...st NOTICE The keycaps on the keyboard are fragile easily dislodged and time consuming to replace Be careful when removing and handling the keyboard 3 Lift the keyboard straight up until it clears the top of the bottom case 4 Rotate the keyboard forward toward the front of the computer 5 Rest the key face of the keyboard on the palm rest file F Service 20Manuals Dell Latitude v710 740 keyboard htm ...

Page 42: ...rd connector to disconnect it from the interface connector on the system board 1 keyboard securing tabs 4 2 keyboard flex cable 3 keyboard connector 4 interface connector on system board 7 Remove the keyboard from the bottom case file F Service 20Manuals Dell Latitude v710 740 keyboard htm 4 of 6 2 28 2004 8 22 13 AM ...

Page 43: ...connector to the interface connector on the system board NOTICE Position the keyboard flex cable so that it is not pinched when you replace the keyboard in the bottom case 3 Rotate the keyboard back and fit it into the bottom case Ensure that all four securing tabs are engaged in their respective slots before trying to completely seat the keyboard Fitting the tabs to the slots may be easiest when ...

Page 44: ...e top of the keyboard 6 Replace the center control cover Ensure that the center control cover is snapped in properly so that it is flush with the keyboard 7 Replace the two M2 5 x 5 mm screws in the back of the hinges Back to Contents Page file F Service 20Manuals Dell Latitude v710 740 keyboard htm 6 of 6 2 28 2004 8 22 13 AM ...

Page 45: ...mbly before you remove the palm rest NOTICE Disconnect the computer and any attached devices from electrical outlets and remove any installed batteries NOTICE To avoid ESD ground yourself by using a wrist grounding strap or by touching an unpainted metal surface on the computer NOTICE Read Preparing to Work Inside the Computer before performing the following procedure file F Service 20Manuals Dell...

Page 46: ...s and support the display assembly so that it does not open past this position 5 Remove the two M2 5 x 5 mm screws that secure the display feed flex cable to the system board NOTICE When reconnecting the display feed flex cable connector to the system board push down on the top left and right ends of the connector Pressing on the center of the connector may damage resistors and compromise EMI prot...

Page 47: ... mm screws 2 4 display feed flex cable 5 pull tab 6 Pull up on the pull tab that is attached to the display feed flex cable connector to remove the connector from the system board 7 Remove the two M2 5 x 5 mm screws from each hinge block file F Service 20Manuals Dell Latitude v710 740 display htm 3 of 10 2 28 2004 8 22 14 AM ...

Page 48: ...ssembly and Display Latch Dell Latitude V710 V740 Service Manual 8 Lift the display assembly up and out of the bottom case file F Service 20Manuals Dell Latitude v710 740 display htm 4 of 10 2 28 2004 8 22 14 AM ...

Page 49: ...the Computer before performing the following procedure 1 Remove the keyboard 2 Remove the display assembly 3 Use a plastic scribe to pry the five screw covers out of the screw holes located on the front of the bezel 4 Remove the five M2 5 x 5 mm screws located on the front of the bezel NOTICE Carefully separate the bezel from the top cover to avoid damage to the bezel 5 Starting at the bottom of t...

Page 50: ...y bezel 4 Remove the two M2 x 3 mm screws on the left side of the display panel 5 Remove the two M2 x 3 mm screws on the right side of the display panel 6 Remove the M2 5 x 5 mm screw that secures the display feed flex cable to the display assembly 7 Unsnap the flex cable retention bracket from the top cover and lift the bracket out of the display assembly 1 flex cable retention bracket 8 Lift the...

Page 51: ...r from the inverter connector on the system board by pulling on the attached pull tab away from the inverter connector 1 top flex cable connector 2 display panel connector 3 pull tab 4 pull tab 5 inverter connector on system board file F Service 20Manuals Dell Latitude v710 740 display htm 7 of 10 2 28 2004 8 22 14 AM ...

Page 52: ...middle of the display feed flex cable to the display panel 4 Place the bottom edge of the display panel in the bottom of the top cover and elevate the top of the panel with your hand 5 Lay the display panel in the top cover 6 Reinstall the four M2 x 3 mm screws that secure the display panel to the top cover 7 Reinstall the M2 5 x 5 mm screw that secures the display feed flex cable to the display a...

Page 53: ...M2 5 x 5 mm screws 2 4 display latch 5 bracket 6 spring hook top cover Replacing the Display Latch 1 Attach one end of the spring to the spring hook on the left edge of the display latch and attach the other end of the spring to the spring hook in the top cover 2 Place the display latch on top of its screw holes and then place the bracket on top of the display latch aligning the bracket and displa...

Page 54: ...Latitude V710 V740 Service Manual 3 Replace the two M2 5 x 5 mm screws that secure the display latch and bracket to the top cover Back to Contents Page file F Service 20Manuals Dell Latitude v710 740 display htm 10 of 10 2 28 2004 8 22 14 AM ...

Page 55: ...llowing procedure 1 Remove the keyboard 2 Remove the two M2 5 x 5 mm screws that secure the display feed flex cable to the system board NOTICE When reconnecting the display feed flex cable connector to the system board push down on the top left and right ends of the connector Pressing on the center of the connector may damage resistors and compromise EMI protection in the computer 3 Pull up on the...

Page 56: ...y installed batteries NOTICE To avoid ESD ground yourself by using a wrist grounding strap or by touching an unpainted metal surface on the computer NOTICE Read Preparing to Work Inside the Computer before performing the following procedure 1 Remove the keyboard 2 Remove the EMI Shield 3 Remove the screw that secures the video board to the system board file F Service 20Manuals Dell Latitude v710 7...

Page 57: ... video board out of the bottom case For V710 pull the video board by the edges toward the front of the computer For V740 pull the video board by the pull tab toward the front of the computer V710 Video Board 1 M2 5 x 5 mm screw 1 2 V710 video board V740 Video Board file F Service 20Manuals Dell Latitude v710 740 palmrest htm 3 of 12 2 28 2004 8 22 16 AM ...

Page 58: ...x 8 mm screw 1 3 pull tab Replacing the Video Board 1 Align the top right corner of the video board with the guide on the system board and slide the top edge of the video board under the palm rest V710 Video Board file F Service 20Manuals Dell Latitude v710 740 palmrest htm 4 of 12 2 28 2004 8 22 16 AM ...

Page 59: ...est Dell Latitude V710 V740 Service Manual 1 M2 5 x 5 mm screw 1 2 palm rest 3 top right corner of the V710 video board 4 guide V740 Video Board file F Service 20Manuals Dell Latitude v710 740 palmrest htm 5 of 12 2 28 2004 8 22 16 AM ...

Page 60: ...nly before you connect the video board to the system board ensure that you route the power board flex cable under the memory module 2 Lay the video board flat on the system board and connect the video board connector to the interface connector on the system board V710 Video Board Connector file F Service 20Manuals Dell Latitude v710 740 palmrest htm 6 of 12 2 28 2004 8 22 16 AM ...

Page 61: ...ard connector 3 system board 4 interface connector NOTICE For V740 only before you connect the video board to the system board ensure that you route the power board flex cable under the memory module V740 Video Board Connector file F Service 20Manuals Dell Latitude v710 740 palmrest htm 7 of 12 2 28 2004 8 22 16 AM ...

Page 62: ...m board 4 interface connector 5 power board flex cable 6 memory module 3 Reinstall the screw that secures the video board to the bottom case For V710 reinstall the M2 5 x 5 mm screw For V740 reinstall the M2 5 x 8 mm screw 4 Replace the EMI Shield file F Service 20Manuals Dell Latitude v710 740 palmrest htm 8 of 12 2 28 2004 8 22 16 AM ...

Page 63: ...nted metal surface on the computer NOTICE Read Preparing to Work Inside the Computer before performing the following procedure 1 Remove the keyboard NOTICE You must remove the display assembly before you remove the palm rest the display hinges pass through the back of the palm rest 2 Remove the display assembly 3 Remove the EMI Shield 4 Remove the video board 5 Remove the two M2 5 x 5 mm screws fr...

Page 64: ...ude V710 V740 Service Manual 1 M2 5 x 5 mm screws 2 2 top of the palm rest 6 Turn the computer over and remove the twelve M2 5 x 8 mm screws labeled circle P file F Service 20Manuals Dell Latitude v710 740 palmrest htm 10 of 12 2 28 2004 8 22 16 AM ...

Page 65: ... V710 V740 Service Manual 1 M2 5 x 8 mm screws 12 7 Turn the computer over and disconnect the touch pad connector and power board connector from the system board file F Service 20Manuals Dell Latitude v710 740 palmrest htm 11 of 12 2 28 2004 8 22 16 AM ...

Page 66: ...separate the palm rest from the bottom case to avoid damage to the palm rest 8 Starting at the back center of the palm rest use your fingers to separate the palm rest from the bottom case by lifting the inside of the palm rest while pushing in on the outside Back to Contents Page file F Service 20Manuals Dell Latitude v710 740 palmrest htm 12 of 12 2 28 2004 8 22 16 AM ...

Page 67: ...wrist grounding strap or by touching an unpainted metal surface on the computer NOTICE Read Preparing to Work Inside the Computer before performing the following procedure 1 Remove the keyboard 2 Remove the EMI Shield NOTE You can remove the microprocessor thermal cooling assembly with the fan attached 3 Disconnect the fan power cable from the system board 4 Loosen in consecutive order the four ca...

Page 68: ...the front of the computer and out of the system board Replacing the Microprocessor Thermal Cooling Assembly 1 Place the back of the microprocessor thermal cooling assembly under the palm rest and lower the assembly onto the system board 2 Tighten the four captive screws labeled 1 through 4 in consecutive order Back to Contents Page file F Service 20Manuals Dell Latitude v710 740 thermal htm 2 of 3...

Page 69: ...Microprocessor Thermal Cooling Assembly Dell Latitude V710 V740 Service Manual file F Service 20Manuals Dell Latitude v710 740 thermal htm 3 of 3 2 28 2004 8 22 16 AM ...

Page 70: ... unpainted metal surface on the computer NOTICE Read Preparing to Work Inside the Computer before performing the following procedure NOTICE Do not touch the processor die Press and hold the microprocessor down on the substrate on which the die is mounted while turning the cam screw to prevent intermittent contact between the cam screw and microprocessor NOTICE To avoid damage to the microprocessor...

Page 71: ...ual 1 screwdriver perpendicular to microprocessor 2 pin 1 corner 3 processor die do not touch 4 ZIF socket 5 ZIF socket cam screw 1 Remove the keyboard 2 Remove the EMI Shield file F Service 20Manuals Dell Latitude v710 740 cpu htm 2 of 4 2 28 2004 8 22 17 AM ...

Page 72: ... 5 Use a microprocessor extraction tool to remove the microprocessor module Replacing the Microprocessor Module NOTICE Ensure that the cam lock is in the fully open position before seating the microprocessor module Seating the microprocessor module properly in the ZIF socket does not require force NOTICE A microprocessor module that is not properly seated can result in an intermittent connection o...

Page 73: ...microprocessor down while turning the cam screw to prevent intermittent contact between the cam screw and microprocessor 2 Tighten the ZIF socket by turning the cam screw clockwise to secure the microprocessor module to the system board 3 Update the BIOS using a flash BIOS update program floppy disk or CD For instructions on how to flash the BIOS see Flashing the BIOS Back to Contents Page file F ...

Page 74: ...creen The computer continues to boot and updates the new BIOS When the flash update is complete the computer will automatically reboot 3 Press during POST to enter the system setup program 4 Press to reset the computer defaults 5 Press to save configuration changes and exit the system setup program 6 Remove the flash BIOS update program floppy disk or CD from the drive and restart the computer Bac...

Page 75: ...urself by using a wrist grounding strap or by touching an unpainted metal surface on the computer NOTICE Read Preparing to Work Inside the Computer before performing the following procedure The speakers are located on the left and right corners of the front of the bottom case Take note of the speaker cable routing so that you can replace the cables properly under or between their routing clips fil...

Page 76: ... die casting 4 right speaker 10 left speaker 5 right speaker cable 11 floppy drive cage 6 right die casting 1 Remove the hard drive 2 Remove the floppy drive 3 Remove the keyboard 4 Remove the display assembly 5 Remove the EMI Shield 6 Remove the video board file F Service 20Manuals Dell Latitude v710 740 speakers htm 2 of 4 2 28 2004 8 22 18 AM ...

Page 77: ...ith care to avoid damaging the cables 9 Remove the speaker cables from under or between their routing clips and die casting NOTICE Handle the speakers with care to avoid damaging them 10 Remove the speakers by pulling them straight up and out of the bottom case 1 left speaker 2 right speaker Replacing the Speakers file F Service 20Manuals Dell Latitude v710 740 speakers htm 3 of 4 2 28 2004 8 22 1...

Page 78: ...eaker cables are under or between their routing clips and route the left and right speaker cables properly beneath the die casting NOTICE Route the speaker cables with care to avoid damaging them 2 Route the speaker cables under or between their routing clips and die casting 3 Connect the speaker connector to the system board Back to Contents Page file F Service 20Manuals Dell Latitude v710 740 sp...

Page 79: ... includes a CD that provides a utility for transferring the service tag sequence to the replacement system board NOTICE Disconnect the computer and any attached devices from electrical outlets and remove any installed batteries NOTICE To avoid ESD ground yourself by using a wrist grounding strap or by touching an unpainted metal surface on the computer NOTICE Read Preparing to Work Inside the Comp...

Page 80: ...ews 2 3 hard drive cage 4 M2 5 x 5 mm screws 2 14 Remove the two M2 5 x 5 mm screws that secure the floppy drive cage to the system board and lift the floppy drive cage out of the bottom case 15 Remove the two M2 5 x 5 mm screws that secure the hard drive cage to the system board and lift the hard drive cage out of the bottom case file F Service 20Manuals Dell Latitude v710 740 sysboard htm 2 of 8...

Page 81: ...eadphone microphone bridge 16 Remove the battery connector cover by lifting the cover out of the bottom case 17 Remove the headphone microphone bridge by lifting the cover out of the bottom case file F Service 20Manuals Dell Latitude v710 740 sysboard htm 3 of 8 2 28 2004 8 22 19 AM ...

Page 82: ...l 1 M2 5 x 4 mm screws 6 NOTE The M2 5 x 4 screws are silver 18 Remove the six M2 5 x 4 mm screws labeled circle L that secure the system board to the bottom case file F Service 20Manuals Dell Latitude v710 740 sysboard htm 4 of 8 2 28 2004 8 22 19 AM ...

Page 83: ... and away from the bottom case Replacing the System Board NOTICE For V740 only prior to replacing the system board ensure that a thermal pad is present on the Memory Controller Hub MCH heat sink located on the base plastics If a thermal pad is already present you do not need to replace it 1 Install the replacement system board a Insert the video connector through the back of the bottom case b Pull...

Page 84: ...ideo connector to the bottom case NOTICE Secure the modem cable grounding terminal to the system board with one of the six M2 5 x 4 mm screws labeled circle L Failure to do so may result in damage to the computer NOTE The M2 5 x 4 screws are silver f Reinstall the six M2 5 x 4 mm screws labeled circle L starting on the right side of the bottom case 1 modem cable grounding terminal 2 M2 5 x 4 mm sc...

Page 85: ...rd 6 Replace the display assembly and the keyboard 7 Replace the floppy drive optical drive modem memory module and hard drive 8 If applicable replace the PC Card in the PC Card slot 9 Replace the battery 10 Connect the AC adapter to your computer and to an electrical outlet NOTICE Before turning on the computer replace all screws and ensure that no stray screws remain inside the computer Failure ...

Page 86: ...System Board Dell Latitude V710 V740 Service Manual file F Service 20Manuals Dell Latitude v710 740 sysboard htm 8 of 8 2 28 2004 8 22 19 AM ...

Page 87: ...ching an unpainted metal surface on the computer NOTICE Read Preparing to Work Inside the Computer before performing the following procedure 1 Remove the hard drive 2 Remove the optical drive 3 Remove the floppy drive 4 Remove the modem 5 Remove the keyboard 6 Remove the display assembly 7 Remove the EMI Shield 8 Remove the video board 9 Remove the palm rest 10 Remove the microprocessor thermal co...

Page 88: ...at sink If a thermal pad is already present you do not need to replace it Replacing the Thermal Pad V740 Only Attach a new thermal pad inside the square etching on the MCH heat sink located on the inside of the base plastics 1 thermal pad 2 square etching on MCH heat sink 3 MCH Back to Contents Page file F Service 20Manuals Dell Latitude v710 740 base htm 2 of 3 2 28 2004 8 22 20 AM ...

Page 89: ...Base Plastics Dell Latitude V710 V740 Service Manual file F Service 20Manuals Dell Latitude v710 740 base htm 3 of 3 2 28 2004 8 22 20 AM ...

Page 90: ...ap or by touching an unpainted metal surface on the computer NOTICE Read Preparing to Work Inside the Computer before performing the following procedure 1 Remove the hard drive 2 Remove the optical drive 3 Remove the floppy drive 4 Remove the modem 5 Remove the keyboard 6 Remove the display assembly 7 Remove the EMI Shield 8 Remove the video board 9 Remove the palm rest 10 Remove the microprocesso...

Page 91: ...bottom case 5 latch spring 6 latch spring connector Replacing the Battery Latch Assembly 1 Attach the latch spring to the latch spring connector in the bottom case 2 Insert the latch plate in the bottom case 3 Install the new latch button from behind the bottom case ensuring that the latch button and latch plate screw holes are properly aligned file F Service 20Manuals Dell Latitude v710 740 batla...

Page 92: ...plate and spring while replacing the latch button 4 Replace and tighten the M2 x 4 mm screw that secures the latch button to the bottom case Ensure that the newly installed latch moves smoothly and freely when pushed and released Back to Contents Page file F Service 20Manuals Dell Latitude v710 740 batlatch htm 3 of 3 2 28 2004 8 22 21 AM ...

Page 93: ...ents Page Pin Assignments for I O Connectors Dell Latitude V710 V740 Service Manual USB Connector PS 2 Connector Video Connector Parallel Connector USB Connector Pin Signal 1 USB5V 2 USBP 3 USBP 4 GND file F Service 20Manuals Dell Latitude v710 740 pinouts htm 1 of 4 2 28 2004 8 22 21 AM ...

Page 94: ...onnectors Dell Latitude V710 V740 Service Manual PS 2 Connector Pin Signal 1 KBDATA 2 PS2DATA 3 GND 4 VCC 5 KBCLK 6 PS2CLK Video Connector file F Service 20Manuals Dell Latitude v710 740 pinouts htm 2 of 4 2 28 2004 8 22 21 AM ...

Page 95: ...ice Manual Pin Signal Pin Signal 1 CRT_R 9 5V 2 CRT_G 10 GND 3 CRT_B 11 MONITOR_DETECT 4 NC 12 DDC_DATA 5 GND 13 CRT_HS 6 GND 14 CRT_VS 7 GND 15 DDC_CLK 8 GND Parallel Connector file F Service 20Manuals Dell Latitude v710 740 pinouts htm 3 of 4 2 28 2004 8 22 21 AM ...

Page 96: ...Manual Pin Signal Pin Signal 1 STROBE 10 ACK 2 PD0 11 BUSY 3 PD1 12 PE 4 PD2 13 SLCT 5 PD3 14 AFD 3M 6 PD4 15 ERROR 7 PD5 16 INIT 8 PD6 17 SLIN 9 PD7 18 25 GND Back to Contents Page file F Service 20Manuals Dell Latitude v710 740 pinouts htm 4 of 4 2 28 2004 8 22 21 AM ...

Reviews: