Pași
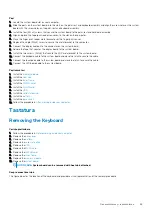
1. Place the display assembly on a clean and flat surface.
2. Align and place the palm-rest and keyboard assembly on the display assembly.
3. Using the alignment posts, close the display hinges.
4. Connect the display cable to the system board and adhere the tape to secure the display cable.
5. Place the EDP metal bracket on the display cable connector.
6. Replace the two (M2x3) screw to secure the EDP metal bracket to the system board.
7. Connect the touchscreen cable to the connector on the system board.
8. Replace the six (M2.5x4) screws that secure the display hinge to the chassis of the computer.
9. Route the WWAN cable and the WLAN cable through the retention clips provided.
Pașii următori
1. Install the
.
2. Install the
.
3. Install the
.
4. Install the
.
5. Follow the procedure in
After working inside your computer
.
Cadrul afişajului
Removing the display bezel
Cerințe preliminare
1. Follow the procedure in
Before working inside your computer
.
2. Remove the
3. Remove the
.
4. Remove the
5. Remove the
6. Remove the
.
Despre această sarcină
The figure indicates the location of the display bezel and provides a visual representation of the removal procedure.
82
Dezasamblarea și reasamblarea
Summary of Contents for Latitude 5501
Page 1: ...Dell Latitude 5501 Service Manual Reglementare de Model P80G Reglementare de Tip P80F003 ...
Page 22: ...22 Dezasamblarea și reasamblarea ...
Page 24: ...24 Dezasamblarea și reasamblarea ...
Page 59: ...Dezasamblarea și reasamblarea 59 ...
Page 63: ...Dezasamblarea și reasamblarea 63 ...
Page 66: ...66 Dezasamblarea și reasamblarea ...
Page 68: ...68 Dezasamblarea și reasamblarea ...
Page 77: ...Dezasamblarea și reasamblarea 77 ...
Page 78: ...78 Dezasamblarea și reasamblarea ...
Page 80: ...80 Dezasamblarea și reasamblarea ...
Page 81: ...Dezasamblarea și reasamblarea 81 ...
Page 88: ...88 Dezasamblarea și reasamblarea ...
Page 90: ...90 Dezasamblarea și reasamblarea ...

