background image

Steps

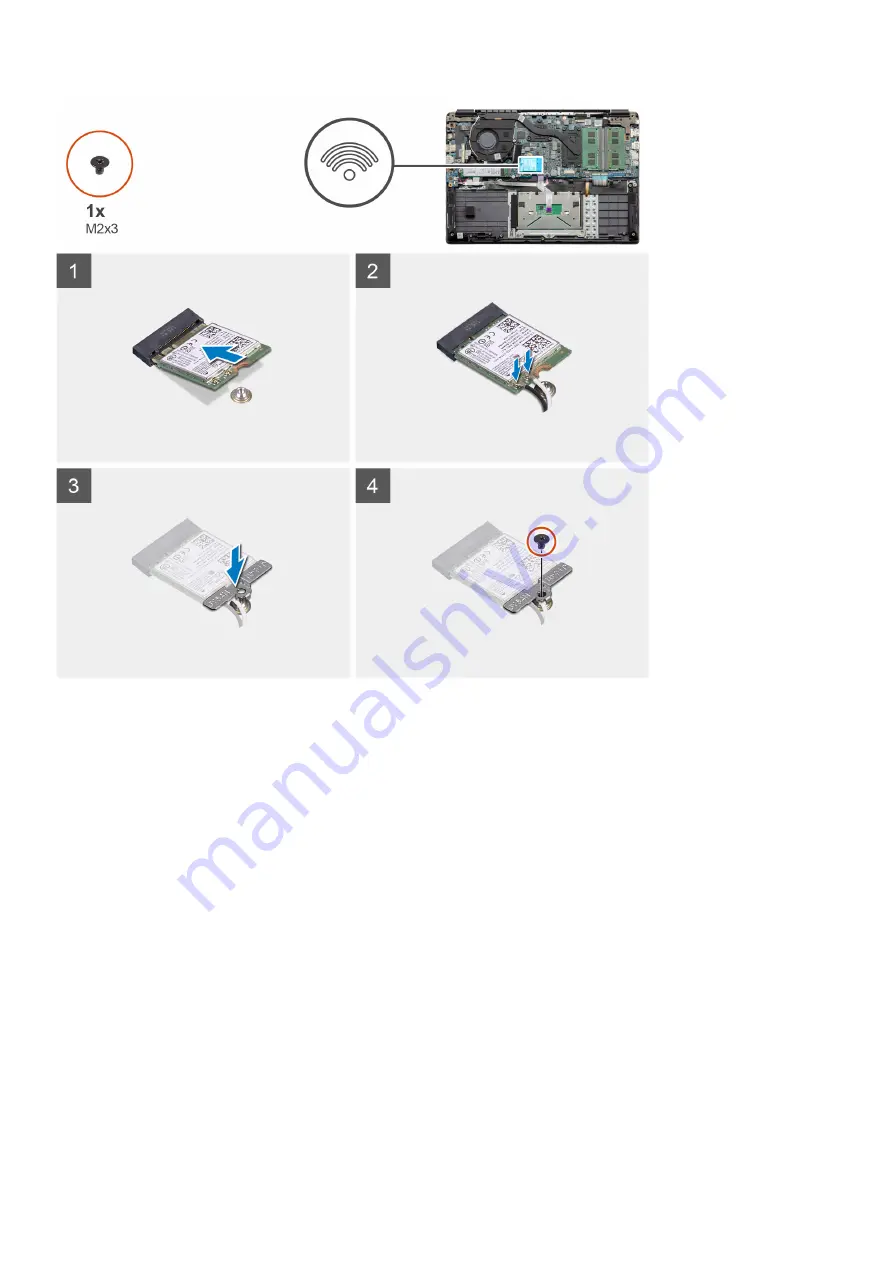
1. Align the notch on the WLAN card with the tab on the WLAN-card slot and insert the WLAN card at an angle into the

WLAN-card slot.

2. Connect the WLAN antenna cables to the WLAN card.
3. Align and place the WLAN-card bracket to secure the WLAN card to the system board.
4. Replace the single (M2x3) screw to secure the WLAN card to the system board.

Next steps

1. Reconnect the 

battery cable

.

2. Install the 

base cover

.

3. Install the 

SD Card

4. Follow the procedure in 

After working inside your computer

.

Coin-cell battery

Removing the coin-cell battery

Prerequisites

1. Follow the procedure in 

Before working inside your computer

.

2. Remove the 

SD card

.

28

Disassembly and reassembly

Summary of Contents for Latitude 3410

Page 1: ...Latitude 3410 Service Manual 1 Regulatory Model P129G Regulatory Type P129G001 P129G002 December 2020 Rev A02 ...

Page 2: ...ential damage to hardware or loss of data and tells you how to avoid the problem WARNING A WARNING indicates a potential for property damage personal injury or death 2020 Dell Inc or its subsidiaries All rights reserved Dell EMC and other trademarks are trademarks of Dell Inc or its subsidiaries Other trademarks may be trademarks of their respective owners ...

Page 3: ...ential damage to hardware or loss of data and tells you how to avoid the problem WARNING A WARNING indicates a potential for property damage personal injury or death 2020 Dell Inc or its subsidiaries All rights reserved Dell EMC and other trademarks are trademarks of Dell Inc or its subsidiaries Other trademarks may be trademarks of their respective owners ...

Page 4: ...alling the base cover 18 Battery 20 Lithium ion battery precautions 20 Disconnecting the battery cable 20 Reconnecting the battery cable 21 Removing the battery 22 Installing the battery 23 Memory modules 24 Removing the memory module 24 Installing the memory modules 25 WLAN card 26 Removing the WLAN card 26 Installing the WLAN card 27 Coin cell battery 28 Removing the coin cell battery 28 Install...

Page 5: ...lling the IO Board 60 Power button 61 Removing the Power Button 61 Installing the Power Button 62 Display assembly 63 Removing the Display Assembly 63 Installing the Display Assembly 66 Display bezel 68 Removing display bezel 68 Installing the display bezel 70 Display panel 71 Removing display panel 71 Installing display panel 72 Camera 73 Removing camera 73 Installing camera 74 Display eDP cable ...

Page 6: ...ate Recovery 95 System Management 96 Keyboard 97 Pre boot Behavior 98 Virtualization 99 Performance 99 System Logs 100 Updating the BIOS in Windows 100 Updating BIOS on systems with BitLocker enabled 101 Updating your system BIOS using a USB flash drive 101 System and setup password 102 Assigning a system setup password 102 Deleting or changing an existing system setup password 103 Chapter 7 Getti...

Page 7: ...4 Heatsink 5 Memory Modules 6 Speakers 7 System Board 8 Touchpad 9 Palmrest Assembly 10 Display Assembly 11 Power Button Module 12 Coin cell Battery 13 IO Board 14 Fan Assembly 15 WLAN Card 16 Solid state Drive 17 Hard Drive Assembly 1 Major components of your system 7 ...

Page 8: ... their part numbers for the original system configuration purchased These parts are available according to warranty coverages purchased by the customer Contact your Dell sales representative for purchase options 8 Major components of your system ...

Page 9: ...by Dell is not covered by your warranty Read and follow the safety instructions that came with the product CAUTION To avoid electrostatic discharge ground yourself by using a wrist grounding strap or by periodically touching an unpainted metal surface at the same time as touching a connector on the back of the computer CAUTION Handle components and cards with care Do not touch the components or co...

Page 10: ...the use of a field service electrostatic discharge ESD kit When connecting a bonding wire ensure that it is connected to bare metal and never to a painted or non metal surface The wrist strap should be secure and in full contact with your skin and ensure that you remove all jewelry such as watches bracelets or rings prior to bonding yourself and the equipment Electrostatic discharge ESD protection...

Page 11: ... recommended to test the wrist strap and bonding wire at least once per week ESD Wrist Strap Tester The wires inside of an ESD strap are prone to damage over time When using an unmonitored kit it is a best practice to regularly test the strap prior to each service call and at a minimum test once per week A wrist strap tester is the best method for doing this test If you do not have your own wrist ...

Page 12: ...g sensitive components After working inside your computer About this task NOTE Leaving stray or loose screws inside your computer may severely damage your computer Steps 1 Replace all screws and ensure that no stray screws remain inside your computer 2 Connect any external devices peripherals or cables you removed before working on your computer 3 Replace any media cards discs or any other parts t...

Page 13: ...anel Camera Display eDP cable Display back cover assembly Palmrest assembly Recommended tools The procedures in this document may require the following tools Phillips 0 screwdriver Phillips 1 screwdriver Plastic scribe Recommended for field technician Screw List The following table shows the screw list and the images for different components Table 1 Screw Size List Component Screw type Quantity Im...

Page 14: ...racket M2x3 1 Hard Drive M3x3 4 Touchpad button board M2x2 7 System fan M2x2 2 Heatsink UMA Captive screws 4 Heatsink Discrete Captive screws 7 System board UMA M2x4 4 System board Discrete M2x3 5 M2 2 2 Power button M2x3 2 IO Board M2x5 1 Display assembly M2 5x5 M2 5x4 5 1 Display Panel M2 5x2 5 M2x2 6 2 14 Disassembly and reassembly ...

Page 15: ... card Prerequisites 1 Follow the procedure in Before working inside your computer About this task Steps 1 Push the microSD card to release it from the computer 2 Slide the microSD card out of the computer Disassembly and reassembly 15 ...

Page 16: ...er 2 Slide the microSD card into the slot until it clicks into place Next steps Follow the procedures in After working inside your computer Base cover Removing the base cover Prerequisites 1 Follow the procedure in before working inside your computer 2 Remove the SD Card 16 Disassembly and reassembly ...

Page 17: ...About this task Disassembly and reassembly 17 ...

Page 18: ... 2 Using a plastic scribe pry the base cover from the top right corner and lift the base cover away from the computer Installing the base cover Prerequisites If you are replacing a component remove the existing component before performing the installation procedure 18 Disassembly and reassembly ...

Page 19: ...About this task The figure indicates the location of the base cover and provides a visual representation of the installation procedure Disassembly and reassembly 19 ...

Page 20: ...Do not expose the battery to high temperatures or disassemble battery packs and cells Do not apply pressure to the surface of the battery Do not bend the battery Do not use tools of any kind to pry on or against the battery Ensure any screws during the servicing of this product are not lost or misplaced to prevent accidental puncture or damage to the battery and other system components If the batt...

Page 21: ... the battery cable Prerequisites If you are replacing a component remove the existing component before performing the installation procedure About this task The figure indicates the location of the battery cable and provides a visual representation of the installation procedure Disassembly and reassembly 21 ...

Page 22: ...1 Replace the base cover 2 Replace the SD Card 3 Follow the procedure in after working inside your computer Removing the battery Prerequisites 1 Follow the procedure in before working inside your computer 2 Remove the microSD card 3 Remove the base cover 22 Disassembly and reassembly ...

Page 23: ... 3 Lift and move the battery away from the computer Installing the battery Prerequisites If you are replacing a component remove the existing component before performing the installation procedure About this task The figure indicates the location of the battery and provides a visual representation of the installation procedure Disassembly and reassembly 23 ...

Page 24: ...eps 1 Replace the base cover 2 Replace the SD Card 3 Follow the procedure in after working inside your computer Memory modules Removing the memory module Prerequisites 1 Follow the procedure in before working inside your computer 2 Remove the SD Card 3 Remove the base cover 4 Disconnect the battery About this task The following images indicate the location of the memory module and provide a visual...

Page 25: ... slot Installing the memory modules Prerequisites If you are replacing a component remove the existing component before performing the installation procedure About this task The figure indicates the location of the memory module and provides a visual representation of the installation procedure Disassembly and reassembly 25 ...

Page 26: ...t steps 1 Install the battery 2 Install the base cover 3 Install the SD Card 4 Follow the procedure in After working inside your computer WLAN card Removing the WLAN card Prerequisites 1 Follow the procedure in Before working inside your computer 2 Remove the SD card 3 Remove the base cover 4 Disconnect the battery cable About this task The figure indicates the location of the WLAN card and provid...

Page 27: ... 4 Slide and remove the WLAN card from the WLAN card slot Installing the WLAN card Prerequisites If you are replacing a component remove the existing component before performing the installation procedure About this task The figure indicates the location of the WLAN card and provides a visual representation of the installation procedure Disassembly and reassembly 27 ...

Page 28: ...re the WLAN card to the system board 4 Replace the single M2x3 screw to secure the WLAN card to the system board Next steps 1 Reconnect the battery cable 2 Install the base cover 3 Install the SD Card 4 Follow the procedure in After working inside your computer Coin cell battery Removing the coin cell battery Prerequisites 1 Follow the procedure in Before working inside your computer 2 Remove the ...

Page 29: ...mrest assembly as the coin cell is affixed to the board with an adhesive NOTE CAUTION The removal of the coin cell battery will result in an RTC error and will clear all CMOS settings Installing the coin cell battery Prerequisites If you are replacing a component remove the existing component before performing the installation procedure About this task The figure indicates the location of the coin...

Page 30: ...l the SD card 4 Follow the procedure in After working inside your computer DC in port Removing the DC in Prerequisites 1 Follow the procedure in Before working inside your computer 2 Remove the SD card 3 Remove the base cover 4 Disconnect the battery cable About this task The figure indicates the location of the DC in and provides a visual representation of the removal procedure 30 Disassembly and...

Page 31: ...e computer and remove the single M2x3 screw 4 Remove the DC in port from the computer Installing the DC in Prerequisites If you are replacing a component remove the existing component before performing the installation procedure About this task The figure indicates the location of the DC in port and provides a visual representation of the installation procedure Disassembly and reassembly 31 ...

Page 32: ...he system board 3 Fold and align the hinge to the screw holders on the palmrest 4 Install the three M2 5x5 screws to secure the hinge Next steps 1 Reconnect the battery cable 2 Install the base cover 3 Install the SD card 4 Follow the procedure in After working inside your computer 32 Disassembly and reassembly ...

Page 33: ...al representation of the removal procedure Steps 1 Remove the single M2x3 screw that secures the solid state module to the palmrest assembly 2 Slide the solid state module out from the M 2 slot Installing M 2 2280 solid state drive Prerequisites If you are replacing a component remove the existing component before performing the installation procedure About this task The figure indicates the locat...

Page 34: ...card 4 Follow the procedure in After working inside your computer Removing the M 2 2230 solid state drive Prerequisites 1 Follow the procedure in before working inside your computer 2 Remove the SD Card 3 Remove the base cover 4 Disconnect the battery About this task The figure indicates the location of the M 2 2230 solid state drive and provides a visual representation of the removal procedure 34...

Page 35: ... slot Installing M 2 2230 solid state drive Prerequisites If you are replacing a component remove the existing component before performing the installation procedure About this task The figure indicates the location of the M 2 2230 solid state drive and provides a visual representation of the installation procedure Disassembly and reassembly 35 ...

Page 36: ...isites If you are replacing a component remove the existing component before performing the installation procedure About this task The figure indicates the location of the M 2 solid state drive bracket and provides a visual representation of the installation procedure Steps 1 Slide the bracket out of the metal holder 2 Rotate the bracket so that it faces the opposite side from its original mountin...

Page 37: ... provide a visual representation of the removal procedure Steps 1 Remove the four M3x3 screws and disconnect the hard drive cable from the connector on the system board 2 Remove the hard drive from the computer Installing the Hard Drive Prerequisites If you are replacing a component remove the existing component before performing the installation procedure About this task The figure indicates the ...

Page 38: ...ve cable to the connector on the system board Next steps 1 Install the battery 2 Install the base cover 3 Install the SD card 4 Follow the procedure in After working inside your computer Touchpad Removing the touchpad Prerequisites 1 Follow the procedure in before working inside your computer 2 Remove the SD Card 3 Remove the base cover 4 Remove the battery 38 Disassembly and reassembly ...

Page 39: ... Remove the four M2x2 screws from the top portion of the touchpad and lift the touchpad away from the computer Installing the touchpad Prerequisites If you are replacing a component remove the existing component before performing the installation procedure About this task The figure indicates the location of the touchpad and provides a visual representation of the installation procedure Disassembl...

Page 40: ...k the two adhesive tape strips onto the touchpad 3 Connect the ribbon cable from the touchpad to the system board 4 Install the three M2x2 screws into the screw posts at the bottom of the palmrest Next steps 1 Install the battery 2 Install the base cover 3 Install the SD card 4 Follow the procedure in After working inside your computer 40 Disassembly and reassembly ...

Page 41: ...s task The figure indicates the location of the speakers and provides a visual representation of the removal procedure Steps 1 Disconnect the speaker cable from the connector on the system board and peel back the adhesive strips holing the connected cables in place 2 Ensure the cables are free and lift the speaker modules from both ends of the computer Disassembly and reassembly 41 ...

Page 42: ...aker assembly onto the mounting points on the bottom base on the computer 2 Route the cables from both the speaker modules through the middle section of the bottom base above the touchpad and fold back the adhesive strips to secure the cables Once secured connect the speaker s cable connector to the connector on the system board Next steps 1 Install the battery 2 Install the base cover 3 Install t...

Page 43: ...battery About this task The figure indicates the location of the fan assembly and provides a visual representation of the removal procedure Steps 1 Disconnect the IO board cable from the connector on the system board and remove the cables from the cable management routes along side the fan assembly 2 Disconnect the fan cable from the system board Disassembly and reassembly 43 ...

Page 44: ...sk The figure indicates the location of the fan assembly and provides a visual representation of the installation procedure Steps 1 Place the fan assembly onto the mounting points on the palmrest on the computer and install the two M2x2 screws 2 Route the antenna cables along the cable management routes on the fan assembly and connect the cables to the WLAN card 3 Install the two M2x2 screws onto ...

Page 45: ...the base cover 4 Disconnect the battery About this task The following images indicate the location of the heatsink and provide a visual representation of the removal procedure Steps 1 Loosen the seven captive screws that secure the heatsink to the system board 2 Lift the heatsink assembly away from the computer Installing the Heatsink Assembly Discrete Prerequisites If you are replacing a componen...

Page 46: ...o the system board Next steps 1 Install the battery 2 Install the base cover 3 Install the SD Card 4 Follow the procedure in After working inside your computer Removing the Heatsink Assembly UMA Prerequisites 1 Follow the procedure in before working inside your computer 2 Remove the SD Card 3 Remove the base cover 4 Disconnect the battery About this task The following images indicate the location ...

Page 47: ...omputer Installing the Heatsink Assembly UMA Prerequisites If you are replacing a component remove the existing component before performing the installation procedure About this task The figure indicates the location of the heatsink and provides a visual representation of the installation procedure Disassembly and reassembly 47 ...

Page 48: ...n After working inside your computer System board Removing the system board Discrete Prerequisites 1 Follow the procedure in before working inside your computer 2 Remove the SD Card 3 Remove the base cover 4 Disconnect the battery 5 Remove the memory modules 6 Remove the WLAN card 7 Remove the solid state drive 8 Remove the heatsink About this task The figure indicates the location of the system b...

Page 49: ...Disassembly and reassembly 49 ...

Page 50: ...ft the latch that locks down the LCD cable onto the system board 5 Disconnect the LCD cable from the system board 6 Peel back the adhesive tape from over the IO board connector cable and disconnect the IO boards connector cable 7 Disconnect the connector cables from the system board in the following order left right Speaker Touchpad USB Battery Keyboard 50 Disassembly and reassembly ...

Page 51: ... the chassis Installing the system board Discrete Prerequisites If you are replacing a component remove the existing component before performing the installation procedure About this task The figure indicates the location of the system board and provides a visual representation of the installation procedure Disassembly and reassembly 51 ...

Page 52: ...52 Disassembly and reassembly ...

Page 53: ...8 Connect the following cables in the following order left right Speaker Touchpad USB Battery Keyboard Next steps 1 Install the Heatsink 2 Install the WLAN card 3 Install the Solid state drive 4 Install the memory module 5 Install the battery 6 Install the base cover 7 Install the SD Card 8 Follow the procedure in After working inside your computer Removing the system board UMA Prerequisites 1 Fol...

Page 54: ...54 Disassembly and reassembly ...

Page 55: ...rd 5 Peel back the adhesive tape from the DC in cable connector and disconnect the DC in cable from the system board 6 Remove the two M2x4 screws from the metal shield covering the USB module 7 Lift and take the metal shield away from the system 8 Disconnect the connector cables from the system board in the following order left right Speaker Touchpad USB Battery Keyboard 9 Remove the two M2x4 scre...

Page 56: ...e board over Installing the system board UMA Prerequisites If you are replacing a component remove the existing component before performing the installation procedure About this task The figure indicates the location of the system board and provides a visual representation of the installation procedure 56 Disassembly and reassembly ...

Page 57: ...Disassembly and reassembly 57 ...

Page 58: ...1 Place the system board onto the palmrest aligning the screw posts to the mounting points on the palmrest Install the two M2x4 screws to secure the system board to the palmrest 58 Disassembly and reassembly ...

Page 59: ...d the adhesive tape back onto the DC in connector 7 Place the metal shield onto the USB port module 8 Install the two M2x4 screws to secure the metal shield 9 Connect the following cables in the following order left right Speaker Touchpad USB Battery Keyboard Next steps 1 Install the Heatsink 2 Install the WLAN card 3 Install the Solid state drive 4 Install the memory module 5 Install the battery ...

Page 60: ...e IO board connector cable and disconnect it from the system board 3 Disconnect the cable connectors from the IO board in the following order left right USB data cable Coin cell battery cable Audio FFC cable 4 Remove the single M2x5 screw that is holding the IO board in place and lift the module away from the computer Installing the IO Board Prerequisites If you are replacing a component remove th...

Page 61: ... cable to the connector on the system board Fold the adhesive tape back onto the IO Board connector on the system board 4 Using the two M2x3 screws close and secure the left hinge to the palmrest Next steps 1 Install the WLAN card 2 Install the battery 3 Install the base cover 4 Install the SD Card 5 Follow the procedure in After working inside your computer Power button Removing the Power Button ...

Page 62: ...oard module Peel off the adhesive cover from over the power button assembly 2 Remove the two M2x2 screws that secure the shield over the power button module 3 Lift the Power Button module away from the computer Installing the Power Button Prerequisites If you are replacing a component remove the existing component before performing the installation procedure About this task The figure indicates th...

Page 63: ... 2 Install the IO board 3 Install the battery 4 Install the base cover 5 Install the SD Card 6 Follow the procedure in After working inside your computer Display assembly Removing the Display Assembly Prerequisites 1 Follow the procedure in before working inside your computer 2 Remove the SD Card 3 Remove the base cover 4 Disconnect the battery About this task The figure indicates the location of ...

Page 64: ...64 Disassembly and reassembly ...

Page 65: ... and fold the hinges backwards 2 Peel back the adhesive tape covering the LCD cable 3 Fold the adhesive tape away from the LCD cable 4 Remove the LCD cable and lift it away from the computer 5 Move the system away from the LCD assembly Disassembly and reassembly 65 ...

Page 66: ...placing a component remove the existing component before performing the installation procedure About this task The figure indicates the location of the LCD Assembly and provides a visual representation of the installation procedure 66 Disassembly and reassembly ...

Page 67: ...display cable to the system board and adhere the tape to secure the display cable 5 Place the EDP metal bracket on the display cable connector 6 Install the six M2 5x5 screws that secure the display hinges to the chassis of your computer Next steps 1 Install the battery 2 Install the base cover 3 Install the SD card 4 Follow the procedure in After working inside your computer Disassembly and reass...

Page 68: ...ve the battery 5 Remove the display assembly About this task Steps 1 Use a plastic scribe to carefully pry open the recesses near the left and right hinges on the bottom edge of the display bezel 2 Carefully pry open the inside edge of the display bezel and then pry open the inside edge of the left and right sides of the display bezel 68 Disassembly and reassembly ...

Page 69: ...nsure to pry along the outside edge of the display bezel using your hands or plastic scribes Using a screw driver or other sharp objects may damage the display panel 3 Lift the display bezel from the display assembly Disassembly and reassembly 69 ...

Page 70: ...with the display assembly and then gently snap the display bezel into place Next steps 1 Replace the display assembly 2 Replace the battery 3 Replace the base cover 4 Replace the SD card 5 Follow the procedure in after working inside your computer 70 Disassembly and reassembly ...

Page 71: ...requisites 1 Follow the procedure in before working inside your computer 2 Remove the SD card 3 Remove the base cover 4 Remove the battery 5 Remove the display assembly 6 Remove the display bezel About this task Disassembly and reassembly 71 ...

Page 72: ...es from the display panel There is no need to separate the brackets from the display panel 2 Peel off the adhesive tape from over the EDP connector and lift the latch 3 Disconnect the EDP cable connector from the display panel and lift it away from the display back cover Installing display panel About this task Steps 1 Connect the EDP cable to the connector on the back of the display panel 72 Disa...

Page 73: ...battery 4 Replace the base cover 5 Replace the SD card 6 Follow the procedure in after working inside your computer Camera Removing camera Prerequisites 1 Follow the procedure in before working inside your computer 2 Remove the SD card 3 Remove the base cover 4 Remove the battery 5 Remove the display assembly 6 Remove the display bezel 7 Remove the display panel About this task Steps 1 Disconnect ...

Page 74: ...assembly 4 Replace the battery 5 Replace the base cover 6 Replace the SD card 7 Follow the procedure in after working inside your computer Display eDP cable Removing display cable Prerequisites 1 Follow the procedure in before working inside your computer 2 Remove the SD card 3 Remove the base cover 4 Remove the battery 5 Remove the display assembly 6 Remove the display bezel 7 Remove the display ...

Page 75: ...About this task Steps Peel the display cable to release it from its adhesive side and lift the display cable from the display back cover Disassembly and reassembly 75 ...

Page 76: ...splay back cover Next steps 1 Replace the camera 2 Replace the display panel 3 Replace the display bezel 4 Replace the display assembly 5 Replace the battery 6 Replace the base cover 7 Replace the SD card 8 Follow the procedure in after working inside your computer 76 Disassembly and reassembly ...

Page 77: ...ve the display panel 8 Remove the camera 9 Remove the display cable About this task After performing the preceding steps you are left with the display back cover Next steps 1 Replace the display cable 2 Replace the camera 3 Replace the display panel 4 Replace the display bezel 5 Replace the display assembly 6 Replace the battery 7 Replace the base cover 8 Replace the SD card 9 Follow the procedure...

Page 78: ...te drive 10 Remove the hard drive 11 Remove the touchpad 12 Remove the speakers 13 Remove the heatsink 14 Remove the system board NOTE The system board can be removed along with the heat sink About this task The figure indicates the location of the Palmrest Assembly and provides a visual representation of the removal procedure Steps Once the required parts are removed the bare palmrest assembly ca...

Page 79: ...d state drive 7 Install the DC in 8 Install the memory modules 9 Install the coin cell battery 10 Install the WLAN card 11 Install the battery 12 Install the base cover 13 Install the SD card SD card 1 Follow the procedure in after working inside your computer Disassembly and reassembly 79 ...

Page 80: ...roblems encountered during testing NOTE The SupportAssist window displays listing all devices detected in the computer The diagnostics starts running the tests on all the detected devices Running SupportAssist diagnostics Steps 1 Turn on your computer 2 As the computer boots press the F12 key as the Dell logo appears 3 On the boot menu screen select the Diagnostics option 4 Click the arrow at the ...

Page 81: ...status light blinks amber two times followed by a pause and then blinks white three times followed by a pause This 2 3 pattern continues until the computer is turned off indicating no memory or RAM is detected The following table shows different power and battery status light patterns and associated problems Table 2 LED codes Diagnostic light codes Problem description 2 1 Processor failure 2 2 Sys...

Page 82: ...The following procedure provides the instructions on how to conduct a WiFi power cycle NOTE Some ISPs Internet Service Providers provide a modem router combo device Steps 1 Turn off your computer 2 Turn off the modem 3 Turn off the wireless router 4 Wait for 30 seconds 5 Turn on the wireless router 6 Turn on the modem 7 Turn on your computer 82 Troubleshooting ...

Page 83: ...en click Submit NOTE If you do not have the Service Tag use the auto detect feature or manually browse for your model 4 Click Drivers and Downloads 5 Select the operating system installed on your 6 Scroll down the page and select the driver to install 7 Click Download File to download the driver for your 8 After the download is complete navigate to the folder where you saved the driver file 9 Doub...

Page 84: ...pics Boot menu Navigation keys Overview Boot Configuration Integrated Devices Storage Display Connection Power Security Passwords Update Recovery System Management Keyboard Pre boot Behavior Virtualization Performance System Logs Updating the BIOS in Windows System and setup password Boot menu Press F12 when the Dell logo appears to initiate a one time boot menu with a list of the valid boot devic...

Page 85: ...oves to the next focus area Esc Moves to the previous page until you view the main screen Pressing Esc in the main screen displays a message that prompts you to save any unsaved changes and restarts the system Overview This section provides hardware specification for the system and contains no modifiable settings Table 5 BIOS Overview Page Options Description Series and system model number This fi...

Page 86: ...inimum clock speed that the CPU is capable of reaching Current Clock Speed This field mentions the clock speed that the CPU is running at currently Core Count This field gives the count of the physical cores on the CPU Processor ID Processor L3 Cache This field gives mentions the amount of cache storage available on the CPU Microcode Version Intel Hyper Threading Capable This field helps identify ...

Page 87: ... Address This field provides the MAC address used to override the dock or dongle MAC address every time it s connected to the network Boot Configuration This section provides Boot Configuration related details and settings Table 6 Boot Configuration Options Description Boot Sequence Boot Mode UEFI only This section allows the user to choose the first bootable device that the computer should use to...

Page 88: ...d settings Table 7 Integrated Devices Options Description Date Time Date This section allows the user to change the date which takes effect immediately The format used is MM DD YYYY Time This section allows the user to change the time which takes effect immediately The format used is HH MM SS in 24 hour format The user also has an option to switch between 12 hours or 24 hours clock Camera Enable C...

Page 89: ...A is setup to support RAID Intel Rapid Storage Technology Selected by default Storage Interface Port Enablement This section allows the user to enable or disable the onboard drives on the computer The following options are available here SATA 0 ON by default M 2 PCIe SSD 0 ON by default SMART Reporting Enable SMART Reporting This section contains a toggle switch that allows the user to enable or d...

Page 90: ...he display brightness when appropriate enabled by default Full Screen Logo Full Screen Logo This section contains a toggle switch which allows the user to enable disable the option to view a full screen logo disabled by default Connection This section provides connection details and settings Table 10 Connection Options Description Wireless Device Enable This section contains a toggle switch that a...

Page 91: ...lows the computer to run on battery during peak usage hours The section contains a toggle switch that allows the user to enable or disable this feature and set the Peak Shift Start End times and Peak Shift Charge Start End OFF by default USB PowerShare This setting contains a toggle witch which allows the user to enable or disable this feature It allows for any external USB devices to charge via t...

Page 92: ... toggle switch to allow the user to enable disable the system from powering on when the lid is open ON by default Intel Speed Shift Technology Intel Speed Shift Technology This section contains a toggle switch to allow the user to enable disable Intel Speed Shift Technology support This feature enables the operating system to select appropriate processor performance automatically ON by default Sec...

Page 93: ...by default TPM State This section allows the user to enable or disable the TPM this is the normal operating state for the TPM when you want to use its complete arrays of capabilities enabled by default Intel Software Guard Extension Intel SGX This section allows the user to select the Intel Software Guard Extension Enclave Reserve Memory Size The options are as follows Disabled Enabled Software Co...

Page 94: ... This field allows the user to set change or delete the system password Internal HDD 0 Password This field allows the user to set change or delete the Hard Drive password Password Configurator Upper Case Letter Enable or disable reinforced use of upper case letters OFF by default Lower Case Letter Enable or disable reinforced use of lower case letters OFF by default Digit Enable or disable reinfor...

Page 95: ... Updates Enable UEFI Capsule Firmware Updates This field contains a toggle switch which allows the user to enable or disable BIOS updates via UEFI capsule update packages ON by default BIOS Recovery from Hard Drive BIOS Recovery from Hard Drive This field contains a toggle switch which allows the user to enable or disable recovery from certain corrupted BIOS conditions from a recovery file on the ...

Page 96: ...by the IT administrator AC Behaviour Wake on AC This field contains a toggle switch which allows the user to enable or disable the feature where the system boots when charger is detected OFF by default Wake on LAN Wake on LAN This field allows the user to select if and how the system should boot when connected to LAN The options here are as follows Disabled The system will not boot with any specia...

Page 97: ...e keyboard illumination will be off Dim Enable the keyboard illumination feature at 50 brightness level Bright Enable the keyboard illumination feature at 100 brightness level selected by default Keyboard Backlight Timeout on AC Keyboard Backlight Timeout on AC This field allows the user to define the timeout value for the backlight when the AC adapter is connected to the computer The options here...

Page 98: ...POST USB C Warnings Enable Dock Warning Messages This field contains a toggle switch to enable or disable dock warning messages enabled by default Fastboot Fastboot This field allows the user to configure the speed of the UEFI boot process The options here are as follows Minimal reduces boot time by skipping certain hardware and configuration initialization during boot selected by default Thorough...

Page 99: ...efault The following must be enabled to configure Intel TXT Trusted Platform Module TPM Intel Hyper Threading All CPU cores Multi Core Support Intel Virtualization technology Intel VT for Direct I O Performance This section provides Performance settings Table 19 Performance Options Description Multi Core Support Active Cores This field allows the user to configure the number of active cores on the...

Page 100: ...t System Logs This section contains BIOS Thermal and Power event logs Table 20 System Logs Options Description BIOS Event Log Clear BIOS Event log This field contains a toggle switch to Keep or Clear BIOS Event logs It also lists all saved events Date Time Message Keep selected by default Thermal Event Log Clear Thermal Event Log This field contains a toggle switch to Keep or Clear Thermal Event l...

Page 101: ...ou will then be prompted to enter the recovery key to progress and the system will ask for this on each reboot If the recovery key is not known this can result in data loss or an unnecessary operating system reinstall For more information about this subject see Knowledge Article Updating the BIOS on Dell Systems With BitLocker Enabled Updating your system BIOS using a USB flash drive About this ta...

Page 102: ...ur computer CAUTION Anyone can access the data stored on your computer if it is not locked and left unattended NOTE System and setup password feature is disabled Assigning a system setup password Prerequisites You can assign a new System or Admin Password only when the status is in Not Set About this task To enter the system setup press F2 immediately after a power on or reboot Steps 1 In the Syst...

Page 103: ...existing System or Setup password if the Password Status is Locked About this task To enter the System Setup press F2 immediately after a power on or reboot Steps 1 In the System BIOS or System Setup screen select System Security and press Enter The System Security screen is displayed 2 In the System Security screen verify that Password Status is Unlocked 3 Select System Password alter or delete t...

Page 104: ...and telephone based support and service options Availability varies by country and product and some services may not be available in your area To contact Dell for sales technical support or customer service issues Steps 1 Go to Dell com support 2 Select your support category 3 Verify your country or region in the Choose a Country Region drop down list at the bottom of the page 4 Select the appropr...

Reviews: