background image

Matchprint Professional Server IIx for Xerox: Hardware Installation and Startup 

2003 Kodak Polychrome Graphics. All rights reserved. 

Page 25 of 36 


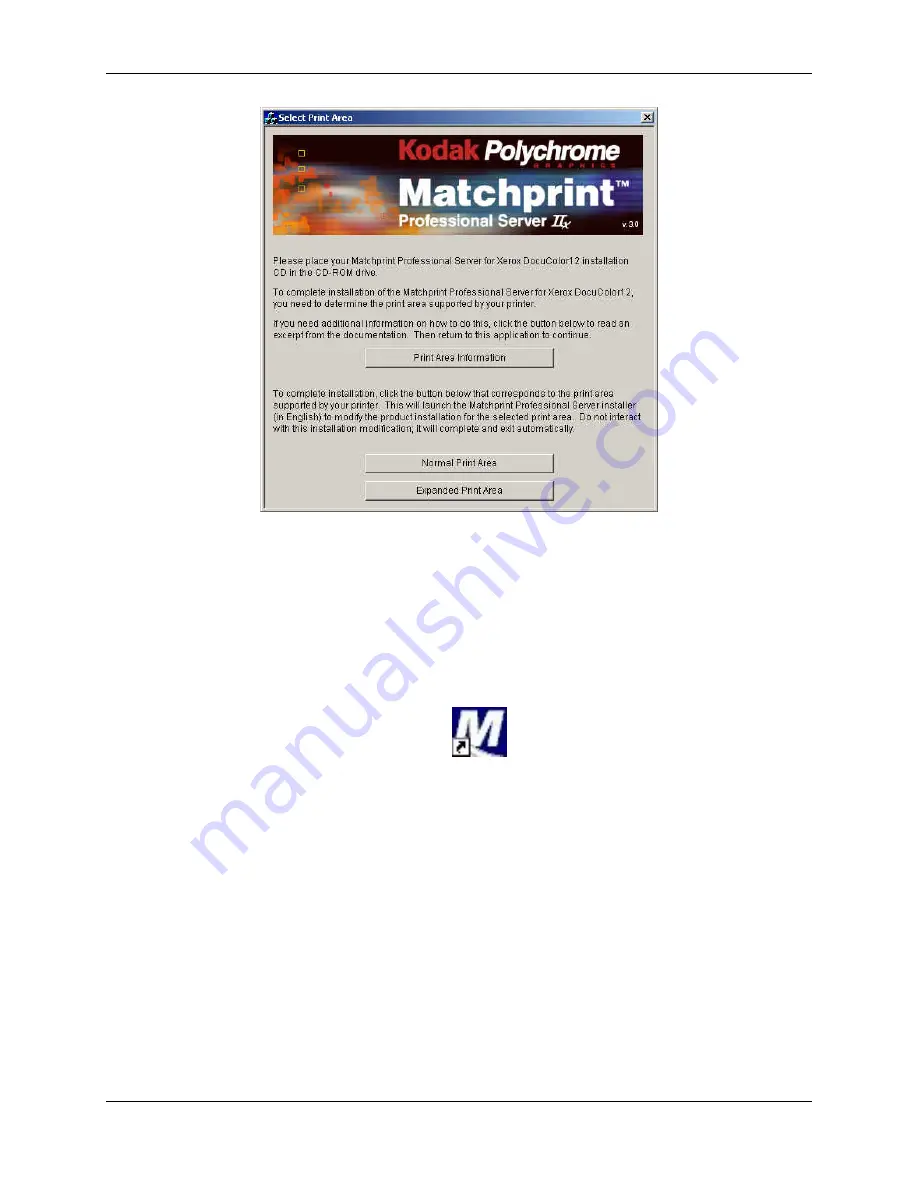
12. Select 

Normal

 or 

Expanded


Print Area

. If you need additional information to determine the print 

area, click on Print Area Information. 

13.  A progress bar displays briefly, then a, “Matchprint Professional Server setup completed 

successfully.” message displays. 

14. Click 

OK


15. Launch the 

Matchprint Professional Server

 program by double-clicking on the Matchprint 

Professional Server icon located on the desktop. 


Follow the next two sections, 

Printer Setup

 and 

Printer Calibration

, to add the printer, print the 

calibration testform, and scan the testform to calibrate the 

Matchprint Professional Server

.  

This will test that the 

Matchprint Professional Server

 and 

Xerox DocuColor 12

 are 

communicating correctly. 


Summary of Contents for KY0730481

Page 1: ...Matchprint Professional Server v3 0 for Xerox DocuColor 12 Hardware Installation and Startup Guide Dell Precision 650 Part number KY0730481 ...

Page 2: ... Matchprint is a trademark of Kodak Polychrome Graphics Kodak is a trademark of Eastman Kodak Company All trademarks and registered trademarks used herein are the property of their respective owners January 2003 Revision B Matchprint Professional Server IIx v3 0 ...

Page 3: ... 36 Table of Contents INTRODUCTION 7 UNPACKING 7 CART ASSEMBLY 11 SERVER INSTALLATION AND CABLING 12 MATCHPRINT PROFESSIONAL SERVER SYSTEM STARTUP 18 PRINTER SETUP 26 PRINTER CALIBRATION 28 Spectrocam Setup 28 Calibration Procedure 29 Calibrating with Scanner 32 Calibrating with Spectrocam 32 SYSTEM TROUBLESHOOTING 35 TECHNICAL SUPPORT 36 ...

Page 4: ...Hardware Installation and Startup Page 4 of 36 2003 Kodak Polychrome Graphics All rights reserved Revision History Revision A October 2002 Initial Release MPS V3 0 Revision B January 2003 MPS IIx V3 0 Release of hardware server Dell Precision 650 ...

Page 5: ...e chassis covers Some system circuitry retains voltage even when the system is turned off Only qualified service technicians should remove chassis covers 2 There are no user serviceable components in the Matchprint Professional Server Refer all system repairs to a qualified service technician Warning The power supply voltage standby circuit is active when the computer is turned off Ensure that the...

Page 6: ...ons However there is no guarantee that interference will not occur in a particular installation If this equipment does cause harmful interference to radio or television reception which can be determined by turning the equipment off and on the user is encouraged to try to correct the interference by one or more of the following measures Reorient or relocate the receiving antenna Increase the separa...

Page 7: ...Server IIx Inspecting the Matchprint Professional Server hardware for loose components or shipping damage Setting up and cabling System startup and software initialization Calibrating the printer to test the Matchprint Professional Server hardware by printing and scanning the calibration test page Unpacking The Matchprint Professional Server comes in three boxes The optional cart comes in a fourth...

Page 8: ... Monitor 2 Carefully flip the box over with the flaps out 3 Pull the box up leaving the contents on the table 4 Remove the packaging from the monitor and cabling The contents of the monitor box should be as displayed here The video cable blue connectors is already connected to the back of the monitor Note The digital cable white connectors is not used with the Matchprint Professional Server monito...

Page 9: ...Open the second larger box 6 Once the box is open remove the smaller interior boxes 7 Remove the Matchprint Professional Server from the box 8 Remove the packaging from the server Remove the cables keyboard mouse and documentation from the accessory box Dell Documentation and CDs Matchprint Professional Server Dell Keyboard Mouse and Power Cord ...

Page 10: ...tallation and Startup Guide Matchprint Professional Server Quick Start Guide Matchprint Professional Server v3 Install Instruct Matchprint Professional Server v3 0 Software Installation Guide Matchprint Professional Server v3 System Upgrade P4 Customer upgrade kit instructions for the Matchprint Professional Server version 3 software upgrade MPSNET 1 Matchprint Professional Server v3 Network Guide...

Page 11: ...hrome Graphics All rights reserved Page 11 of 36 Cart Assembly There are no special unpacking requirements for the cart Note The cart is shipped fully assembled The following diagram is for reference or repair purposes Assemble the cart tabletop shelf and wheels as shown in the following graphic ...

Page 12: ...ct inside the computer to make sure that the expansion cards fans or airflow baffles have not been dislodged during shipping and unpacking Close the cover side panel and slide the cover release latch to the right towards the bottom of the server to lock 2 The following graphics show the front and back of the server Use them to familiarize yourself with the various ports and features 1 floppy drive...

Page 13: ...t 3 padlock ring 4 power connector 5 card slots 6 6 back panel connectors 1 parallel connector 2 line out connector 3 line in connector 4 mouse connector 5 link integrity light 6 network connector 7 network activity light 8 USB 2 0 connectors 2 9 IEEE 1394 connector 10 USB 2 0 connectors 2 11 keyboard connector 12 microphone connector 13 serial connector COM 2 14 serial connector COM 1 ...

Page 14: ... optional cart The monitor and server should be located within 15 feet of the Xerox copier printer The server should be placed in a location that provides sufficient airflow clearance The monitor should be positioned on a solid table or cart Important Note Surge protection is strongly recommended for all Matchprint Professional Server installations The power source for the Matchprint Professional ...

Page 15: ...should go in with moderate pressure If you feel you are using excessive force you probably don t have the connections aligned properly If you use excessive force on the External SCSI and Printer cables you may dislodge the expansion card within the chassis If this occurs call the dealer for instructions on how to reseat the boards Keyboard cable serial Mouse Cable serial Spectrocam cable optional ...

Page 16: ... 16 of 36 2003 Kodak Polychrome Graphics All rights reserved 5 Connect the Monitor power cable and video cable to the back underside of the monitor 6 Connect the other end of the Printer and Scan cables to the Xerox copier printer Power cable Monitor video cable Print cable Scan cable ...

Page 17: ...lychrome Graphics All rights reserved Page 17 of 36 7 Power up the system by pressing the power button located on the front of the server on the upper right corner Note Pressing the Power button until the system beeps then releasing the button will force the computer to shut down Power button ...

Page 18: ... Graphics All rights reserved Matchprint Professional Server System Startup 1 After completing the previous instructions press the Power Button to turn on the computer The system launches the Welcome to Windows 2000 Setup Wizard Click on Next 2 At the license window select I accept the agreement then click on Next ...

Page 19: ... Personalizing your Software window enter an appropriate name and organization company name You may enter your company name in both if you wish Click on Next 4 Enter your Product Key in the spaces provided Click on Next The Product Key license number is located with the Windows 2000 Server Software that came packaged with Matchprint Professional Server ...

Page 20: ...ws 2000 has randomly generated Leave the Administrator password and Confirm password fields blank for now Both the Computer name and Administrator passwords can be changed at a later time Important The administrator password and confirmation should be left blank 6 Click on Next 7 Set the Date Time and the Time Zone then click on Next 8 Your computer will automatically restart in about 15 seconds o...

Page 21: ...ter the computer has restarted depending on your system configuration the following Welcome to the Found New Hardware Wizard screen may display If it does display continue with 9a 9f Otherwise you are ready to launch the Matchprint Professional Server v3 0 application and run a simple test of printing a At the Welcome to the Found screen click Next ...

Page 22: ...22 of 36 2003 Kodak Polychrome Graphics All rights reserved b At the Install Hardware Device Drivers screen make sure the Search for a suitable driver for my device is selected Then click Next c At the Locate Driver Files screen make sure Specify a location is selected then click Next ...

Page 23: ...p 2003 Kodak Polychrome Graphics All rights reserved Page 23 of 36 d At the Found New Hardware Wizard window use the drop down list box or browse to select Copy manufacturer s files from c AHT Drivers v3 0 DC12 Then click OK e At the Driver Files Search Results screen click Next ...

Page 24: ...up Page 24 of 36 2003 Kodak Polychrome Graphics All rights reserved f At the Completing the Found New Hardware Wizard screen click Finish 10 When the Setup Utility screen displays click OK 11 At the Select Print Area screen insert the Matchprint Professional Server v3 0 CD ROM ...

Page 25: ...a Matchprint Professional Server setup completed successfully message displays 14 Click OK 15 Launch the Matchprint Professional Server program by double clicking on the Matchprint Professional Server icon located on the desktop Follow the next two sections Printer Setup and Printer Calibration to add the printer print the calibration testform and scan the testform to calibrate the Matchprint Prof...

Page 26: ... new ones If the system asks you if you want to delete previous files used only with this printer select Yes 2 From the Printer menu select Add Printer or select Xerox DocuColor 12 or the name of the printer you need to change The Printer Settings window displays 3 Confirm the desired Printer Options Active Make sure this is checked This ensures the printer is available to the Matchprint Professio...

Page 27: ...inches Tray 6 High Capacity Feeder Optional Media Type Normal Bond Media Size Letter 8 5 x 11 inches Notes Tray 5 is a manual feed tray located on the left side of the Xerox DocuColor 12 Tray 5 is not configured here Load Kodak Polychrome Graphics Xerox Color Laser Proofing Paper so the watermark wording is face down in the tray The DocuColor 12 can be set to disable automatic tray switching howev...

Page 28: ...her sizes in the media weight may be substituted for the purpose of calibrating the Xerox DocuColor 12 LP CP Important If a media other than the recommended Xerox media is used the following error appears Caution The media used for calibration appears to be significantly different from the Normal Bond or Heavyweight media recommended for used with this application Results of the calibration on thi...

Page 29: ...before removing the Spectrocam from the Matchprint Professional Server Calibration Procedure 1 From the Printer menu select Xerox DocuColor 12 or the name of the printer requiring calibration The Printer Settings window displays 2 Click on Calibration to display menu selections Perform Printer Calibration and Printer Calibration Setup 3 Select Printer Calibration Setup to display the following set...

Page 30: ... button nullifies the most recent calibration and returns the selected media to its default setting The Calibrate this printer every ___ days is specific to the printer only The Last Calibration number indicates when the printer was last calibrated with specified media For example if the printer is set to be calibrated every 3 days it may have been 6 days since it was last calibrated with commerci...

Page 31: ...r wants to calibrate the media contained in a specific tray of the DocuColor 12 An Automatic selection chooses the input tray if no input tray is specified If Extra Heavyweight or a KODAK POLYCHROME GRAPHICS Xerox co branded media such as Commercial is selected the input tray defaults to Manual Feed In this case the user is not able to change the input tray 11 Click on Print Test Form button A pro...

Page 32: ...alibration will fail Calibrating with Spectrocam 1 Place the test form and ruler on the black scanner plate and position the measurement device on the first patch on the upper left corner 2 Click on the Calibrate button If the Spectrocam was not previously calibrated a prompt directs you to measure remeasure the white reference Place the measurement device on the white target reference and touch t...

Page 33: ... top of the window will indicate any action you must take regarding measurement readings To read the last two rows you will need to move the test form up so the Spectrocam rests on the black scanner plate Note The Spectrocam times out after 10 minutes of inactivity Instructions appear directing the user to restart the calibration process If the calibration is successful the following message appea...

Page 34: ...eleasing the switch will shut the computer off However doing this may result in loss of data and corruption of the computer operation system or application The computer should only be shut off using the front power switch when the operating system becomes unavailable for shutting off the computer All other user information is available online through the Help menu selection or as a printable PDF f...

Page 35: ... DC12 1 Contact your sales CBU 2 Walk the customer through the Hardware Installation and Quick Start Guide to get system usable INSTALLATION 1 Unit was just dropped off the system isn t up and running 2 What can the customer do to finish installation 3 Once the Matchprint Professional Server is connected and powered up what do we do next 1 The Rigger installer contracted by Xerox is to setup the s...

Page 36: ...dure that can be used by all customers If you generally use only bond media or are having extreme problems with the calibration application check the apply to all box when calibrating to normal bond letter size media Calibrate to normal bond letter size media Next calibrate with 12 x 18 media When setting the 12 x 18 calibration page on the scanner offset the page to the right about 1 inch CALIBRA...

Reviews: