background image

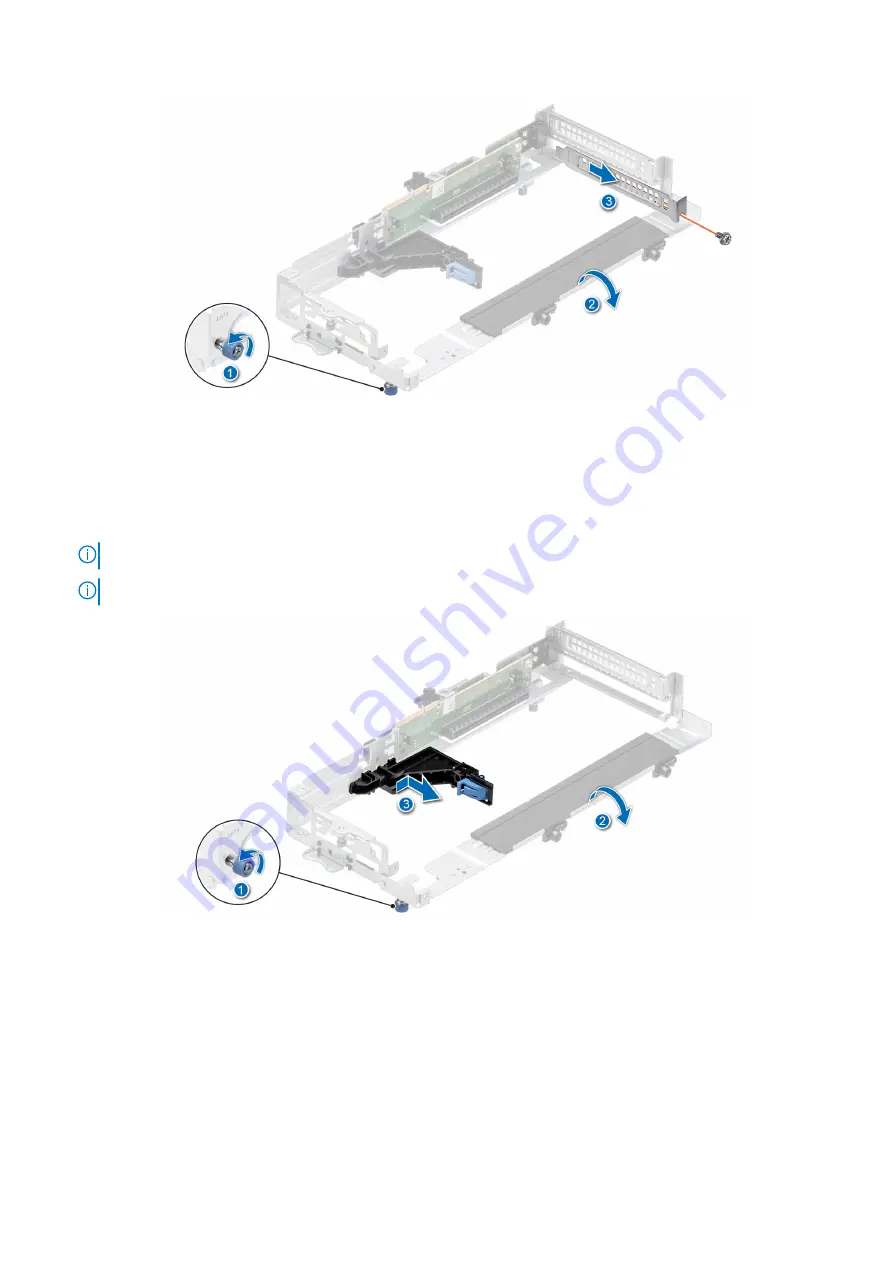
Figure 59. Removing a filler bracket from riser 3

4. Remove the plastic card guide from the riser if the expansion card to be installed is longer than half-length.
5. Hold the card by the edges, and align the card edge connector with the expansion card connector on the riser.
6. Insert the card edge connector firmly into the expansion card connector until the card is fully seated.
7. Using the Phillips #1 screwdriver, tighten the screw.

NOTE:

 The numbers on the image do not depict the exact steps. The numbers are for representation of sequence.

NOTE:

 For a double-width, full-length GPU card, remove the plastic card guide from the riser.

Figure 60. Removing the plastic card guide from the riser

Installing and removing system components

57

Summary of Contents for E73S

Page 1: ...Dell EMC PowerEdge XR12 Installation and Service Manual Part Number E73S Regulatory Type E73S001 July 2021 Rev A00 ...

Page 2: ...ential damage to hardware or loss of data and tells you how to avoid the problem WARNING A WARNING indicates a potential for property damage personal injury or death 2021 Dell Inc or its subsidiaries All rights reserved Dell EMC and other trademarks are trademarks of Dell Inc or its subsidiaries Other trademarks may be trademarks of their respective owners ...

Page 3: ... download firmware 21 Options to download and install OS drivers 21 Downloading drivers and firmware 22 Chapter 4 Minimum to POST and system management configuration validation 23 Minimum configuration to POST 23 Configuration validation 23 Error messages 24 Chapter 5 Installing and removing system components 25 Safety instructions 25 Before working inside your system 26 After working inside your ...

Page 4: ...2 Installing the drive into the drive carrier 63 Drive backplane 64 Drive backplane details 64 Removing the drive backplane 65 Installing the drive backplane 65 Internal storage configuration matrix for XR12 66 Cable routing 68 Drive cage 72 Removing the drive cage 72 Installing the drive cage 73 Cooling fans 74 Removing a cooling fan 74 Installing a cooling fan 75 Intrusion switch module 76 Remov...

Page 5: ...nitializing TPM for users 109 Initializing the TPM 2 0 for users 109 Control panel 109 Removing the status LED control panel 109 Installing the status LED control panel 112 Removing the power button control panel 115 Installing the power button control panel 117 Chapter 6 MIL 901E and MIL 461G rugged kit 121 Installing the MIL 901E and MIL 461G rugged kit 121 Chapter 7 Upgrade Kits 123 Chapter 8 J...

Page 6: ...ervice information 135 Contacting Dell Technologies 135 Accessing system information by using QRL 135 Quick Resource Locator for PowerEdge XR12 system 136 Receiving automated support with SupportAssist 136 Chapter 11 Documentation resources 137 6 Contents ...

Page 7: ...ument provides an overview about the system information about installing and replacing components technical specifications diagnostic tools and guidelines to be followed while installing certain components 1 About this document 7 ...

Page 8: ...d CAUTION Do not install GPUs network cards or other PCIe devices on your system that are not validated and tested by Dell Damage caused by unauthorized and invalidated hardware installation will null and void the system warranty NOTE For more information see the Dell EMC PowerEdge XR12 Technical Specifications on the product documentation page Topics Front view of the system Rear view of the syst...

Page 9: ...the iDRAC Direct status LED 3 Information tag N A The Information tag is a slide out label panel that contains Service Tag iDRAC MAC address and LOM 1 MAC address 4 Cooling fan N A Indicates the fan Figure 2 Front view of Front Accessed 6 x 2 5 inch drive configuration Table 2 Features available on the front view of Front Accessed 6 x 2 5 inch drive configuration Item Ports panels or slots Icon De...

Page 10: ...l that contains Service Tag iDRAC MAC address and LOM 1 MAC address 8 Power button control panel N A Contains the power button USB port iDRAC Direct micro port and the iDRAC Direct status LED 9 Power supply unit PSU 2 Indicates the PSU 10 Power supply unit PSU 1 Indicates the PSU 11 PCIe expansion card riser 3 slot 4 and 5 N A Enables you to connect PCI Express expansion cards 12 USB 2 0 port This...

Page 11: ...bles you to remotely access iDRAC For more information see the iDRAC User s Guide at www dell com poweredgemanuals 5 Drive N A Enables you to install drives that are supported on your system 6 Power supply unit PSU 2 Indicates the PSU 7 Power supply unit PSU 1 Indicates the PSU 8 PCIe expansion card riser 3 slot 4 and 5 N A Enables you to connect PCI Express expansion cards 9 USB 2 0 port This por...

Page 12: ...C using system ID ensure that the system ID button is enabled in the iDRAC setup If the system stops responding during POST press and hold the system ID button for more than five seconds to enter the BIOS progress mode Figure 4 Rear view of Front Accessed 6 x 2 5 inch drive configuration Table 4 Features available on the rear view of Front Accessed 6 x 2 5 inch drive configuration Item Ports panel...

Page 13: ...on NOTE For more information about the indicator codes see the System diagnostics and indicator codes section Power button control panel Figure 6 Power button control panel Table 6 Power button control panel Item Indicator or button Icon Description 1 Power button Indicates if the system is powered on or off Press the power button to manually power on or off the system NOTE Press the power button ...

Page 14: ... iDRAC direct features For more information see the https www dell com idracmanuals NOTE You can configure iDRAC Direct by using a USB to micro USB type AB cable which you can connect to your laptop or tablet Cable length should not exceed 3 feet 0 91 meters Performance could be affected by cable quality NOTE For more information see the Dell EMC PowerEdge XR12 Technical Specifications on the prod...

Page 15: ...ress Service Code and Service Tag The unique Express Service Code and Service Tag are used to identify the system The information tag is located on the front of Rear and Front Accessed configurations The information tag includes system information such as the Service Tag Express Service Code Manufacture date NIC MAC address QRL label and so on Figure 9 Locating the Service Tag of your system 1 Inf...

Page 16: ...and Manufacture Date Mfg Date The Exp Svc Code is used by Dell EMC to route support calls to the appropriate personnel Alternatively the Service Tag information is located on a label on the left wall of Rear Accessed configuration and right wall of the Front Accessed configuration System information label The system information label is located on back of the system cover Figure 10 Service informa...

Page 17: ...Figure 12 Electrical overview Figure 13 Icon Legend and QRL Figure 14 System tasks 1 PowerEdge XR12 system overview 17 ...

Page 18: ...nd Rack Compatibility Matrix available at https i dell com sites csdocuments Business_solutions_engineering Docs_Documents en rail rack matrix pdf The document provides the information that is listed below Specific details about rail types and their functionalities Rail adjustability range for various types of rack mounting flanges Rail depth with and without cable management accessories Types of ...

Page 19: ...RAC configuration The Integrated Dell Remote Access Controller iDRAC is designed to make you more productive as a system administrator and improve the overall availability of Dell EMC servers iDRAC alerts you to system issues helps you to perform remote management and reduces the need for physical access to the system Options to set up iDRAC IP address To enable communication between your system a...

Page 20: ... or use the iDRAC Direct port by using the USB cable You can also access iDRAC through the shared LOM mode if you have opted for a system that has the shared LOM mode enabled Options to log in to iDRAC To log in to the iDRAC Web User Interface open a browser and enter the IP address You can log in to iDRAC as iDRAC user Microsoft Active Directory user Lightweight Directory Access Protocol LDAP use...

Page 21: ... com support article sln308699 OpenManage Deployment Toolkit www dell com openmanagemanuals OpenManage Deployment Toolkit Dell certified VMware ESXi www dell com virtualizationsolutions NOTE For more information about Installation and How to videos for supported operating systems on PowerEdge system see Supported Operating Systems for Dell EMC PowerEdge systems Options to download firmware You can...

Page 22: ...n308699 Downloading drivers and firmware It is recommended that you download and install the latest BIOS drivers and systems management firmware on the system Prerequisites Ensure that you clear the web browser cache before downloading the drivers and firmware Steps 1 Go to www dell com support drivers 2 Enter the Service Tag of the system in the Enter a Dell Service Tag Dell EMC Product ID or Mod...

Page 23: ...which is compared with one of the qualified configurations stored in a table maintained by iDRAC One or more sensors are assigned to each of the configuration elements During POST any configuration validation error is logged in the System Event Log SEL LifeCycle LC log The reported events are categorized in the configuration validation error table Table 11 Configuration validation error Error Desc...

Page 24: ...the message is observed in the System Configuration Check operation Recommended Response Action Do the following and retry the operation 1 Disconnect the input power 2 Check for proper cable connection and component placement If the issue persists contact the service provider Category System Health HWC Hardware Config Severity Critical Trap EventID 2329 Table 13 Error message HWC8011 Error code HW...

Page 25: ...e people lift the system horizontally from the box and place it on a flat surface rack lift or into the rails WARNING Opening or removing the system cover while the system is powered on may expose you to a risk of electric shock WARNING Do not operate the system without the cover for a duration exceeding five minutes Operating the system without the system cover can result in component damage CAUT...

Page 26: ... the Safety instructions Steps 1 Power off the system and all attached peripherals 2 Disconnect the system from the electrical outlet and disconnect the peripherals 3 If applicable remove the system from the rack For more information see the Rail Installation Guide relevant to your rail solutions at www dell com poweredgemanuals 4 Remove the system cover After working inside your system Prerequisi...

Page 27: ...art number 3080 or equivalent 65 30 stranding Optional front bezel Removing the front bezel Prerequisites Follow the safety guidelines listed in the Safety instructions Steps 1 Remove the screws that secure the bezel on both sides of the system rack ears 2 Holding the bezel at its edges remove the bezel Figure 19 Removing the front bezel for Rear Accessed configuration Figure 20 Removing the front...

Page 28: ...ign the screws on the sides of the bezel with the holes on the system rack ears 2 Tighten the screws that secure the bezel on both sides of the system rack ears Figure 21 Installing the front bezel for Rear Accessed configuration Figure 22 Installing the front bezel for Front Accessed configuration 28 Installing and removing system components ...

Page 29: ...de side facing up and slide the latch on either end of the bezel in the direction of the arrow Now the latch is opened lift the filter by using the pull tab NOTE To maintain optimal system health Dell Technologies recommends checking and changing the filter every three months Filters can be ordered from Dell Technologies Figure 23 Removing the bezel filter for Rear Accessed configuration Installin...

Page 30: ...llow the procedure listed in the Before working inside your system 3 Remove the bezel Steps 1 Place the new filter in the bezel cavity under the filter bracket Ensure that the filter is smooth and flush in the allowed cavity 2 Slide the side latches open to allow the filter to be placed into the bezel Ensure the filter is square in the allowed cavity and that the two side latches have closed 30 In...

Page 31: ...gure 25 Installing the bezel filter for Rear Accessed configuration Figure 26 Installing the bezel filter for Front Accessed configuration 3 Install the bezel Installing and removing system components 31 ...

Page 32: ...ect the system from the electrical outlet and peripherals Steps 1 Using a 1 4 inch flat head or Phillips 2 screwdriver rotate the lock counterclockwise to the unlock position 2 Lift the release latch until the system cover slides back 3 Lift the cover from the system Figure 27 Removing the system cover for Rear Accessed configuration 32 Installing and removing system components ...

Page 33: ...re listed in Before working inside your system 3 Ensure that all internal cables are connected and routed properly and no tools or extra parts are left inside the system Steps 1 Align the tabs on the system cover with the guide slots on the system 2 Close the system cover release latch 3 Using a 1 4 inch flat head or Phillips 2 screwdriver rotate the lock clockwise to the lock position Installing ...

Page 34: ...em cover for Rear Accessed configuration Figure 30 Installing the system cover for Front Accessed configuration Next steps Follow the procedure listed in After working inside your system 34 Installing and removing system components ...

Page 35: ...xpansion card riser 2 NOTE The procedure to remove the air shroud is the same for Rear Accessed and Front Accessed configurations Steps 1 Holding the air shroud at both the ends disengage it from the guide pins on the chassis 2 Lift the air shroud out of the system Figure 31 Removing the air shroud Next steps Replace the air shroud Installing the air shroud Prerequisites 1 Follow the safety guidel...

Page 36: ...Install the expansion card riser 2 2 Follow the procedure listed in After working inside your system Expansion cards and expansion card risers NOTE A system event entry is logged in the iDRAC Lifecycle Controller if an expansion card riser is not supported or missing It does not prevent your system from turning on However if a F1 F2 pause occurs with an error message see Troubleshooting expansion ...

Page 37: ... Length Slot width Config0 R1B R2A R3A Rear Front Accessed configurations 3 Processor 1 Low profile Half length x8 2 Full Height Full length x16 4 Full Height Full length x16 Config1 R1B R2B R3B Rear Front Accessed configurations 3 Processor 1 Low profile Half length x8 1 2 Full Height Full length x8 x8 4 5 Full Height Full length x8 x8 Config2 R1B R2B R3A Rear Front Accessed configurations 3 Proc...

Page 38: ... hot swappable The following table provides guidelines for installing expansion cards to ensure proper cooling and mechanical fit The expansion cards with the highest priority should be installed first using the slot priority indicated All the other expansion cards should be installed in the card priority and slot priority order 38 Installing and removing system components ...

Page 39: ...SFP FH 2 1 Intel NIC 10Gb FH all others including V2 of 4x10 and 2x10 SFP cards 4 2 2 Intel NIC 10Gb LP 3 1 Intel NIC 1Gb FH 4 2 2 Intel NIC 1Gb LP 3 1 Dell BOSS S1 card Module Integrated slot 1 Table 15 Configuration 1 R1B R2B R3B Rear Front Accessed configurations Card type Slot priority Maximum number of cards Internal PERC adapter LP 3 1 Dell External Adapter FH 1 2 4 5 2 Broadcom NIC 25Gb FH ...

Page 40: ...3 Broadcom NIC 25Gb LP 3 1 Broadcom NIC 10Gb FH 4 1 2 3 Broadcom NIC 10Gb LP 3 1 Broadcom NIC 1Gb FH 4 1 2 3 Broadcom NIC 1Gb LP 3 1 Intel NIC 25Gb FH 4 1 2 3 Intel NIC 25Gb LP 3 1 Intel NIC 4x10Gb SFP FH 1 2 2 Intel NIC 2x10Gb SFP FH 1 2 2 Intel NIC 10Gb FH all others including V2 of 4x10 and 2x10 SFP cards 4 1 2 3 Intel NIC 10Gb LP 3 1 Intel NIC 1Gb FH 4 1 2 3 Intel NIC 1Gb LP 3 1 3 1 Dell BOSS ...

Page 41: ... thumbscrew 2 Hold the blue touch points and lift the expansion card riser from the riser connector on the system board Figure 37 Removing the expansion card riser 1 Next steps Replace the expansion card riser 1 Installing the expansion card riser 1 Prerequisites 1 Follow the safety guidelines listed in the Safety instructions 2 Follow the procedure listed in the Before working inside your system ...

Page 42: ...llow the procedure listed in After working inside your system 4 Install any device drivers required for the card as described in the documentation for the card Removing the expansion card riser 2 Prerequisites 1 Follow the safety guidelines listed in the Safety instructions 2 Follow the procedure listed in the Before working inside your system NOTE The procedure to remove the expansion card riser ...

Page 43: ...e procedure to install the expansion card riser 2 is the same for Rear Accessed and Front Accessed configurations Steps 1 Holding the blue touch points align the expansion card riser with the connector and the riser guide pins on the system board 2 Lower the expansion card riser into place until the expansion card riser connector is fully seated in the connector on the system board 3 Using Phillip...

Page 44: ...s 2 Follow the procedure listed in the Before working inside your system 3 Remove the expansion card riser 2 4 Remove the air shroud 5 Remove the drives 6 Remove the backplane 7 Remove the drive cage NOTE The procedure to remove the expansion card riser 3 is the same for Rear Accessed and Front Accessed configurations Steps 1 Using Phillips 2 screwdriver loosen the blue thumbscrews 2 Hold the blue...

Page 45: ... air shroud 5 Remove the drive cage NOTE The procedure to remove the expansion card riser 3 is the same for Rear Accessed and Front Accessed configurations Steps 1 Holding the blue touch points align the expansion card riser with the connector and the riser guide pins on the system board 2 Lower the expansion card riser into place until the expansion card riser connector is fully seated in the con...

Page 46: ...isted in the Safety instructions 2 Follow the procedure listed in the Before working inside your system 3 Remove the expansion card riser 2 4 Remove the air shroud 5 Remove the expansion card riser 1 6 If applicable disconnect the internal cables that are connected to expansion card NOTE The procedure to remove the expansion card is the same for Rear Accessed and Front Accessed configurations Step...

Page 47: ...the exact steps The numbers are for representation of sequence Figure 44 Installing filler bracket in riser 1 Next steps If applicable Install an expansion card into the expansion card riser 1 or Install the expansion card riser 1 Installing an expansion card into the expansion card riser 1 Prerequisites 1 Follow the safety guidelines listed in the Safety instructions 2 Follow the procedure listed...

Page 48: ...also keep dust and dirt out of the system and aid in proper cooling and airflow inside the system Figure 45 Removing a filler bracket from riser 1 3 Hold the expansion card by the edges and align the card edge connector with the expansion card connector on the riser 4 Insert the card edge connector firmly into the expansion card connector until the card is fully seated 5 Close the expansion card r...

Page 49: ... by unauthorized and invalidated hardware installation will null and void the system warranty Removing expansion card from the expansion card riser 2 Prerequisites 1 Follow the safety guidelines listed in the Safety instructions 2 Follow the procedure listed in the Before working inside your system 3 Remove the expansion card riser 2 4 If applicable disconnect the internal cables that are connecte...

Page 50: ...bracket NOTE You must install a filler bracket over an empty expansion card slot to maintain Federal Communications Commission FCC certification of the system The filler brackets also keep dust and dirt out of the system and aid in proper cooling and airflow inside the system NOTE The numbers on the image do not depict the exact steps The numbers are for representation of sequence 50 Installing an...

Page 51: ...the card 4 Remove the expansion card riser 2 NOTE The procedure to install the expansion card or GPU card is the same for Rear Accessed and Front Accessed configurations Steps 1 Using the Phillips 1 screwdriver loosen the blue thumbscrew 2 Lift the L shaped bracket from the expansion card riser and remove the screws 3 If installed remove the filler bracket NOTE Store the filler bracket for future ...

Page 52: ... the riser 6 Insert the card edge connector firmly into the expansion card connector until the card is fully seated 7 Using the Phillips 1 screwdriver tighten the screw NOTE The numbers on the image do not depict the exact steps The numbers are for representation of sequence Figure 52 Installing a half length full height GPU card into a riser 2 NOTE For full length GPU card remove the plastic card...

Page 53: ...Figure 53 Removing the plastic card guide from the riser Figure 54 Installing a double width full length GPU card into a riser 2 Installing and removing system components 53 ...

Page 54: ...ds or other PCIe devices on your system that are not validated and tested by Dell Damage caused by unauthorized and invalidated hardware installation will null and void the system warranty Removing expansion card from the expansion card riser 3 Prerequisites 1 Follow the safety guidelines listed in the Safety instructions 2 Follow the procedure listed in the Before working inside your system 3 Rem...

Page 55: ...to be replaced install a filler bracket and close the card retention latch NOTE You must install a filler bracket over an empty expansion card slot to maintain Federal Communications Commission FCC certification of the system The filler brackets also keep dust and dirt out of the system and aid in proper cooling and airflow inside the system NOTE The numbers on the image do not depict the exact st...

Page 56: ... 2 5 Remove the air shroud 6 Remove the drive cage 7 Remove the expansion card riser 3 NOTE The procedure to install the expansion card or GPU card is the same for Rear Accessed and Front Accessed configurations Steps 1 Using the Phillips 1 screwdriver loosen the blue thumbscrew 2 Lift the L shaped bracket from the expansion card riser and remove the screws 3 If installed remove the filler bracket...

Page 57: ...e riser 6 Insert the card edge connector firmly into the expansion card connector until the card is fully seated 7 Using the Phillips 1 screwdriver tighten the screw NOTE The numbers on the image do not depict the exact steps The numbers are for representation of sequence NOTE For a double width full length GPU card remove the plastic card guide from the riser Figure 60 Removing the plastic card g...

Page 58: ...ed in the documentation for the card NOTE While replacing a faulty storage controller or NIC card or GPU card with the same type of card after you power on the system the new card automatically updates to the same firmware and configuration of the faulty one For more information about the Part replacement configuration see the Lifecycle Controller User s Guide available at https www dell com idrac...

Page 59: ...mmunications Commission FCC certification of the system The blanks also keep dust and dirt out of the system Steps Press the release button and slide the drive blank out of the drive slot Figure 63 Removing a drive blank Next steps Installing a hard drive or Installing a drive blank Installing a drive blank Prerequisites 1 Follow the safety guidelines listed in the Safety instructions 2 If install...

Page 60: ... For more information see the documentation for the storage controller at www dell com support home CAUTION Before attempting to remove or install a drive while the system is running see the documentation for the storage controller card to ensure that the host adapter is configured correctly to support drive removal and insertion CAUTION To prevent data loss ensure that your operating system suppo...

Page 61: ...a loss ensure that your operating system supports hot swap drive installation See the documentation supplied with your operating system CAUTION When a replacement hot swappable drive is installed and the system is powered on the drive automatically begins to rebuild Ensure that the replacement drive is blank or contains data that you wish to overwrite Any data on the replacement drive is immediate...

Page 62: ...w the safety guidelines listed in the Safety instructions Steps 1 Using a Phillips 1 screwdriver release the screws from the slide rails on the drive carrier NOTE If the drive carrier has Torx screw use Torx 6 for 2 5 inch drive screwdriver to remove the drive 2 Lift the drive out of the drive carrier 62 Installing and removing system components ...

Page 63: ...r ensure that the screws are torqued to 4 in lbs Steps 1 Insert the drive into the drive carrier with the drive connector facing towards the rear of the carrier 2 Align the screw holes on the drive with the screws holes on the drive carrier 3 Using a Phillips 1 screwdriver secure the drive to the drive carrier with the screws NOTE If the drive carrier has Torx screw use Torx 6 for 2 5 inch drive s...

Page 64: ... Install the drive carrier Drive backplane This is a service technician replaceable part only Drive backplane details The system supports 2 5 inch x6 backplane Figure 69 6 x 2 5 inch backplane 1 PA2 NVMe signal connector 64 Installing and removing system components ...

Page 65: ...low the procedure listed in the Before working inside your system 3 Remove all the drives 4 Disconnect the drive backplane cables from the connectors on the system board and PIB NOTE The procedure to remove the drive backplane is the same for Rear Accessed and Front Accessed configurations Steps 1 Hold the drive backplane by the edges and lift it upwards to disengage the backplane from the guide p...

Page 66: ...al storage configuration matrix for XR12 Table 17 Internal storage configuration matrix Configu ration Chassis Orientatio n Base Configuration Description Backplane Description Storage Controller s Controller Form Factor BOSS Enable d Riser Configuration 1 Front Accessed ASSY CHAS RAF 6HD 3PCI 2U XR12 x6 2 5 SATA only Onboard SATA Onboard SATA Y C0 R1B R2A R3A C1 R1B R2B R3B C2 R1B R2B R3A 2 Front...

Page 67: ...A only Onboard SATA Onboard SATA Y C0 R1B R2A R3A C1 R1B R2B R3B C2 R1B R2B R3A 8 Rear Accessed ASSY CHAS NAF 6HD 3PCI 2U XR12 x6 2 5 SAS SATA HBA355i Adapter Y C0 R1B R2A R3A C1 R1B R2B R3B C2 R1B R2B R3A 9 Rear Accessed ASSY CHAS NAF 6HD 3PCI 2U XR12 x6 2 5 SAS SATA H755 Adapter Y C0 R1B R2A R3A C1 R1B R2B R3B C2 R1B R2B R3A 10 Rear Accessed ASSY CHAS NAF 6HD 3PCI 2U XR12 x6 2 5 SAS SATA H345 Ad...

Page 68: ...om To PWR PIB power connector BP_PWR backplane power connector BP_DST_PA1 backplane NVMe connector cable marking BP PA1 and BP_DST_PB1 backplane NVMe connector cable marking BP PB1 APERC_CTRL_PA1 signal connector on the system board cable marking CTRL_PA1 Figure 73 PERC PB NVMe cable with 6 x 2 5 inch backplane 68 Installing and removing system components ...

Page 69: ...able marking CTRL_PB1 Figure 74 PERC SA SAS cable with 6 x 2 5 inch backplane Table 20 Connector descriptions for PERC SA SAS cable with 6 x 2 5 inch backplane From To PWR PIB power connector BP_PWR backplane power connector BP_DST_SA1 backplane SAS connector cable marking BP SA1 APERC_CTRL_SA signal connector on the system board cable marking CTRL_SA1 Figure 75 SATA cable connector with 6 x 2 5 i...

Page 70: ...able marking MB SA1 Figure 76 NVMe cable connector with 6 x 2 5 inch backplane Table 22 Connector descriptions for NVMe cable connector with 6 x 2 5 inch backplane From To PWR PIB power connector BP_PWR backplane power connector BP_DST_PA1 backplane NVMe connector cable marking BP PA1 SL2_CPU_PB1 signal connector on the system board cable marking MB PB1 Figure 77 NVMe cable connector with 6 x 2 5 ...

Page 71: ...B1 SL2_CPU_PA1 signal connector on the system board cable marking MB PA1 Figure 78 PIB to Riser 2 with one single width full length GPU Table 24 Connector descriptions for PIB to Riser 2 with one single width full length GPU From To GPU_PWR1 PIB power cable connector GPU_PWR GPU power cable connector Figure 79 PIB to Riser 2 with double width full length GPU Installing and removing system componen...

Page 72: ...r cable connector Drive cage This is a service technician replaceable part only Removing the drive cage Prerequisites 1 Follow the safety guidelines listed in the Safety instructions 2 Follow the procedure listed in the Before working inside your system 3 Remove the drives 4 Remove the backplane NOTE The procedure to remove the drive cage is the same for Rear Accessed and Front Accessed configurat...

Page 73: ...isted in the Before working inside your system 3 Remove the drives 4 Remove the backplane NOTE The procedure to install the drive cage is the same for Rear Accessed and Front Accessed configurations Steps 1 Align the drive cage with the guide pins on the system and lower it until fully seated 2 Using Phillips 2 screwdriver tighten the blue thumbscrews Installing and removing system components 73 ...

Page 74: ...e the cables out of way to access the fan cable connector on the system board or the PIB NOTE Observe the fan cable routing or make a note on the fan cable routing NOTE The procedure to remove the cooling fan is the same for Rear Accessed and Front Accessed configurations Steps 1 Disconnect the cooling fan cable that is connected on the system board connector or the power interposer board PIB NOTE...

Page 75: ...for Rear Accessed and Front Accessed configurations Steps 1 Ensure to match the airflow directional arrows on the fan assembly to the arrows on the chassis Lower the cooling fan into the cage until it is seated firmly 2 Route the fan cables properly to prevent the cables from being pinched or crimped 3 Press the release tabs on the fan cable connector and connect the cable to the system board or t...

Page 76: ...ns 2 Follow the procedure listed in the Before working inside your system NOTE The procedure to remove the intrusion switch module is the same for Rear Accessed and Front Accessed configurations Steps 1 Disconnect and remove the intrusion switch cable from the connector on the power interposer board PIB NOTE Observe the routing of the cable as you remove them from the system 2 Using the Phillips 1...

Page 77: ...rusion switch module is the same for Rear Accessed and Front Accessed configurations Steps 1 Align and insert the intrusion switch module until it is firmly seated in the slot on the system 2 Using the Phillips 1 screwdriver tighten the screw securing the intrusion switch module 3 Connect the intrusion switch cable to the connector on the power interposer board PIB NOTE Route the cable properly wh...

Page 78: ...MMs and Intel Optane PMem 200 Series System memory holds the instructions that are executed by the processor Your system contains 8 memory sockets organized into 8 channels to the processor Memory channels are organized as follows Table 27 Memory channels Channel A Channel B Channel C Channel D Channel E Channel F Channel G Channel H Slots A1 Slots A5 Slots A3 Slots A7 Slots A2 Slots A6 Slots A4 S...

Page 79: ...ed voltage and speed Operating speed for DIMMs per Channel DPC RDIMM 1R 8 GB DDR4 1 2V 3200 MT s 2933 MT s or 2666 MT s 3200 MT s RDIMM 2R 16 GB 32 GB 64 GB DDR4 1 2V 3200 MT s 2933 MT s or 2666 MT s 3200 MT s LRDIMM 4R 128 GB DDR4 1 2V 3200 MT s 2933 MT s or 2666 MT s 3200 MT s Intel Optane PMem 200 Series DIMM 1R 128 GB DDR4 1 2V 3200 MT s 2933 MT s or 2666 MT s 3200 MT s Installing and removing...

Page 80: ...re followed NOTE For example 8 GB and 16 GB memory modules can be mixed Mixing of more than two memory module capacities in a system is not supported Unbalanced or odd memory configuration results in a performance loss and system may not identify the memory modules being installed so always populate memory channels identically with equal DIMMs for best performance Odd memory configuration with 3 5...

Page 81: ... guidelines listed in the Safety instructions 2 Follow the procedure listed in the Before working inside your system 3 Remove the expansion card riser 2 4 Remove the air shroud NOTE The procedure to remove the memory module is the same for Rear Accessed and Front Accessed configurations WARNING The memory modules are hot to touch for some time after the system has been powered off Allow the memory...

Page 82: ...allic contacts 2 If a memory module blank is installed in the socket remove it NOTE Ensure the socket ejector latches are fully open before installing the memory module 3 Align the edge connector of the memory module with the alignment key of the memory module socket and insert the memory module in the socket CAUTION To prevent damage to the memory module or the memory module socket during install...

Page 83: ...e System Memory Size is incorrect one or more of the memory modules may not be installed properly Ensure that the memory modules are firmly seated in their sockets 6 Run the system memory test in system diagnostics Processor and heat sink module This is a service technician replaceable part only Removing a processor and heat sink module Prerequisites 1 Follow the safety guidelines listed in the Sa...

Page 84: ... the screw diagonally opposite to the screw you loosened first c Repeat the procedure for the remaining two screws 2 Set the Anti Tilt wires to the unlocked position inward position Figure 90 Loosening the screws and set the Anti Tilt wires to the unlocked position 3 Lift the processor and heat sink module PHM from the system and set the PHM aside with the processor side facing up 84 Installing an...

Page 85: ...move the processor and heat sink module NOTE The procedure to remove the processor from the processor and heat sink module is the same for Rear Accessed and Front Accessed configurations CAUTION An expected CMOS battery loss or CMOS checksum error message may be displayed during the first instance of powering on the system after replacing the processor or system board To resolve this issue go to s...

Page 86: ... that you return the TIM break lever back to its original position 4 Using your thumb and index finger first hold the carrier release tab at the pin 1 connector pull out the tip of the carrier release tab and then lift the carrier partially from the heat sink 5 Repeat the procedure at the remaining three corners of the carrier 6 After all the corners are released from the heat sink lift the carrie...

Page 87: ...processor and heat sink module is the same for Rear Accessed and Front Accessed configurations Steps 1 Place the processor in the processor tray NOTE Ensure that the pin 1 indicator on the processor tray is aligned with the pin 1 indicator on the processor 2 Place the processor carrier on top of the processor that is in the processor tray aligning pin 1 indicator on the processor NOTE Ensure that ...

Page 88: ...tched to the processor carrier Figure 96 Press the carrier on the four sides 4 If you are using an existing heat sink remove the thermal grease on the heat sink by using a clean lint free cloth or the cleaning pad that came with the processor kit 5 Use the thermal grease syringe included with your processor kit to apply the grease in a thin spiral on the bottom of the heat sink 88 Installing and r...

Page 89: ... 98 Remove the Thermal Interface Material TIM protective film 7 Place the heat sink on the processor and press the heat sink until the carrier locks onto the heat sink at all the four corners CAUTION To avoid damaging the fins on the heat sink do not press down on the heat sink fins NOTE Ensure that the pin 1 indicator on the heat sink is aligned with the pin 1 indicator on the carrier before plac...

Page 90: ...onditions 1 Follow the safety guidelines listed in the Safety instructions 2 Follow the procedure listed in the Before working inside your system 3 Remove the expansion card riser 2 4 Remove the air shroud 5 If installed remove the processor socket cover NOTE The procedure to install the processor and heat sink module is the same for Rear Accessed and Front Accessed configurations Steps 1 Set the ...

Page 91: ...nstalling the processor and heat sink module PHM 3 Set the Anti Tilt wires to the locked position outward position and then using the Torx T30 screwdriver tighten the screws 8 in lbs on the heat sink in the order below a Tighten the first screw completely b Tighten the screw diagonally opposite to the screw you tighten first c Repeat the procedure for the remaining two screws Installing and removi...

Page 92: ...erver the maximum permissible dimensions of the USB memory key are 15 9 mm width x 57 15 mm length x 7 9 mm height 1 Follow the safety guidelines listed in the Safety instructions 2 Follow the procedure listed in the Before working inside your system 3 Remove the expansion card riser 2 4 Remove the air shroud 5 Remove the expansion card riser 1 NOTE The procedure to remove the USB memory key is th...

Page 93: ...e air shroud 5 Remove the expansion card riser 1 NOTE The procedure to install the USB memory key is the same for Rear Accessed and Front Accessed configurations Steps Connect the USB memory key into the USB port on riser 1 Figure 103 Installing the internal USB memory key Next steps 1 Install the expansion card riser 1 2 Follow the procedure listed in After working inside your system 3 While boot...

Page 94: ...or Figure 104 Removing the M 2 BOSS card from the system board Next steps Replace the M 2 BOSS card Installing the M 2 BOSS card Prerequisites 1 Follow the safety guidelines listed in the Safety instructions 2 Follow the procedure listed in Before working inside your system 3 Remove the expansion card riser 2 4 Remove the air shroud NOTE The procedure to install the M 2 BOSS card is the same for R...

Page 95: ... listed in the Safety instructions 2 Follow the procedure listed in the Before working inside your system 3 Removing the M 2 BOSS card NOTE The procedure to remove the M 2 SSD module is the same for Rear Accessed and Front Accessed configurations Steps 1 Using the Phillips 1 screwdriver remove the screw securing the M 2 SSD module to the BOSS card 2 Pull the M 2 SSD module to disconnect from the c...

Page 96: ...dure to install the M 2 SSD module is the same for Rear Accessed and Front Accessed configurations Steps 1 Align the M 2 SSD module at angle with the connector on the M 2 BOSS card 2 Insert the M 2 SSD module until it is firmly seated in M 2 BOSS card connector 3 Using the Phillips 1 screwdriver secure the M 2 SSD module on the M 2 BOSS card with the screw NOTE The numbers on the image do not depi...

Page 97: ...leep state The active PSU supports 100 percent of the system load thus operating at higher efficiency The PSU in the sleep state monitors output voltage of the active PSU If the output voltage of the active PSU drops the PSU in the sleep state returns to an active output state If having both PSUs active is more efficient than having one PSU in the sleep state the active PSU can also activate the s...

Page 98: ... Federal Communications Commission FCC certification of the system The blank also keeps dust and dirt out of the system and aids in proper cooling and airflow inside the system Figure 108 Removing a power supply unit blank Next steps Replace the PSU or PSU blank Installing a power supply unit blank Prerequisites 1 Follow the safety guidelines listed in the Safety instructions NOTE Install the powe...

Page 99: ...to remove 3 Remove the cable from the strap on the PSU handle 4 Unlatch and lift the optional cable management arm if it interferes with the PSU removal For information about the cable management arm see the system s rack documentation at https www dell com poweredgemanuals NOTE The procedure to remove the power supply unit is same for Rear Accessed and Front Accessed configurations Steps Press th...

Page 100: ...anuals 2 Connect the power cable to the PSU and plug the cable into a power outlet CAUTION When connecting the power cable to the PSU secure the cable to the PSU with the strap NOTE When installing hot swapping or hot adding a new PSU wait for 15 seconds for the system to recognize the PSU and determine its status The PSU redundancy may not occur until discovery is complete The PSU status indicato...

Page 101: ... supply unit blank 6 Disconnect the cables that are connected to power interposer board PIB and from the system board NOTE The procedure to remove the PIB is same for Rear Accessed and Front Accessed configurations Steps 1 Using a Phillips 2 screwdriver remove the screws securing the power interposer board to the system NOTE Observe the routing of the cables as you remove it from the system 2 Lift...

Page 102: ...ard NOTE The procedure to install the PIB is same for Rear Accessed and Front Accessed configurations Steps 1 Align the slots on the PIB with the hook on the chassis and slide it into place 2 Using Phillips 2 screwdriver tighten the screws to secure the PIB to the system Figure 113 Installing the power interposer board 3 Reconnect the cables that are connected to the power interposer board PIB and...

Page 103: ...able disconnect the power or data cables from the expansion cards Steps 1 To remove the battery a Push the battery holder clip away from the battery CAUTION To avoid damage to the battery holder clip ensure that you do not bend the battery holder clip while installing or removing a battery b Pull the battery out of the battery holder NOTE Ensure that the side of the battery is facing the battery h...

Page 104: ... System Setup d To test the newly installed battery remove the system from the enclosure for at least an hour e Reinstall the system into the enclosure after an hour f Enter the System Setup and if the time and date are still incorrect see Getting help section System board This is a service technician replaceable part only Removing the system board Prerequisites CAUTION If you are using the Truste...

Page 105: ...s that secure the system board to the chassis 2 To disengage the ports from the slots on the chassis slide the system board toward the fan chassis 3 Incline the system board at an angle and lift the system board out of the chassis Figure 116 Removing the system board Next steps Install the system board Installing the system board Prerequisites NOTE Before replacing the system board replace the old...

Page 106: ...e system board by holding a memory module processor or other components CAUTION Take care not to damage the system identification button while placing the system board into the chassis 2 Holding the system board by the edges lower the system board into the system 3 Incline the system board at an angle and align the connectors on the system board with the slots on the I O of the chassis until the c...

Page 107: ... service tag manually See the Manually update the Service Tag by using System Setup section c Update the BIOS and iDRAC versions Re enable the Trusted Platform Module TPM See the Upgrading the Trusted Platform Module section 3 If you are not using Easy restore import your new or existing iDRAC Enterprise license For more information see the iDRAC User s Guide available at https www dell com idracm...

Page 108: ...vice tag is entered it cannot be updated or changed 5 Click OK Trusted Platform Module This is a service technician replaceable part only Upgrading the Trusted Platform Module Prerequisites NOTE Ensure that your operating system supports the version of the TPM module being installed Ensure that you download and install the latest BIOS firmware on your system Ensure that the BIOS is configured to e...

Page 109: ...ializing TPM for users Steps 1 Initialize the TPM For more information see Initializing the TPM for users 2 The TPM Status changes to Enabled Activated Initializing the TPM 2 0 for users Steps 1 While booting your system press F2 to enter System Setup 2 On the System Setup Main Menu screen click System BIOS System Security Settings 3 From the TPM Security option select On 4 Save the settings 5 Res...

Page 110: ...ve it from the system 2 Using the Phillips 2 remove screws from rack ear assembly 3 Using the Torx 8 remove screws from status LED control panel assembly 4 Hold the status LED control panel assembly and remove the status LED control panel along with the cable from the system NOTE The numbers on the image do not depict the exact steps The numbers are for representation of sequence Figure 120 Removi...

Page 111: ...Figure 121 Removing the status LED control panel for Rear Accessed configuration Figure 122 Removing the left ear for Front Accessed configuration Installing and removing system components 111 ...

Page 112: ...ove the expansion card riser 1 Steps 1 Route the control panel cable through the guide slots in the system and connector on system board NOTE Route the cable properly to prevent the cable from being pinched or crimped 2 Align and insert the status LED control panel assembly in the slot on the system 3 Using the Torx 8 tighten screws from status LED control panel assembly 4 Using the Phillips 2 tig...

Page 113: ...Figure 124 Installing the status LED control panel for Rear Accessed configuration Figure 125 Installing the left ear for Rear Accessed configuration Installing and removing system components 113 ...

Page 114: ...ED control panel for Front Accessed configuration Figure 127 Installing the left ear for Front Accessed configuration Next steps 1 Install the expansion card riser 1 2 Install the air shroud 114 Installing and removing system components ...

Page 115: ...eps 1 Disconnect the control panel cable from the system board connector NOTE Observe the routing of the cable as you remove it from the system 2 Using the Phillips 2 remove screws from rack ear assembly 3 Using the Torx 8 remove screws from power button control panel assembly 4 Hold the control panel assembly and remove the control panel along with the cable from the system NOTE The numbers on th...

Page 116: ...Figure 129 Removing the power button control panel for Rear Accessed configuration Figure 130 Removing the right ear for Front Accessed configuration 116 Installing and removing system components ...

Page 117: ...e expansion card riser 1 Steps 1 Route the control panel cable through the side wall of the system NOTE Route the cable properly to prevent the cable from being pinched or crimped 2 Align and insert the control panel in the slot on the system 3 Connect the control panel cable to the connector on the system board 4 Using the Torx 8 tighten screws from power button control panel assembly 5 Using the...

Page 118: ...Figure 132 Installing the power button control panel for Rear Accessed configuration Figure 133 Installing the right ear for Rear Accessed configuration 118 Installing and removing system components ...

Page 119: ...on control panel for Front Accessed configuration Figure 135 Installing the right ear for Front Accessed configuration Next steps 1 Install the expansion card riser 1 2 Install the air shroud Installing and removing system components 119 ...

Page 120: ...3 Install the expansion card riser 2 4 Follow the procedure listed in the After working inside your system 120 Installing and removing system components ...

Page 121: ... 461G rugged kit Prerequisites NOTE The MIL 901E and MIL 461G rugged kits are ordered separately from Dell 1 Follow the safety guidelines listed in Safety instructions 2 Unpack the 901E and MIL 461G rugged brackets 3 Remove the front bezel for Front Accessed configuration 4 Remove the system cover 5 Remove the drive cage Steps 1 Using a Phillips 2 screwdriver secure the power supply rugged bracket...

Page 122: ... seated Using a Phillips 2 screwdriver secure the 901E and MIL 461G drive rugged bracket NOTE To secure the 901E and MIL 461G drive rugged bracket ensure to use the black screws shipped with the 901E and MIL 461G kit Figure 137 Installing the 901E and MIL 461G PCI rugged bracket 4 Install the front bezel Using a Phillips 2 screwdriver tighten one screw to system cover NOTE The kit consists of extr...

Page 123: ...alling the SSDs Processors See Installing the processor Heat sink See Installing the heat sink Storage controller cards See Installing the expansion card into the expansion card riser HBA CNA 3rd party card Network cards Power supplies See Installing the power supply units Cables Rail Kits Bezels See Installing the bezels Risers See Installing an expansion card riser Power cords 7 Upgrade Kits 123...

Page 124: ...elp to disable the system and reset the passwords To install components and cables correctly you must be able to identify the connectors on the system board Topics System board connectors System board jumper settings Disabling a forgotten password System board connectors Figure 138 System board jumpers and connectors 1 IO_Riser2 Riser 2connector 2 PWRD_EN BIOS password jumper 8 124 Jumpers and con...

Page 125: ...isabled and you are not allowed to set a new password NVRAM_CLR The BIOS configuration settings are retained at system boot The BIOS configuration settings are cleared at system boot CAUTION Be careful when changing the BIOS settings The BIOS interface is designed for advanced users Any change in the setting could prevent your system from starting correctly and you might have potential loss of dat...

Page 126: ...ord you must move the jumper back to pins 2 and 4 NOTE If you assign a new system and or setup password with the jumper on pins 4 and 6 the system disables the new password s the next time it boots 5 Reconnect the peripherals and connect the system to the electrical outlet and then power on the system 6 Power off the system 7 Remove the system cover 8 Move the jumper on the system board from pins ...

Page 127: ...Run the appropriate Online Diagnostics test Restart the system and run embedded diagnostics ePSA If the drives are configured in a RAID array restart the system and enter the host adapter configuration utility program Temperature indicator The indicator turns solid amber if the system experiences a thermal error for example the ambient temperature is out of range or there is a fan failure Ensure t...

Page 128: ... If the problem persists see the Getting help section PCIe indicator The indicator turns solid amber if a PCIe card experiences an error Restart the system Update any required drivers for the PCIe card Reinstall the card If the problem persists see the Getting help section NOTE For more information about the supported PCIe cards see the Expansion card installation guidelines section System health ...

Page 129: ...subsystem You can configure iDRAC Direct by using a USB to micro USB type AB cable which you can connect to your laptop or tablet Cable length should not exceed 3 feet 0 91 meters Performance could be affected by cable quality The following table describes iDRAC Direct activity when the iDRAC Direct port is active Table 36 iDRAC Direct LED indicator codes iDRAC Direct LED indicator code Condition ...

Page 130: ...ng sent or received Link indicator is amber and activity indicator is off Indicates that the NIC is connected to a valid network at less than its maximum port speed and data is not being sent or received Link indicator is blinking green and activity is off Indicates that the NIC identity is enabled through the NIC configuration utility Power supply unit indicator codes AC and DC power supply units...

Page 131: ...imum output power CAUTION When correcting a PSU mismatch replace the PSU with the blinking indicator Swapping the PSU to make a matched pair can result in an error condition and an unexpected system shutdown To change from a high output configuration to a low output configuration or vice versa you must power off the system CAUTION AC PSUs support both 240 V and 120 V input voltages with the except...

Page 132: ...ve is accessed Figure 144 Drive indicators 1 Drive activity LED indicator 2 Drive status LED indicator 3 Drive capacity label NOTE If the drive is in the Advanced Host Controller Interface AHCI mode the status LED indicator does not power on NOTE Drive status indicator behavior is managed by Storage Spaces Direct Not all drive status indicators may be used Table 40 Drive indicator codes Drive stat...

Page 133: ...ut the failed device s View status messages that inform you if tests are completed successfully View error messages that inform you of issues encountered during testing Running the Embedded System Diagnostics from the Dell Lifecycle Controller Steps 1 When the system is booting press F10 2 Select Hardware Diagnostics Run Hardware Diagnostics The ePSA Pre boot System Assessment window is displayed ...

Page 134: ...lts of all tests that are run System health Provides the current overview of the system performance Event log Displays a time stamped log of the results of all tests run on the system This is displayed if at least one event description is recorded 134 System diagnostics and indicator codes ...

Page 135: ...elect your country from the drop down menu on the lower right corner of the page 3 For customized support a Enter the system Service Tag in the Enter a Service Tag Serial Number Service Request Model or Keyword field b Click Search The support page that lists the various support categories is displayed 4 For general support a Select your product category b Select your product segment c Select your...

Page 136: ...port for your Dell EMC server storage and networking devices By installing and setting up a SupportAssist application in your IT environment you can receive the following benefits Automated issue detection SupportAssist monitors your Dell EMC devices and automatically detects hardware issues both proactively and predictively Automated case creation When an issue is detected SupportAssist automatic...

Page 137: ...ing Started Guide document that is shipped with your system www dell com poweredgemanuals Configuring your system For information about the iDRAC features configuring and logging in to iDRAC and managing your system remotely see the Integrated Dell Remote Access Controller User s Guide For information about understanding Remote Access Controller Admin RACADM subcommands and supported RACADM interf...

Page 138: ...e Dell EMC SupportAssist Enterprise User s Guide https www dell com serviceabilitytools For information about partner programs enterprise systems management see the OpenManage Connections Enterprise Systems Management documents www dell com openmanagemanuals Working with the Dell PowerEdge RAID controllers For information about understanding the features of the Dell PowerEdge RAID controllers PERC...

Reviews: