


38
CHAPTER 4: INSTALLING ADDITIONAL OR REPLACEMENT COMPONENTS
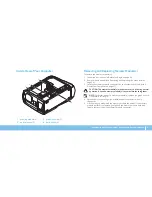
Follow the instructions in “Before You Begin” on page
1.
34.
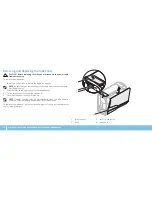
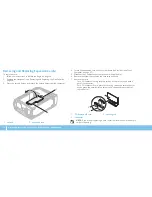
Align the notch on the bottom of the memory module with the tab on the
2.
memory module connector.
4
3
2
1
1
memory module connector
2
tab
3
notch
4
memory module
CAUTION: To avoid damage to the memory module, press the memory
module straight down into the memory module connector while you
apply equal force to each end of the memory module.
To replace memory module(s):
Recommended memory configuration:
Type
Slots
1333 MHz, 1600 MHz, and 1866 MHz
Slots 1 and 2 or slots 1 — 4
Summary of Contents for Alienware Aurora R3
Page 1: ......
Page 2: ......
Page 3: ... ALIENWARE DESKTOP MANUAL ...
Page 6: ...4 ...
Page 8: ...6 ...
Page 16: ...14 CHAPTER 1 SETTING UP YOUR DESKTOP ...
Page 25: ...23 CHAPTER 3 USING YOUR DESKTOP CHAPTER 3 USING YOUR DESKTOP CHAPTER 4 USING YOUR DESKTOP ...
Page 46: ...44 CHAPTER 4 INSTALLING ADDITIONAL OR REPLACEMENT COMPONENTS ...
Page 47: ...45 CHAPTER 5 TROUBLESHOOTING CHAPTER 5 TROUBLESHOOTING CHAPTER 6 TROUBLESHOOTING ...
Page 56: ...54 CHAPTER 5 TROUBLESHOOTING ...
Page 60: ...58 CHAPTER 6 SYSTEM RECOVERY ...
Page 69: ......
Page 70: ......