background image

2

Follow the procedure that is listed in 

After working inside your system

.

Removing the optical drive

Prerequisites

1

Follow the safety guidelines listed in 

Safety instructions

.

2

Follow the procedure listed in 

Before working inside your system

.

3

Remove the front bezel

.

4

Disconnect the power and data cables from the back of the optical drive.

NOTE: 

Ensure that you note the routing of the power and data cable on the side of the system as you remove them from 

the system board and drive .

Steps

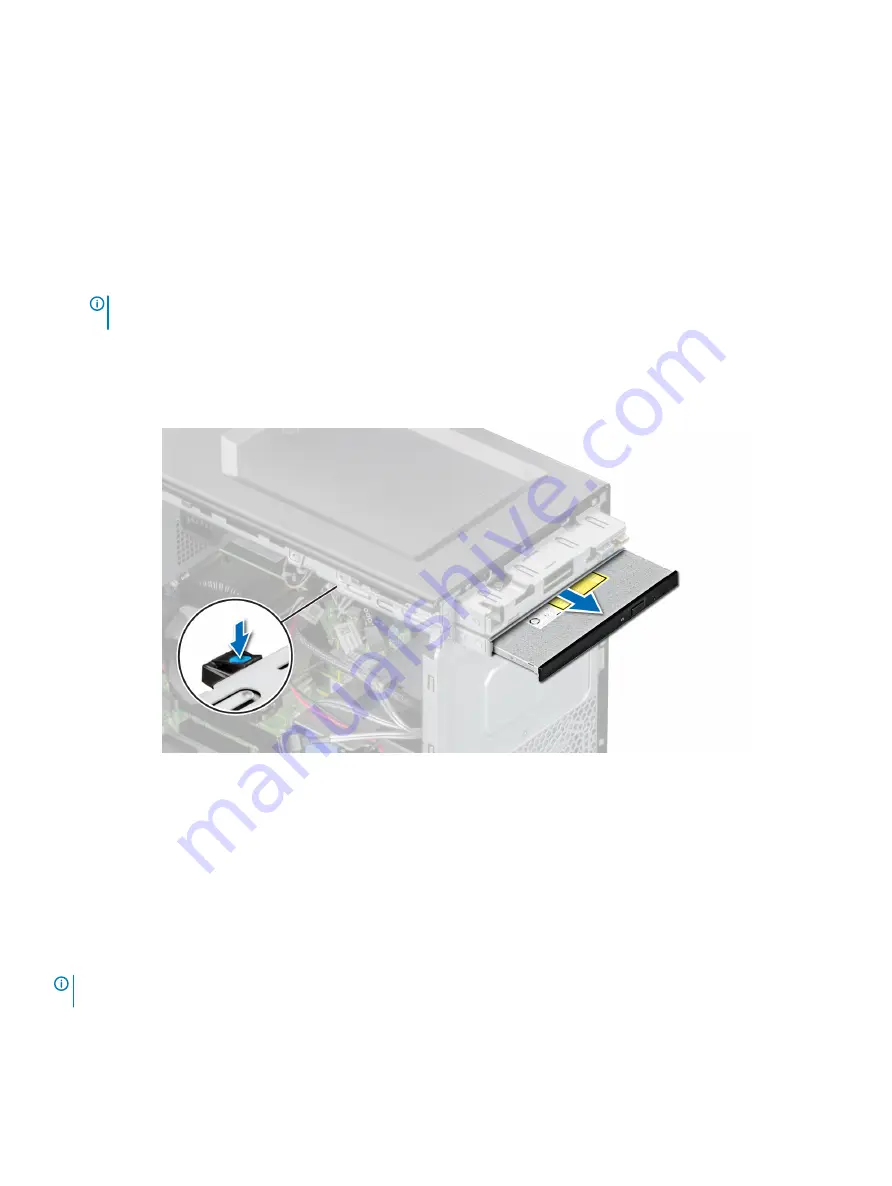
To release the optical drive, press and push the release tab toward the front of the system.

Slide the optical drive out of the system.

If you are not installing a new optical drive, 

install the optical drive fillers

.

Figure 21. Removing the optical drive

Next step

1

Replace the optical drive

.

Installing the optical drive

Prerequisites

NOTE: 

Only slim 9.5-mm SATA DVD-ROM drive or DVD+/-RW drive can be installed in your system. External optical drives can 

be connected through USB ports.

1

Follow the safety guidelines listed in 

Safety instructions

.

2

Follow the procedure that is listed in 

Before working inside your system

.

3

Remove the front bezel

.

Installing and removing system components

51

Summary of Contents for PowerEdge T140

Page 1: ...Dell EMC PowerEdge T140 Installation and Service Manual Regulatory Model E59S Series Regulatory Type E59S001 ...

Page 2: ...amage to hardware or loss of data and tells you how to avoid the problem WARNING A WARNING indicates a potential for property damage personal injury or death 2018 Dell Inc or its subsidiaries All rights reserved Dell EMC and other trademarks are trademarks of Dell Inc or its subsidiaries Other trademarks may be trademarks of their respective owners 2018 12 Rev A00 ...

Page 3: ...ds to download firmware and drivers 16 Downloading drivers and firmware 17 4 Pre operating system management applications 18 Options to manage the pre operating system applications 18 System Setup 18 Viewing System Setup 18 System Setup details 19 System BIOS 19 iDRAC Settings utility 37 Device Settings 37 Dell Lifecycle Controller 37 Embedded system management 37 Boot Manager 38 Viewing Boot Mana...

Page 4: ...module 54 Installing a memory module 55 Cooling fan 56 Removing the cooling fan 56 Installing a cooling fan 57 Optional internal USB memory key 58 Replacing the optional internal USB memory key 58 Expansion cards 59 Expansion card installation guidelines 59 Removing a PCIe expansion card 60 Installing a PCIe expansion card 61 Storage controller card 63 Removing the integrated storage controller ca...

Page 5: ...ors 88 System board jumpers and connectors 89 System board jumper settings 90 Disabling forgotten password 91 7 Technical specifications 92 Chassis dimensions 93 System weight 93 Processor specifications 93 Supported operating systems 94 PSU specifications 94 Cooling fan specifications 94 System battery specifications 94 Expansion card specifications 94 Memory specifications 95 Storage controller ...

Page 6: ...d power supply unit indicator codes 102 Using system diagnostics 103 Dell Embedded System Diagnostics 103 9 Getting help 105 Recycling or End of Life service information 105 Contacting Dell 105 Accessing system information by using QRL 105 Quick Resource Locator for Dell EMC PowerEdge T140 system 106 Receiving automated support with SupportAssist 106 10 Documentation resources 107 6 Contents ...

Page 7: ...ument provides an overview about the system information about installing and replacing components technical specifications diagnostic tools and guidelines to be followed while installing certain components 1 About this document 7 ...

Page 8: ...bled SAS or SATA drives For more information about supported drives see the Drive specifications section NOTE All instances of SAS SATA drives and SSDs are referred to as drives in this document unless specified otherwise Topics Front view of the system Rear view of the system Inside the system Locating the information tag of your system System Information Label 2 8 Dell EMC PowerEdge T140 system ...

Page 9: ...ystem 1 Power button 2 System health and ID indicator 3 USB 3 0 port 4 iDRAC direct micro USB port 5 Optical drive optional For more information about the ports see the Ports and connectors specifications section Dell EMC PowerEdge T140 system overview 9 ...

Page 10: ...ode QRL label 4 OpenManage Mobile OMM label 5 PCIe expansion card slots 4 6 USB 2 0 port 4 7 System identification button 8 NIC port Gb 2 9 USB 3 0 ports 2 10 NIC port Gb 1 11 iDRAC dedicated NIC port 12 VGA port 13 Serial port 14 Power supply unit 15 PSU Built in Self Test BIST LED 16 PSU Built in Self Test BIST Button 10 Dell EMC PowerEdge T140 system overview ...

Page 11: ... warranty Read and follow the safety instructions that are shipped with your product Figure 3 Inside the system 1 Cabled Power Supply Unit PSU 2 Optical drive 3 Cabled drives 4 4 System board 5 Expansion card retention latch 6 PCIe expansion card slots 4 7 Intrusion switch 8 Fan 9 Memory module sockets Locating the information tag of your system Your system is identified by a unique Express Servic...

Page 12: ...System Information Label The Dell EMC PowerEdge T140 system information label Figure 4 Icon legend Figure 5 Service information 12 Dell EMC PowerEdge T140 system overview ...

Page 13: ...Figure 6 Memory information Figure 7 Quick resource locator Dell EMC PowerEdge T140 system overview 13 ...

Page 14: ...Figure 8 System task 14 Dell EMC PowerEdge T140 system overview ...

Page 15: ...ess To enable communication between your system and iDRAC you must first configure the network settings based on your network infrastructure NOTE For static IP configuration you must request for it at the time of purchase This option is set to DHCP by Default You can set up the IP address by using one of the following interfaces Interfaces Document Section iDRAC Settings utility Dell Integrated De...

Page 16: ... information see the RACADM Command Line Interface Reference Guide at Dell com poweredgemanuals Options to install the operating system If the system is shipped without an operating system install a supported operating system by using one of the following resources Table 1 Resources to install the operating system Resources Location iDRAC Dell com idracmanuals Lifecycle Controller Dell com idracma...

Page 17: ...cache before downloading the drivers and firmware Steps 1 Go to Dell com support home 2 In the Drivers Downloads section type the Service Tag of your system in the Enter a Service Tag or product ID box and then click Submit NOTE If you do not have the Service Tag select Detect Product to allow the system to automatically detect the Service Tag or click View products and navigate to your product 3 ...

Page 18: ...onfigure the BIOS settings iDRAC settings and device settings of your system NOTE Help text for the selected field is displayed in the graphical browser by default To view the help text in the text browser press F1 You can access system setup by one of the following Standard graphical browser The browser is enabled by default Text browser The browser is enabled by using Console Redirection Viewing...

Page 19: ... 1 Power on or restart your system 2 Press F2 immediately after you see the following message F2 System Setup NOTE If the operating system begins to load before you press F2 wait for the system to finish booting and then restart the system and try again 3 On the System Setup Main Menu screen click System BIOS System BIOS Settings details The System BIOS Settings screen details are explained as fol...

Page 20: ...on screen to view system properties such as Service Tag system model name and BIOS version Viewing System Information To view the System Information screen perform the following steps 1 Power on or restart your system 2 Press F2 immediately after you see the following message F2 System Setup NOTE If your operating system begins to load before you press F2 wait for the system to finish booting and ...

Page 21: ... and then restart the system and try again 3 On the System Setup Main Menu screen click System BIOS 4 On the System BIOS screen click Memory Settings Memory Settings details The Memory Settings screen details are explained as follows Option Description System Memory Size Specifies the memory size in the system System Memory Type Specifies the type of memory installed in the system System Memory Sp...

Page 22: ...the BIOS displays only one logical processor per core This option is set to Enabled by default Virtualization Technology Enables or disables the virtualization technology for the processor This option is set to Enabled by default Adjacent Cache Line Prefetch Optimizes the system for applications that need high utilization of sequential memory access This option is set to Enabled by default You can...

Page 23: ...m begins to load before you press F2 wait for the system to finish booting and then restart your system and try again 3 On the System Setup Main Menu screen click System BIOS 4 On the System BIOS screen click SATA Settings SATA Settings details The SATA Settings screen details are explained as follows Option Description Embedded SATA Enables the embedded SATA option to be set to Off AHCI or RAID m...

Page 24: ... Capacity Specifies the total capacity of the hard drive This field is undefined for removable media devices such as optical drives Port D Sets the drive type of the selected device When the Embedded SATA setting is AHCI Mode BIOS support is always enabled Option Description Model Specifies the drive model of the selected device Drive Type Specifies the type of drive attached to the SATA port Capa...

Page 25: ...gs screen perform the following steps 1 Power on or restart your system 2 Press F2 immediately after you see the following message F2 System Setup NOTE If your operating system begins to load before you press F2 wait for the system to finish booting and then restart your system and try again 3 On the System Setup Main Menu screen click System BIOS 4 On the System BIOS screen click Boot Settings Bo...

Page 26: ...de NOTE BIOS does not control network settings in the BIOS mode For the BIOS boot mode the optional Boot ROM of the network controllers handles the network settings Viewing Network Settings To view the Network Settings screen perform the following steps 1 Power on or restart your system 2 Press F2 immediately after you see the following message F2 System Setup NOTE If your operating system begins ...

Page 27: ...I iSCSI Settings details The UEFI iSCSI Settings screen details are explained as follows Option Description iSCSI Initiator Name Specifies the name of the iSCSI initiator iqn format iSCSI Device1 Enables or disables the iSCSI device When enabled a UEFI boot option is created for the iSCSI device automatically iSCSI Device1 Settings Enables you to control the configuration of the iSCSI device Integ...

Page 28: ...ontroller as the primary display When set to Enabled the Embedded Video Controller will be the primary display even if add in graphic cards are installed When set to Disabled an add in graphics card will be used as the primary display BIOS will output displays to both the primary add in video and the embedded video during POST and pre boot environment The embedded video will then be disabled right...

Page 29: ...wer on or restart your system 2 Press F2 immediately after you see the following message F2 System Setup NOTE If your operating system begins to load before you press F2 wait for the system to finish booting and then restart your system and try again 3 On the System Setup Main Menu screen click System BIOS 4 On the System BIOS screen click Serial Communication Serial Communication details The Seri...

Page 30: ...rmine the baud rate automatically This failsafe baud rate is used only if the attempt fails and the value must not be changed This option is set to 115200 by default Remote Terminal Type Sets the remote console terminal type This option is set to ANSIVT100 VT220 by default Redirection After Boot Enables or disables the BIOS console redirection when the operating system is loaded This option is set...

Page 31: ...tion Number of Turbo Boost Enabled Cores for Processor 1 NOTE If there are two processors installed in the system you will see an entry for Number of Turbo Boost Enabled Cores for Processor 2 Controls the number of turbo boost enabled cores for Processor 1 The maximum number of cores is enabled by default Monitor Mwait Enables the Monitor Mwait instructions in the processor This option is set to E...

Page 32: ...m This field is read only when TPM Security is set to Off The action requires an additional reboot before it can take effect Intel R TXT Enables or disables the Intel Trusted Execution Technology TXT option To enable the Intel TXT option virtualization technology and TPM Security must be enabled with Pre boot measurements This option is set to Off by default When TPM 2 0 is installed TPM 2 Algorit...

Page 33: ...he available options are User Mode Audit Mode and Deployed Mode Options Description User Mode In User Mode PK must be installed and BIOS performs signature verification on programmatic attempts to update policy objects The BIOS allows unauthenticated programmatic transitions between modes Audit Mode In Audit mode PK is not present The BIOS does not authenticate programmatic updates to the policy o...

Page 34: ...s task If you have assigned a setup password the system accepts your setup password as an alternate system password Steps 1 Power on or reboot your system 2 Type the system password and press Enter Next step When Password Status is set to Locked type the system password and press Enter when prompted at reboot NOTE If an incorrect system password is typed the system displays a message and prompts y...

Page 35: ...tempts exceeded System halted Even after you turn off and restart the system the error message is displayed until the correct password is typed The following options are exceptions If System Password is not set to Enabled and is not locked through the Password Status option you can assign a system password For more information see the System Security Settings screen section You cannot disable or c...

Page 36: ...abled if Redundant OS Location is set to None or if Redundant OS State is set to Hidden When set to Enabled BIOS boots to the device specified in Redundant OS Location When set to Disabled BIOS preserves the current boot list settings This option is set to Enabled by default Miscellaneous Settings You can use the Miscellaneous Settings screen to perform specific functions such as updating the asse...

Page 37: ...uest This option is set to None by default iDRAC Settings utility The iDRAC settings utility is an interface to set up and configure the iDRAC parameters by using UEFI You can enable or disable various iDRAC parameters by using the iDRAC settings utility NOTE Accessing some of the features on the iDRAC settings utility needs the iDRAC Enterprise License upgrade For more information about using iDR...

Page 38: ...ager main menu Menu item Description Continue Normal Boot The system attempts to boot to devices starting with the first item in the boot order If the boot attempt fails the system continues with the next item in the boot order until the boot is successful or no more boot options are found One shot Boot Menu Enables you to access boot menu where you can select a one time boot device to boot from L...

Page 39: ...figure the networked systems remotely To access the PXE boot option boot the system and then press F12 during POST instead of using standard Boot Sequence from BIOS Setup It does not pull any menu or allows managing of network devices Pre operating system management applications 39 ...

Page 40: ...your product CAUTION To ensure proper operation and cooling all bays in the system and system fans must be always populated with a component or a blank NOTE It is recommended that you always use an antistatic mat and antistatic strap while working on components inside the system Before working inside your system Prerequisite Follow the safety guidelines listed in Safety instructions Steps 1 Power ...

Page 41: ...tructions 2 Power off the system and all attached peripherals 3 Disconnect the system from the electrical outlet and peripherals 4 Place the system on a flat stable surface NOTE Ensure that the lock on the side of the system cover is unlocked Step Lift the cover release latch and remove the system cover Figure 9 Removing the system cover Next step 1 Replace the system cover Installing and removing...

Page 42: ...s the system cover until it clicks into place Figure 10 Installing the system cover Next steps 1 Place the system upright on a flat stable surface 2 Reconnect the peripherals and connect the system to the electrical outlet 3 Power on the system including any attached peripherals Front bezel Removing the front bezel Prerequisites 1 Follow the safety guidelines listed in Safety instructions 2 Follow...

Page 43: ...ext step 1 Replace the front bezel Installing the front bezel Prerequisites 1 Follow the safety guidelines listed in Safety instructions 2 Follow the procedure that is listed in Before working inside your system Steps 1 Place the bezel tabs into the bezel slots in the system 2 Press the bezel into the system until the retention clips lock into place Installing and removing system components 43 ...

Page 44: ...y and unplug cables before remove the drive For more information see the Dell com storagecontrollermanuals CAUTION Before attempting to remove or install a drive while the system is running see the documentation for the storage controller card to ensure that the host adapter is configured correctly to support drive removal and insertion CAUTION Mixing drive carriers from previous generations of Po...

Page 45: ...xt to a partially installed carrier can damage the partially installed carrier s shield spring and make it unusable CAUTION To prevent data loss ensure that your operating system supports hot swap drive installation See the documentation supplied with your operating system CAUTION When a replacement hot swappable drive is installed and the system is powered on the drive automatically begins to reb...

Page 46: ...king inside your system Removing a drive from the drive carrier Prerequisites 1 Follow the safety guidelines listed in Safety instructions 2 Follow the procedure that is listed in Before working inside your system 3 Remove a 3 5 inch drive carrier from the drive bay Step Flex the drive bracket and remove the drive from the carrier 46 Installing and removing system components ...

Page 47: ... carrier Installing a drive into the drive carrier Prerequisites 1 Follow the safety guidelines listed in Safety instructions 2 Follow the procedure that is listed in Before working inside your system 3 Remove a 3 5 inch drive carrier from the drive bay Installing and removing system components 47 ...

Page 48: ...e drive carrier and place the drive into the drive carrier Figure 16 Installing a drive into the drive carrier Next steps 1 Install a 3 5 drive carrier into the drive bay 2 Follow the procedure that is listed in After working inside your system Optional optical drive 48 Installing and removing system components ...

Page 49: ...ive cage Steps 1 On the front bezel press the retention clip of the optical drive filler and pull the filler out of the front bezel Figure 17 Removing the optical drive filler from the front bezel 2 On the optical drive cage hold the tabs on the optical drive filler and remove the optical drive filler from the optical drive cage Figure 18 Removing the optical drive filler from the optical drive ca...

Page 50: ...on the optical drive cage Steps 1 On the front bezel insert the tabs on optical drive blank into the slots and push the blank until it locks into place Figure 19 Installing the optical drive filler into the front bezel 2 On the optical drive cage hold the tabs on the optical drive filler and push the optical drive filler into the optical drive cage Figure 20 Installing the optical drive filler int...

Page 51: ... 1 To release the optical drive press and push the release tab toward the front of the system 2 Slide the optical drive out of the system 3 If you are not installing a new optical drive install the optical drive fillers Figure 21 Removing the optical drive Next step 1 Replace the optical drive Installing the optical drive Prerequisites NOTE Only slim 9 5 mm SATA DVD ROM drive or DVD RW drive can b...

Page 52: ...e data cable to the optical drive NOTE Route the cables properly to prevent them from being pinched or crimped 2 Install the front bezel 3 Follow the procedure that is listed in After working inside your system System memory System memory guidelines Your system contains four memory sockets that are organized into two channels In each channel the first socket is marked white and the second socket b...

Page 53: ...hannels Channel 0 Channel 1 Slot A1 and A3 Slot A2 and A4 Table 5 Memory population DIMM Type DIMMs Ranking Capacity DIMM rated voltage speed 13th Generation Memory H3 2DPC Platforms DPC means DIMMs per channel 1 DPS 2 DPS UDIMM 1 8 GB and 16 GB DDR4 1 2 V 2666 2666 2 Installing and removing system components 53 ...

Page 54: ...ulation Memory population information Single processor Optimizer Independent channel population order 1 2 3 4 Odd amount of DIMMs per processor allowed Populate all the sockets with white release tabs first followed by the black release tabs When mixing memory modules with different capacities populate the sockets with memory modules with the highest capacity first For example if you want to mix 8...

Page 55: ...opriate memory module socket CAUTION Handle each memory module only by the card edges ensuring not to touch the middle of the memory module or metallic contacts CAUTION To prevent damage to the memory module or the memory module socket during installation do not bend or flex the memory module insert both ends of the memory module simultaneously 2 Open the ejectors on the memory module socket outwa...

Page 56: ...test in system diagnostics Cooling fan Removing the cooling fan Prerequisites CAUTION Do not remove or install the fan by holding the blades CAUTION Never operate your system with the system fan removed System can overheat and result in shutdown of the system and loss of data 1 Follow the safety guidelines listed in Safety instructions 2 Follow the procedure that is listed in Before working inside...

Page 57: ... Hold the cooling fan by the sides with the cable end facing the bottom of the system 2 Align the four grommets on the system with the four holes on the sides of the cooling fan NOTE It is recommended to first install the lower two grommets 3 Pass the grommets through the corresponding holes on the cooling fan 4 Stretch the grommets and push the cooling fan toward the system until it is secured in...

Page 58: ... the system board see the System board jumpers and connectors section Replacing the optional internal USB memory key Prerequisites CAUTION To avoid interference with other components in the server the maximum permissible dimensions of the USB memory key 15 9 mm width x 57 15 mm length x 7 9 mm height 1 Follow the safety guidelines listed in the Safety instructions 2 Follow the procedure listed in ...

Page 59: ...TB or more drive capacity PERC is required for thermal control The following table describes the installation order for installing expansion cards to ensure proper cooling and mechanical fit The expansion cards with the highest priority must be installed first by using the slot priority indicated Table 8 Expansion card installation order Card Priority Categor y Card Type Form factor Slot Priority ...

Page 60: ...ted in Before working inside your system 3 Disconnect any cables that are connected to the expansion card Steps 1 Press the blue expansion card retention latch and push down the latch to open it 2 Holding the card by its edge pull the card to disengage it from the connector and lift the card out of the system Figure 28 Removing a PCIe expansion card 3 If you are not replacing the expansion card in...

Page 61: ...tallation NOTE For instructions see the documentation accompanying the card 2 Press and push out the expansion card release latch to open it 3 Remove the expansion card or filler bracket from the expansion card holder NOTE Store this bracket for future use Filler brackets must be installed in empty expansion card slots to maintain FCC certification of the system The brackets also keep dust and dir...

Page 62: ... is fully seated 6 Close the expansion card latch by pushing the latch up until the latch snaps into place Figure 31 Installing a PCIe expansion card Next steps 1 Connect the cables to the expansion card 2 Install any device drivers required for the card as described in the documentation for the card 3 Follow the procedure that is listed in After working inside your system 62 Installing and removi...

Page 63: ... card to disconnect from the system board connector Figure 32 Removing the integrated storage controller card 3 If you are not replacing the integrated storage controller card install a filler bracket NOTE Installing the filler bracket for integrated storage controller card is similar to installing the filler bracket under removing a PCIe expansion card section Next step 1 Replace the integrated s...

Page 64: ...ertification of the system The brackets also keep dust and dirt out of the system and aid in proper cooling and airflow inside the system 2 Hold the storage controller card by the edges and align the connector on the card with the connector on the system board 3 Lower the card into the system until the card is firmly seated 4 Close the expansion card retention latch by pushing the latch up until t...

Page 65: ...Cable routing Figure 34 Cable routing four 3 5 inch cabled SATA drive Figure 35 Cable routing four 3 5 inch cabled SAS drive with storage controller card Installing and removing system components 65 ...

Page 66: ...rd Steps 1 Using the Phillips 1 screwdriver remove the screws securing the M 2 SSD module to the BOSS card 2 Pull the M 2 SSD module to disconnect from the BOSS card connector Figure 36 Removing the M 2 SSD module Next step Replace the M 2 SSD module Installing the M 2 SSD module Prerequisites 1 Follow the safety guidelines listed in Safety instructions 2 Follow the procedure listed in Before work...

Page 67: ...llow the procedure listed in the After working inside your system Processor and heat sink Removing the heat sink module Prerequisites WARNING The heat sink may be hot to touch for some time after the system has been powered off Allow the heat sink to cool before removing it 1 Follow the safety guidelines listed in Safety instructions 2 Follow the procedure that is listed in Before working inside y...

Page 68: ...denly if not firmly held NOTE Only remove the processor if you are replacing the processor or system board This procedure is not required when replacing a heat sink module 1 Follow the safety guidelines listed in Safety instructions 2 Follow the procedure that is listed in Before working inside your system 3 Remove the heat sink module Steps 1 Release the socket lever by pushing the lever down and...

Page 69: ...d place the processor on the socket CAUTION Positioning the processor incorrectly can permanently damage the system board or the processor Be careful not to bend the pins in the socket 2 Lower the socket lever and push it under the tab to lock it 3 If the processor has previously been used in a system remove any remaining thermal grease from the processor by using a lint free cloth 4 Use the therm...

Page 70: ...the safety guidelines listed in the Safety instructions 2 Follow the procedure that is listed in Before working inside your system 3 If removed install the processor Steps 1 If you are using an existing heat sink remove the thermal grease from the heat sink by using a clean lint free cloth 2 Use the thermal grease syringe included with your processor kit to apply the grease in a quadrilateral desi...

Page 71: ...ollowing a Partially tighten the first screw approximately 3 turns b Tighten the diagonally opposite screw completely c Return to the first screw and tighten it completely d Repeat the procedure for the remaining two screws NOTE The processor and heat sink module retention screws should not be tightened to more than 0 13 kgf m 1 35 N m or 12 in lbf Figure 42 Installing the heat sink Installing and...

Page 72: ...ving the power supply unit Prerequisites 1 Follow the safety guidelines listed in Safety instructions 2 Follow the procedure that is listed in Before working with system 3 Disconnect the power cable from the power supply unit PSU 4 Disconnect all the power cables from the PSU to the system board Steps 1 Remove the screws securing the PSU to the system 2 Press the release tab beside the PSU and sli...

Page 73: ...ow steps to bundle the P3 cable CAUTION Connecting the PSU P3 cable to any of the connectors on the system board may result in system board damage a Bundle the P3 cable providing equal interval spaces between the smaller cable ties NOTE Ensure to align the connector head closer to the middle b Secure the P3 cable using the larger cable tie c Leaving 10 mm of the larger cable tie snip the excess ca...

Page 74: ...atteries according to the manufacturer s instructions See the safety instructions that came with your system for more information 1 Follow the safety guidelines listed in the Safety instructions 2 Follow the procedure listed in the Before working inside your system 3 Locate the battery socket For more information see the System board jumpers and connectors section Steps 1 To remove the battery a P...

Page 75: ...ve side of the battery connector on the system board c Insert the battery into the battery socket Figure 47 Installing system battery Next steps 1 Follow the procedure listed in the After working inside your system 2 Confirm that the battery is operating properly by performing the following steps a Enter the System Setup while booting by pressing F2 b Enter the correct time and date in the System ...

Page 76: ... Safety instructions 2 Follow the procedure that is listed in Before working inside your system Steps 1 Disconnect the intrusion switch cable from the connector on the system board 2 Slide and push the intrusion switch out of the intrusion switch slot on the system Figure 48 Removing the intrusion switch Next step 1 Replace the intrusion switch Installing the intrusion switch Prerequisites 1 Follo...

Page 77: ...ou must supply the recovery key when you restart your system or program before you can access the encrypted data on your hard drives CAUTION Do not attempt to remove the TPM plug in module from the system board After the TPM plug in module is installed it is cryptographically bound to that specific system board Any attempt to remove an installed TPM plug in module breaks the cryptographic binding ...

Page 78: ...hassis CAUTION Do not lift the system board by holding a memory module processor or other components 2 Using the Phillips 2 screwdriver remove the screws that secure the system board to the chassis Figure 50 System board screw location 3 Holding the blue holder incline the system board at an angle and lift the system board out of the chassis 78 Installing and removing system components ...

Page 79: ...E Do not lift the system board by holding a memory module processor or other components CAUTION Take care not to damage the system identification button while placing the system board into the chassis 2 Holding the blue holder incline the system board at an angle and align the connectors on the system board with the slots on the system and lower the system board into the system 3 Using the Phillip...

Page 80: ...les to the system board NOTE Ensure that the cables inside the system are routed along the chassis wall and secured by using the cable securing bracket 4 Boot the system 5 Follow the procedure that is listed in the After working inside your system section 6 Ensure that you a Use the Easy Restore feature to restore the Service Tag For more information see the Restoring the system using Easy Restore...

Page 81: ...y Restore fails follow this process to manually enter the Service Tag using System Setup About this task If you know the system service tag use the System Setup menu to enter the service tag Steps 1 Power on the system 2 To enter the System Setup press F2 3 Click Service Tag Settings 4 Enter the service tag NOTE You can enter the service tag only when the Service Tag field is empty Ensure that you...

Page 82: ...M 1 Locate the TPM connector on the system board 2 Press to hold the module down and remove the screw using the security Torx 8 bit shipped with the TPM module 3 Slide the TPM module out from its connector 4 Push the plastic rivet away from the TPM connector and rotate it 90 counterclockwise to release it from the system board 5 Pull the plastic rivet out of its slot on the system board Installing...

Page 83: ... Setup Main Menu screen click System BIOS System Security Settings 3 From the TPM Security option select On with Preboot Measurements 4 From the TPM Command option select Activate 5 Save the settings 6 Restart your system 7 Enter System Setup again 8 On the System Setup Main Menu screen click System BIOS System Security Settings 9 From the Intel TXT option select On Initializing the TPM 2 0 for TX...

Page 84: ... force when removing the control panel cables as it can damage the connectors 5 Remove the front bezel Steps 1 Using the Phillips 1 screwdriver remove the screws that secure the control panel cage to the system 2 Slide the control panel cage out of the system along with the cables Figure 54 Removing the control panel cage Next step 1 Remove the control panel Removing the control panel Prerequisite...

Page 85: ...control panel out of the control panel cage Figure 55 Removing the control panel Next step 1 Replace the control panel Installing the control panel Prerequisites 1 Follow the safety guidelines listed in Safety instructions 2 Follow the procedure that is listed in Before working inside your system Steps 1 Align and insert the control panel into the control panel cage 2 Using the Phillips 2 screwdri...

Page 86: ... guidelines listed in Safety instructions 2 Follow the procedure that is listed in Before working inside your system Steps 1 Align and insert the control panel cage into the control panel cage slot in the system 2 Secure the control panel cage to the system with screws 3 Route the control panel cable and control panel USB cable through the system clip 4 Connect the control panel cable and control ...

Page 87: ...nel cage Next steps 1 Install the front bezel 2 Reconnect the disconnected peripherals from the control panel assembly 3 Follow the procedure that is listed in After working inside your system Installing and removing system components 87 ...

Page 88: ...and describes the connectors on the board in the system Jumpers on the system board help to disable the system and setup passwords You must know the connectors on the system board to install components and cables correctly Topics System board jumpers and connectors System board jumper settings Disabling forgotten password 6 88 Jumpers and connectors ...

Page 89: ...and connectors Item Connector Description 1 PWR_CPU 1 CPU power connector P2 2 A3 A1 A4 A2 Memory module sockets 3 PWR_SYSTEM 1 System power connector P1 4 SATA 0 3 Mini SAS connector 5 SATA_ODD HDD 4 Optical disk drive connector 6 FAN 4 CPU_FAN CPU fan connector 7 CPU Processor socket Jumpers and connectors 89 ...

Page 90: ...connector 20 Slot 4 PCIE_G3_X4 PCH PCIe card connector 4 21 T_INTRUSION Intrusion connector 22 SYSTEM FAN System cooling fan connector System board jumper settings For information on resetting the password jumper to disable a password see the Disabling a forgotten password section Table 10 System board jumper settings Jumper Setting Description PWRD_EN The BIOS password feature is enabled The BIOS...

Page 91: ...ve the jumper on the system board jumper from pins 2 and 4 to pins 4 and 6 4 Install the system cover The existing passwords are not disabled erased until the system boots with the jumper on pins 4 and 6 However before you assign a new system and or setup password you must move the jumper back to pins 2 and 4 NOTE If you assign a new system and or setup password with the jumper on pins 4 and 6 the...

Page 92: ...ht Processor specifications Supported operating systems PSU specifications Cooling fan specifications System battery specifications Expansion card specifications Memory specifications Storage controller specifications Drive specifications Ports and connectors specifications Video specifications Environmental specifications 7 92 Technical specifications ...

Page 93: ...hes Without bezel NA 400 0 mm 15 75 inches 418 75 mm 16 49 inches System weight Table 12 Dell EMC PowerEdge T140 system weight System configuration Maximum weight with all drives 4 x 3 5 inch drives 11 84 kg 26 10 lb Processor specifications Table 13 Dell EMC PowerEdge T140 processor specifications Supported processor Number of processors supported Intel Xeon Scalable Processor One Technical speci...

Page 94: ... BTU hr 50 60 Hz 100 240 V AC autoranging 365 W N A N A 5 A NOTE Heat dissipation is calculated using the PSU wattage rating NOTE This system is also designed to connect to the IT power systems with a phase to phase voltage not exceeding 240 V Cooling fan specifications The Dell EMC PowerEdge T140 system supports the following One system cooling fan located at the back of the system One processor ...

Page 95: ...rts the following memory specifications for optimized operation Table 16 Memory specifications DIMM type DIMM rank DIMM capacity Minimum RAM Maximum RAM UDIMM Single rank 8 GB 8 GB 32 GB 16 GB 16 GB 64 GB Dual rank 8 GB 8 GB 32 GB 16 GB 16 GB 64 GB Storage controller specifications The Dell EMC PowerEdge T140 system supports the following controller cards Table 17 Dell EMC PowerEdge T140 system co...

Page 96: ...ant ports Four USB 2 0 compliant ports One internal USB 3 0 compliant port NIC ports specifications The Dell EMC PowerEdge T140 system supports up to two 10 100 1000 Mbps Network Interface Controller NIC ports that are located on the back panel Serial connector specifications The Dell EMC PowerEdge T140 system supports one serial connector on the back panel which is a 9 pin connector Data Terminal...

Page 97: ...or altitude less than 950 m or 3117 ft 10 35 C 50 95 F with no direct sunlight on the equipment Fresh air For information about fresh air see the Expanded operating temperature section Maximum temperature gradient operating and storage 20 C h 36 F h Table 22 Relative humidity specifications Relative humidity Specifications Storage 5 to 95 RH with 33 C 91 F maximum dew point Atmosphere must be nonc...

Page 98: ... 1 F 547 ft above 950 m 3 117 ft 35 40 C 95 104 F Maximum temperature is reduced by 1 C 175 m 1 F 319 ft above 950 m 3 117 ft 40 45 C 104 113 F Maximum temperature is reduced by 1 C 125 m 1 F 228 ft above 950 m 3 117 ft Standard operating temperature Table 27 Standard operating temperature specifications Standard operating temperature Specifications Continuous operation for altitude less than 950 ...

Page 99: ... m 10 000 ft One non redundant power supply unit is required One system fan required Non Dell qualified peripheral cards and or peripheral cards greater than 25 W are not supported GPU is not supported Tape backup unit is not supported For a system with 4 TB or more drive capacity PERC is required for thermal control Thermal restriction matrix Table 29 Thermal restrictions matrix Ambient 25 C 30 C...

Page 100: ...Air must be free of conductive dust zinc whiskers or other conductive particles NOTE This condition applies to data center and non data center environments Corrosive dust Air must be free of corrosive dust Residual dust present in the air must have a deliquescent point less than 60 relative humidity NOTE This condition applies to data center and non data center environments Table 31 Gaseous contam...

Page 101: ...dition Solid blue Indicates that the system is turned on system is healthy and system ID mode is not active Press the system health and system ID button to switch to system ID mode Blinking blue Indicates that the system ID mode is active Press the system health and system ID button to switch to system health mode Solid amber Indicates that the system is in fail safe mode If the problem persists s...

Page 102: ...nk indicator is amber and activity indicator is blinking green The NIC is connected to a valid network at less than its maximum port speed and data is being sent or received Link indicator is green and activity indicator is off The NIC is connected to a valid network at its maximum port speed and data is not being sent or received Link indicator is amber and activity indicator is off The NIC is co...

Page 103: ...ng data loss If you are unable to fix the problem yourself service and support personnel can use the diagnostics results to help you solve the problem Dell Embedded System Diagnostics NOTE The Dell Embedded System Diagnostics is also known as Enhanced Pre boot System Assessment ePSA diagnostics The Embedded System Diagnostics provides a set of options for particular device groups or devices allowi...

Page 104: ...em Diagnostics from the Dell Lifecycle Controller 1 As the system boots press F10 2 Select Hardware Diagnostics Run Hardware Diagnostics The ePSA Pre boot System Assessment window is displayed listing all devices detected in the system The diagnostics starts executing the tests on all the detected devices System diagnostic controls Menu Description Configuration Displays the configuration and stat...

Page 105: ... down menu on the lower right corner of the page 3 For customized support a Enter your system Service Tag in the Enter your Service Tag field b Click Submit The support page that lists the various support categories is displayed 4 For general support a Select your product category b Select your product segment c Select your product The support page that lists the various support categories is disp...

Page 106: ...g and setting up a SupportAssist application in your IT environment you can receive the following benefits Automated issue detection SupportAssist monitors your Dell EMC devices and automatically detects hardware issues both proactively and predictively Automated case creation When an issue is detected SupportAssist automatically opens a support case with Dell EMC Technical Support Automated diagn...

Page 107: ...he Getting Started Guide document that is shipped with your system Dell com poweredgemanuals Configuring your system For information about the iDRAC features configuring and logging in to iDRAC and managing your system remotely see the Integrated Dell Remote Access Controller User s Guide For information about understanding Remote Access Controller Admin RACADM subcommands and supported RACADM int...

Page 108: ...ng Dell SupportAssist see the Dell EMC SupportAssist Enterprise User s Guide Dell com serviceabilitytools For information about partner programs enterprise systems management see the OpenManage Connections Enterprise Systems Management documents Dell com openmanagemanuals Working with the Dell PowerEdge RAID controllers For information about understanding the features of the Dell PowerEdge RAID co...

Reviews: