background image

20

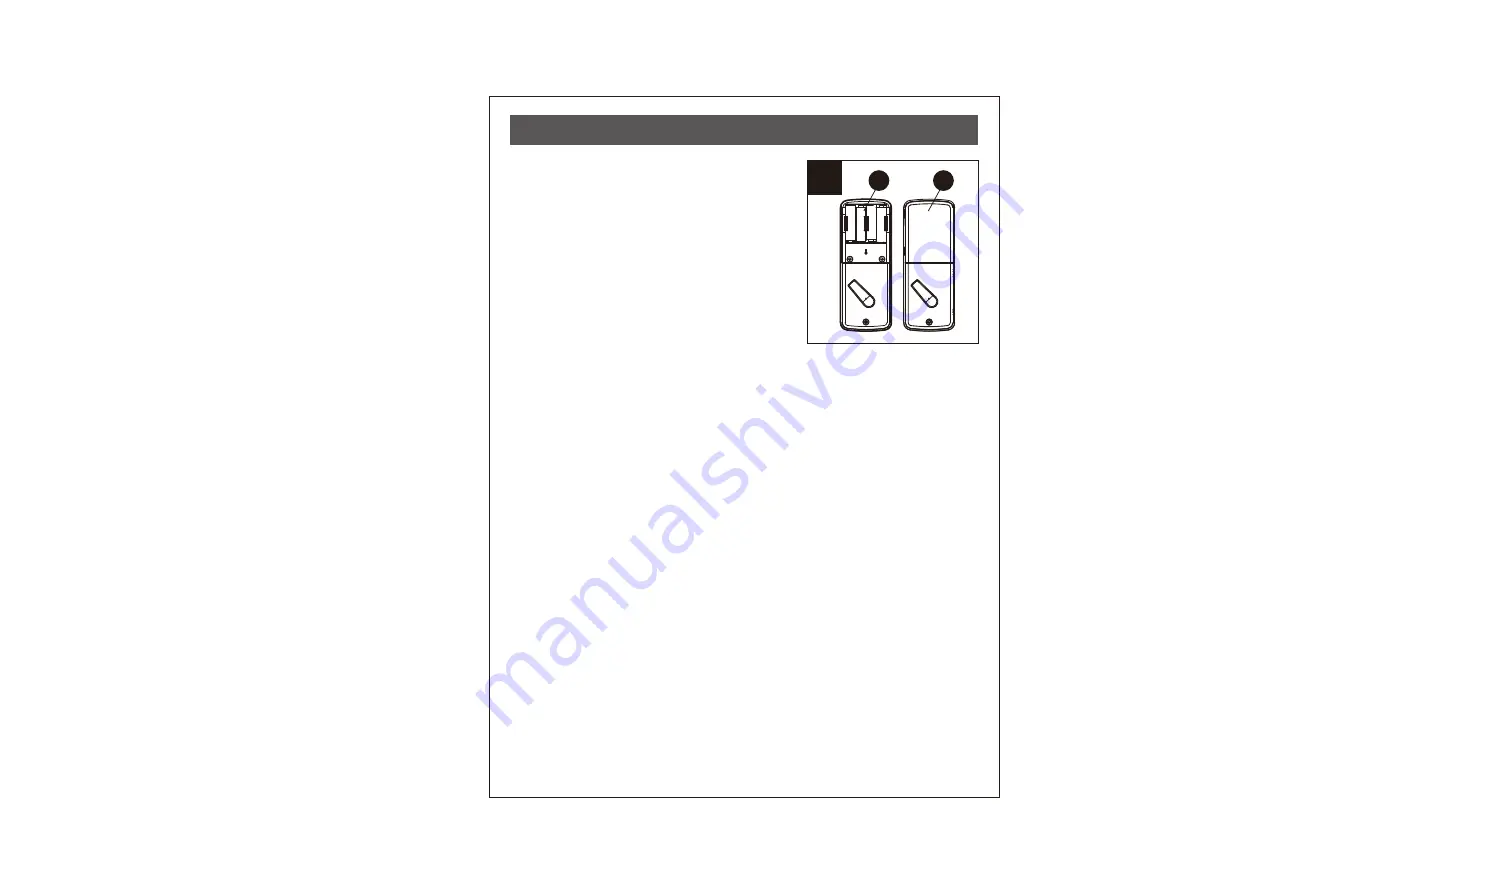
20. Insert Batteries


Insert 4 (AA) 1.5 V alkaline batteries and
slide the battery cover (H) back onto the
receiver module (G).
Remarks: 
(1) Alkaline batteries are recommended in
     order to stabilize the power supply. If you
     don't use alkaline, battery performance
     will be reduced greatly.
(2) All settings will be retained in the memory
     even if the batteries are completed dead.

10

G

H

ASSEMBLY INSTRUCTIONS

Summary of Contents for KP300

Page 1: ...in the Product covered by this warranty we will repair or replace the item at our option using new or refurbished components 2 Exclusions This warranty covers defects in manufacturing discovered while...

Page 2: ...SCRIPTION QUANTITY A B C D E F G H I J K L Key Cylinder Deadbolt pad Assembly Touch Deadbolt Latch Strike Plate Mounting Plate Receiver Assembly Battery Cover Drive in Sleeve 2 1 1 1 1 1 1 1 1 3 5 2 M...

Page 3: ...rews Qty 5 Deadbolt Chassis Screws Qty 2 J K L HARDWARE SCREWS CONTENTS LATCH BACKSET ADJUSTMENT Remarks Please notice the the latch box between two different backsets slight differences in 180 2 3 4...

Page 4: ...which latch mounting method will be used and make necessary adjustments No adjustment required for square latch face plate a Use a flat screwdriver to separate the face plate b Snap selected latch fa...

Page 5: ...o the 2 3 8 60 mm backset 4 Mark the Door with Template Select the height and backset as desired on the door face use the TEMPLATE as an indication to mark the centre of the circle on the door face an...

Page 6: ...oor edge Note It is not necessary to chisel the door edge for the faceplate installation if you use the drive in latch 8 Install Latch Insert the latch D into the door Make sure the cross is on the bo...

Page 7: ...doorframe exactly opposite the latch hole in the door edge 10 1 Drill Hole on Door Frame Measure one half of door thickness from door stop and vertically mark centre line of strike Drill 1 25 4 mm ho...

Page 8: ...ews K 12 Install Touchpad Assembly Make sure the latch bolt is retracted 13 Install Assembly Touchpad touchpad Install cylinder B into the deadbolt assembly C with tailpiece in horizontal position ins...

Page 9: ...wire through the wire hole of the mounting plate F Fix the mounting plate F with screws L If outside lock assembly is lopsided please loosen the screws to adjust its position and tighten the screws ag...

Page 10: ...emove the battery cover H push it up first then pull it out 19 Install Receiver Module Connect the IC wire into the back of the receiver module Ensure that the deadbolt tailpiece is engaged with turn...

Page 11: ...nto the receiver module G Remarks 1 Alkaline batteries are recommended in order to stabilize the power supply If you don t use alkaline battery performance will be reduced greatly 2 All settings will...

Page 12: ...side Washer Prevents water from permeating into lockset Battery Lid Slide the lid to change the batteries Battery Holder Four AA 1 5 V alkaline batteries R Button Reset Restore default settings Turn p...

Page 13: ...ng code It s recommended to change the default programming code and default user code right after you install the lock Every programming step should be done within 6 seconds OPERATING INSTRUCTIONS Ope...

Page 14: ...alid when Default programming code PC 0000 Default user code UC 1234 Your new programming code PC ____________ Your new user code UC ___________________ The same programming code and user code cannot...

Page 15: ...Create a One Time User Code 4 10 Digits Long Note The one time user code will automatically cancel after it is used one time 6 Toggle Auto Lock On Off Note following instructions 7 Repeat the steps in...

Page 16: ...e or even mainboard The manufacturer warrants the product to be free from defects in material and workmanship for a period of 12 months from the original date of purchase If you discover a defect in t...

Page 17: ...dead If so re install or change the battery If not please check to see if the cable is properly connected When you are in the door handing identifying process you hear three times and three short bee...

Page 18: ...r the latch bolt coming out when you press the lock button to lock the door however three short beeps are emitted Conversely while the door is open no beeps are emitted when locking the latch bolt 1 T...

Page 19: ...gain before programming any other functions 1 Wake up your lock by touching the screen 2 Open the Delaney Smart App on your mobile device 3 Tap add device on your app then enter to lock Enter Your Pro...

Page 20: ...ng identifying process 1 again before programming any other functions 1 Wake up your lock by touching the screen 2 Open the Delnaey Smart App on your mobile device 3 Tap add device on your app then en...

Reviews: