


9
8
© 2020 Dehaco B.V. • User Manual • Floor stripper DTS 170 UK (115V)_2020-04_v2.2_EN
Dehaco B.V. • Kruisbaak 25 • 2165 AJ Lisserbroek (NL) •
✆
+31 (0)88 - 20 20 600 •
[email protected] • www.dehaco.nl
8. Get started!
7. Transport & Storage | 8. Get started!
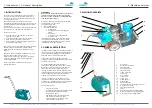
7. TRANSPORT & STORAGE
7.1 Transport
CAUTION!
Ø
Remove the blade from the stripper prior to
transport! Think of your safety.
- Due to the compact dimensions and low own
weight, it is possible to use a car trailer or van
to supply and remove the Floor stripper.
- Loading and unloading can be performed with
a ramp and the machine’s own drive.
- A crane hook has been provided for using
lifting tools.
- In order to save space, it is possible to remove
the handle (tiller head). Use the provided 8mm
socket head wrench for this.
7.2 Opslag
When decommissioning the DTS170 Floor stripper for
a longer period of time, it is recommended to perform
the following actions:
STORAGE!
Ø
Do NOT clean the Floor stripper with a high-
pressure cleaner! Cleaning with compressed air!
- Neatly clean the machine.
- Perform maintenance, see section 9.
- Store the machine in a dry, preferably
frost-free room.
- Cover the machine, if possible.
8. GET STARTED!
CAUTION!
Check in advance that there are NO bolts, screws or
threaded ends protruding from the floor. This could
damage the strip mechanism.
8.1 Get started
CAUTION!
Ø
Before you connect a power cord, you must first
check it for damages!
CAUTION!
Ø
The Floor stripper can be moved manually by
tilting the machine backwards, so that it is
supported by the transport wheels.
CAUTION!
Ø
The hard steel blades are very sharp!!
Ø
Proceed carefully when installing and removing
the blade!
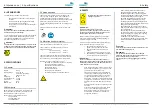
8.2 Start working
CAUTION!
Ø
Prior to pressing the “on/reset” button, ALWAYS
first set the strip motor to “0” to prevent overload
due to the starting current!
- First set the strip motor to “0/OFF”.
- Set the rotary button for drive speed fully to
the left, to the zero position.
- Check that the emergency stop button is not
pressed in.
- Press the green “ON” button: the led in the
button should light now.
- Set the strip motor to “I / ON”.
- Operate the drive motor forwards or
backwards using the green thumb buttons on
the handle.
- Use the potentiometer on the tiller head to set
the forward drive speed, the reverse speed is
always maximum.
- Work in long lanes, do not repeatedly reverse.
- Turning around is easy by tilting the stripper
backwards and using the freewheels for
turning around.
CAUTION!
Ø
Do NOT stand on the stripper for extra weight!
- Also during the work, regularly check that all
bolts are still properly fastened.
- Do not drive against walls or fixed objects.
Make sure there are no bolts, screws or
threaded ends protruding from the floor. This
could damage the strip mechanism.
- Regularly remove stripped carpet from the
front of the machine.
- Do watch out for the power cords, to prevent
accidents.
8.3 Completing the work
- Set the strip motor switch to “0/OFF”.
- Remove the plug from the socket.
8.4 Preparing for transport
- Remove the plug from the socket.
- ALWAYS remove the blade prior to transport!
- Before departure, check that all tools,
components and PPE have been returned to
the provided case.
- Insert the plug in the socket again.
- Drive the DTS170 to the transport device by
means of its own power, or manually by means
of the freewheels.
- Store the power cords.
CAUTION!
Ø
Check that the power supply and converter are
suitable for the machine!
- Check that the tiller and the plug of the tiller
head cord are properly fastened.
- Mount the counter-weight plates and fasten
them properly. The bolt heads should go in the
blind holes, so they do not protrude! Use the
provided 8 mm socket head wrench for this.
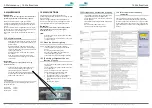
- Carefully select a strip blade type: see box to
the left. The correct strip blade that is suitable
for the work will save you a lot of time and
ensure a better end result!!
- Place a blade in the blade holder and properly
fasten the clamping plate using the 6 mm
socket head wrench.
- Insert the power cord in the counter plug on
the stripper.
The Floor stripper is now ready for use.
Guidelines for selecting the
correct strip blade:
-
In case of a concrete floor, keep
the bevelled side of the blade at
the top.
-
In case of a wooden (soft)
subfloor, it may be better to
turn the blade around, due to
the adapted cutting angle.
-
In case of a soft subfloor, select a blade with a
15° angle
-
In case of hard material, select a narrower
blade
-
In case of carpet, for instance, select a U blade
to cut loose strips of material
-
Use your experience and/or consult with your
supplier to determine which blade model is
most suitable for your application.
8.5 Replacing a blade
WARNING!
The strip blades are hardened and very sharp,
ALWAYS wear gloves when placing and replacing a
strip blade!
- Place a block under the blade holder, so
that the Floor stripper is somewhat tilted
backwards.
- Loosen the four bolts of the blade holder by a
few turns.
- Take the blunt blade from the blade holder,
store it so that no-one can injure themselves
with it.
- Slide the required strip blade between the
lower and upper piece of the blade holder,
making sure the recesses fall over the bolts.
- Properly tighten the blade holder bolts again,
replace the screws when they show signs of
wear!
- The Floor stripper is now ready for use again!