owner’s manual
Studio
5
www.definitivetech.com
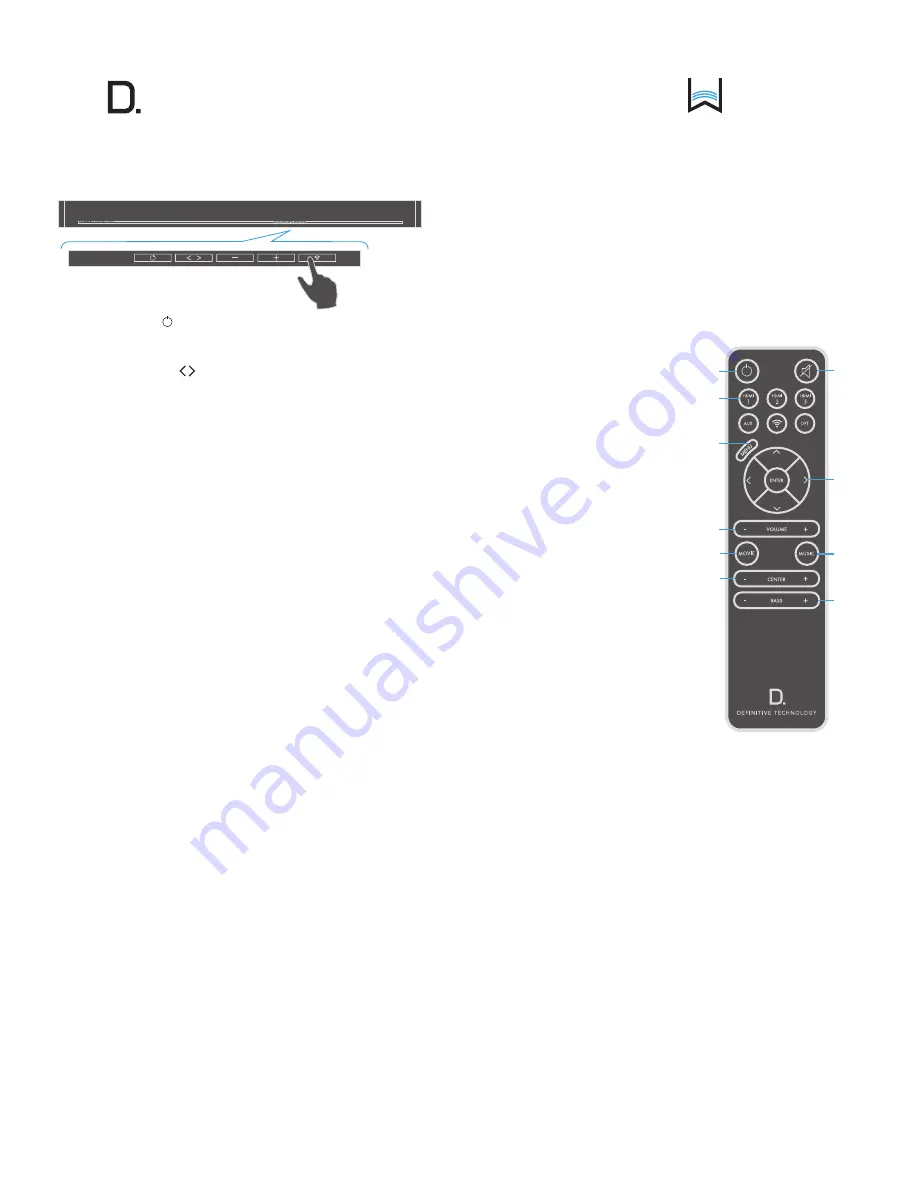
Sound Bar Button Controls
1.
POWER:
Press to turn on the system (sound bar and
wireless subwoofer).
2.
SOURCE (Symbol
):
Six LED lights correspond to each of the six
source inputs. Example: You want to play a Blu-ray disc and are
currently playing another source on input #1. Your Blu-ray player is
connected to source input #2. Simply touch this switch once to select
the input.
NOTE:
When advancing more than one source, please allow for
a few seconds of delay.
3.
Volume DOWN:
Press – to decrease the system volume. A row of
LED’s displays the volume level. It takes 4-5 presses to change the LED,
but you will hear, and see on the OSD pop-up screen, that the volume
is decreasing.
4.
Volume UP:
Pr to increase the system volume, with a
corresponding change in the LED display/OSD.
5.
Wi-Fi Source/Setup:
Press once to select Wi-Fi Input. For Wi-Fi setup
instructions, see page 6.
NOTE:
you can also press and hold the Wi-Fi button on the
remote to connect.
Remote Control Functionality
1.
Power:
Press Power to toggle the unit on/off. A front panel light
recognizes the command. The subwoofer also turns on when it
sees a signal from the sound bar. Please allow approximately
10 seconds for the system to turn on.
2.
Mute:
Turns sound off while the system remains on. Press MUTE
again to return the sound to the previous volume level. The
On-Screen Display (OSD) pop-up menu confirms your selection
3.
Sources:
HDMI 1, HDMI 2, HDMI 3,
AUX, Wi-Fi, Optical. These enable
you to select sources, such as a
Blu-ray player or tuner that you’ve
connected to the rear panel source
inputs. The OSD pop-up confirms your
selection.
4.
Menu:
Press MENU to call up the
On-Screen Display (OSD). This
shows a series functions that can be
accessed to make system changes.
Press MENU again to exit from the
OSD once you’ve completed making
your selections. See the section titled
“On-Screen Display set-up menu
functions” for more detail.
5.
Cursor control/Enter button:
Press
the four arrow keys, with the ENTER
button in the middle, to select and
adjust menu items such as surround
immersion level. The OSD pop-up
menu confirms your selection.
6.
Master Volume up/down (+ –):
Press (+) to increase the system
volume. Press (–) to decrease the volume. Volume is displayed
on the front panel LEDs and on the OSD pop-up menu.
7.
Movie:
Press MOVIE to optimize the bass output, surround
processing and other sound parameters, so movies sound their
best. The OSD pop-up menu confirms your selection.
8.
Music:
Press MUSIC to optimize the sound characteristics for
maximum music enjoyment. The OSD pop-up menu confirms
your selection.
9.
or – :
Use to increase or decrease the center channel
volume, independently of changing the overall volume level.
For example, if family members are sleeping, you may want
to improve the movie dialog audibility without significantly
increasing the overall volume level.
10.
Bass output up/down (+ –):
Press (+) to increase the bass output
of the subwoofer relative to the system volume. Press (–) to
decrease the bass output. The OSD pop-up menu confirms
your selection.
AAA
AAA
1
2
3
5
6
7
8
9
10
4
1
2
3
4
6
7
9
5
8
10


