Defender Car Vision 2020 HD Operation Manual Download Page 4

4

www.defender-global.com


Trifles make perfection 


Using of Micro SD/ SD memory card


1. Insert the card (not included) into SD slot until its clicking position (if you use MicroSD card, 

you need an adaptor). The device is ready to be used. 

To remove SD card, slightly press it, it is partially pulled out now and you may remove it. 

If no card is in the slot the message “No Card” will appear on the screen. Note: Check that you 

insert SD card by the correct side, otherwise you may damage the device and the memory card. 
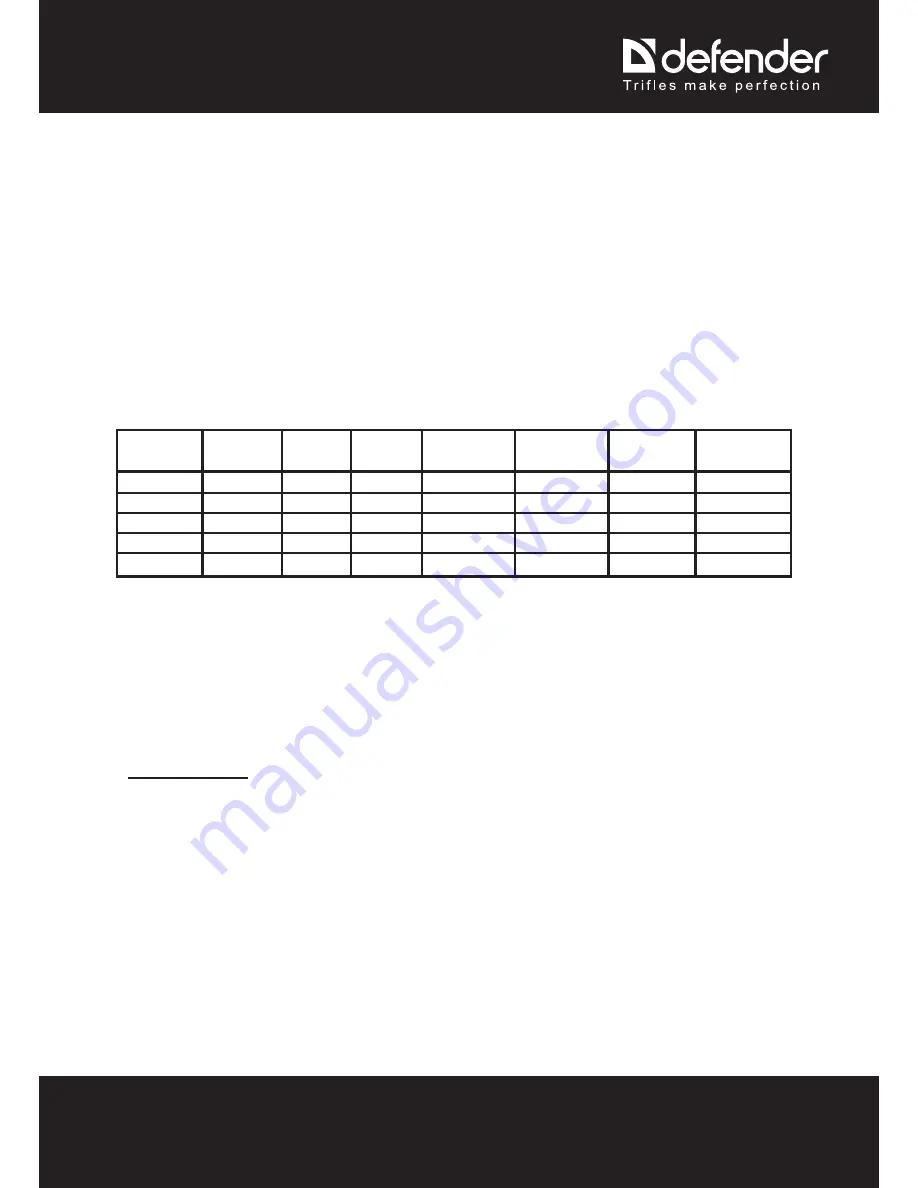


Amount 


of images and video recording time:


SD Card 

1280*720 

(720р)


848*480 

(D1) 

640*480 

(640) 

1280*1024 

(1.3М)


1600*1200 

(2М)


2048*1536 

(ЗМ)


2592*1944 

(ЗМ)


16G 

128 min 

128 min  256 

MIN

  12160(image

s) 

11520(image

s) 

10960 

(images) 

9440 

(images) 

8G 

64 min 

64 min 

128 

MIN

  6080 

(images) 

5760 

(images) 

5530 

(images) 

4720 

(images) 

4G 

32 min 

32 min 

64 min 

3040 

(images) 

2880 

(images) 

2760 

(images) 

2360 

(images) 

2G 

16 min 

16 min  32 min 

1520 

(images) 

1440 

(images) 

1380 

(images) 

1180 

(images) 

1G 

8 min 

8 min 

16 min 

760 (images)  720 (images)  690(images

590 (images) 

Note: the amount of images to be saved will differ depending the device configuration, photo 

shooting and used memory card. 

Device charging:


Charging variants: 

1)


by means of computer / notebook via mini-USB cable. 

2)


by means of car charger. 

Warning: If low charging, the car video recorder will switch to energy saving mode. Please charge the 

battery before switching the device on. 

Operation Manual


On/Off and mode switching


1)


Press “POWER” button to switch the device on.


2)


After switching on, the device is in the video recording mode. Press “OK” button to start recording.


Press “OK” button 

again to pause recording and save the files in the automatic mode. 

3) 

Press “MODE ” button to select the mode of photo, audio recording, playback or video recording.


4) Press and hold down “POWER” button for three seconds to switch the device off when video 

recording is stopped. 

Modes


Video recording mode


1. 

Press “POWER” button to switch the device on. After switching on, the device is in the video 

recording mode. 

Summary of Contents for Car Vision 2020 HD

Page 1: ...1 www defender global com Trifles make perfection 1 Operation Manual Defender Car Vision 2020 HD Car DVR ...

Page 2: ... using the device read carefully this manual Function buttons POWER switching the device on or off OK confirmation of the selected mode UP upward or zoom control DOWN downward or zoom control MODE shifting the modes photo audio playback video record MENU activation ofconfigurationmenu mini USBconnector HDMIconnector ...

Page 3: ... 1280 720 HD 720p Video frame rate 30 Still image format JPEG Still image resolution up to 2592 1944 5 MP Built in microphone and speaker Motion detection sensor Autostart upon power supply to mini USB connector Video recording while charging Built in memory 4х16М SDRAM unavailable to the user External memory SD card up to 32 GB Built in battery 600 mAh Operation time from storage battery up to 70...

Page 4: ... min 1520 images 1440 images 1380 images 1180 images 1G 8 min 8 min 16 min 760 images 720 images 690 images 590 images Note the amount of images to be saved will differ depending the device configuration photo shooting and used memory card Device charging Charging variants 1 by means of computer notebook via mini USB cable 2 by means of car charger Warning If low charging the car video recorder wi...

Page 5: ...mode 1 Switch the device on Press MODE button unless enter the playback mode After that the triangle icon appears in the upper left corner of the screen In the bottom left corner you can see the file type Video video camera icon Photo without ant icon or Audio recording microphone icon In the upper right corner you can see the file number the total amount of files recorded 2 Press DOWN UP button t...

Page 6: ...utton While selecting Multi upon pressing the button 3 shots are made consequently 5 Date and time Switch off Date and time to show date and time on the photo Upon selection press OK button to confirm the configuration is complete Then press MENU button to exit Playback configuration Switch the device on In the playback mode press MENU button to enter the configuration menu Then on the first tab P...

Page 7: ... min 3 min 5 min Off Switching the device off if no motion detection within the set time interval 4 Switching the screen off 30 seconds 1 min 2 min Off Switching the screen off in the set time interval To switch the screen press any button 5 Date and time month day year hour minute 6 Language English Chinese simplified Chinese traditional Spanish French Portuguese German Japanese Russian 7 TV outp...

Page 8: ...ce to TV of high resolution via HDMI cable Troubleshooting Problem а I can t make photo video Check the spare place on the memory card Change photo or video resolution b What to do if the image is displayed incorrectly on TV Connect the device to TV via AV cable Check the AV plug is promptly inserted into TV video terminal and also that the relevant TV input and the chromatic system are selected c...

Reviews: