


5
OpErATION
After completely reading these instructions,
confirm all controls on fireplace are in the
OFF position. plug the fireplace into a 15 AMp
/ 120 Volt outlet. If the cord does not reach, you
may use an extension cord rated for a minimum
of 1875 watts. Once the fireplace insert has been
properly connected to a grounded electrical
outlet, it is ready to operate.
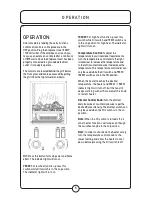
The controls are located behind the grill below
the front glass and can be accessed by pulling
the grill from the top, forward and down.
o/i:
press this button for main power and flame
effect. The indicator light will turn on.
750w:
For low heat function, press this
switch while O/I switch is in the on position.
The indicator light will turn on.
1500w:
For high heat function, press this
switch while O/I switch and 750W switch are
in the on position for high heat. The indicator
light will turn on.
temperature control:
To adjust the
temperature to your individual requirements,
turn the temperature control dial to the right
(clockwise) to increase the temperature and
to the left (counter clockwise) to decrease the
temperature. This temperature control dial can
only be used while the O/I switch and 750 W /
1500 W switches are in the ON position.
When the heater reaches the desired
temperature, the heater and 750 W / 1500 W
indicator light will turn off, but the fan still
keeps working with air flow. Adjust this knob
to restart heater.
dimmer control knob:
Turn the dimmer
dial clockwise or counter clockwise to get the
desired flame intensity. The dimmer switch can
only be used when the O/I switch is in the on
position.
note:
When the O/I switch is turned off, all
other heater functions will stop even though
the switches may be in the on position.
note:
In order to shut down the heater safely,
turn the temperature control knob to the
lowest setting and allow the heater to cool
down before pressing the O/I switch to off.
O p E r A T I O N