background image

19

Using for the first time

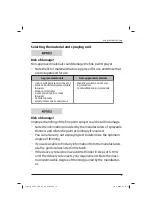
Selecting the material and spraying unit

Risk of damage!

Non-approved materials could damage the fine paint sprayer.


− Note the list of materials that are approved for use and those that 

are not approved for use.

Approved materials

Non-approved materials

-  Indoor wall paint (emulsions etc.) 
-  Solvent-based and water-soluble 

lacquers

-  Glazes and primers
-  2-component paints, clear 

lacquers

- Vehicle topcoats
-  Wood preservatives and stains 

-  Alkaline solutions, acidic coat-

ing materials

-  Combustible coating materials

Risk of damage!

Improper handling of the fine paint sprayer could result in damage.


− Note the information provided by the manufacturers of sprayable 

thinners and dilute the paint accordingly if required.


− You can also carry out a spraying test to determine the optimum 

degree of thinning.


− If you are unable to find any information from the manufacturers, 

use the guide values listed in the table.


− If the delivery rate is too low, add the thinner in steps of 5–10 % 

until the delivery rate meets your requirements. Note the maxi-
mum permissible degree of thinning quoted by the manufactur-
er. 

Layout_DS_FSS_500_EX_UK_SPK7.indd   19

Layout_DS_FSS_500_EX_UK_SPK7.indd   19

19.11.2020   15:15:29

19.11.2020   15:15:29

Summary of Contents for DS-FSS 500

Page 1: ...User Manual Original instructions PAINT SPRAY SYSTEM ELECTRIC DS FSS 500 Layout_DS_FSS_500_EX_UK_SPK7 indd 1 Layout_DS_FSS_500_EX_UK_SPK7 indd 1 19 11 2020 15 15 11 19 11 2020 15 15 11 ...

Page 2: ...Operation 22 Switching the fine paint sprayer On and Off 22 Adjusting the spray pattern 23 Controlling the material volume 24 Adjusting the spray width 24 Changing the nozzle set 25 Instructions for use 26 Care and maintenance 28 Cleaning the spraying unit 28 Cleaning the motor unit 30 Changing the air filter 30 Storage 32 Spare parts and accessories 32 Technical data 33 Noise vibration informatio...

Page 3: ...5 6 7 8 9 10 11 8 7 6 10 12 5 13 14 15 16 17 18 A Package contents Package contents Package contents Layout_DS_FSS_500_EX_UK_SPK7 indd 3 Layout_DS_FSS_500_EX_UK_SPK7 indd 3 19 11 2020 15 15 20 19 11 2020 15 15 20 ...

Page 4: ...4 Package contents 4 22 21 20 19 12 23 22 21 20 19 23 11 9 E 18 15 B 7 5 C D E Layout_DS_FSS_500_EX_UK_SPK7 indd 4 Layout_DS_FSS_500_EX_UK_SPK7 indd 4 19 11 2020 15 15 20 19 11 2020 15 15 20 ...

Page 5: ...5 Package contents 8 24 25 26 27 10 24 25 9 11 13 23 F H I K 28 29 2 L A B C G Layout_DS_FSS_500_EX_UK_SPK7 indd 5 Layout_DS_FSS_500_EX_UK_SPK7 indd 5 19 11 2020 15 15 23 19 11 2020 15 15 23 ...

Page 6: ...b 11 Spraying unit for enamels and varnishes 12 Union nut with adjusting ring spraying unit for enamels and varnishes 13 Nozzle set 3 5 mm needle and nozzle 14 Needle removal tool 15 Container for checking the viscosity 16 Cleaning needle 17 Cleaning brush 18 Safety catch 19 Air cap 1x per spraying unit 20 Nozzle 1x per spraying unit 21 Nozzle seal 1x per nozzle 22 Twist cap 1x per spraying unit 2...

Page 7: ...ts 26 Lid seal 1x per lid 27 Tub seal 1x per paint tub 28 Air filter motor unit 29 Filter cover motor unit Layout_DS_FSS_500_EX_UK_SPK7 indd 7 Layout_DS_FSS_500_EX_UK_SPK7 indd 7 19 11 2020 15 15 28 19 11 2020 15 15 28 ...

Page 8: ...cal and national reg ulations relating to the use of this product Keep these operating in structions in a safe place for later reference If you give the fine paint sprayer to any other person to use it is essential that you pass on these operating instructions as well Explanation of symbols The following symbols and signal words are used in these operating instructions on the fine paint sprayer or...

Page 9: ...section Declaration of conformity Products bearing this symbol comply with all applicable Community legislation of the European Economic Area Read the operating instructions This equipment complies with protection class II Layout_DS_FSS_500_EX_UK_SPK7 indd 9 Layout_DS_FSS_500_EX_UK_SPK7 indd 9 19 11 2020 15 15 28 19 11 2020 15 15 28 ...

Page 10: ...for which it is intended failure to observe the safety information warnings assembly in structions operating instructions maintenance instructions and cleaning instructions presented in this manual failure to observe any accident prevention regulations occupa tional health regulations or safety regulations which apply specif ically and or generally to the use of the fine paint sprayer use of acces...

Page 11: ... to health caused by hand arm vibrations if the fine paint sprayer is used over a long period of time or is not properly guid ed and maintained skin irritations allergies if no suitable protective clothing is used Safety information Read all the safety information and instructions Failure to adhere to the safety information and instructions set out below may result in electric shock fire and or se...

Page 12: ... as pipes hea ting systems stoves and refrigerators There is an increased risk of suffering an electric shock if your body is earthed c Keep the power tool out of the rain and away from moisture The ingress of water into an electric power tool increases the risk of an electric shock d Do not use the power cable for a purpose for which it is not designed for example to carry the power tool hang it ...

Page 13: ...supply and or connect the battery pack pick it up or carry it If you have your finger on the switch while carrying the power tool or if you connect the power tool to the power supply while it is switched on this may cause accidents d Remove all adjusting tools or wrenches before you switch on the power tool Any tool or wrench in a rotating part of the pow er tool could cause injuries e Avoid abnor...

Page 14: ...er tool down These precautions will prevent the power tool starting accidentally d Keep unused electric tools out of the reach of children Do not allow people who are not familiar with the power tool or who have not read these instructions to use the power tool Electric tools are dangerous if they are used by inexperienced people e Look after power tools and plug in tools with care Check that movi...

Page 15: ...tion also to the information printed on the con tainers or issued by the manufacturer of the material Do not spray any materials if you do not know how hazardous they are Wear suitable safety equipment e g a protective dust mask Do not clean the spray gun with combustible solvents Supplementary safety information Paint mist and solvent vapors are harmful to your health Work only in well ventilated...

Page 16: ...sheets and bags made of plastic film away from children There is a risk of suffocation Connect the fine paint sprayer only to a properly installed socket with an earthing contact Connect the fine paint sprayer to the power supply only when the supply voltage at the power socket complies with the specifica tions on the rating plate Connect the fine paint sprayer only to a readily accessible power s...

Page 17: ... order Stop using the fine paint sprayer if paint rises into the ventilation tube Dismantle the ventilation tube valve and membrane clean them and replace the membrane if necessary If the power cable of the fine paint sprayer becomes damaged it must be replaced by the manufacturer by one of its customer service centers or by a similarly trained person in order to prevent hazards Keep this safety i...

Page 18: ...aces if present Check to see if all the items are present Inspect the equipment and accessories for transport damage If possible keep the packaging until the end of the guarantee period After unpacking the equipment check that it is complete and to prevent hazards that it has not been damaged in transit If you have any doubts do not use the equipment but contact our cus tomer service center instea...

Page 19: ...coating materials Risk of damage Improper handling of the fine paint sprayer could result in damage Note the information provided by the manufacturers of sprayable thinners and dilute the paint accordingly if required You can also carry out a spraying test to determine the optimum degree of thinning If you are unable to find any information from the manufacturers use the guide values listed in the...

Page 20: ...ed viscosity see Fig C Fill the container for the viscosity test with the required spray material until completely full 2 Let the spray material in the container run out through the open ing in the bottom and note the time it takes for all the spray ma terial to emerge The time recorded is the basis for calculating the viscosity of the spray material in the unit DIN sec 3 If you are unsure about w...

Page 21: ...ed in Fitting removing the spraying unit to from the motor unit 1 Swing down the safety catch 18 on the motor unit 2 as far as possible see Fig A 2 Insert the required spraying unit 9 or 11 into the motor unit mount such that the line mark on the spraying unit points to the line mark alongside the symbol on the motor unit see Fig B 3 Then turn the motor unit clockwise through 90 as far as it will ...

Page 22: ...n be examined on a test piece Adjust the settings as described below before you start on the real work Switching the fine paint sprayer On and Off 1 Connect the fine paint sprayer to the power supply by inserting the power plug in a suitable power socket 2 Point the fine paint sprayer at the object that you want to be sprayed 3 Pull the trigger to begin spraying 6 4 Let go of the trigger 6 to swit...

Page 23: ...ntal surfaces B Horizontal cone Vertical surfaces C Round cone Corners edges surfaces that are difficult to access Spray pattern of the spraying unit for enamels and varnishes When you turn the adjusting ring take care not to loosen the union nut and unscrew it from the spraying unit After you have set the required spray pattern tighten the union nut again by screwing clockwise Turn the adjusting ...

Page 24: ...also a scale for orientation at the trigger To reduce the material volume turn the setting screw coun ter clockwise To increase the material volume turn the setting screw clockwise Adjusting the spray width With the help of the lever 5 for setting the spray width you can make the spray cone wider or narrower see Fig D Push the lever for setting the spray width towards or to position in order to ma...

Page 25: ... for setting the spraying width must be in position on the twist cap in order to be able to re move the twist cap from the spraying unit 3 Guide the tool 14 for removing the needle as far as possible over the fitted needle 23 from the front see Fig F Make sure that the hooks on the side of the needle slide into the guide grooves inside the tool 4 Rotate the tool one quarter of a revolution 90 5 Wi...

Page 26: ... to align the nozzle such that the edge on the side of the spraying unit engag es in the corresponding recess on the side of the nozzle and that the inserted needle is seated in the middle opening of the nozzle 10 Place the air cap onto the spraying unit such that the two side hooks of the air cap lie inside the corresponding recesses on the side of the nozzle 11 Screw the union nut clockwise onto...

Page 27: ... the heavy paint mist produced see Fig H Move the fine paint sprayer evenly back and forth or up and down depending on which spray pattern is set Steady movement of the fine paint sprayer will result in uniform coverage of the surface Indoor wall paint in strong colors must be applied at least twice Let the first layer of paint dry before you apply the second layer This will produce a better resul...

Page 28: ...work Do not use any combustible materials for cleaning purposes Cleaning the spraying unit Risk of damage Dried up spray material can clog the spraying unit making it useless for the next spraying job It is important therefore to clean the spraying unit each time after you use it Cleaning the paint tub the intake tube and the venting tube 1 The power plug must be pulled out of the power socket bef...

Page 29: ... spraying unit from underneath Make sure that the intake tube is correctly aligned when you do The hook at the top end of the intake tube must run inside the guide groove on the corresponding mount in order for the intake tube to be correctly seated 9 Fill the paint tub with water or solvent 10 Screw the paint tub back onto the spraying unit from underneath 11 Fit the spraying unit back on the mot...

Page 30: ...ll the power plug out of the power socket 2 Remove the motor unit 2 as described in the section Fitting removing the spraying unit to from the motor unit 3 Wipe the outside of the motor unit with a dry or slightly damp cloth Make sure that no liquid gets inside the motor Changing the air filter Risk of damage Improper handling of the fine paint sprayer could result in damage The fine paint sprayer...

Page 31: ... filter can be cleaned in various ways With the filter cover in place clean the air filter with a vacuum cleaner or Remove the air filter see the instructions below for fitting and re moving and then beat out or blow out the dirt and dust 1 Undo the 4 screws holding the filter cover see Fig L 2 Remove the filter cover 3 The air filter can now be taken out and a corresponding replace ment filter in...

Page 32: ...for a long time protect it when you put it into stor age e g place it in its original packaging or in a box Spare parts and accessories You can order suitable spare parts and accessories for your fine paint sprayer via the Internet at www Einhell Service com You will find the latest prices and information there Please provide the following information when ordering spare parts Type DS FSS 500 Einh...

Page 33: ... Health hazard Working without ear protection or protective clothing may be harm ful to health Wear ear protection and suitable protective clothing when using the machine The noise and vibration values were determined in accordance with EN 60745 1 and EN 50580 Sound pressure level LpA 85 dB A Sound power level LWA 96 dB A Uncertainty K 3 dB Subject to technical changes Layout_DS_FSS_500_EX_UK_SPK7...

Page 34: ... the dangers and risks involved Vibration value ah 2 5 m s2 Uncertainty K 1 5 m s2 IMPORTANT The vibration emission level vibration value quoted above was measured in accordance with a standardized method set out in EN 60745 1 and EN 50580 and can be used to compare one electric tool with another It can also be used for a provisional assessment of the level of exposure The actual vibration value c...

Page 35: ...ondition Wear vibration dampened gloves when you use the fine paint sprayer Provide the fine paint sprayer with the care and maintenance list ed in these operating instructions Avoid using the fine paint sprayer at temperatures below 10 C Plan your work schedule to avoid having to use highly vibrating tools over several days Layout_DS_FSS_500_EX_UK_SPK7 indd 35 Layout_DS_FSS_500_EX_UK_SPK7 indd 35...

Page 36: ...ger be capable of being used at some point in time dispose of it in accordance with the regulations in force in your city or county This ensures that old appliances are recycled in a professional manner and also rules out negative conse quences for the environment For this reason electrical equipment is marked with the symbol shown here You can obtain information about collection points from your ...

Page 37: ...essure build up in the paint tub is too low Thin the material Turn the setting screw for con trolling the material volume to the left Clean the nozzle Clean or replace the air filter Turn the paint tub until tight Intermittent fluttering spray Almost all of the material in the paint tub has been used up Air filter is heavily soiled Fill in more material Clean or replace the air filter Paint runs T...

Page 38: ...kalavimams ir prekės normoms RO declară următoarea conformitate conform directivei UE şi normelor pentru articolul GR δηλώνει την ακόλουθη συμμόρφωση σύμφωνα με την Οδηγία ΕΚ και τα πρότυπα για το προϊόν HR potvrđuje sljedeću usklađenost prema smjernicama EU i normama za artikl BIH potvrđuje sljedeću usklađenost prema smjernicama EU i normama za artikl RS potvrđuje sledeću usklađenost prema smerni...

Page 39: ...39 Layout_DS_FSS_500_EX_UK_SPK7 indd 39 Layout_DS_FSS_500_EX_UK_SPK7 indd 39 19 11 2020 15 15 34 19 11 2020 15 15 34 ...

Page 40: ...ce when used properly In the event of product failure within its intended use over the course of the first 3 years after date of purchase we will remedy the problem as quickly as possible once it has been brought to our attention In the unlikely event of such an occurrence or if you require any information about the product please contact us via our helpline support services details of which are to...

Reviews: