Daytech DT-C8814 Quick Installation Manual Download Page 2

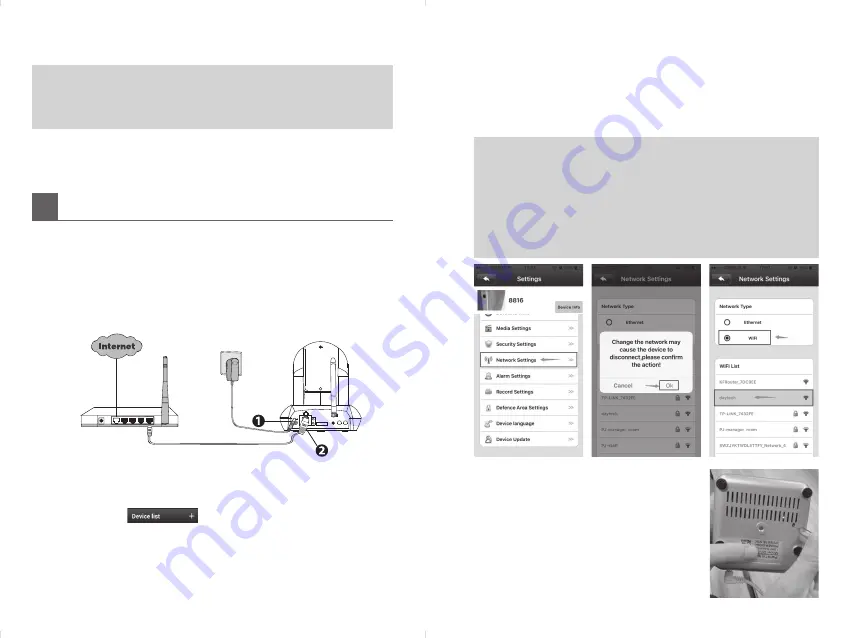
the wifi that your phone is using → click OK → input wifi pass

-

word → connection succeed (a Tick icon appear before the wifi 

name) → plug out the cable.

For other people want to access the IP Camera, just refer to 

above 3.1.5 instructions: manual add, then input ID/password. 

(not need to insert router cable again)

3.1.7 

To keep your privacy, please change the password.

NOTE:


y

After connection succeed, you can plug out the cable and move 

camera to other room, then connect  power, the camera can work 

normally, not need any other operations.


y

Refer to the above point 3.1.6 if the camera can not access Wifi 

successfully, go back to the App “Device list” page, if you can view 

and control the camera normally, it means access wifi successfully.


y

Please reset camera, if you fail to access wifi.

How to reset it: 

press “Reset” button for 5 

seconds → hear a prompt sound → cut off 

power.

Download from APP store

Search “Yoosee” directly on the APP Store or Google Play, then install it.

Before you continue, please note:


y

Make sure your wireless router is enabled DHCP, and connected to internet.


y

Make sure your smart phone is connected to your wireless router and 

located near the camera.


‰

Register An Account

You can use email to register and create a password contains 6-30 char-

acters including digitals and letters.

 3 

 Add IP Camera 

(there are two ways)

3.1 

Wired Connection Switch Wireless (Recommend!)

3.1.1 

Connect the camera with power adapter, and wait for 20 sec-

onds, until hear “di-di-di” sound from camera.

3.1.2 

Connect the camera with router by Ethernet cable, make sure 

your smart phone is connected to your wireless router. (camera 

and smart phone need in same router).

IN

OUT

ANT

SD

AUDIO

WPS

o

3.1.3 

Run the Yoosee APP on your smart phone, register an account 

then log in.

3.1.4 

Click the top right corner “+” of the device list, please see as 
shown:  

3.1.5 

Choose “Manual Add” , then input Camera ID number and orig-

inal password.

3.1.6 

After connection, if you don’t want to use cable,we can switch 

wired to wireless,please follow the below steps: Run on Yoosee 

App → “Setting” → “Network Settings” → access wifi → choose 

Summary of Contents for DT-C8814

Page 1: ...19 device password is empty please create a new password con tains 6 to 30 characters including alphabetic and number Please change the password of your camera regularly and use the combination of numbers letters and special characters Please keep the username and password of your camera safe and secret 2 Download APP To install the APP Yoosee on your smart phone there are two ways Scan the QR cod...

Page 2: ...lay then install it Before you continue please note y y Make sure your wireless router is enabled DHCP and connected to internet y y Make sure your smart phone is connected to your wireless router and located near the camera Register An Account You can use email to register and create a password contains 6 30 char acters including digitals and letters 3 Add IP Camera there are two ways 3 1 Wired C...

Page 3: ...on prompt then input Wifi name and original password 3 2 3 After adding IP camera succefully as shown NOTE y y Please ensure camera and phone use the same wireless router after connection you can view camera remotely on phone by dif ferent wifi or 2 4G not support 5G y y If you fail to add your camera to smart phone for several times please reset the camera y y For other people want to access the ...

Page 4: ...s recommended y y Turn off MAC address filtering on wireless y y Turn off WMM of Advanced Settings y y The WIFI name needs to be in English and has a password y y Before re install camera please reset the camera COMPUTER CLIENT OPERATING GUIDE CMS Client Downloads Directly input http www yoosee co in computer browser click download on computer and install it The CMS support XP Win7 Win8 Win10 do n...

Page 5: ... to Recording Settings Record click the button to start stop recording the video will save in AV format in computer hard disk NOTE y y the device can only record video while CMS is working Playback select playback date to find play back files and play di rectly NOTE y y recorded video file save in computer s hard disk Capture The screen shot will save in computer automatically in bmp format ...

Reviews: