


Mounting the Sensor Tilting Bracket
Page 5
Mounting on the Sensor Mounting Arm
Follow the instructions below to mount the STB on the Sensor Mounting Arm
(SMA).
1. Make sure that you mount the SMA (or plan to mount the SMA) so the sensor(s) on the
STB point towards the sun at solar noon.
Solar noon occurs halfway between sunrise and sunset; consult your local paper
or the WeatherLink
®
software for sunrise and sunset times. To correctly align
the arm, screw a mounting screw part way into any of the screw positions on
the mounting arm and rotate the arm until the shadow from the screw is paral-
lel to the edge of the sensor arm at solar noon.
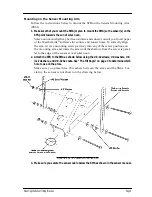
2. Attach the STB to the SMA as shown below using the #8-32 screws, #8 washers, #8
lock washers, and #8-32 hex nuts. See “The Tilt Angle” on page 3 to determine which
hole to use on the arms.
Make sure you place three #8 washers between the arms and the SMA. For
clarity, the sensor is not shown in the drawing below.
M
OUNTING
ON
THE
S
ENSOR
M
OUNTING
A
RM
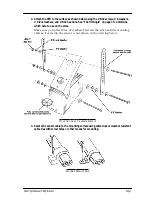
3. Make sure you secure the sensor cable below the SMA as shown in the sensor manual.


