background image

3

Preparing the Temperature Station

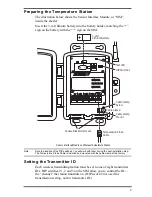
The illustration below shows the Sensor Interface Module, or “SIM”, 
inside the shelter.
Insert the 3-volt lithium battery into the battery holder, matching the “+” 
sign on the battery with the “+” sign on the SIM.

3-Volt  
Lithium Battery 

DIP Switches

Cable Clamp 
Mount 

Temperature Probe 
Cable 

Square Black Grommets  

SENSOR 

SENSOR 

INTERFACE 

INTERFACE 

MODULE 

MODULE 

UV 

UV 

SUN 

SUN 

RAIN 

RAIN 

WIND 

WIND 

TEMP 

TEMP 

HUM 

HUM 

Cable Clamp 

Test LED

Cable Clamp 
Screw 

Sensor Interface Module on Wireless Temperature Station

Note: 

Note the location of the DIP switches. You will work with them during the next installation step. 
The Temperature Probe Cable is installed and mounted with the cable clamp at the factory. 

Setting the Transmitter ID

Each wireless transmitting station must be set to one of eight transmitter 
IDs. DIP switches #1, 2 and 3 on the SIM allow you to control the ID — 
the “channel” the station transmits on. (DIP switch #4 is used for 
transmission testing, not for transmitter ID.) 

Summary of Contents for 6372

Page 1: ...he following components and mounting hardware 1 4 Flat Washers 1 4 Lock Washers 1 4 Hex Nuts 3 Volt Lithium Battery U Bolts 1 4 x 1 1 2 Lag Screws 8 Cable Ties 4 Cable Tie Shelter with Temperature Pro...

Page 2: ...sole to recognize the signals page 4 View current temperature page 5 If you don t see temperature from the correct Station No put the transmitter in TEST mode page 5 Choose a location for the wireless...

Page 3: ...RAIN RAIN WIND WIND TEMP TEMP HUM HUM Cable Clamp Test LED Cable Clamp Screw Sensor Interface Module on Wireless Temperature Station Note Note the location of the DIP switches You will work with them...

Page 4: ...ballpoint pen or paper clip to toggle DIP switches 1 2 and 3 The settings for transmitter IDs 1 8 are shown in the table below ID CODE SWITCH 1 SWITCH 2 SWITCH 3 1 default off off off 2 off off ON 3 o...

Page 5: ...PH until the word TEMP appears 5 To exit Setup Mode press and hold DONE See the Vantage Pro2 User s Manual Setup Guide Setup Mode Screen 2 Selecting Transmitters Viewing Current Temperature Press TEMP...

Page 6: ...you re finished testing wireless transmission If it is left ON the blinking LED will reduce battery life significantly Choosing a Location for the Wireless Temperature Station Locate the station s te...

Page 7: ...signal aluminum siding a furnace with metal ducts and your refrigerator are examples Sometimes transmission between wireless units is obscured by something you cannot identify or by some obstacle tha...

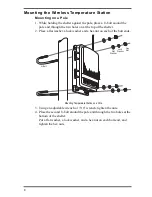
Page 8: ...Place a flat washer a lock washer and a hex nut on each of the bolt ends Flat Washer Lock Washer Hex Nut U Bolt Mounting Temperature Station on a Pole 3 Using an adjustable wrench or 7 16 wrench tight...

Page 9: ...rew Mounting Temperature Station on a Vertical Surface 3 Insert the 1 4 x 1 1 2 lag screws through the flat washers and through the holes at the top of the shelter into the post Using an adjustable wr...

Page 10: ...for Technical Support Monday Friday 7 00 a m 5 30 p m Pacific Time 800 678 3669 Toll Free Order Line Monday Friday 7 00 a m 5 00 p m Pacific Time Our customer service representatives can answer most...

Page 11: ...ve Frequency US Models 902 928 MHz FHSS Overseas Models 868 0 868 6 MHz FHSS ID Codes Available 8 Output Power 902 928 MHz FHSS FCC certified low power less than 8 mW no license required 868 0 868 6 M...

Page 12: ...t harmful interference in a residential installation This equipment generates uses and can radiate radio frequency energy and if not installed and used in accordance with the instructions may cause ha...

Reviews: