background image

9

Chapter 3

Using Your Weather Station

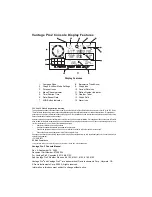
The console LCD screen and keyboard provide easy access to your 
weather information. The large LCD display shows current and past envi-
ronmental conditions as well as a forecast of future conditions. The key-
board controls console functions for viewing current and historical 
weather information, setting and clearing alarms, changing stations types, 
viewing and/or changing station settings, setting up and viewing graphs, 
selecting sensors, getting the forecast, and so on. 

Console Modes

The Vantage Pro2 console operates in five different modes:

Setup Mode

Setup Mode provides access to the station configuration settings that con-
trol how the station operates. Setup Mode consists of series of screens for 
selecting console and weather station options. The screens that display in 
Setup Mode vary depending on the weather station type (cabled or wire-
less), or if the console has a WeatherLink connection already established. 
See the WeatherLink Getting Started Guide for more information on con-
necting your console to your computer.

Setup Mode Commands

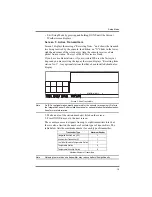
Setup Mode displays when the console is first powered up. This mode can 
be displayed at any time to change any of the console/weather station 
options. Use the following commands to enter, exit and navigate Setup 
Mode:

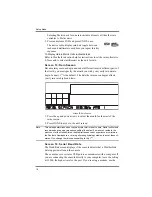
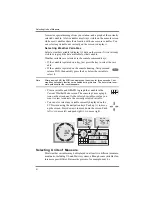
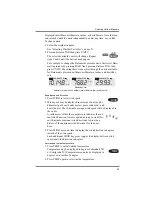
• Enter Setup Mode by pressing DONE and the down arrow (-)


at the 

same time. 

Note: 

The console automatically enters Setup Mode when first powered.

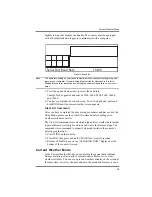
• Press DONE to move to the next screen in the Setup Mode. 

• Press BAR to display the previous screen in the Setup Mode.

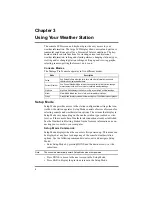
Mode

Description

Setup

Use Setup Mode to enter the time, date, and other information required to 

calculate and display weather data.

Current Weather

Use Current Weather Mode to read the current weather information, change 

measurement units, and to set, clear or calibrate weather readings.

High/Low

High/Low Mode displays the daily, monthly or yearly high and low readings.

Alarm

Alarm Mode allows you to set, clear, and review alarm settings. 

Graph

Graph Mode displays your weather data using over 100 different kinds of graphs.

Summary of Contents for DWW6312

Page 1: ...Vantage Pro2 Console Manual For Vantage Pro2 Vantage Pro2 Plus Weather Stations Davis Instruments 3465 Diablo Avenue Hayward CA 94545 510 732 9229 www davisnet com...

Page 2: ...ned by turning the equipment on and off the user is encouraged to try to cor rect the interference by one or more of the following measures Reorient or relocate the receiving antenna Increase the sepa...

Page 3: ...of Measure 21 Displaying the Forecast 27 Displaying Time Date or Sunrise Sunset 27 Calibrating Setting and Clearing Variables 27 Highs and Lows Mode 30 Alarm Mode 32 Graph Mode 34 Troubleshooting and...

Page 4: ...t and historical data set and clear alarms change station models enter calibration numbers set up and view graphs select sensors and read the forecast The keyboard consists of 12 command keys located...

Page 5: ...display Use Envoy to interface your wireless station to a computer when you d rather place the console in another location for viewing weather conditions Anemometer Transmitter Kit 6332 Provides more...

Page 6: ...0 61 m Davis Baseball Cap PR725 100 cotton twill cap is two toned with a washed khaki crown dark blue brim and embroidered Davis logo Self fabric closure with brass buckle One size fits all WeatherLin...

Page 7: ...ower supply The console batter ies provide backup power for up to four to six weeks Wireless Vantage Pro2 Stations Wireless Vantage Pro2 consoles do not require the use of an AC adapter You may use th...

Page 8: ...n page 9 for more information Installing Batteries 1 Remove the battery cover located on the back of the console by pressing down on the two latches at the top of the cover 2 Insert three C batteries...

Page 9: ...ving data from the ISS through the con sole connection see Cabled ISS Assembly in the Integrated Sensor Suite Installation Manual Console Location You should place the console in a location where the...

Page 10: ...damage to furniture and surfaces 2 Lean the kickstand out by pulling on its top edge You ll see the indentation for your fin ger at the top edge of the console 3 Slide the catch to rest the kickstand...

Page 11: ...running inside the wall mount the console over an empty switch box 2 Use a drill and a 3 32 or 7 64 2 5 mm drill bit to drill two pilot holes for the screws 3 Using a screwdriver drive the two 6 x 1...

Page 12: ...already established See the WeatherLink Getting Started Guide for more information on con necting your console to your computer Setup Mode Commands Setup Mode displays when the console is first powere...

Page 13: ...Transmitters Note An ISS or optional station must be powered for the console to recognize it Refer to the Integrated Sensor Suite Installation manual or optional station installation instruc tions fo...

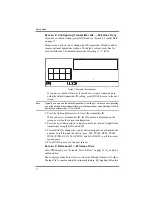
Page 14: ...nearby neighbor has a Vantage Pro2 Sta tion that uses transmitter ID 1 for the ISS 3 Press the right and left arrows to select the transmitter ID When you select a transmitter ID the ID number is dis...

Page 15: ...nges the transmitter ID used for retransmit 2 Use the right arrow to scroll through the list of available transmitter IDs and select the ID for your console 3 Press DONE to move to the next screen Not...

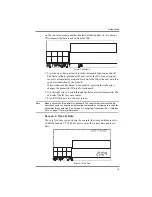
Page 16: ...een 5 Latitude The console uses latitude along with longitude to determine your location allowing it to adjust the forecast and calculate the times for sunset and sun rise Screen 5 Latitude Latitude m...

Page 17: ...th through Greenwich England Longitude is used with latitude to identify your position on earth 1 Press the right and left arrows to move between fields 2 Press the up and down arrows to change the se...

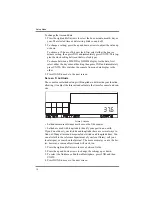
Page 18: ...n press the up and down arrows to set your UTC offset 3 Press DONE to select the time zone or UTC offset shown on the screen and move to the next screen Screen 8 Daylight Savings Settings In most of N...

Page 19: ...ent time and date 2 Press DONE to move to the next screen Screen 10 Elevation Meteorologists standardize barometric pressure data to sea level so that surface readings are comparable whether they re t...

Page 20: ...ve entered a non zero digit and when the zero in the position immediately to the left of the left most non zero digit has been selected 5 Press DONE to move to the next screen Screen 11 Wind Cup Size...

Page 21: ...e selected setting and move to the next screen Note See the Integrated Sensor Suite Manual for instructions on installing the metric rain adapter The 0 1mm setting does not provide correct rain measur...

Page 22: ...s and lows Screen 13 Rain Season 1 Press the up and down arrows to select the month for the start of the rainy season 2 Press DONE to move to the next screen Note This setting determines when the year...

Page 23: ...e completed the above setup procedures and have exited the Setup Mode please use the Clear All command before putting your weather station into service The Clear All command clears all stored high and...

Page 24: ...s Com mand key secondary functions are enabled during this time The keys return to nor mal operation after the icon disappears Press a variable and GRAPH to graph the variable in the Current Weather M...

Page 25: ...er hour m p h kilometers per hour km h meters per second m s and knots knots The 10 minute average wind speed will be displayed in the ticker A solid arrow within the compass rose indicates the cur re...

Page 26: ...nected to your console The order the optional sensors readings display depends on your station configuration Humidity readings for humidity sta tions display with leaf wetness and leaf temperature re...

Page 27: ...n to display the accumulated UV index for the day The accumulated UV index is the total ultraviolet radiation that the sensor has read throughout the day The accumulated UV index for the day is reset...

Page 28: ...ng of your rain year in Setup Mode See Screen 13 Rain Season on page 19 Year to date precipitation is displayed in inches in or millimeters mm Daily Rain Press RAINDAY to display the rain accumulated...

Page 29: ...on the backlight for the screen display Press 2ND then LAMPS again to turn the back light off Use the backlight when the LCD is not clearly visible When the console is battery operated the backlight r...

Page 30: ...th the rain or snow icon displays When both the rain and snow icons display together a chances of rain freezing rain sleet and or snow are likely Displaying Time Date or Sunrise Sunset Your console sh...

Page 31: ...current direction of the wind vane on the anemometer Compare it to the wind direction reading on the console If the wind vane is pointing south for instance the wind direction reading on the screen s...

Page 32: ...es not affect yearly rain total Yearly Rain The sets the current year s rain total Daily ET Evapotranspiration This sets the daily ET total Monthly and yearly ET totals are updated Monthly ET This set...

Page 33: ...ro or in the case of the barometer the raw barometer value Clearing the barometer value also clears the elevation setting Clear All Command This command clears all stored high and low weather data inc...

Page 34: ...d and forward the flashing dot changes to show what value you re looking at Weather Variable High Low Day Time Date Month Year Additional Information Outside Temperature Yes Yes Yes Yes Yes Inside Tem...

Page 35: ...larm will continue sounding as long as the condition exists The alarm will sound again for each new alarm If more than one alarm is active the description for each active alarm cycles onto the screen...

Page 36: ...3 Press the right and left arrows to select one of the variables displayed on the screen or use the console keys to select any weather variable 4 Press 2ND then press SET to change the selected variab...

Page 37: ...Storm Clearing uses trend value falling rate Evapotranspiration ET Alarm uses total ET for the day Humidity Inside High and Low Humidity Outside High and Low Dew Point High and Low Leaf Wetness High...

Page 38: ...4 hours 5 Press the up and down arrows to shift the graph s time span If you press the down arrow the graph shifts from the last 24 hours to the last 24 days Now each dot represents the high recorded...

Page 39: ...e C C H L H L Dew Point C C H L H L Leaf Wetness C C H L Rain T T T T T T Storm Rain Rate H H H H H H Soil Moisture C C H L Solar Radiation A A H Inside Temperature C C H L H L Outside Temperature C C...

Page 40: ...ing readings to exceed dis play limits Check calibration number and adjust if necessary Console is sluggish or does not work at low temperatures The console and display may not work below 32 F 0 C Use...

Page 41: ...cessary Sprinklers may be hitting the ISS radiation shield Relocate See ISS manual Inside temperature sensor reading seems too low Make sure the console or other temperature sensor is not in contact w...

Page 42: ...eneath the ISS then antennas should be hori zontal Try distancing your console from your ISS at least 10 feet apart Check the ISS Refer to the ISS Installation Manual for instructions on how to check...

Page 43: ...to differentiate which screen is currently being displayed Statistical Diagnostic Screen The Statistical Diagnostic displays information about how data is being received from the weather station to th...

Page 44: ...ic Screen The Reception Diagnostic screen displays information pertinent to the con sole s wireless reception To view this screen from the Statistical Diagnos tic screen press 2ND and then press CHILL...

Page 45: ...Batteries Use this procedure to change console batteries without losing any stored weather data or console configuration settings 1 Plug in the AC adapter or if the AC adapter is not present enter Set...

Page 46: ...age Pro2 calculates three apparent temperature readings Wind Chill Heat Index and the Temperature Humidity Sun Wind THSW Index Apparent temperatures use additional weather data to calculate what a hum...

Page 47: ...alize that relative humidity changes with temperature pressure and water vapor content A parcel of air with a capacity for 10 g of water vapor which contains 4 g of water vapor the relative humidity w...

Page 48: ...atmospheric pressure this in turn means that atmospheric pressure changes with altitude For example atmospheric pressure is greater at sea level than on a mountain top To compensate for this differen...

Page 49: ...2 to determine the amount of UV radiation to which you expose yourself Scientific evi dence suggests that UV exposure should be avoided and that even low UV doses can be harmful UV MEDs MED Minimum Er...

Page 50: ...Light Brown Burns moderately tans gradually IV Moderate Brown Burns minimally tans well V Dark Brown Burns rarely tans profusely VI Black Never burns deep pigmentation a Developed by T B Fitzpatrick...

Page 51: ...ce of the sensor is The leaf wetness reading ranges from 0 dry to 15 Leaf wetness requires an optional Leaf Soil Moisture Tem perature Station and is only available for Wireless Vantage Pro2 Stations...

Page 52: ...power Wireless up to 9 months Cabled 1 month approximately Connectors Modular RJ 11 Housing Material UV resistant ABS plastic Console Display Type LCD Transflective Display Backlight LEDs Dimensions C...

Page 53: ...ari able selected Graph Time Span 24 Intervals Current Interval see Graph Intervals to determine time span Graph Variable Span Vertical Scale Automatic varies depending upon data range Maximum and min...

Page 54: ...eater of 5 or 0 01 0 25 mm Inside Humidity Included in Console 1 10 to 90 5 RH Outside Humidity ISS or Temp Hum Station 1 0 to 100 3 RH 4 above 90 Extra Humidity ISS or Temp Hum Station 1 0 to 100 3 R...

Page 55: ...MED 20 1 MED 20 0 to 199 MEDs 5 Wind Direction Anemometer 1 0 to 360 7 Compass Rose 22 5 16 compass pts 0 3 compass pt Wind Speed large cups 1 mph 1 kt 0 5 m s 1 km h 2 to 150 mph 2 to 130 kts 3 to 24...

Page 56: ...tecting rain Barometric Pressure Trend Arrows show direction of pressure change for last three hours Contacting Davis Technical Support If you have any questions or encounter problems installing or op...

Reviews: