background image

USER’S MANUAL 

MA30-02/A 


3.4. 

3.4. 

3.4. 

3.4. ANALYSIS MODES

ANALYSIS MODES

ANALYSIS MODES

ANALYSIS MODES    

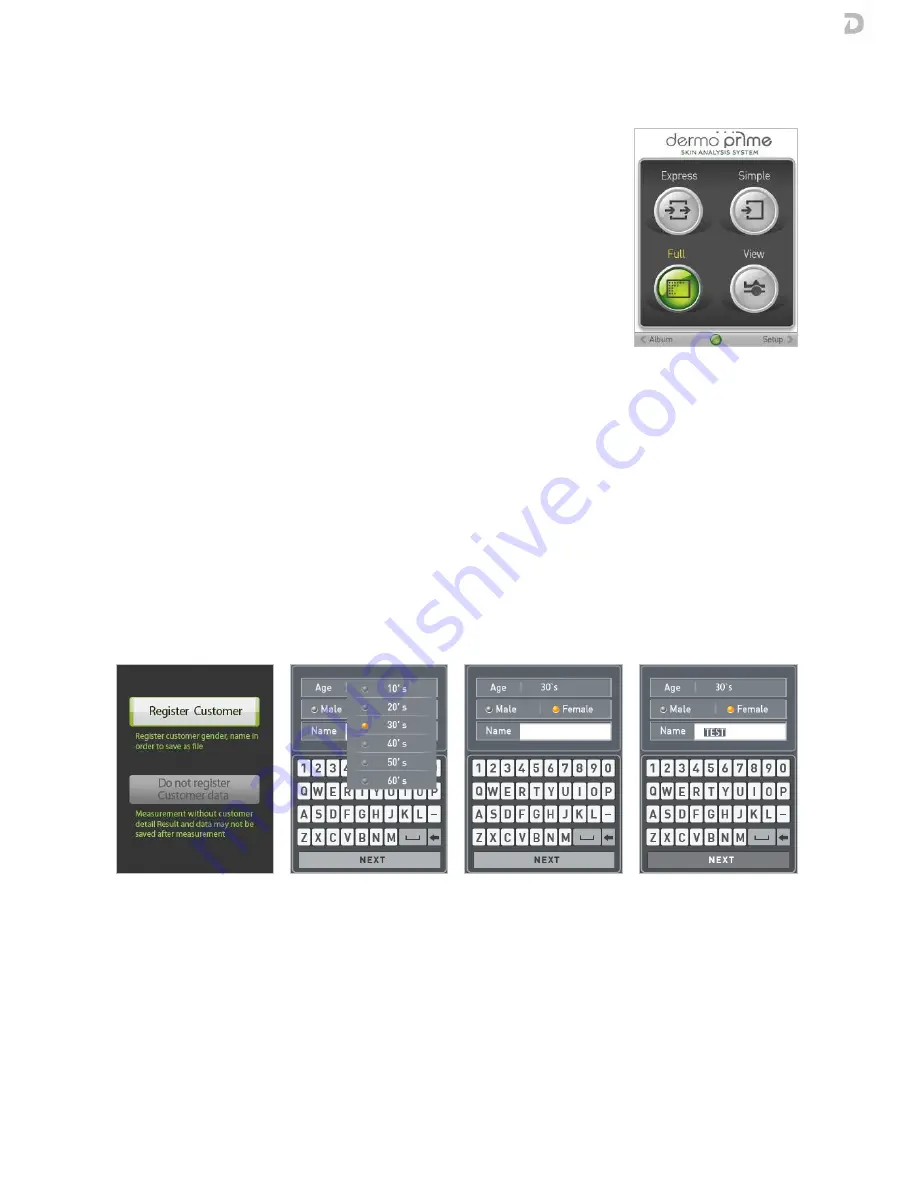
On the home screen you can select between four different modes of analysis: 

Express:

Express:

Express:

Express:    
1.


Moisture 

2.


Uniformity and spots 

3.


Sebum 

4.


Wrinkles 

Simple:

Simple:

Simple:

Simple:    
1.


Moisture 

2.


Sebum 

Full:

Full:

Full:

Full:    
1.


Moisture 

2.


Sebum 

3.


Uniformity 

4.


Wrinkles 

5.


Spots 

 
The fourth mode is View

View

View

View, which allows you to view and capture images with the 

two polarizations of the device. Captures are not stored. 
 
NOTE:  The  measures  that  have  been  disabled  in  the  settings  will  not  be 
performed.  The  above  lists  correspond  to  the  full  set  of  measurements 
considering that all of them are enabled. 


3.

3.

3.

3.5

5

5

5. . . . CUSTOMER REGISTRATION

CUSTOMER REGISTRATION

CUSTOMER REGISTRATION

CUSTOMER REGISTRATION    

The customer record is optional. At the beginning of each test (except Simple mode) we can register the client 
so that the contents of the analysis are stored in the memory of dpsmart. 
 
If you use the software dpsmart dermoprime, you must register the client to analyze the data later.

If you use the software dpsmart dermoprime, you must register the client to analyze the data later.

If you use the software dpsmart dermoprime, you must register the client to analyze the data later.

If you use the software dpsmart dermoprime, you must register the client to analyze the data later.    
    
Use the Up, Down,

Use the Up, Down,

Use the Up, Down,

Use the Up, Down, Left and Right keys to enter customer data. Press Confirm to save your selection.

 Left and Right keys to enter customer data. Press Confirm to save your selection.

 Left and Right keys to enter customer data. Press Confirm to save your selection.

 Left and Right keys to enter customer data. Press Confirm to save your selection. 


o


Select first, the customer's age group. 

o


Then select the gender of the customer. 

o


To enter the customer's name, scroll through the keyboard and press the Confirm key to enter the selected 
letter. 

o


After entering the name, press M. 

o


Press Confirm to start measuring. 


Summary of Contents for Dp smart

Page 1: ...USER S MANUAL MA30 02 A 27 02 2012 www davicia com ...

Page 2: ... 1 5 Bluetooth settings 4 1 6 Advanced settings 4 2 Connecting with PC 4 2 1 Connecting with cable 4 2 2 Connecting with Bluetooth 11 11 11 12 12 12 13 13 14 14 14 5 5 5 5 MAINTENANCE AND CLEANING MAINTENANCE AND CLEANING MAINTENANCE AND CLEANING MAINTENANCE AND CLEANING 5 1 Instructions for installing batteries 5 2 Instructions for charge and connect 5 3 Environmental 5 4 Equipment disposal 15 15...

Page 3: ...ivel head 2 Moisture sensor 3 Camera and lighting 4 LED indicator 5 On Off button 6 LCD screen 7 Memory 8 External adapter connexion The head rotates 90 degrees clockwise Turning in any other way can cause damage to the equipment 1 5 2 3 4 6 7 8 ...

Page 4: ... MANUAL MA30 02 A 3 1 1 1 1 1 1 1 1 PART LIST PART LIST PART LIST PART LIST dpsmart dpsmart dpsmart dpsmart Batteries x2 Charger x1 USB cable x1 Hand strap x1 Case x1 User s Manual Cradle x1 Cleaning cloth x1 ...

Page 5: ...llation Environment Installation Environment Installation Environment Installation Environment Do not install the product in a too hot or cold place Recommended Temperature 15ºC 35ºC o Sunlight Sunlight Sunlight Sunlight Do not expose the camera of the product to the sun or a direct ray of light It may cause product damage o Shock or Vibration Shock or Vibration Shock or Vibration Shock or Vibrati...

Page 6: ... Turn On o Press the On Off button 5 until the LED indicator stops blinking and the screen turns on Turn Off o Press the On Off button 5 for 2 3 seconds The device will be switched off automatically o By pressing the On Off button you will be able to go back to the home screen o If the device is not in use for 9 minutes it will be switched off automatically o Make sure to switch off the device whe...

Page 7: ... 1 LCD SYMBOL DESCRIPTION LCD SYMBOL DESCRIPTION LCD SYMBOL DESCRIPTION LCD SYMBOL DESCRIPTION Display Display Display Display Description Description Description Description Battery fully charged Most of the battery charged Half of the battery charged Out of battery Battery need to charge or replace Guide is enabled Measurement Indicates the measurement mode which is enabled Previous Capture Next...

Page 8: ...ress and hold to go to the Album Diagnosis Previous measurement End of diagnosis Go to Bluetooth settings Confirm Diagnosis Capture image Album See the images Right Homescreen Press and hold to go to the Configuration Album Delete an image Diagnosis Next measurement 3 3 3 3 3 3 3 3 RECOMMENDED LOCATION F RECOMMENDED LOCATION F RECOMMENDED LOCATION F RECOMMENDED LOCATION FOR MEASUREMENT GUIDE OR ME...

Page 9: ...ient so that the contents of the analysis are stored in the memory of dpsmart If you use the software dpsmart dermoprime you must register the client to analyze the data later If you use the software dpsmart dermoprime you must register the client to analyze the data later If you use the software dpsmart dermoprime you must register the client to analyze the data later If you use the software dpsm...

Page 10: ... be repeated for both designated face areas U zone and T zone o Take one sample of sebum indicator o Press the pink area of the sebum indicator on the skin for 3 seconds in the T zone o Frame the pink area impregnated with skin s sebum using the camera o Press Capture button o Press Next button o Repeat the previous steps for the U zone using a new sebum indicator sample o Press Next button when f...

Page 11: ...10 10 10 IMAGE TRANSFER IMAGE TRANSFER IMAGE TRANSFER IMAGE TRANSFER The images taken by dpsmart as well as the results can be transferred to Personal Computers via Cradle USB data cable provided by the supplier or Bluetooth Each time a diagnosis is finished the screen displays the options to transfer or save the images o Press Bluetooth button to pair the dpsmart to the host device o Press Send b...

Page 12: ... the measurements you want to diagnose BT BT BT BT Select the Bluetooth pairing device Wi Wi Wi Wi Fi Fi Fi Fi This option is permanently disabled Advance Advance Advance Advance Information related to the software version and contact details o To exit the setup menu press the On Off button 4 1 1 Date Time setting 4 1 1 Date Time setting 4 1 1 Date Time setting 4 1 1 Date Time setting If you selec...

Page 13: ...ode Mode Mode option the display shows the following screen o Press Left or Right keys to move down or up through the mode options see 3 4 Analysis modes o To go back to the setup menu press the On Off button 4 1 4 1 4 1 4 1 4 4 4 4 Measurements Measurements Measurements Measurements setting setting setting setting If you select the Measurement Measurement Measurement Measurement option the displa...

Page 14: ...ough Bluetooth devices o When the desired device is selected press Connect o If the host device requires pairing code enter 0 number in Bluetooth pairing settings o When the connection is completed the analyzer screen will display Bluetooth device connected 4 1 4 1 4 1 4 1 6 6 6 6 Advance Advance Advance Advanced d d d settings settings settings settings If you select the Advanced Advanced Advance...

Page 15: ...adle If you wish not to use the cradle connect the USB cable directly to the device o On the display on the device will appear the message USB connexion If the message doesn t appear turn on the device o The PC will automatically recognise the device and will enable image browsing NOTE Always use the USB data cable provided by the supplier 4 2 4 2 4 2 4 2 2 2 2 2 Connecting with Connecting with Co...

Page 16: ...1 5 1 5 1 INSTRUCTIONS FOR INSTALLING BATTERIES INSTRUCTIONS FOR INSTALLING BATTERIES INSTRUCTIONS FOR INSTALLING BATTERIES INSTRUCTIONS FOR INSTALLING BATTERIES 1 Slide to open the battery cover 2 Insert the battery 3 Close the battery cover 5 5 5 5 2 2 2 2 INSTRUCTIONS FOR CHARGE AND CONNECT INSTRUCTIONS FOR CHARGE AND CONNECT INSTRUCTIONS FOR CHARGE AND CONNECT INSTRUCTIONS FOR CHARGE AND CONNE...

Page 17: ...ies contain toxic compounds disposal of batteries should be delegated to a competent organization complying with the deposit of Poisonous Waste Regulation 1972 Please do not incinerate batteries The optimum operating temperature for the device is 10ºC to 50ºC although it will operate at higher and lower temperatures the scale s battery life will adversely be affected 5 5 5 5 4 4 4 4 EQUIPMENT DISP...

Page 18: ... if you use additional functions of the device such as the Bluetooth The screen is frozen and the keys not working when using the device Please remove the battery from the device and put it on again If the device is still not working please contact to the customer service center I cannot transfer the file by Bluetooth Please check whether the paring is completed with the device which you want to t...

Page 19: ... x 18 mm Image sensor Type Maximize pixel Available pixel Capture mode 1 2 7 Type CCD Image Sensor 1188 H x 888 V x 2 2 109 888 Pixel 1152 H x 864 V x 2 1 990 656 Pixel X1 X30 X60 Bluetooth Version Frequency range Available distance Fully Qualified Bluetooth V2 0 EDR System 2402 2480MHz Up to 10M 1Mbps Power supply Li Ion Battery 4 2V 1150mA AC Adaptor DC 5V 1000mA Memory card Micro SD Ver2 0 2GB ...

Page 20: ...fied free of charge upon presentation of the purchase receipt for the appliance No other rights can be taken into consideration Return shipment is at the customer s expense if the appliance is anywhere other than at the customer s headquarters In the event of damage during shipment guarantee rights will be granted only if the appliance is shipped in the original packaging You are therefore recomme...

Page 21: ...USER S MANUAL MA30 02 A 20 9 CE DECLARATION OF CONFORMITY ...

Page 22: ...USER S MANUAL MA30 02 A 21 ...

Page 23: ...USER S MANUAL MA30 02 A 22 ...

Page 24: ...uments are available on the web www davicia com www davicia com www davicia com www davicia com C Murcia 35 Nave G Pol industrial Can Calderón E 08830 Sant Boi de Llobregat Barcelona Spain Tel 34 93 654 32 32 Fax 34 93 654 16 62 info davicia com www davicia com ...

Reviews: