background image

Page 23

7.7.3 Configuring A Maintenance Timer

Follow these steps to modify the total number of weeks or the number of elapsed weeks for a given maintenance
timer:

1) Select the MAINT TIMERS submenu.
2) Select the desired maintenance timer using the UP and DOWN buttons.
3) Press the SCROLL button once to view the maintenance timer options.
4) Press the UP button once to begin timer configuration. The Total Weeks field begins to flash.
5) Use the UP and DOWN buttons to adjust the selected field as required. Hold down either button for automatic

key press repeat.

6) Press the SCROLL button to confirm the current setting and move to the next field.
7) Repeat steps 5 and 6 to set the number of weeks already elapsed. Generally you will want to leave this field at 0

- the start of the timed period.

8) Press the SCROLL button once to return to the maintenance timer submenu.

(ESC) (CFG)

- - - -

008/008

WEEKS

5) Press the SCROLL button to confirm

and move to the next field.

7.7.4 Disabling A Maintenance Timer

If you want to disable a maintenance timer follow the procedure outlined above until you reach step 5. At this point
press the DOWN button until the Total Weeks field is 0. Press the SCROLL button once to save the new setting and
return to the maintenance timer options view. This will completely disable the maintenance timer.

Notes:
1) Lowest numbered timers have the highest priority and will be shown first if two or more timers are due at the same

time. Clearing the first maintenance timer will result in the controller notifying you that next highest priority timer is
due.

2) The maintenance timers will not accumulate time while the controller is turned off.

(CLR)

(ESC) (CFG)

- - - -

000/008

WEEKS

4) Press the DOWN button to reset the week count to zero.

Reset to zero

Up

Down

Push 4

(Light Adjust)

LIGHT ADJUST :

100

36.75

C

O

Page 10

6 Spa Power Variable Colour Light (SPVCL)

The Spa Power Variable Colour Light is controlled via two touch pad buttons - Light Level and Light Effect Mode. If
no SPVCL is fitted then the buttons can still be used to produce lighting effects on the touch pad as though a light
was fitted.

The Light Level button selects the intensity of the light and the Light Effect Mode button selects the light colour and
effect.

Pressing the UP or DOWN button while in high, medium or low mode will automatically change to adjustable mode.

6.1 Adjustable Light Intensity Mode

In the adjustable light intensity mode the UP and DOWN buttons are used to set the light between 2 and 100 percent
of maximum intensity. On the first press of UP/DOWN the LCD will display “LIGHT ADJUST” along with a bar graph
showing the current setting. While viewing this display you may press the UP and DOWN buttons to adjust the
intensity as required. Hold down either button for automatic key press repeat. This setting is saved and will be
automatically restored next time you select the adjustable light intensity mode.

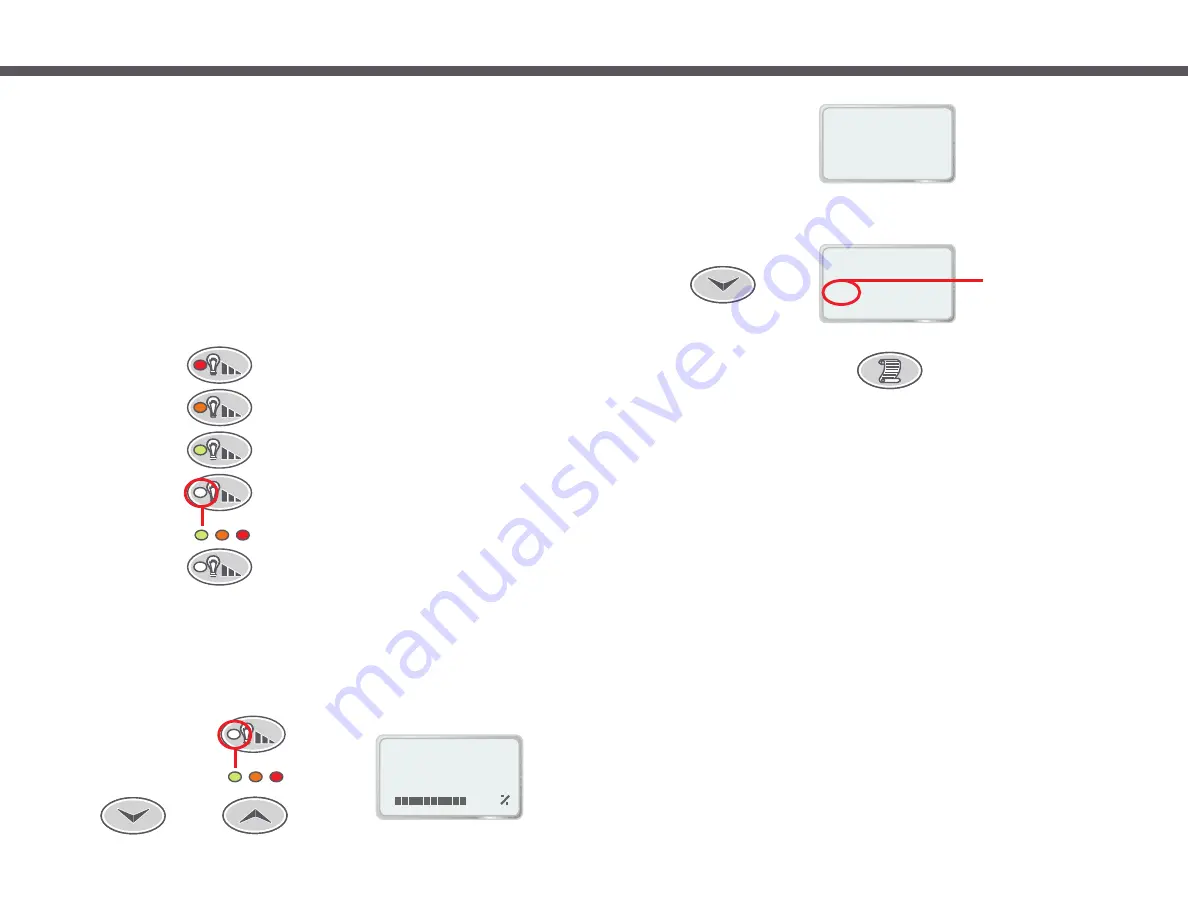
Five pushes of the Light level button selects the light intensity as follows:

2) Pressing the Air button while the blower is running will only cycle through the available options when the LCD is

displaying the current selection. This allows you to set the function of the UP and DOWN buttons and to view
the current Blower setting without changing it.

3) Pressing either the UP or DOWN button while in the full-speed or oscillating mode will automatically change the

SPVSB to adjustable speed mode.

4) If left on, this accessory will automatically switch off after 25 minutes.
5) If the heater element is on, switching on the SPVSB may cause the heater to load shed and switch off. If this

occurs the heater will come back on approximately 5 seconds after the SPVSB is turned off.

Push 2

(Medium)

Push 1

(High)

Push 3

(Low)

Push 4

(Adjust)

Push 5

(Off)

LCD Displays “LIGHT HIGH”, 100% light intensity

LCD Displays “LIGHT MEDIUM”, 66% light intensity

LCD Displays “LIGHT LOW”, 33% light intensity

LCD Displays “LIGHT ADJUST”, adjustable light intensity mode,
button LED colour changes with setting when up or down buttons
are pressed. (Green 2-32, Orange 34-66, Red 68-100%)
(See “Adjustable Light Intensity Mode” in next section for more details.

LCD Displays “LIGHT OFF”, light off

Summary of Contents for SP1200-35

Page 1: ...y to the above values to ensure a healthyexperiencebothforyouasbathersandforyourspapoolequipment Damage to the element thermostat pockets and associated metalwork due to the poor maintenanceofwaterchemistryisnotcoveredbywarranty PH Models SP1200 35 1ph 3ph SP1200 45 SP1200 60 1ph only Davey Water Products Pty Ltd Member of the GUD Group ABN 18 066 327 517 Head Office and Manufacturing 6 Lakeview D...

Page 2: ...ill a problem then contact your spa pool supplier Error 6 THERMAL CUT OUT Thermal Cut Out Tripped This error indicates that the safety electromechanical over temperature cut out on the heater has operated This is not necessarily a problem with the SP1200 It may have occurred from an air lock around the element high temperatures during shipping or pump failure This automatic cut out will only reset...

Page 3: ...g detected in the heater housing On a push of the DOWN button the main pump will run for 10 seconds to try to get water to the heater If successful normal operation will resume If unsuccessful the error will be indicated on the display again Note When this error occurs you will also be given the option to run the SP1200 in demo mode this feature is not intended for end users If you inadvertently e...

Page 4: ...ng any water in the heater housing If no water is being detected the LCD Display will also show WATER PRIMING PLEASE WAIT Heater This LED shows when the heater is on The heater will turn on and off as required whenever the pump is running The LED is red when the heater is on high and orange when on low The low setting is used for load shedding to keep the total controller load within safe limits w...

Page 5: ... touch pad LCD contrast brightness can be manually adjusted if the display appears too dark or light To adjust the contrast follow these steps 1 Press and hold down the LIGHT button This will cycle the light intensity as usual however you must keep the button held down before proceeding with the following steps 2 With the LIGHT button held down press the UP or DOWN buttons to darken or lighten the...

Page 6: ...ion please see section 3 9 LD DEFAULTS SET NO ARE YOU SURE Push 9 Scroll to SET NO YES 1 SET TEMP 2 USER TIMER 3 CLOCK 4 USER ALARM 5 SLEEP TIMES 6 MAINT TIMERS 7 MISC OPTIONS 8 ADV OPTIONS 9 LD DEFAULTS Page 29 Select MAIN menu then push UP button nine times 7 10 Load Factory Default Settings The load defaults option provides a way of restoring all factory default settings These include obvious s...

Page 7: ...n hour to ensure filtration times are met similarly a setting of 4 hours indicates that a filtration run will occur once every 4 hours 1 Select the ADV OPTIONS submenu from the main menu 2 Select the FILT TIME menu item 3 Press the SCROLL button to begin Filtration Period modification 4 Use the UP and DOWN buttons to set the desired filtration period 5 Press the SCROLL button to confirm the curren...

Page 8: ... the controller will attempt to use the high setting whenever heating is required Note that high heat may not always be available due to possible load shedding when accessories are turned on depends on installer configuration Range of adjustment is 0 00 default off to 5 00 in steps of 0 25 degrees Celsius At the maximum setting of 5 00 the pool water must be five or more degrees below the set temp...

Page 9: ...tton modify light synchronisation setting 4 Use the UP and DOWN buttons to toggle between on and off 5 Press the SCROLL button to set Note This option is only available if a SPVCL Spa Power Variable Colour Light is in the pool Page 7 3 3 Pump 1 Two speed 24HR circulation pump fitted This pump is controlled via two touch pad buttons one to turn the pump on off and another to change its speed The mo...

Page 10: ...s of touch pad inactivity no button presses the backlight intensity will automatically return to a fixed 34 setting This is to ensure long life of the backlight LEDs As soon as you press a button on the touch pad your custom setting will be restored 1 Select the MISC OPTIONS submenu from the main menu 2 Select the PANEL LIGHT COLOUR menu item 3 Press the SCROLL button to begin light colour selecti...

Page 11: ... touch pad inactivity The Air Button controls a Spa Power Variable Speed Blower if fitted It is used to turn the blower on off and select different operating modes Four pushes of the air button cycle the blower as follows 5 1 Adjustable Speed Mode SPVSB In the adjustable speed mode the UP and DOWN buttons are used to set the blower to one of 9 different speeds On the first press of UP or DOWN the ...

Page 12: ...no SPVCL is fitted then the buttons can still be used to produce lighting effects on the touch pad as though a light was fitted The Light Level button selects the intensity of the light and the Light Effect Mode button selects the light colour and effect Pressing the UP or DOWN button while in high medium or low mode will automatically change to adjustable mode 6 1 Adjustable Light Intensity Mode ...

Page 13: ...the available colours one at a time without any smooth fading between different colours The UP and DOWN buttons may be used to change the speed of the light effect see section 6 2 1 below LCD Displays DELAYED CHANGE Light cycles through all of the available colours one at a time Each colour is shown for a short period then the light will quickly fade to the next colour The UP and DOWN buttons may ...

Page 14: ...splay Notes 1 For correct sleep operation ensure the clock is set correctly You will need to set it the first time the controller is powered up or if the controller has been turned off for a long period 2 The maximum possible sleep time for one period is 23 hours 59 minutes This is achieved when the stop time is one minute before the start time If the two times are equal the sleep period will have...

Page 15: ...us Options Menu and Advanced Options Menu These sub menus are accessed via main menu items 4 to 8 respectively Simply select one of these items in the main menu and press the SCROLL button You will now be in the given sub menu Browse sub menus just as you would the main menu the interface functions exactly the same To select any other item either within the main menu or any of the sub menus simply...

Page 16: ...ery handy feature that is used to silence the spa pool during your hours of sleep While the SP1200 is asleep no automatic heating or filtration maintenance will occur however the spa can still be used in manual mode without having to change any settings There are a total of nine individual sleep times that can be programmed each of which can operate on one or more specified weekdays You may use as...

Page 17: ... timer by pressing SCROLL again Otherwise wait approximately five seconds for the message to disappear and you will be returned back to the default view with the timer running in the background 7 4 Clock The SP1200 contains a real time clock that will retain the correct time even during short power cuts The clock provides the user with a convenient way to tell the time in the pool and is also used...

Page 18: ...2 USER TIMER 3 CLOCK 4 USER ALARM 5 SLEEP TIMES 6 MAINT TIMERS 7 MISC OPTIONS 8 ADV OPTIONS 9 LD DEFAULTS Page 17 Select MAIN menu then push UP button four times 7 5 User Alarms The SP1200 controller has nine user programmable alarms that you can configure to go off at a preset time while you are using the spa These alarms function similarly to a regular clock alarm but with the additional benefit...

Reviews: