background image

T e c h n o l o g y ,   L L C

DIESEL PRO

®

 245

TECHNICAL MANUAL FOR DTNA

7

www.davco.com

800-328-2611

Saline, MI  48176

P. O. Box 487

DAVCO Technology, LLC

F1353 REV B

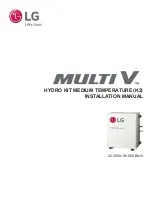
VISUAL DIAGNOSTICS - AIR VS. VAPOR BUBBLES

FUEL RETURN 

ENGINE 

LIFT PUMP

DIESEL PRO 

DIESEL PRO 

FUEL RETURN 

ENGINE 

LIFT PUMP

Air Bubbles

Air bubbles are caused by any air leak on the vacuum (suc-

tion) side of the fuel system from the fuel tank pick-up to and 

including the lift pump (see Figure 1).
If there is an air leak in the fuel system, air bubbles will be 

present in the clear cover of the Diesel Pro. Follow test 

procedures outlined in “Diagnostic Procedures for Air Leaks” 

for air leak diagnostics. If there are no bubbles present in 

the Diesel Pro cover and the engine continues to run rough, 

lopes or has a loss of power, there may be an air leak between 

the Diesel Pro outlet port and lift pump inlet. This type of air 

bubble can be seen if a sight tube is installed at the lift pump 

inlet. Air bubbles may also be visible in the fuel return (spill) 

hose out of the fuel gallery. These leaks are easily eliminated 

by checking and torquing the fuel fittings in the area of the 

leak.

TEST 1: 

A quick procedure to determine if the air leak 

is between the fuel tank and the Diesel Pro is to remove 

the Diesel Pro inlet hose and route a new hose from the 

Diesel Pro inlet into a container of fuel or the fuel tank fill cap 

opening. Start the engine and check for bubbles.
If there are no air leak symptoms, but bubbles are present in a 

sight tube at the fuel lift pump inlet, they are most likely vapor 

bubbles.

Vapor Bubbles

All diesel fuel has some level of entrained air caused by the 

natural splashing that occurs in the fuel tank during normal 

vehicle or equipment operation. Vapor bubbles develop in 

the Diesel Pro because the pressure inside the Diesel Pro is 

lower than the atmospheric pressure in the fuel tank. Vapor 

bubbles can vary from champagne size up to ¼" in diameter. 

They may increase in size or volume as engine RPM increas-

es. The lower pressure draws the entrained air/vapor out of 

the fuel and these bubbles will be visible as the fuel exits the 

Diesel Pro (See Figure 2). As the fuel enters the lift pump, it 

is pressurized and the bubbles are compressed back into the 

fuel. There will be no bubbles on the fuel return side of the 

system. These vapor bubbles will not affect the performance 

of the engine.

TEST 2:

 An easy way to determine the difference between 

vapor and air bubbles is by temporarily removing the filter ele-

ment from the Diesel Pro. Fill the cover with clean diesel fuel, 

replace the vent cap and re-run the outlet fitting sight glass 

test. If there are no bubbles visible in the sight glass, then the 

bubbles that were previously visible were vapor bubbles. If 

bubbles are still present then they are air. If air bubbles still 

exist, re-run the test in 

TEST 1

 to eliminate the chassis plumb-

ing as a variable.

There is no troubleshooting or repair procedure required 
for vapor bubbles. Vapor bubbles do not cause perfor-
mance issues and will not be present after the lift pump.

There are two kinds of bubbles that may be visible at the fuel pump inlet of a diesel fuel system. The bubbles can be 

characterized as either air bubbles or vapor bubbles.

AIR BUBBLES

VAPOR BUBBLES

Figure 1

Figure 2

Summary of Contents for DIESEL PRO 245

Page 1: ...ns 1 How it Works 1 SEEING IS BELIEVING 2 Dimensions and Specifications 3 E E Important Safety Precautions 4 Installation Instructions 5 12VDC and 24VDC Pre heater Installation 6 Visual Diagnostics Air vs Vapor Bubbles 7 Visual Diagnostics with Clear Cover 8 Diagnostic Procedures Air Leaks 9 Diagnostic Procedures Check Valve and Heater Testing 10 Filter Change Procedure 11 Preventative Maintenance...

Page 2: ......

Page 3: ...nto the clear cover Contaminants and emulsified water are captured by the filter media Fuel level continues to rise to maintain a fuel path through the clean filter media with low restriction Clean water free fuel exits the Diesel Pro and flows to the engine fuel injection system Applications 2017 engine models Detroit DD5 and DD8 Meets Exceeds 2017 engine manu facturer s stringent water separatio...

Page 4: ...e media removes 98 of free and emulsified water This far exceeds the performance of cellulose media When new the fuel level in the filter will be very low with minimal restriction As the filter is used contaminants collect on the filter from the bottom up Fuel rises on the filter indicating remaining filter life Fuel level increases in clear cover As contaminants collect on the filter the fuel ris...

Page 5: ...In Connection M22 Fuel Out Connection M22 Filter Service Clearance Min 3 5 88 9 mm Max Fuel Flow 60 gph Electric Pre heater 12VDC 24VDC 155W FILTRATION PERFORMANCE AT 55 GPH Micron 8 Coarse water removal 98 Emulsified water removal new filter 93 Emulsified water removal end of life filter 50 Dirt holding capacity grams 70 0 00 0 20 0 40 0 60 0 80 1 00 1 20 1 40 1 60 1 80 2 00 0 20 40 60 80 100 120...

Page 6: ... Fire Prevention Heated fuel can form combustible vapor mixtures in the area around the fuel source To eliminate the potential for fire keep open flames sparks or other potential ignition sources away from the work area Do not smoke during filter replacement or service operations Inhalation Precaution Always perform engine or vehicle fuel system maintenance in a well ventilated area that is kept f...

Page 7: ...n the job be sure that the inner liner of the fuel hose is not cut by the fitting which can cause check valve performance issues Make sure hoses are clean and free of debris before installing To avoid damaging the aluminum Diesel Pro body do not over tighten fuel lines or fuel line fittings 1 Route the fuel supply line from the pick up on the fuel tank to the Diesel Pro inlet labeled Fuel In 2 Rou...

Page 8: ... the drain valve HEATER PORT 2 Remove the plug from the pre heater port 3 Apply liquid thread sealant to the pre heater threads and install into the bottom plate Tighten to 15 30 ft lbs 4 Connect the chassis harness to the Diesel Pro harness 5 Connect the power lead to the fused accessory side of the ignition switch The fuse rating depends on the pre heater installed Approved fuse ratings 12VDC Sy...

Page 9: ...ost likely vapor bubbles Vapor Bubbles All diesel fuel has some level of entrained air caused by the natural splashing that occurs in the fuel tank during normal vehicle or equipment operation Vapor bubbles develop in the Diesel Pro because the pressure inside the Diesel Pro is lower than the atmospheric pressure in the fuel tank Vapor bubbles can vary from champagne size up to in diameter They ma...

Page 10: ...re seen flowing in with the fuel Î ÎCheck all fittings and lines from the fuel tank to the Fuel Processor Check lower and upper collar o rings Fuel drains back to the fuel tank when changing the fuel filter or draining separator Î ÎRemove the check valve assembly Clean or replace and retest Check air leaks in the fuel system Fuel level is at the top of the filter Low power Î ÎChange the filter at ...

Page 11: ...bles persist test as follows a Remove the Diesel Pro from the chassis b Plug the fuel outlet port Do not remove filter cover collar vent cap drain valve and or check valve If the Diesel Pro is equipped with a pre heater do not remove the pre heater c Apply 15 PSI of air pressure at the fuel inlet Immerse the Diesel Pro in a tank of water and look for air bubbles d Correct the source of the air lea...

Page 12: ... the check valve spring and spring retainer If the spring or spring retainer is broken or if the check ball has groves nicks or is out of round replace with a check valve service kit Otherwise clean and reassemble the check valve assembly 5 The spring retainer snaps into a groove in the check valve body 6 Replace the check valve assembly into the body and torque to 25 40 ft lbs 7 Connect the fuel ...

Page 13: ...e the filter element from the Diesel Pro by pulling upward 8 Install the new filter element Position the filter element so the key is lined up with the keyway on the separator plate of the housing Use the arrow on the top of the endplate to align the filter Ensure the filter element is fully seated by firmly pushing on the endplate The filter should not rotate freely Key Endplate Keyway Arrow Sepa...

Page 14: ...80 days Weekly water drains 1 Turn off the engine and remove the vent cap 2 Place a suitable container under the Diesel Pro and open the drain valve 3 Collected water will flow into the container When fuel begins to flow out the drain close the drain valve Drain the least amount of fuel as possible 4 Install the vent cap and tighten it by hand until it clicks 5 Start the engine and raise the RPM f...

Page 15: ...ollar o ring not included D DVC 243017DAV Cover with Red Stripe Collar Spring Vent Cap and Vent Cap O ring Collar o ring not included D E DVC 232009DAV O ring Service Kit F DVC 380056DAV Spring G DVC 245013DAV Check Valve Service Kit Includes Ball Spring and Retainer G H DVC 245010DAV Check Valve Assembly Includes Body and Check Valve Service Kit H I DVC 245011DAV Adapter 14 to M22 J DVC 102821SDA...

Page 16: ...ATER IN FUEL WIF SENSOR PARTS DVC 103595DAV 12VDC 155W PTC Pre heater Metri Pack Connector 14 UNF Threads Harness Length 7 50 Freightliner Only DVC 102697DAV Two Pin WIF Metri Pack Connector 20 UNF Threads Harness Length 17 5 DVC 102770 Two Pin WIF Metri Pack Connector 20 UNF Threads Harness Length 6 50 Freightliner DVC 103433DAV WIF Metri Pack Digital WIF Harness Length 15 75 F1353 REV B ...

Page 17: ...les whichever comes first from the purchase date By installing and or using the product you agree to be bound by the following This Warranty does not apply to Failure or inadequate performance due to improper installation misuse misapplication faulty installation alteration modification poor maintenance neglect accident or conditions resulting from actions outside DAVCO s control including but not...

Page 18: ... will be issued for returns in which DAVCO inadvertently shipped incorrect quantity or product Overstock Returns for ordering more product s than required or incorrect part s will be accepted within 60 days from the date of purchase Proof of purchase will be required i e original invoice delivery receipt These types of return s are subject to a minimum restock fee of 40 or 40 00 whichever is highe...

Page 19: ......

Reviews: