background image


iboot-dc_v181024e 

iBoot-DC   

Page 6 


4. 

Initial Configuration 

4.1. 

Auto-Configuration 

If your network supports 

Dynamic Host Configuration 

Protocol  (

DHCP

),  the  iBoot  will  be  automatically 

assigned  an  IP  Address  and  be  ready  to  use.    You 
can  discover  the  IP  Address  through  your 
Server/Router, 

or 

use 

Dataprobe’s 

Device 

Management Utility (DMU).


4.2. 

Device Management Utility 

The 

DMU 

is 

available 

online 

at 

dataprobe.com/support-iboot-dc/

provides 

the 

easiest  means  to  find  and  configure  your  iBoot-DC 
for use.  It can: 


Discover all the iBoots on your network,  


Display the current IP address of each 


Allow setting of an IP address 


Reset to Factory Defaults 


Upgrade the Firmware of the iBoot-DC 


Obtain and use the DMU: 

1.  Download  the  latest  version  of  the  DMU  at 

dataprobe.com/support-iboot-dc/


2.  Run DMUSetup.exe 
3.  Run the DMU  


Note:  The IP address can only be set within the first 
two minutes of powering up the iBoot-DC or pressing 
the  reset  button  (see  Section  11).    The  Setup  Utility 
will  only  work  with  iBoots  on  the  same  physical 
subnet as the PC. 
 
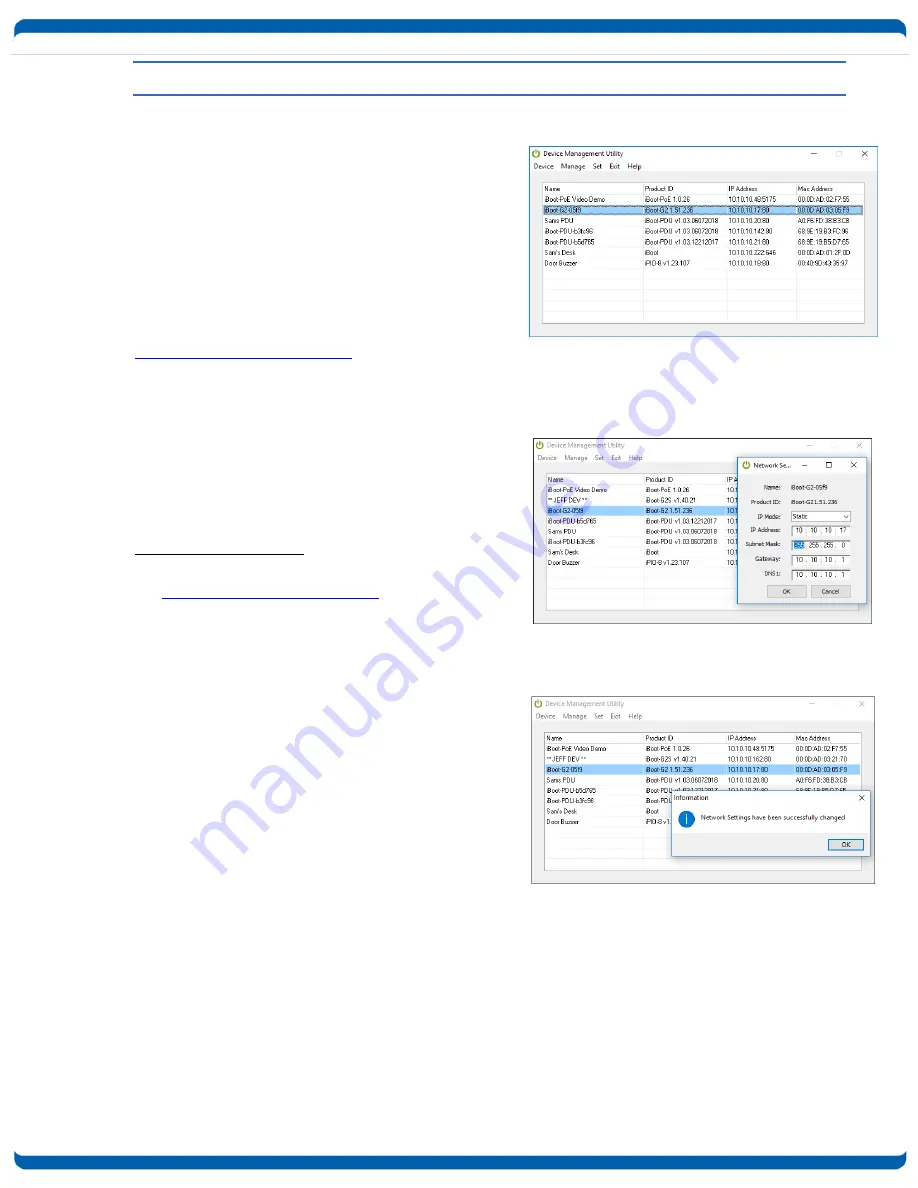
Once  the  DMU  is  run,  click  on  Device  |  Discover  to 
display all the iBoots on your network.  The DMU will 
display  the  Location  Name  of  the  iBoot,  The  product 
ID  and  Version  Number,  the  current  IP  Address,  and 
the  MAC  Address.    Factory  defaulted  iBoots  will 
display  with  the  name 

iBoot-DC-xxxx  where  the 

xxxx are the last 4 segments of the MAC address, 

and  have  the  factory  default  IP  address  of 

192.168.1.254, or as set by DHCP

.   

 
The  IP  address  field  also  indicates  the  port  for  web 
access  that  is  used  by  the  iBoot.    The  standard  port 
for web browser control is factory default Port 80.   


DMU Discovers Dataprobe Devices  

on your Network 


Enter New IP Address for iBoot 


IP Address Successfully Set 


Summary of Contents for iBoot-DC

Page 1: ...u the ability to reboot crashed devices with the click of a mouse Be sure to read up on all the features of the iBoot DC Including Web Based setup and control iBoot Cloud Service Control all your iBoots from one web portal AutoPing Automatic monitoring and action for failed equipment Event Scheduling for real time power control Telnet setup and control Management Utility Easy Setup Firmware upgrad...

Page 2: ... and tear Power up alert devices like sirens lamps messages or control environmental system like heaters coolers pumps etc 2 2 Multiple Control Options In addition to the Web control capabilities iBoot DC features several other means to operate automatically or under computer control URL Control You can send a single URL to the iBoot DC containing all the information necessary to query or change t...

Page 3: ...t s 3 2 DC Power Connections iBoot DC uses screw terminal connections for the DC input and switched output connections The screw terminals can be removed to facilitate connection and cable fabrication Maximum Operating Current 5 0 to 29 9 VDC 12 Amps 30 0 to 48 0 VDC 2 Amps The Positive lead is switched When ON the power will be at the NO connection When OFF the power will be at the NC connection ...

Page 4: ...tage is positive RELATIVE to the terminal voltage Do Not connect Chassis Ground when using VDC Power 3 4 Mounting Options iBoot DC is suitable for desktop or shelf mounting A mounting kit for wall and DIN rail mounting is available Order part 1920034 Mounting Kit for iBoot Series Remove all cables from the unit prior to installing or removing any mounting hardware 1920033 Mounting Kit iBoot Series...

Page 5: ...it Do not disassemble the unit 1 Install the Wall Mounting Kit as shown 2 Install the wall mounting ears to the unit using the screws removed in Step 2 2 Install the DIN rail clips using the four screws provided 3 The unit is ready for wall mounting 3 Ready for DIN rail mounting 4 Use M3 or 4 screws not included for attachment to suitable surface ...

Page 6: ... com support iboot dc 2 Run DMUSetup exe 3 Run the DMU Note The IP address can only be set within the first two minutes of powering up the iBoot DC or pressing the reset button see Section 11 The Setup Utility will only work with iBoots on the same physical subnet as the PC Once the DMU is run click on Device Discover to display all the iBoots on your network The DMU will display the Location Name...

Page 7: ...C and click on Manage Launch Browser See Section 6 to configure the iBoot The DMU can also be used to return an iBoot DC to its Factory Default condition This can be used to recover an iBoot DC with a lost password Highlight an iBoot DC from the display and select Set Factory Defaults Using the Utility to reset defaults will not change the network settings allowing you to re access the unit You ca...

Page 8: ...d the Control and Status Page is displayed iBoot DC uses an inactivity timer for security This timeout is user selectable from 0 to 99 minutes Setting to zero disables the timeout feature When there is no activity for the set time in minutes the user is automatically logged out and the username and password will need to be entered again for access This is to prevent accidental lockout by leaving t...

Page 9: ...ded If the iBoot DC is connected to a time server see Section 6 3 The Home page will also show the five most recent history events including the Outlet Action User and Time Date of each event The iBoot DC holds the last 32 events in memory The user can access a complete history webpage download the history in a csv file or clear the history Navigation Menu Refresh Use the Refresh button to obtain ...

Page 10: ...variables is not significant The user and password are not required when Auto Login feature is enabled see Section 6 8 for security options Examples http 192 168 1 254 s 1 u user p user Turn the outlet on for the default user http 192 168 1 254 s 0 t 5 Reboot for 5 seconds with Auto Login http 192 168 1 254 8080 s 2 u admin p admin Return status using http port 8080 URL Command Responses iBoot DC ...

Page 11: ... meaning the state it was in when the power was removed or reset commenced Upgrade Enable Check this box to allow remote firmware upgrades of the iBoot DC When this box is unchecked firmware upgrades will not be allowed Auto Logout This setting sets the automatic logout for inactivity on both the web and telnet users It can be set from 0 to 99 minutes 0 disables the Auto Logout feature As the iBoo...

Page 12: ...able Cloud Services This setting enables the iBoot for iBoot Cloud Services iBCS iBCS allows the iBoot to be monitored and controlled from a web portal from any browser It allows multiple iBoots to be managed from a single portal For a complete description of iBCS and setup instructions see Section 7 Note All of the TCP IP Settings require a reboot of the iBoot DC after clicking Save A Reboot butt...

Page 13: ...Boot DC is installed with the device it monitors and automatically reboots if there is no response Ideal for Kiosks Servers AutoPing as an Alert Generator iBoot DC monitors network device and powers up alarm environmental response or redundant system Ideal for Hot Standby Servers Environmental Control Alert for any Network Failure 6 6 AutoPing Settings Address Enter the IP address of the device or...

Page 14: ...t DC is receiving responses to the ping or that the fail counter has not yet been exceeded If the fail count has been exceeded the status will change to FAIL The Trigger Counter indicates the number of times the AutoPing action has been triggered A counter reset button is provided Note All of the AutoPing Settings require a reboot of the iBoot DC after clicking Save A Reboot button will appear at ...

Page 15: ...the User level operation No login challenge will be required for any mode of operation until any setup function is requested The Admin username and password is required for any admin functions User Disabled There is no User account The Admin username and password will be required for operation and setup functions across all modes of operation This is the factory default mode Two passwords are used...

Page 16: ...ill not allow programming for On Follow Off Latch or Off Latch If a Schedule Settings event has action for Off it will be reprogrammed for On Schedule Settings will not allow programming for action Off Web page will not show the Power OFF button Web Page will not process an HTTP POST for Off URL control will not process an unqualified off status request s 0 A qualified off status request with a ti...

Page 17: ...s device name when on the local network By default the name is iBoot DC xxxx where the xxxx is the last 4 segments of the MAC address for your iBoot DC When you reprogram the name of the device a reboot is required to apply the new name as the LLMNR for the device The LLMNR name does not allow spaces If using the LLMNR feature to access the iBoot DC do not use a space in the name When accessing th...

Page 18: ...igurations 7 1 iBCS Setup Operation Use of the iBoot Cloud Services requires the iBoot to be configured to access the Internet Please review the installation and configuration procedures to insure proper setup a Establish Account with iBoot Cloud Server Visit http iboot co from your browser Click on Register Complete the information Confirm Registration by clicking on the link provided in the emai...

Page 19: ...account Alternatively you can log in to the Service and click on Add Device and enter the activation code in the field provided Congratulations You are now on the cloud e iBCS Main Page The iBCS main web page provides a menu bar with the following options Devices List all registered iBoot units ordered by their Name Click on any iBoot line to manage that unit Locations Group all iBoots by location...

Page 20: ...name the device move the device to a defined location or delete the device Give the device a name and Click Rename Device The remainder of the modal is very similar to the iBoot web page Select Power ON Power OFF or Cycle Power g Assign Names and Locations You can establish multiple locations and assign each iBoot to a location You can also name each iBoot independently from the Device Name that i...

Page 21: ... The maximum auto disconnect time is 8 minutes If the Auto Logout setting is shorter than 8 minutes that setting will apply To avoid this and use a longer auto disconnect time use a telnet client that periodically sends a No Operation NOP command like Dtelnet 8 2 iBoot DC CLI Syntax Command Description Factory Default Control Commands These commands are used to monitor and control the outlet set o...

Page 22: ...92 168 1 254 set subnet dotted decimal This command is used to set the iBoot DC s subnet mask 255 255 255 0 set gateway dotted decimal This command is used to set the Gateway 192 168 1 1 set http port 0 65535 This command sets the port that the iBoot DC s web server listens for incoming connections on When set to 0 the web server is disabled 80 set telnet port 0 65535 This command sets the port th...

Page 23: ...d or Sets single AutoPing or two AutoPing relationship And or Or Single set autoping action none on latch on follow off latch off follow cycle This command is used to set the action that the iBoot DC will perform when the autoping triggers None set autoping cycle 0 999 This command sets the maximum number of power cycles when the AutoPing triggers 0 Unlimited 1 set autoping wait 1 999 This command...

Page 24: ...t 2 00 Server time nist gov set event 1 8 run hold This command is used to all the event to run or put the event on hold run set event 1 8 date mm dd yyyy This command is used to set the scheduled action s start date set event 1 8 time hh mm This command is used to set the time the scheduled action will occur in 24 hour format set event 1 8 action on off cycle This command is used to set the sched...

Page 25: ...ease notes for the upgrade before making changes to you iBoot DC 1 Insure that the Upgrade Enable checkbox is checked in the Network Setup web page of the iBoot DC 2 Run the Device Management Utility available at the link above If the iBoot DC you would like to upgrade is not visible in the list box either Select Device Discover from the menu to locate iBoot DC units on the local network or Select...

Page 26: ...tlet status 10 Seconds push Reset to Factory Defaults Hold the button in until the Outlet LED is blinking then release Hold in while and Power up the iBoot Recovery Mode Allows upload of new firmware to the current IP Address Will recover to the Factory default IP Address 192 168 1 254 if the database has been corrupted Factory reset excluding basic network settings can be done using the Device Ma...

Page 27: ...eptacle Screw Terminals Current Capacity 5 0 29 9 VDC 12 Amps Max 30 0 48VDC 2 Amps Max 12 2 Compliance FCC Part 15 Class B 12 3 Network Dual 10 100 Unshielded Twisted Pair Ethernet Jacks IP Addressed DHCP assigned or Static Internal HTTP Web Server Forms Processing Browser required Telnet Server User Settings Record your Setup here for reference Location HTTP Port MAC Address Auto Ping Address IP...

Page 28: ...er this Warranty is obtained by contacting your Authorized Dataprobe Reseller THIS WARRANTY DOES NOT APPLY TO NORMAL WEAR OR TO DAMAGE RESULTING FROM ACCIDENT MISUSE ABUSE OR NEGLECT SELLER MAKES NO EXPRESS WARRANTIES OTHER THAN THE WARRANTY EXPRESSLY SET FORTH HEREIN EXCEPT TO THE EXTENT PROHIBITED BY LAW ALL IMPLIED WARRANTIES INCLUDING ALL WARRANTIES OF MERCHANT ABILITY OR FITNESS FOR ANY PURPO...

Reviews: