background image


25 

3

3

3

.

.

.

5

5

5


P

P

P

r

r

r

e

e

e

s

s

s

e

e

e

n

n

n

t

t

t

e

e

e

r

r

r


M

M

M

o

o

o

d

d

d

e

e

e


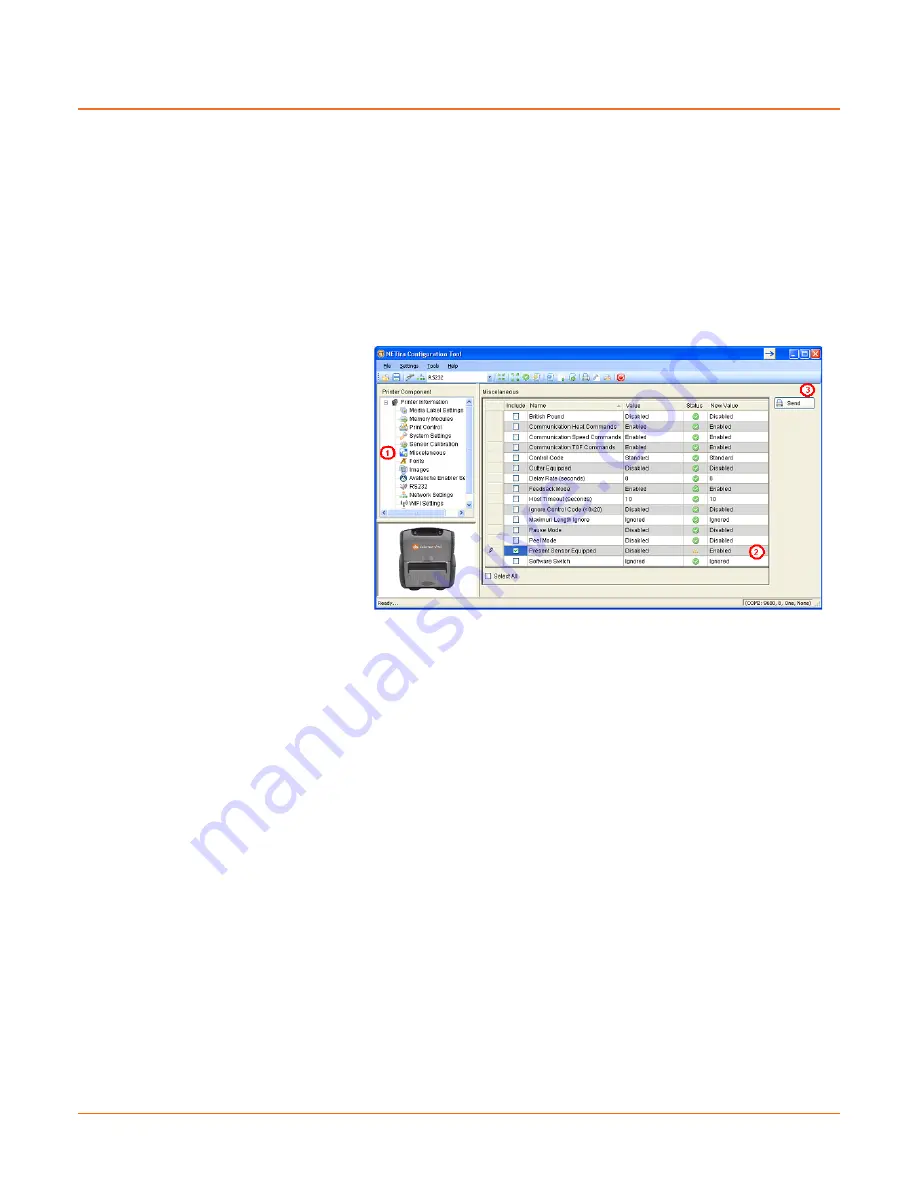
To set the printer to work in Presenter Mode, follow the following steps: 
 
-  Set the “Presenter Sensor Equipped” parameter to enable the presenter sensor. 


-  Calibrate the Presenter Sensor to store the media settings (liner and media). 


These setting changes can be performed using the NETira CT configuration utility, (see section 3.3 for 
more information on NETira CT).  
 
Launch the NETira CT configuration utility, and query (connect) to the printer. 


Enable the Presenter Sensor: 


1)  Click on the ‘Miscellaneous’ 

printer component. 

 
2)  Set the ‘Present Sensor 

Equipped’ to Enabled. 

 
3)  After updating the “New Value” 

column, click the Send button 
to send this change to the 
printer. 


Summary of Contents for RL3

Page 1: ...User Guide ...

Page 2: ......

Page 3: ... the total amounts paid to Datamax O Neil hereunder by the purchaser for a defective product In no event shall Datamax O Neil be liable to the purchaser for any damages resulting from or related to any failure or delay of Datamax O Neil in the delivery or installation of the computer hardware supplies or software or in the performance of any services Some states do not permit the exclusion of inci...

Page 4: ...Place the printer on a flat firm solid surface Make sure all openings on the printer remain unblocked never insert anything into the openings or ventilation slots Do not place the printer near a heat source Do not use your printer near water or spill liquid into it Be certain that your power source matches a listed voltage rating for the printer if unsure check with your dealer or local utility co...

Page 5: ...nterference to radio communications Operation of this equipment in a residential area is likely to cause harmful interference in which case the user will be required to correct the interference at his own expense FCC Notice RL4 Printers This equipment has been tested and found to comply with the limits for a Class B digital device pursuant to Part 15 of the FCC Rules These limits are designed to p...

Page 6: ......

Page 7: ...dia Loading 11 3 Printer Operation 3 1 Front Panel 13 3 1 1 LCD Icons 13 3 1 2 Audible Alerts 13 3 1 3 Buttons 14 3 1 4 Menu 14 3 2 Configuration Label 15 3 3 NETira CT Printer Configuration Utility 16 3 4 Media and Calibration 18 3 4 1 Selecting Media Type 18 3 4 2 Quick Media Calibration 20 3 4 3 Manual Media Calibration 21 3 5 Presenter Mode 25 3 6 Printer Input Mode Emulation 27 3 7 Saving Loa...

Page 8: ... B 2 Static IP DHCP Setting 2 B 3 Infrastructure Ad hoc Setting 3 B 4 Wireless LAN Security Settings 4 B 4 1 WEP 64 128 Bit 4 B 4 2 WPA2 PSK w CCMP 5 B 4 3 WPA2 PSK w TKIP 5 B 4 4 WPA2 Enterprise 6 B 4 5 WPA PSK TKIP w TKIP 7 B 5 Resetting the Printer 8 B 6 Bluetooth Setup 8 Appendix C USB Setup C 1 Introduction 1 C 2 Printer Configuration 2 C 3 Composite Class Installation 3 C 4 CDC Only Installa...

Page 9: ...website www datamax oneil com If you wish to write a custom program a copy of the Programmer s Manual can also be found on our website 1 1 1 2 2 2 U U Un n np p pa a ac c ck k ki i in n ng g g After removing the printer from the packaging material check the contents The following items should be included Printer Belt Clip Documentation Any special or additionally purchased items Additional Require...

Page 10: ...d USB only Serial RL4 DP 00000100 SERIAL USB RL4 Serial and Bluetooth v2 1 RL4 DP 00000200 SERIAL USB RL4 Serial and 802 11 b g a RL4 DP 00100000 SERIAL USB RL4 RS 232 and USB only Serial Liner less Media Capability RL4 DP 00100100 SERIAL USB RL4 Serial and Bluetooth v2 1 Liner less Media Capability RL4 DP 00100200 SERIAL USB RL4 Serial and 802 11 b g a Liner less Media Capability RL4 DP 00000010 ...

Page 11: ...however these are not OSHA approved safety straps Both the hand strap and shoulder strap have a limited break away strength If the strap is caught or wrapped and pulled beyond normal use the strap will come off the Attachment Points Do not use the straps for mounting hanging or otherwise a permanent installation of the printer If the latch appears damaged white stress marks in plastic discontinue ...

Page 12: ...ing This ingress of moisture should be avoided at all cost The printer warranty can not be honored for excessive water inside the printer even if an IP54 case is used 1 Open the case at the 2 side zippers 2 Slide the printer into the case 3 Close the case using the 2 side zippers and Velcro closure 4 Fold back the paper exit flap for each print job The paper exit flap can also be rolled up out the...

Page 13: ...t the operating ranges of the power supply are compatible with your electrical service see Appendix A for details then connect power as follows The maximum operating temperature of the printer is 50 C However the maximum operating temperature when used with a Datamax O Neil power supply for charging is limited to 40 C Please charge the printer in a suitable location that meets this temperature req...

Page 14: ...tured cracked immediately remove from the printer If the pack becomes extremely hot or begins to smell DO NOT touch Place immediately in a empty metal trash can DO NOT use the battery for any product other than the RL3 RL4 or designated printer DO NOT tamper with or attempt to disassemble the battery pack DO NOT subject the battery pack to water or liquids of any kind Be careful when setting the b...

Page 15: ...e connecting Power or interface cables to the printer be sure the printer is powered off Serial Connection The serial interface supports RS 232C communications via a RJ 11 connector The following list of serial port settings is menu selectable via host software driver and must match the host computer s serial port settings Baud Rate Default 9600 bps Parity Default N Word Length Default 8 bits Stop...

Page 16: ... d di i ia a a L L La a ab b be e el l ls s s o o or r r P P Pa a ap p pe e er r r Load media into the printer as follows 1 Slide the Thumb latch rearward and then lift up on the printer s Cover Thumb Latch Cover 2 Slide and hold open the Supply hubs Supply Hubs ...

Page 17: ...ia 4 Allow the Supply Hubs to retract onto the Roll of Media Then close the printer s Cover and press downward until latched Supply Hubs Roll of Media Cover 5 Press the button a couple of times to normalize tracking The printer should advance the media to the start of the next label for each press ...

Page 18: ...normalize tracking The printer should advance the media to the start of the next label for each press With some types of media it may be necessary to periodically remove slack in the backing liner material that accumulates before the Peeler Door To remove Hold the Peeler Door closed and pull on the backing material until the slack is removed and is tight When using the printer in presenter mode a ...

Page 19: ...Loading Load media into the printer as follows 1 Slide the Thumb latch rearward and then lift up on the printer s Cover Thumb Latch Cover 2 Open the External Media Door located in the bottom of the printer External Media Door ...

Page 20: ...4 Insert the Media through the External Media Door and through the printer as shown Media 5 Then close the printer s Cover and press downward until latched 6 Press the button a couple of times to normalize tracking The printer should advance the media to the start of the next label for each press ...

Page 21: ...ater by modifying System Settings System Powerdown setting See section 3 3 for more information on NETira CT When the printer is chagrining it will not auto shutoff 3 1 1 LCD Icons Icon Function 90 Battery Charge Level The number of bars and the will change according to remaining battery charge During charging the battery level is continuously progressing to show charging unless at 100 Wireless LA...

Page 22: ...em and returns to Ready Mode OK Selects the current highlighted item or menu branch 3 1 4 Menu Pressing the button enters the printer s menu system The menu system is informational only configuration changes to the printer can not be made via the menu The menu consists of three branches default values are show next to each item Serial Baud Rate 9600 BPS Data Bits 8 Parity None Stop Bits 1 Protocol...

Page 23: ...ncluding the firmware version memory allocations enabled options communications settings and label counter data To print the Configuration Label 1 Be sure the printer is properly loaded with media at least 4 inches wide and that the power to the printer is off 2 Turn on the printer allow the printer to reach a ready state 3 Press and hold the for 4 to 7 seconds and then release The printer will no...

Page 24: ...inter language input mode If the printer has been set to use an input mode other than DPL the printer s input mode must be changed back to Auto or DPL This can be performed using the Tools Set Input Mode function within NETira CT 1 Once installed launch the NETira CT configuration utility 2 Be sure the battery is installed and the printer is ON Connect the host to the printer see Section 2 2 Inter...

Page 25: ...c In the toolbar from the drop down menu box select TCP_IP Then click on the Query Printer Icon 3 At this point you may browse the Printer Component categories and make any changes necessary to the printer configuration 4 Once your changes are complete send the new settings to the printer using the Send button Note When using the Send button only the changes displayed on the current page will be s...

Page 26: ...ge Notch Media Center Reflective Media Black Mark Continuous Media Sensor Setting Gap Not Supported Gap Reflective Continuous Requires the Continuous Label Length value to be set Most applications that use label media will use the default setting of Gap However if black mark or continuous media is being used this setting must be changed The Sensor Type setting can be changed using the NETira CT co...

Page 27: ...edia 3 Maximum Label Length 1 100 inch 800 Distance must be greater than the length of your media i e 1000 10 inches 4 Sensor Type Continuous Gap Labels with gap Continuous Media with no gaps Reflective Labels with Q Mark or black mark 3 After updating the New Value columns click the Send button to send these changes to the printer Note NETira CT will change its column status from a green to orang...

Page 28: ...on utility see section 3 3 for more information on NETira CT or the front panel menu see section 3 14 It is recommended that the battery is charged to 50 or greater before starting media calibration Launch the NETira CT configuration utility and query connect to the printer 1 Click on the Sensor Calibration printer component 2 Install your media in the printer and click the Quick Media button 3 Th...

Page 29: ...Media Calibration can be performed using the NETira CT configuration utility see section 3 3 for more information on NETira CT It is recommended that the battery is charged to 50 or greater before starting media calibration Launch the NETira CT configuration utility and query connect to the printer Procedure for Gap Type Media be sure the printer is set to sense Gap media see Section 3 4 1 1 Click...

Page 30: ...bserve that Gap Back Value and Gap Paper Value have changed Procedure for Black Mark Media be sure the printer is set to sense Black Mark media see Section 3 4 1 1 Click on the Sensor Calibration printer component 2 Click the Manual Media button to start the manual calibration process Follow the instructions on the following screen 3 Select the Reflective radio button then click OK ...

Page 31: ...d and used for this calibration procedure 4 Load Stock Place a white section of media under the sensor close the door then click OK Printing Area Sensor 5 Load Special Q Mark Media for Reflective Media Place a black section of the media under the sensor and close the door then click OK Q Mark Area Sensor 6 Remove Stock Remove all media from printer close the door then click OK ...

Page 32: ... will display a message indicating the process has finished In case of any error a FAILED CALIBRATION message will be displayed Repeat the process 8 To confirm changes observe that the Black Mark values have changed ...

Page 33: ... store the media settings liner and media These setting changes can be performed using the NETira CT configuration utility see section 3 3 for more information on NETira CT Launch the NETira CT configuration utility and query connect to the printer Enable the Presenter Sensor 1 Click on the Miscellaneous printer component 2 Set the Present Sensor Equipped to Enabled 3 After updating the New Value ...

Page 34: ...number 6 as the Advance Distance after QMark Gap Click the OK button This value may vary if Datamax O Neil media is not used and may require adjustments to the Advance Distance after QMark Gap parameter for the sensor to work properly 5 The following screen will be shown Click the OK button to start the process After the calibration is performed successfully the following confirmation screen will ...

Page 35: ... using the NETira CT configuration utility see section 3 3 for more information on NETira CT The NETira CT configuration utility can only communicate to the printer using the DPL printer language input mode If the printer has been set to use an input mode other than DPL the printer s input mode must be changed back to Auto or DPL This can be performed using the Tools Set Input Mode function within...

Page 36: ...e NETira CT configuration utility and query connect to the printer To Save a Configuration File 1 Once the printer has been queried the current settings can now be saved to a file You may also make changes to any of the settings and have these values saved as well 2 To save current configuration in a file go to File Save As menu and specify the filename The current settings will be saved in a file...

Page 37: ...aunch the NETira CT configuration utility select Tools then Printer Demo 2 Browse to folder containing print files highlight files to be printed and click Add 3 Click on Print to send the file s to the printer Standalone Printer Demo 1 Launch the Printer Demo utility 2 Select file to print from the drop down menu 3 Select Settings to set the communication parameters for the communication type sele...

Page 38: ... 4 Click the Send button to start the firmware update Loading Boot 1 and Boot 2 and Firmware Loading Boot Firmware requires a serial connection to the printer 1 Connect the printer to your PC using a serial cable 2 Launch the NETira CT configuration utility and query connect to the printer see section 3 3 for more information on NETira CT It is recommended that the configuration be saved before do...

Page 39: ... Cleaning Pens After 3 5 rolls of media Platen Roller Cotton Swab w Isopropyl Alcohol Cleaning Pens After 3 5 rolls of media Peel Off Roller Cleaning Pens Cleaning Pens After 3 5 rolls of media Lid Roller Cotton Swab w Isopropyl Alcohol Cleaning Pens After 3 5 rolls of media Media Sensor Compressed Air Compressed Air Monthly Interior Compressed Air Compressed Air As Needed Isopropyl alcohol is a f...

Page 40: ...Streaks in printed labels usually indicate a dirty or faulty printhead To clean the printhead using Datamax O Neil cleaning card The following procedure is for standard configuration printers Linerless printers should only be cleaned with the Datamax O Neil Cleaning Pens 1 Open the printer Cover Remove any media installed in the printer Open the External Media Door located in the bottom of the pri...

Page 41: ...using Datamax O Neil Cleaning Pens 770189 000 The Cleaning Pens are typically intended for use on linerless model printers or any printer with adhesive build up They are used to clean components that are exposed directly to adhesive Two pens are included in the kit the first pen Step 1 breaks up the adhesive and the second pen Step2 removes it STEP 1 STEP2 The pen s end cap has a plastic scraper t...

Page 42: ...34 ...

Page 43: ...ad see Section 4 2 The temperature setting may be incorrect for the media being used Use the configuration utility or software commands adjust the Heat Setting and Print Speed Faulty printhead call for service The printer does not print or prints several labels at once The labels are incorrectly loaded See the loading instructions in Section 2 3 The media is not calibrated Calibrate it see Section...

Page 44: ...or marks in the labels are in line with the media sensor The media sensor or media sensor circuitry may be defective Call for service Labels move excessively from side to side during printing The media may not be properly loaded Reload it see Section 2 3 When loading media ensure that the supply hubs are against the media and that gaps or marks in the labels are in line with the media sensor When ...

Page 45: ...ge Temperature 40 F to 140 F 40 C to 60 C Charging Temperature 41 F to 104 F 5 C to 40 C Relative Humidity 10 90 non condensing ESD Protection RL4 8kV Air 6kV Contact RL3 6kV Air 6kV Contact Print Technology Printhead Direct thermal 203 dots per inch 8 dots per mm Print Width RL3 2 8 72 mm RL4 4 125 105 mm Print Speed 4 per second 102 mm per second Memory Installed Memory 32 MB RAM 64 MB Flash Med...

Page 46: ...quipped with the most popular industry fonts and bar codes see the Programmer s Manual for full listings and detailed information Scalable Fonts CG TriumvirateTM Bold Condensed CG Triumvirate CG Times with Cyrillic Greek Arabic and Hebrew character support from Monotype Imaging Standard fonts 5 5CPI 7 2CPI 10 2 CPI 10 7CPI 18 5CPI 20 4CPI 22 6CPI 34 0CPI OCR A OCR B additional fonts available Down...

Page 47: ...Niceware NiceLabel and others ERP Systems SAP Oracle Software development kit C Visual Basic Approved Media To achieve optimum print quality and maximum printhead life Datamax O Neil specifies the use of Datamax O Neil brand media These supplies are specially formulated for use in our printers use of non Datamax O Neil supplies may affect the print quality performance and life of the printer or it...

Page 48: ...A 4 ...

Page 49: ... be modified using the NETira CT configuration program See section 3 3 for more information on NETira CT Network Parameter RL3 All Firmware Versions RL4 Firmware version 8_02_0050 or earlier RL4 Firmware version 8_02_0051 or later ESSID D O None D O TCP Port 9100 515 9100 UDP Port 9200 515 9200 Bluetooth Name Printer RL3 Printer RL4 Printer RL4 1 Turn the printer ON and connect it to the computer ...

Page 50: ...r updating the New Value column click the Send button to send these changes to the printer Values obtained from the DHCP server will be shown under the fields Active IP address Active Subnet Mask and Active Gateway Using Static IP Address 1 Click on the Wireless General Network printer component 2 Change or confirm the following parameter settings IP address method Static Static IP address Accordi...

Page 51: ...e or confirm the following parameter settings ESSID Default D O Type name that match the name of your access point Network Type Infrastructure or Adhoc 3 After updating the New Value column click the Send button to send these changes to the printer Note To validate a successful Wireless LAN connection the IP address obtained from the access point will be shown on the LCD display of the printer ...

Page 52: ...1 WEP 64 128 Bit 1 Click on the WIFI printer component 2 Click the Static WEP radio button 3 Change or confirm the following parameter settings WEP Selected Key Select the key number to use WEP AP authentication Users share 40 bit 64 bit encryption Users share 128 bit 128 bit encryption WEP Data Encryption Enable WEP Data Encryption WEP Key 1 4 Enter the WEP keys that match values used in the acce...

Page 53: ...itive 5 After updating the New Value column click the Send button to send these changes to the printer B 4 3 WPA2 PSK w TKIP 1 Click on the WIFI printer component 2 Click the Click the WPA WPA2 radio button 3 Change or confirm the following parameter settings Group Cipher TKIP Network Authentication Type WPA2 PSK 4 Type the Pass Phrase under the WPA_PSK_TKIP WPA2_PSK settings section Note that Pas...

Page 54: ...ings Network Authentication Type WPA Enterprise Phase 2 Method EAP MSCHAPv2 EAP Type Select EAP PEAP Note EAP Type can be variable Other values supported EAP LEAP EAP TTLS EAP PEAP EAP FAST 4 Type the user name and password under the WPA WPA2 Enterprise section 5 After updating the New Value column click the Send button to send these changes to the printer ...

Page 55: ...ange or confirm the following parameter settings Group Cipher TKIP Network Authentication Type WPA2 PSK_TKIP 4 Type the Pass Phrase under the WPA_PSK_TKIP WPA2_PSK settings section Note that Pass Phrase is case sensitive 5 After updating the New Value column click the Send button to send these changes to the printer ...

Page 56: ...ds and then re install the battery see section 2 1 B B B 6 6 6 B B Bl l lu u ue e et t to o oo o ot t th h h S S Se e et t tu u up p p The printer is configured with default factory settings To determine your printer s configuration print a Configuration Label see Section 3 2 1 Click the Bluetooth menu item in the Printer Component section of the configuration utility 2 To set up the printer for B...

Page 57: ...C Printer Class Whenever possible it is recommended to use the Composite Class as it gives the most flexibility However on some systems e g handheld devices CDC or Printer Class alone should be selected as handheld devices have limited support Software Files Needed The following files can be downloaded from www datamax oneil com NETira CT Configuration Utility Seagull Windows Drivers for Printer a...

Page 58: ...3 3 for more information This configuration utility can be downloaded from our website 3 Query the printer by using the Auto Detect button This will connect to the printer and retrieve the setting currently stored in the printer Note The message Done query printer confirms that communication process was successfully executed 4 Click on the Miscellaneous printer component 5 Change or confirm the US...

Page 59: ...e Create a new folder on your local computer named Drivers Download the necessary files and place them in this folder Step A Driver Extraction 1 To extract the Windows drivers to your local computer double click the Datamax O Neil_x x x file that was previously downloaded from the website The following screen will appear Click the Accept radio button and then click Next to continue 2 At the next s...

Page 60: ...on and then click Next 3 Select the Install from a list or specific Advanced radio button and then click Next 4 Select the Search for the best driver in these locations radio button 5 Check the Include this location in the search checkbox and then click Browse 6 Navigate to the Driver folder you created earlier that contains the Datamax O Neil Composite Class inf file 7 Select the folder and then ...

Page 61: ...sary ports to the printer 10 Click Finish to close the wizard Proceed to Step C to begin the installation of the Windows Printer Driver Step C Windows Printer Driver Installation 1 The PC will launch the Found New Hardware Wizard again 2 Select the No not this time radio button and then click Next ...

Page 62: ...in these locations radio button 5 Check the Include this location in the search checkbox and then click Browse 6 Navigate to C Seagull folder on your computer s hard drive 7 Select the folder and then Click OK Then Click Next 8 Select the driver that matches your model printer there may be multiple models listed and then click Next ...

Page 63: ... Continue Anyway 10 Windows will now install the necessary files for the Windows printer driver 11 Click Finish to close the wizard The printer can now be selected for use in the printer dialogue box of any windows application ...

Page 64: ...lace it in this folder 1 Turn on the printer and wait until the Ready screen appears The PC will then detect the printer and launch the Found New Hardware Wizard 2 Select the No not this time radio button and then click Next 3 Select the Install from a list or specific Advanced radio button and then click Next 4 Select the Search for the best driver in these locations radio button 5 Check the Incl...

Page 65: ...ick Continue Anyway 9 Windows will now load the drivers to assign the necessary ports to the printer 10 Click Finish to close the wizard The printer can now be selected for using the virtual com port assigned to the printer ...

Page 66: ...w folder on your local computer named Drivers Download the necessary file and place it in this folder Step A Driver Extraction 1 To extract the Windows drivers to your local computer double click the Datamax O Neil_x x x file that was previously downloaded from the website The following screen will appear Click the Accept radio button and then click Next to continue 2 At the next screen you can ch...

Page 67: ...ick Next 3 Select the Install from a list or specific Advanced radio button and then click Next 4 Select the Search for the best driver in these locations radio button 5 Check the Include this location in the search checkbox and then click Browse 6 Navigate to C Seagull folder on your computer s hard drive 7 Select the folder and then Click OK Then Click Next ...

Page 68: ...models listed and then click Next 9 When prompted click Continue Anyway 10 Windows will now install the necessary files for the Windows printer driver 11 Click Finish to close the wizard The printer can now be selected for use in the printer dialogue box of any windows application ...

Page 69: ...R R Re e ef f fl l le e ec c ct t ti i iv v ve e e M M Me e ed d di i ia a a C C Ca a al l li i ib b br r ra a at t ti i io o on n n L L La a ab b be e el l l ...

Page 70: ......

Reviews: