background image

2

PRINTPAD SERIES OF PRINTERS USER'S GUIDE

Using Batteries

The printer ships with two batteries installed. Before 

operating the printer, remove the two red, isolator 

labels either by gently pulling the labels out, or by 

lifting the batteries up.

Charging Batteries

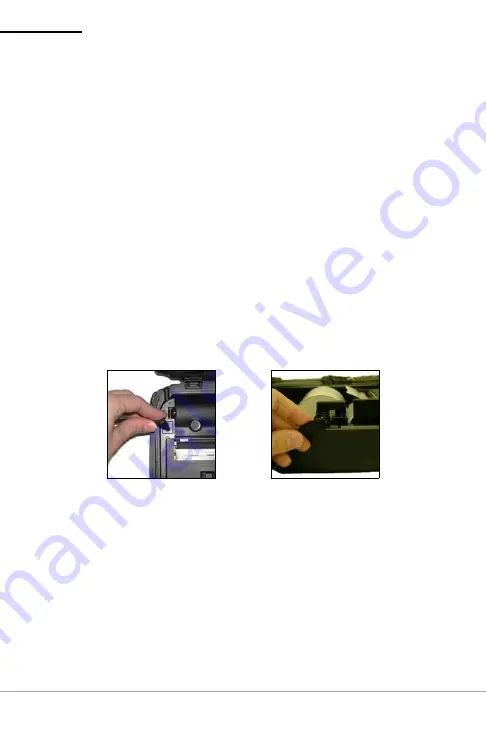
1. Plug the power supply connector into the printer's

power port as follows:

If you are using a standard PrintPAD series

printer, the power port is located next to the 

paper cavity (Figure 1). 

If you are using a PrintPAD-9000 printer, the

power port is located on the side of the printer's 

case and is accessible when the printer's lid is 

closed (Figure 2).

2. Plug the AC adapter in an appropriate power source.
The charge LED turns red when charging and turns 

green when fully charged. If you are using the 

PrintPAD-9000 printer, the charge LED is visible when 

the printer's lid is closed. A complete charge takes 

approximately 6 hours.
You can determine the relative battery capacity by 

printing a self-test. For more information, see 

Printing a 

Self-Test on page 7

. On the printout, “Battery Volt” 

varies between 6.8 and 8.4 volts.

Figure 1

Figure 2

Summary of Contents for PrintPAD Series

Page 1: ...PrintPAD MC65 110288 000 User Guide...

Page 2: ...r HHC 3 Compatible Handheld Computers 4 Loading Paper 4 Printing a Self Test 5 Configuring the Printer 5 Using the Printer Data Cables 5 Using Bluetooth 6 Bluetooth Parameters 6 PrintPAD MC65 LEDs and...

Page 3: ...ting the batteries up If you are storing your printer for a long period of time or shipping it reinstall the battery isolator labels Both batteries must be installed for your printer to operate proper...

Page 4: ...acing the outside edge of the printer Figure 3 5 Close the battery cover by snapping it into place Charging the Batteries and Handheld Computer If the battery is low when the printer wakes up the prin...

Page 5: ...er cord Wait 30 seconds then replug the power cord The MC65 Handheld Computer will charge while power is plugged into the DC power port Caution Do not plug DC power into the internal and external powe...

Page 6: ...y open Figure 9 3 Wake up the printer by momentarily pressing the red self test button Figure 10 4 Feed the end of the paper and center it under the roller until the paper exits from the top of the pr...

Page 7: ...ring the Printer The printer has many configurable settings To configure or upgrade firmware download the Windows configuration program Using the Printer Data Cables 1 Select the appropriate cable for...

Page 8: ...A C power is plugged in the LED flashes and charging is in progress None Wait for the charge LED to turn green Orange solid The battery has less than 25 power If A C power is not plugged in indicates...

Page 9: ...is on when blue RF power button is pressed and power was turned off None 2 short RF power is off when blue RF power button is pressed and power was turned on None 1 long Boot code is starting or resta...

Page 10: ...LED indicators and audio indicators see CardReader Indicators on page 8 CardReader Indicators Audio Indicators Using External Charging Overview External charge capable printers have two charging conta...

Page 11: ...ed with the accessories Warning Use of any product not approved by Datamax O Neil for use with their printers could cause damage to the batteries and or printer and will void the warranty DO NOT plug...

Page 12: ...o guarantee that interference will not occur in a particular installation If this equipment does cause harmful interference to radio or television reception which can be determined by turning the equi...

Page 13: ...ompany names are trademarks service marks or registered trademarks of their respective owners Media Supplies Datamax O Neil offers seven certified grades of paper for use in the PrintPAD series of pri...

Page 14: ...PRINTPAD MC70 110219 003 User Guide...

Page 15: ...7 Compatible Handheld Computers 7 Loading Paper 8 Printing a Self Test 9 Configuring the Printer 10 Using the Printer Data Cables 10 Using Bluetooth 11 Bluetooth Parameters 11 PrintPad MC70 LEDs and...

Page 16: ...View Roller Battery battery cavity Battery clip Paper paper cavity Data port Self test button Charge LED Battery Status LED Radio LED Power LED Battery Status Radio LED Power LED Handheld cavity Latch...

Page 17: ...batteries up If you are storing your printer for a long period of time or shipping it reinstall the battery isolator labels Both batteries must be installed for your printer to operate properly Instal...

Page 18: ...70 USER S GUIDE 4 Insert the new batteries Verify the battery contacts are facing down and are facing the outside edge of the printer Figure 3 5 Close the battery cover by snapping it into place Figur...

Page 19: ...ource The Charge LED flashes red when charging and flashes green when fully charged The Charge LED is visible when the printer s lid is open or closed A complete charge takes approximately 7 9 hours F...

Page 20: ...MC70 USER S GUIDE Caution Do not plug DC power into the internal and external power ports at the same time Caution Do not plug in either DC plug to power if using external charge contacts and they ar...

Page 21: ...tery is replaced by an incorrect type Dispose of used batteries according to the instructions Caution The operating temperature of this portable printer is 50 C However the operating temperature when...

Page 22: ...ng it into the side channels 2 Press down until the handheld is fully seated Figure 5 Compatible Handheld Computers Note The PrintPad MC70 is intended for use with UL Listed Accessory Handheld Compute...

Page 23: ...it is fully open The lever clicks midway at the partially open position however do not stop here continue to raise the lever until it is fully open Figure 7 3 Wake up the printer by momentarily press...

Page 24: ...ning in the printer s cover 7 Remove any excess paper by grasping the top corner of the paper and pulling it up and away 8 Close and latch the printer s cover Printing a Self Test 1 Open the printer s...

Page 25: ...gure or upgrade firmware download the Windows configuration program Using the Printer Data Cables 1 Select the appropriate cable for use with the host and or device you are using 2 Insert the plug int...

Page 26: ...have multiple printers configure them specifically for use in your environment For proper system operation set the following parameters on your printer and host computer Bluetooth Parameters Device N...

Page 27: ...en Orange solid The battery has less than 25 power If A C power is not plugged in indicates the battery charge is low Charge the battery If A C power is plugged in the LED flashes and charging is in p...

Page 28: ...een depending on the battery status LED color that is initially displayed to indicate the AC adapter is plugged in None Beep s Description Action 1 Printer wakes up None 2 Out of paper Install paper 3...

Page 29: ...adio LED Blue flash slow RF power is on and printer is asleep Blue flash fast RF power is on and printer is awake Off RF power is off Power LED Description Off Printer is asleep Red flash Paper out Gr...

Page 30: ...the DEX cable is plugged into the data port the printer automatically turns off to allow data transfer between the MC70 and the DEX port Remove the DEX cable to resume connection to the printer Note D...

Page 31: ...e using a Magnetic CardReader insert a card with the stripe facing away from the printer For information on CardReader LED indicators and audio indicators see CardReader Indicators on page 16 CardRead...

Page 32: ...be used with various Datamax O Neil accessories such as the truck mount bracket When an external charge capable printer is mounted to one of these accessories the printer s batteries are automatically...

Page 33: ...e with their printers could cause damage to the batteries and or printer and will void the warranty Failure to observe the instructions and or warnings specified in the documentation may result in dam...

Page 34: ...wever there is no guarantee that interference will not occur in a particular installation If this equipment does cause harmful interference to radio or television reception which can be determined by...

Page 35: ...ss for a particular purpose Datamax O Neil shall not be liable for any errors or for incidental or consequential damages in connection with the furnishing performance or use of this manual or the exam...

Page 36: ...lity supplies are also the key to extending the life of the printer Datamax O Neil strongly recommends using Datamax O Neil Certified Supplies only Maintenance Supplies We recommend that you follow a...

Page 37: ...PrintPAD CN3 4 3e 4e 110244 003 User Guide...

Page 38: ...ompatible Handheld Computers 4 Installing the Battery Spacers 4 Loading Paper 5 Printing a Self Test 6 Configuring the Printer 6 Using the Printer Data Cables 6 Using Bluetooth 7 Bluetooth Parameters...

Page 39: ...out or by lifting the batteries up If you are storing your printer for a long period of time or shipping it reinstall the battery isolator labels Both batteries must be installed for your printer to o...

Page 40: ...and are facing the outside edge of the printer Figure 3 5 Close the battery cover by snapping it into place Charging the Batteries and Handheld Computer If the battery is low when the printer wakes up...

Page 41: ...capacity a new battery must cycle through two to three charges To restart a charge unplug the power cord Wait 30 seconds then replug the power cord The CN3 3e and CN4 4e Handheld Computer will charge...

Page 42: ...pacers using a screwdriver Note The PrintPAD CN3 4 PrintPAD CN3e 4e are intended for use with UL Listed Accessory Handheld Computer Intermec CN3 CN3e CN4 and CN4e Note If the extended battery is not b...

Page 43: ...t is fully open Figure 9 3 Wake up the printer by momentarily pressing the red self test button Figure 10 4 Feed the end of the paper and center it under the roller until the paper exits from the top...

Page 44: ...n Configuring the Printer The printer has many configurable settings To configure or upgrade firmware download the Windows configuration program Using the Printer Data Cables 1 Select the appropriate...

Page 45: ...ge the battery If A C power is plugged in the LED flashes and charging is in progress None Wait for the charge LED to turn green Orange solid The battery has less than 25 power If A C power is not plu...

Page 46: ...F power is on when blue RF power button is pressed and power was turned off None 2 short RF power is off when blue RF power button is pressed and power was turned on None 1 long Boot code is starting...

Page 47: ...rdReader LED indicators and audio indicators see CardReader Indicators on page 9 CardReader Indicators Audio Indicators Using External Charging Overview External charge capable printers have two charg...

Page 48: ...t s included with the accessories Warning Use of any product not approved by Datamax O Neil for use with their printers could cause damage to the batteries and or printer and will void the warranty DO...

Page 49: ...ations However there is no guarantee that interference will not occur in a particular installation If this equipment does cause harmful interference to radio or television reception which can be deter...

Page 50: ...uct and company names are trademarks service marks or registered trademarks of their respective owners Media Supplies Datamax O Neil offers seven certified grades of paper for use in the PrintPAD seri...

Page 51: ...PRINTPAD 7900 User Guide...

Page 52: ...ld Computers 4 Loading Paper 5 Printing a Self Test 6 Using Bluetooth 7 Bluetooth Parameters 7 Using PrintPAD LEDs Buttons and Audio Indi cators 8 Charge LED Indicators 8 LED Indicators 8 Button Funct...

Page 53: ...intPAD Printer Views Open View Closed View Self test button Data port Printhead lever Battery battery cavity Power port Roller Paper paper cavity Charge LED Battery clip Handheld cavity Latch Paper op...

Page 54: ...ter s lid is closed Figure 1 2 Plug the AC adapter in an appropriate power source The charge LED turns red when charging and turns green when fully charged The charge LED is visible when the printer s...

Page 55: ...ting temperature when used with Datamax O Neil power supply for charging the portable printer is limited to 40 C Please charge the printer in a suitable location that meets this temperature requiremen...

Page 56: ...into place Removing the Handheld 1 Unlock the locking lever so that the printer can be removed from the cavity 2 The handheld should easily lift out of the cavity do not use force to remove the handh...

Page 57: ...lever until it is fully open The lever clicks midway at the partially open position however do not stop here continue to raise the lever until it is fully open Figure 5 3 Wake up the printer by moment...

Page 58: ...excess paper by grasping the top corner of the paper and pulling it up and away 8 Close and latch the printer s cover Printing a Self Test 1 Open the printer s cover 2 Press the red self test button u...

Page 59: ...have multiple printers configure them specifically for use in your environment For proper system operation set the following parameters on your printer and host computer Bluetooth Parameters Device Na...

Page 60: ...attery is too cold Battery is disconnected Change environment Connect battery Red flash fast High temperature Change environment Red orange flash slow Battery voltage is very low Wait for solid red Re...

Page 61: ...is turned off Beep s Description Action 1 Printer wakes up None 2 Out of paper Install paper 3 Low battery Charge battery 1 short RF power is on when blue RF power button is pressed and power was tur...

Page 62: ...ies by pressing the retainer clip outward with your thumb While pressing the retainer clip lift the outside end of the battery past the retainer clip Figure 10 3 Insert the new batteries Verify the ba...

Page 63: ...ge DEX port can only used with the Datamax O Neil approved DEX cable P N 210237 000 When the DEX cable is plugged into both the printer and into a data source the printer automatically turns off to al...

Page 64: ...is awake If you are using a Magnetic CardReader insert a card with the stripe facing toward the printer then slowly remove the card from the CardReader slot For information on CardReader LED indicato...

Page 65: ...AD 7900 USER S GUIDE CardReader Indicators Audio Indicators Magnetic LED Indicators Beep Description Action 1 long Bad read None 2 short Good read None LED Description Green flash Good read Red flash...

Page 66: ...wever there is no guarantee that interference will not occur in a particular installation If this equipment does cause harmful interference to radio or television reception which can be determined by...

Page 67: ...ss for a particular purpose Datamax O Neil shall not be liable for any errors or for incidental or consequential damages in connection with the furnishing performance or use of this manual or the exam...

Page 68: ...optimal image quality and print performance Quality supplies are also the key to extending the life of the printer Datamax O Neil strongly recommends using Datamax O Neil Certified Supplies only Maint...

Page 69: ...PrintPAD Dolphin 99EX 110280 001 User Guide...

Page 70: ...ndheld Computers 3 Installing the Battery Spacers 3 Loading Paper 5 Printing a Self Test 6 Configuring the Printer 6 Using the Printer Data Cables 6 Using Bluetooth 7 Bluetooth Parameters 7 PrintPAD D...

Page 71: ...g the batteries up If you are storing your printer for a long period of time or shipping it reinstall the battery isolator labels Both batteries must be installed for your printer to operate properly...

Page 72: ...Batteries and Handheld Computer If the battery is low when the printer wakes up the printer sounds three short beeps 1 Remove the red battery isolator labels if necessary 2 Plug the power supply conn...

Page 73: ...he power cord Wait 30 seconds then replug the power cord The Dolphin 99EX Handheld Computer will charge while power is plugged into the DC power port Caution Do not plug DC power into the internal and...

Page 74: ...USER GUIDE 2 If using the Standard Battery install the Battery Spacers using a screwdriver Caution Over torquing the screws will strip the screw holes It is recommended that the screws be tightened by...

Page 75: ...ully open Figure 9 3 Wake up the printer by momentarily pressing the red self test button Figure 10 4 Feed the end of the paper and center it under the roller until the paper exits from the top of the...

Page 76: ...iguring the Printer The printer has many configurable settings To configure or upgrade firmware download the Windows configuration program Using the Printer Data Cables 1 Select the appropriate cable...

Page 77: ...ery If A C power is plugged in the LED flashes and charging is in progress None Wait for the charge LED to turn green Orange solid The battery has less than 25 power If A C power is not plugged in ind...

Page 78: ...RF power button is pressed and power was turned off None 2 short RF power is off when blue RF power button is pressed and power was turned on None 1 long Boot code is starting or restarting when downl...

Page 79: ...er LED indicators and audio indicators see CardReader Indicators on page 9 CardReader Indicators Audio Indicators Using External Charging Overview External charge capable printers have two charging co...

Page 80: ...cluded with the accessories Warning Use of any product not approved by Datamax O Neil for use with their printers could cause damage to the batteries and or printer and will void the warranty DO NOT p...

Page 81: ...mmunications However there is no guarantee that interference will not occur in a particular installation If this equipment does cause harmful interference to radio or television reception which can be...

Page 82: ...d company names are trademarks service marks or registered trademarks of their respective owners Media Supplies Datamax O Neil offers seven certified grades of paper for use in the PrintPAD series of...

Page 83: ...PrintPAD CN70 70e 110287 001 User Guide...

Page 84: ...mputer HHC 3 Compatible Handheld Computers 3 Loading Paper 4 Printing a Self Test 5 Configuring the Printer 5 Using the Printer Data Cables 5 Using Bluetooth 6 Bluetooth Parameters 6 PrintPAD CN70 Ind...

Page 85: ...lifting the batteries up If you are storing your printer for a long period of time or shipping it reinstall the battery isolator labels Both batteries must be installed for your printer to operate pr...

Page 86: ...facing the outside edge of the printer Figure 3 5 Close the battery cover by snapping it into place Charging the Batteries and Handheld Computer If the battery is low when the printer wakes up the pr...

Page 87: ...Wait 30 seconds then replug the power cord The CN70 70e Handheld Computer will charge while power is plugged into the DC power port Caution Do not plug DC power into the internal and external power p...

Page 88: ...lly open Figure 9 3 Wake up the printer by momentarily pressing the red self test button Figure 10 4 Feed the end of the paper and center it under the roller until the paper exits from the top of the...

Page 89: ...guring the Printer The printer has many configurable settings To configure or upgrade firmware download the Windows configuration program Using the Printer Data Cables 1 Select the appropriate cable f...

Page 90: ...If A C power is plugged in the LED flashes and charging is in progress None Wait for the charge LED to turn green Orange solid The battery has less than 25 power If A C power is not plugged in indica...

Page 91: ...r is on when blue RF power button is pressed and power was turned off None 2 short RF power is off when blue RF power button is pressed and power was turned on None 1 long Boot code is starting or res...

Page 92: ...r LED indicators and audio indicators see CardReader Indicators on page 8 CardReader Indicators Audio Indicators Using External Charging Overview External charge capable printers have two charging con...

Page 93: ...uded with the accessories Warning Use of any product not approved by Datamax O Neil for use with their printers could cause damage to the batteries and or printer and will void the warranty DO NOT plu...

Page 94: ...no guarantee that interference will not occur in a particular installation If this equipment does cause harmful interference to radio or television reception which can be determined by turning the eq...

Page 95: ...company names are trademarks service marks or registered trademarks of their respective owners Media Supplies Datamax O Neil offers seven certified grades of paper for use in the PrintPAD series of p...

Page 96: ...is awake Off Printer is asleep Blue Flashing RF power is on Off RF power is off Red Orange Flashing Replace battery Red Flashing Unit too cold hot Orange Flashing Error disconnect and reconnect power...

Page 97: ...4s CN51 PrintPAD Install Datamax O Neil by Honeywell Windows CE USB Drivers to Handheld Card reader optional not available in all models Power Supply sold separately Batteries Green...

Page 98: ...PrintPAD Series CN70 70e CN51...

Page 99: ...Batteries 7 Charge the Batteries and Mobile Computer 8 Determine Battery Condition 9 Load the Media 10 Print a Self Test 11 3 Printer Configuration 13 Printer Data Cables 14 Update Firmware and Driver...

Page 100: ...PrintPAD Series CN70 70e CN51 User Guide 4 Printer Options 21 DEX UCS Port 22 Magnetic Stripe Card Reader 23 External Charge Contacts 24 A Printer Specifications 25 PrintPAD Series 26...

Page 101: ...1 1 Safety Information Please read the following safety information prior to setting up or operating your printer...

Page 102: ...ning instruction labels on the printer Place the printer on a flat firm solid surface Make sure all openings on the printer remain unblocked never insert anything into the openings or ventilation slot...

Page 103: ...features including how to load the media install replace and charge the batteries and perform a test to ensure the printer is operating properly Also in this chapter refer to the printer status LEDs...

Page 104: ...w Closed View Use this illustration to familiarize yourself with the printer components in the closed position Roller Battery battery cavity Battery clip Paper paper cavity Data port Bluetooth button...

Page 105: ...reen Green solid Thebattery is near or at full capacity If AC power is not plugged in the battery is well charged If AC power is plugged in the LED is solid and charging is complete None Red to orange...

Page 106: ...dio Indicators continued Beeps Description Action Radio LEDs LED Description Blue flash slow RF power is on and printer is asleep Blue flash fast RF power is on and printer is awake Off RF power is of...

Page 107: ...period of time or shipping it reinstall the battery isolator labels Both batteries must be installed for your printer to operate properly Install and Replace Batteries 1 Open the printer by unsnappin...

Page 108: ...sible when the printer s lid is open or closed A complete charge takes approximately 7 to 9 hours For more information on Charge LEDs see Status LEDs and Indicators on page 5 Note To obtain full batte...

Page 109: ...he battery is replaced by an incorrect type Dispose of the used batteries according to the instructions The maximum operating temperature of the portable printer is 122 F 50 C However the operating te...

Page 110: ...t is fully open The lever clicks midway at the partially open position however do not stop here and continue to raise the lever until it is fully open 3 Wake up the printer by momentarily pressing the...

Page 111: ...y excess paper by grasping the top corner of the paper and pulling it up and away 7 Close and latch the printer s cover Print a Self Test 1 Open the printer s cover 2 Press and hold the red self test...

Page 112: ...13 3 Printer Configuration Use this chapter to configure your printer...

Page 113: ...s 1 Select the appropriate cable for use with the host and device you are using 2 Insert the plug into the printer s data port Note Do not close the lid or damage will occur to the cable The data cabl...

Page 114: ...andheld computer and printer it is necessary that the appropriate USB driver is installed To obtain the appropriate driver for the PrintPAD To Install the USB Driver 1 Go to datamax oneil and select S...

Page 115: ...ial adapter Setup USB Connection To connect the printer via USB connection an Internet connection may required You may also need administrative access rights to your host computer for completing this...

Page 116: ...CN51 User Guide 17 Setup Bluetooth Connection Power on the printer and confirm that the wireless radio is on Follow your host PC for adding a new Bluetooth device Once connected and connection is esta...

Page 117: ...int formats to the printer 1 Download the Printer Demo program and select Supports Download Downloads and Drivers PrintPAD Series Utility Printer Demo 2 Launch the Printer Demo utility 3 Locate and se...

Page 118: ...ion Utility The MFlash Configuration utility is used to verify or change printer settings 1 Download the Printer Demo program and select Supports Download Downloads and Drivers PrintPAD Series Utility...

Page 119: ...nters configure them specifically for use in your environment For proper system operation set the following parameters on your printer and host computer Bluetooth Parameters Device Name Authentication...

Page 120: ...21 4 Printer Options Learn to use the optional printer capabilities including the DEX UCS port for data transfer the Magnetic Stripe Card Reader option and the External Charge Contacts option...

Page 121: ...il by Honeywell approved DEX cable P N 210237 xxx When the DEX cable is plugged into the data port the printer automatically turns off to allow data transfer between the mobile computer and the DEX po...

Page 122: ...e awake When using the Magnetic Card Reader insert a card with the stripe facing away from the printer The card can be swiped in either direction For information on Card Reader LED indicators and audi...

Page 123: ...n of printer on external charge contacts Refer to the status LEDs for proper charging For more information see the instruction sheets included with the accessories Note The following information appli...

Page 124: ...25 A Printer Specifications...

Page 125: ...th prints approx 1 320 157 5 mm 6 2 in receipts or 207 9 mm 8 2 in receipts on a single battery charge Printer recharging 7 9 hrs from AC adapter or 12V auto power adapter Handheld recharging 5 hrs fr...

Page 126: ...ted versions v1 2 compatible with v1 1 devices DEX Port optional DEX UCS standard Software Firmware Protocol Line Printer Mode Easy Print Drivers Windows CE and Desktop Compatible label design softwar...

Page 127: ...4s Out of Paper 2 3 4 5 1 Quick Start Guide 1 2 4 3 1 2 3 Green 9hrs PrintPAD CN70 70e Install Datamax O Neil USB Drivers to Handheld 5 Printers Accessories...

Page 128: ...is fully charged Blue Flashing RF power is on Off RF power is off Toggle RF ON and OFF Feed Paper short press Red Orange Flashing Replace battery Red Flashing Unit too cold hot Orange Flashing Error...

Page 129: ...PRINTPAD SERIES OF PRINTERS User Guide...

Page 130: ...intPAD Series Print ers 4 Using a HHC with PrintPAD 9000 Printers 4 Compatible Handheld Computers 5 Loading Paper 6 Printing a Self Test 7 Using Bluetooth 8 Bluetooth Parameters 8 Using PrintPAD Charg...

Page 131: ...SER S GUIDE PrintPAD Printer Views Open View Closed View Self test button Data port Printhead lever Battery battery cavity Power port Roller Paper paper cavity Charge LED Battery clip Handheld cavity...

Page 132: ...1 If you are using a PrintPAD 9000 printer the power port is located on the side of the printer s case and is accessible when the printer s lid is closed Figure 2 2 Plug the AC adapter in an appropria...

Page 133: ...n The operating temperature of this portable printer is 50 C However the operating temperature when used with Datamax O Neil power supply for charging the portable printer is limited to 40 C Please ch...

Page 134: ...nd press down until the handheld is firmly seated Figure 3 Using a HHC with PrintPAD 9000 Printers 1 Insert the handheld into the cavity by slightly rotating it into the side channels 2 Press down unt...

Page 135: ...ld should easily lift out of the cavity do not use force to remove the handheld Compatible Handheld Computers Note The PrintPAD 1700 1800 2700 2800 is intended for use with UL Listed Accessory Handhel...

Page 136: ...nstalled the roll of paper latches into place 2 Raise the printhead release lever until it is fully open The lever clicks midway at the partially open position however do not stop here continue to rai...

Page 137: ...Feed the end of paper through opening in the printer s cover 7 Remove any excess paper by grasping the top corner of the paper and pulling it up and away 8 Close and latch the printer s cover Printin...

Page 138: ...If you have multiple printers configure them specifically for use in your environment For proper system operation set the following parameters on your printer and host computer Bluetooth Parameters De...

Page 139: ...y contacts are facing down and are facing the outside edge of the printer Figure 13 Charge LED State of Charge Action Solid red Charge in progress Wait for green LED Green Charge completed None Red fl...

Page 140: ...nly The direct exchange DEX port can only used with the Datamax O Neil approved DEX cable P N 210237 000 When the DEX cable is plugged into both the printer and into a data source the printer automati...

Page 141: ...printer is awake If you are using a Magnetic CardReader insert a card with the stripe facing toward the printer then slowly remove the card from the CardReader slot For information on CardReader LED i...

Page 142: ...ES OF PRINTERS USER S GUIDE CardReader Indicators Audio Indicators Magnetic LED Indicators Beep Description Action 1 long Bad read None 2 short Good read None LED Description Green flash Good read Red...

Page 143: ...ions However there is no guarantee that interference will not occur in a particular installation If this equipment does cause harmful interference to radio or television reception which can be determi...

Page 144: ...d fitness for a particular purpose Datamax O Neil shall not be liable for any errors or for incidental or consequential damages in connection with the furnishing performance or use of this manual or t...

Page 145: ...nce Quality supplies are also the key to extending the life of the printer Datamax O Neil strongly recommends using Datamax O Neil Certified Supplies only Maintenance Supplies We recommend that you fo...

Reviews: