background image

Removal and Replacement

4-20

Installation:

1. Place the Isolator against the Centerplate opening as shown and secure it using the two

Screws.

2.  Install the Drive Motor; see Section 4.7.

4.8 Platen and Assist Roller

Removal:

1 Turn OFF and unplug the printer.

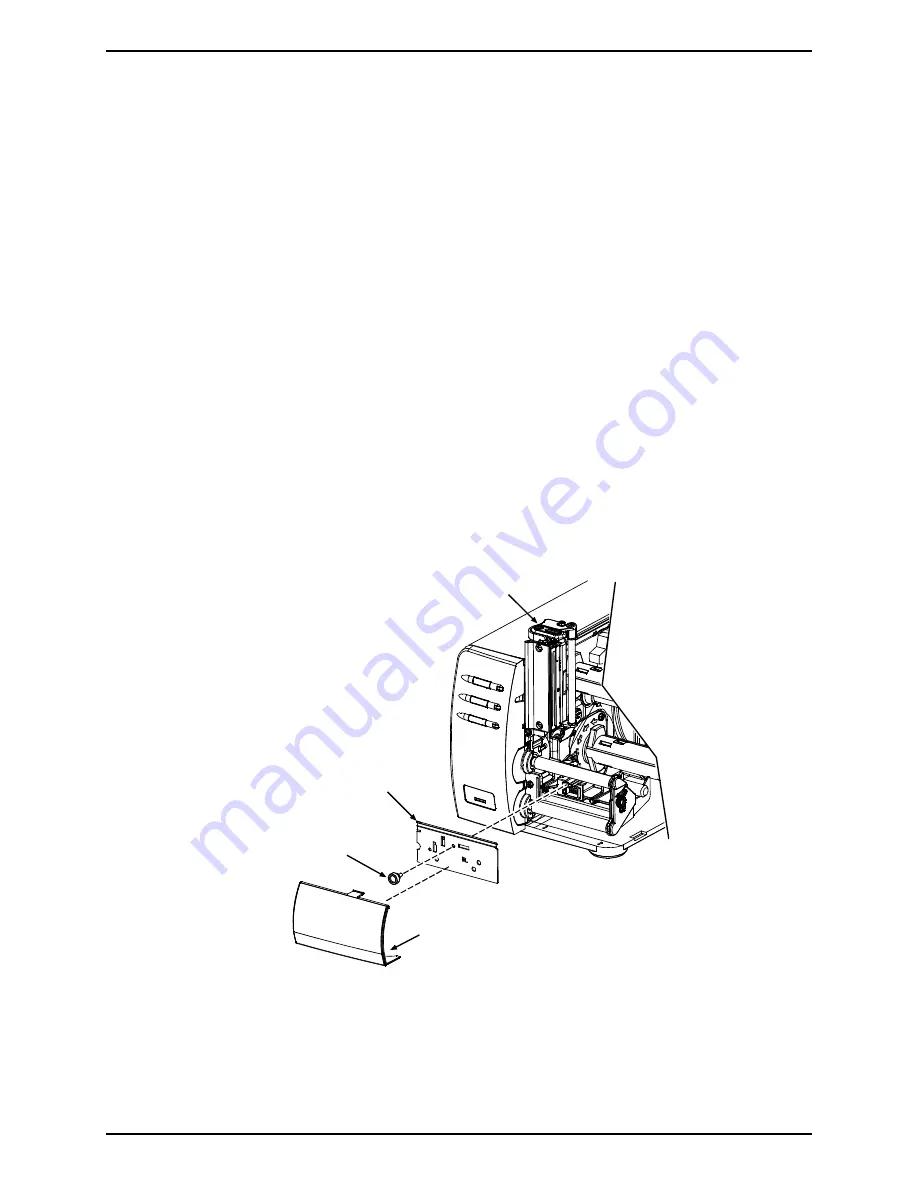
2. Remove the Fascia and Tearplate (or any other attached output device) and then raise

the Printhead Assembly.

Fascia

Tearplate

Thumbscrew

Printhead

Assembly

3. Remove the Screw that secures the Inner Bearing Plate, and then remove the Inner

Bearing Plate from the Platen Block.

Summary of Contents for M-Class Mark II

Page 1: ...M Class Mark II Maintenance Manual...

Page 2: ...e is protected by applicable copyright laws and Licensor retains all rights not expressly granted In no event will Licensor or its suppliers be liable for any damages or loss including direct incident...

Page 3: ...i Contents 1 Overview 2 Adjustments and Maintenance 3 Troubleshooting 4 Removal and Replacement...

Page 4: ...ii...

Page 5: ...i 1 Overview 1 0 Introduction 1 1 1 About this Printer 2...

Page 6: ...ii...

Page 7: ...ad at http www datamax oneil com For operating information reference the Operator s Manual part number 88 2340 01 For software information reference the Class Series 2 Programmer s Manual part number...

Page 8: ...mber when referencing specific information within this manual Because optional items are not present on all models certain printer configurations may not appear in some of the illustrations in this ma...

Page 9: ...3 Cleaning the Platen 6 2 1 4 Cleaning the Ribbon Path 7 2 2 Media Sensor Calibration 9 2 2 1 Calibrating Non Display Models 9 2 2 1 1 Automatic Calibration 9 2 2 1 2 Manual Calibration 10 2 2 2 Calib...

Page 10: ...n Path Alignment 23 2 7 Darkness Adjustment 26 2 8 Downloading Firmware and Fonts 26 2 9 Resetting the Printer 27 2 9 1 Non Display Models 27 2 9 2 Display Equipped Models 27 2 10 Printhead Voltage Ad...

Page 11: ...After each roll of ribbon if using thermal transfer media or after each roll of media or as needed if using direct thermal media Cotton swab dampened with isopropyl alcohol and if necessary use Print...

Page 12: ...greatly reducing the life of the printhead Faulty Label Instead of consistent patterns streaks in the print indicate a dirty or faulty printhead According to the media ribbon and printing parameters u...

Page 13: ...soaked with isopropyl alcohol gently clean the entire Printhead surface paying special attention to the Burn Line until all build up is removed 3 Allow the printhead to dry Reinstall media and ribbon...

Page 14: ...nd latch the Printhead Assembly Disengage the Media Width Adjustment see Section 2 3 4 Close the cover Proceed according to printer type Display Equipped Models Press and hold TEST for approximately f...

Page 15: ...Close the cover Proceed according to printer type Display Equipped Models Press and hold TEST for approximately four seconds As an alternate CLEAN HEAD NOW can be selected in the menu system Non Displ...

Page 16: ...ove any media 3 Clean the Media Sensor using compressed air or a soft brush Use a cotton swab dampened with isopropyl alcohol as needed to remove adhesive accumulations 4 Allow to dry Reinstall media...

Page 17: ...wipe the Platen clean Manually rotate the rollers as necessary wiping rotating and repeating until the surfaces of each are clean Allow to dry 2 1 4 Cleaning the Ribbon Path Ribbon path components co...

Page 18: ...3 Using a Cotton Swab or lint free cloth dampened with isopropyl alcohol wipe the Ribbon Idler and Ribbon Post clean 4 Using a Cotton Swab or lint free cloth dampened with isopropyl alcohol wipe the R...

Page 19: ...actory defaults can be restored 2 2 1 1 Automatic Calibration Automatic Calibration lets the printer establish the optimum media sensing values as follows Note Before calibrating ensure that media is...

Page 20: ...e to hold the button until the STOP Light turns OFF 3 Press and hold FEED until the STOP Light turns ON 4 Press CANCEL The ERROR Light will flash as empty is analyzed 5 Position the backing material o...

Page 21: ...st calibration method Note Quick Calibration is not required for continuous media If UNCALIBRATED is displayed use Standard Calibration Section 2 2 2 2 Perform a Quick Calibration as follows 1 Ensure...

Page 22: ...libration During the Standard Calibration process the printhead assembly can be raised for visual access to the media and the sensor In addition displayed sensor readings can be used to indicate the b...

Page 23: ...en press ESC PERFORM CALIBRATION REMOVE LABEL STOCK PRESS ESC KEY yyy This sets the empty parameter where yyy is a numeric value representing the current sensor reading 7 Proceed according to the medi...

Page 24: ...Observe the message PERFORM CALIBRATION GAP MODE CALIBRATION COMPLETE yyy The calibration result is given For reflective media REFLECTIVE MODE will be indicated and for continuous media CONTINUOUS MOD...

Page 25: ...CED MENU 3 Press ENTER MEDIA SETTINGS MEDIA TYPE You are entering MEDIA SETTINGS 4 Scroll to SENSOR CALIBRATION and press ENTER SENSOR CALIBRATION PERFORM CALIBRATION Press EXIT to leave this procedur...

Page 26: ...setting of 00 where yyy represents the current sensor reading Sample Calibration Table Gain Number Label Value TOF Value Difference Value 00 252 01 02 31 Step Action Displayed Message Comment 9 Use th...

Page 27: ...N yyy 0 31 31 Do not position a perforation in the Media Sensor and if using preprinted media ensure the label area placed in the sensor is free of text graphics lines etc 11 Lower and latch the print...

Page 28: ...Gain Setting In your sample calibration table Where both the Label Value and TOF Value are at least 20 subtract the amounts and record the result as a Difference Value see below Identify the largest...

Page 29: ...r Eye Mark then latch the printhead assembly Record the sensor value as P B Raise the printhead assembly Place the backing notch or mark under the Sensor Eye Mark Latch the printhead assembly Record t...

Page 30: ...SC Scroll to EMPTY SENSOR LEVEL and then press ENTER Set the Empty value determined in Step 15 and then press ENTER EMPTY SENSOR LEVEL 0 255 009 This is the Empty value 19 Press EXIT and when prompted...

Page 31: ...maintain tension while allowing adjustment Slide the Thumbscrew to the left see Example 1 below 3 Next while observing the printed labels move the Thumbscrew to the right until the labels contain a co...

Page 32: ...Models Select a Print Quality Label 4 The image should be light and uneven and then tighten just until snug the Locking Screws enough to remove the play in the printhead assembly while allowing the Ad...

Page 33: ...dia rotate the Printhead Pressure Adjustment Screws counterclockwise to increase the pressure or clockwise to decrease the pressure Set the Media Width Adjustment see Section 2 3 Notes 1 Narrow therma...

Page 34: ...ether from the printer 2 Disengage the Media Width Adjustment see Section 2 3 3 Press FEED several times to normalize the path of the ribbon and media 4 Press FEED several more times observing the rib...

Page 35: ...printed images show no evidence of ribbon wrinkling proceed to Step 7 otherwise slightly loosen the Ribbon Shield Adjustment Screws then move either side of the Ribbon Shield forward or back until th...

Page 36: ...ness Adjustment increases can shorten the printhead service life For darker print increase the HEAT setting and or slow the PRINT SPEED 2 8 Downloading Firmware and Fonts The operating programs and fo...

Page 37: ...ost to printer interface is functional otherwise Flash memory may be defective see Section 4 4 2 9 Resetting the Printer To reset the printer proceed according to the type 2 9 1 Non Display Models To...

Page 38: ...ired if the applied voltage exceeds 28 VDC printhead damage can result The printhead voltage adjustment is required when 1 replacing the power supply or 2 if the factory voltage setting has been chang...

Page 39: ...r Lead D19 Upper Lead anode Power Supply PCB RP1 4 Raise the Printhead Assembly Locate and note the Printhead Resistance Value on the printhead label Printhead Resistance Value Printhead Assembly 5 En...

Page 40: ...nently damage or shorten printhead service life Printhead Voltage Adjustment Model Printhead Resistance Ohms Applied Voltage 0 1 VDC M 4206 800 24 0 680 710 22 4 711 740 22 9 741 770 23 4 771 800 23 8...

Page 41: ...2 1 Problem Isolation 2 3 2 1 1 No Power 3 3 2 1 2 ERROR Light ON 5 3 2 1 2 1 Media Sensor Fault 6 3 2 1 2 2 Ribbon Sensor Fault 7 3 2 1 3 STOP Light ON 8 3 2 1 4 No Print Poor Quality 8 3 2 1 5 No C...

Page 42: ...ii...

Page 43: ...the unit has been placed on a level stable surface and 3 use extreme care if measuring voltages Perform the following actions before troubleshooting then proceed according to the symptom Remove any di...

Page 44: ...contrast otherwise if it does not change see Section 4 2 1 No Go to Step 2 Yes Go to Step 3 2 Press FEED Does the printer attempt to move media No Go to Section 3 2 1 1 Yes Go to Section 3 2 1 2 3 Pr...

Page 45: ...nt Panel PCB see Section 4 2 1 3 Turn OFF and unplug the printer Remove the cover see Section 4 1 Check the cable between the Front Panel PCB and the Main Logic PCB Is the cable properly connected and...

Page 46: ...plug in and turn ON the printer Is the STOP ERROR or READY Light ON No Go to step 8 Yes Replace the Media Sensor see Section 4 6 8 Turn OFF and unplug the printer Disconnect the cable from J7 on the M...

Page 47: ...te Yes Go to Step 3 2 Press FEED Do labels advance No Go to Step 7 Yes Go to Section 3 2 1 2 2 3 Did a complete label advance without the ERROR Light illuminating No Go to Step 4 Yes Go to Step 5 4 Di...

Page 48: ...o Step 4 3 Plug in and turn ON the printer Perform calibration Was calibration successful No 1 Replace the Media Sensor see Section 4 6 or 2 Replace the Main Logic PCB see Section 4 4 Yes Go to Step 5...

Page 49: ...then examine the timing disk for wear or debris build up on the sensor Main PCB If necessary clean it or replace the hub or 2 Replace the Main Logic PCB see Section 4 4 2 Ensure that the ribbon core...

Page 50: ...ired operational settings 3 2 1 4 No Print Poor Quality Note 1 If printed results are uneven light or splotchy try increasing HEAT or reducing PRINT SPEED as no further adjustments may be needed 2 dur...

Page 51: ...el No Go to Step 4 Yes Go to Step 5 4 Do dropouts run perpendicular to the direction of media travel No Go to Step 6 Yes 1 Defective gear or worn drive component see Section 4 7 2 Replace the Power Su...

Page 52: ...he Main Logic PCB and to J2 of the Power Supply PCB Are the cables connected and undamaged No Properly connect the cable s or replace if damaged Yes Replace the printhead see Section 4 3 9 Using a mul...

Page 53: ...is complete 2 Examine the label Is the label printed as designed No Verify label setup and format layout for missing data check image location memory allocations and supported symbologies Yes Go to S...

Page 54: ...e Description Possible Solution s DOT FAILURE Defective printhead elements have been detected Replace the printhead if print quality becomes unacceptable see Section 4 3 GAP MODE WARNING LOW BACKING O...

Page 55: ...the condition persists verify that environmental conditions are within specification for the printer 3 3 2 Fault Messages Fault Messages receive the highest display priority and if multiples occur me...

Page 56: ...ed 2 Clean the cutter and ensure that the mechanism is unobstructed 3 The cutter may be defective replace it 4 The Main Logic PCB may be defective see Section 4 4 DMA FAULT Direct Memory Access has fa...

Page 57: ...ive see Section 4 6 4 The Main Logic PCB may be defective see Section 4 4 HEAD CLEANING FAULT The scheduled maintenance interval has been exceeded three times Clean the printhead see Section 2 1 1 OUT...

Page 58: ...e fault does not clear replace the Main Logic PCB see Section 4 4 RAM FAULT A memory error has been detected Cycle power OFF and ON If the fault does not clear replace the Main Logic PCB see Section 4...

Page 59: ...may be defective see Section 4 4 RIBBON FAULT The thermal transfer MEDIA TYPE is selected but Ribbon Supply Hub movement has not been detected Press any key to continue then try the following 1 Ensur...

Page 60: ...nd that the printhead is latched Then press FEED and proceed accordingly If media advances 1 Ensure that the Media Sensor Media Guide and Media Width Adjustment are properly set 2 Ensure the correct M...

Page 61: ...he output will be immediate and in the form shown below As a final note many software programs use bit mapping to construct the label making diagnosis difficult Contact Datamax O Neil Technical Suppor...

Page 62: ...Troubleshooting 3 20...

Page 63: ...1 1 Head Pressure Cams and Springs 9 4 4 Main Logic PCB 11 4 5 Power Supply PCB 13 4 5 1 Fuses 14 4 6 Media Sensor 15 4 7 Drive Motor 17 4 7 1 Isolator 19 4 8 Platen and Assist Roller 20 4 9 Thermal...

Page 64: ...ii 4 11 Media Supply Assembly 28 4 11 1 Media Hanger 28 4 11 2 Media Hub 29...

Page 65: ...n CAUTION Always disconnect AC power before performing service Wear a wrist strap and follow all ESD prevention measures Use extreme care and never use sharp objects on the Printhead Platen or Assist...

Page 66: ...l and Replacement 4 2 3 Loosen the two Screws that secure the Side Cover Assembly to the Centerplate Screws Side Cover Assembly Centerplate 4 Lift the Side Cover Assembly off the printer Side Cover As...

Page 67: ...Centerplate 4 2 Front Cover Removal 1 Turn OFF and unplug the printer 2 Remove the Side Cover Assembly see Section 4 1 3 Push up on the Tab shown and gently pull the Front Cover forward off the print...

Page 68: ...nnect the Front Panel Cable Remove the PCB Front Panel Cable Screws Front Panel PCB If servicing a display equipped model lift the tabs and remove the Bezel Remove the two Screws that secure the Front...

Page 69: ...er voltage is suspected see Section 2 10 Handle the printhead with extreme care and never use a sharp object on the printhead surface Removal 1 Turn OFF and unplug the printer Open the cover if ribbon...

Page 70: ...over tighten Printhead Printhead Assembly Cable Connectors Locator Pins Guard 3 Clean the Printhead see Section 2 1 1 4 Reload ribbon if removed then lower and latch the Printhead Assembly 5 Adjust t...

Page 71: ...ar Screw Platen Block Hinge 5 Extract the Pivot Pin from the Platen Block Hinge and Printhead Assembly Then remove the Printhead Assembly the Front Lift Spring and the Rear Lift Spring will follow and...

Page 72: ...ot Pin solid end forward Raise the assembly and position the Front Lift Spring leg Printhead Assembly Pivot Pin Platen Block Hinge Front Lift Spring Centerplate Rear Lift Spring leg 3 Install and secu...

Page 73: ...Remove the Printhead Assembly see Section 4 3 1 2 Remove the two Screws that secure the Ribbon Shield and then remove it from the Printhead Assembly Ribbon Shield Printhead Assembly Screws 3 Loosen t...

Page 74: ...Carriage Bottom Carriage 5 Remove the Cams and Springs from the Top and Bottom Carriages Cams Springs Top Carriage Bottom Carriage Installation 1 Place the Springs into the Sockets in the Top Carriag...

Page 75: ...Carriage and secure it using the two Screws Ribbon Shield Top Carriage Screws 5 Install the Printhead Assembly see Section 4 3 1 6 Align the Printhead see Section 2 4 7 Adjust the Printhead Pressure...

Page 76: ...ain Logic PCB PCB Back Plate Installation 1 Position the Main Logic PCB in the printer Using the two Screws secure the PCB Back Plate to the printer 2 Connect the cables to the Main Logic PCB J11 J14...

Page 77: ...Input Connector AC Input Retainer 5 Remove the Screw and Lock Washer that secures the Ground Wire 6 Remove the two Short Screws that secure the Power Supply PCB and the two Long Screws that secure th...

Page 78: ...ection 2 10 6 Install the Side Cover Assembly see Section 4 1 4 5 1 Fuses CAUTION Only use replacement fuses of the same type and rating as the originals failure to comply could cause serious damage i...

Page 79: ...Fast acting 3 amps 250 Volts 5 x 20 mm 2 Install the Side Cover Assembly see Section 4 1 4 6 Media Sensor Removal 1 Turn OFF and unplug the printer 2 Remove the Side Cover Assembly see Section 4 1 3...

Page 80: ...te opening and then slide in Media Sensor Media Sensor Centerplate 2 Replace the Outer Bearing Plate and start but do NOT tighten the Screw 3 Ensure that the Leveling Cam is loose and then latch the P...

Page 81: ...ection 2 3 4 7 Drive Motor Removal 1 Turn OFF and unplug the printer 2 Remove the Side Cover Assembly see Section 4 1 and the Front Cover see Section 4 2 Also if the printer is equipped with an Assist...

Page 82: ...PCB 5 Remove the two Screws and Lock Washers that secure the Drive Motor then carefully remove the Drive Motor Drive Motor Screws Lock Washers Drive Motor Cable Isolator Installation 1 Carefully inser...

Page 83: ...Bearing Plate and secure it to the Platen Block using the Screw otherwise go to Step 6 5 If removed install the tearplate and fascia or other previously attached output device 6 Install the Front Cov...

Page 84: ...or see Section 4 7 4 8 Platen and Assist Roller Removal 1 Turn OFF and unplug the printer 2 Remove the Fascia and Tearplate or any other attached output device and then raise the Printhead Assembly Fa...

Page 85: ...ck Screw Inner Bearing Plate 4 Remove the Screw that secures the Outer Bearing Plate then remove the Outer Bearing Plate and slide the Bushing s out of the Platen Block Platen Block Outer Bearing Plat...

Page 86: ...crew 3 Install the Bushing s over the roller shaft s and into the Platen Block 4 Replace the Outer Bearing Plate and start but do NOT tighten the Screw 5 Ensure that the Leveling Cam is loose and then...

Page 87: ...Screws Thermal Transfer Assembly Centerplate Installation Position the Thermal Transfer Assembly over the opening in the Centerplate and secure it using the three Screws 4 9 1 Take up Hub Clutch Asse...

Page 88: ...sembly Casting 2 Slide the Take up Hub Shaft through the Inner Bearing Clutch Assembly and Outer Bearing then insert the C Clip onto the Take up Hub Shaft to secure the components within the Assembly...

Page 89: ...Supply Hub Shaft through the Plastic Spacer and partially into the Assembly Casting 2 After ensuring that the Pin on the Supply Hub Shaft engages the Notch in the Assembly Casting slide the Supply Hub...

Page 90: ...en remove the Internal Rewinder from the Centerplate Internal Rewinder Screws Centerplate Installation Position the Internal Rewinder over the opening in the Centerplate and secure it using the three...

Page 91: ...llation 1 Position the Clutch Assembly in the Assembly Casting 2 Install the Inner Bearing then slide the Rewind Hub Shaft through the Clutch Assembly and Assembly Casting 3 Install the Outer Bearing...

Page 92: ...omponents in the Assembly Casting with the Screw 2 Install the Internal Rewinder see Section 4 10 4 11 Media Supply Assembly 4 11 1 Media Hanger Removal 1 Remove the Main Logic PCB see Section 4 4 2 R...

Page 93: ...ction 4 4 4 11 2 Media Hub Removal 1 Remove the Power Supply PCB see Section 4 5 2 Remove the Screw that secures the Media Hub Assembly to the Hub Mount and then remove the assembly Media Hub Assembly...

Page 94: ...Removal and Replacement 4 30...

Reviews: