background image


Chapter 3 – Printer Operation 

23 

3

3

3

.

.

.

7

7

7


M

M

M

e

e

e

d

d

d

i

i

i

a

a

a


C

C

C

a

a

a

l

l

l

i

i

i

b

b

b

r

r

r

a

a

a

t

t

t

i

i

i

o

o

o

n

n

n


The printer is factory calibrated for operation with most media types (both gap and black mark).  Try your 

media without performing any calibration adjustments first; this will determine if the factory settings are 

compatible. Only perform the calibration adjustments if you are experiencing media registration issues. 


The Quick Media Calibration should be performed first, if it fails to detect your label media proceed to the 

Manual Media Calibration procedure, see section 3.7.2.  


3.7.1 Quick Calibration 


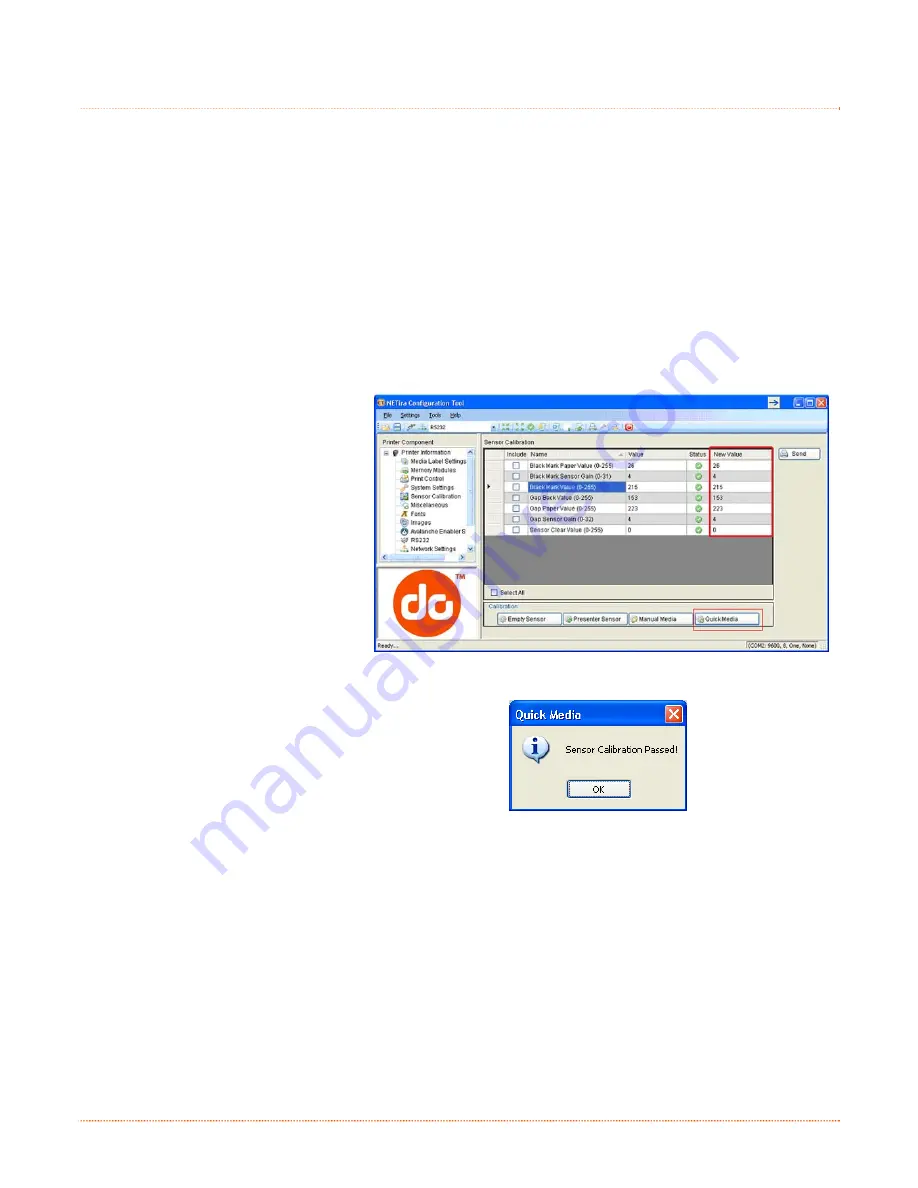
The Quick Media Calibration can be performed using the NETira CT configuration utility, (see section 3.5 for 

more information on NETira CT). 


Launch the NETira CT configuration utility, and query (connect) to the printer. 


1)  Click on the ‘Sensor Calibration’ 

printer component. 


2)  Install your media in the 

printer and click the ‘Quick 

Media’ button. 


3)  The printer will feed media 

while the sensor is being 

calibrated. At the end of the 

process the following message 

will be shown, indicating a 

successful calibration. Values 

displayed in the “New Value” 

column may change after a 

calibration. 


If the calibration is not 

successful, repeat the 

procedure. If the Quick Media 

calibration continues to fail, 

proceed to section 3.7.2 

Manual Media Calibration  


Summary of Contents for E-Class Mark III

Page 1: ...Operator s Manual Basic and Advanced Models Serial 4xxxxxxx or greater ...

Page 2: ......

Page 3: ... party to duplicate or copy the Firmware or the information contained in the non volatile or programmable memory The firmware Software is protected by applicable copyright laws and Licensor retains all rights not expressly granted In no event will Licensor or its suppliers be liable for any damages or loss including direct incidental economic special or consequential damages arising out of the use...

Page 4: ...icle 58 2 of Radio Waves Act FCC This device complies with FCC CFR 47 Part 15 Class A Note This equipment has been tested and found to comply with the limits for a Class A digital device pursuant to Part 15 of the FCC Rules These limits are designed to provide reasonable protection against harmful interference when the equipment is operated in a commercial environment This equipment generates uses...

Page 5: ...3 2 Loading External or Fan Fold Media 7 2 3 3 Loading Media with the Peel and Present Option 9 2 3 4 Loading Media with the Cutter Option 10 2 4 Loading Ribbon 11 2 4 1 Using the Ribbon Core Adapters 14 3 3 3 P P Pr r ri i in n nt t te e er r r O O Op p pe e er r ra a at t ti i io o on n n 1 1 15 5 5 3 1 Introduction 15 3 2 LED Indicators 15 3 3 Multi Function Button 16 3 4 Printer Configuration ...

Page 6: ...mware and Fonts 35 5 5 5 T T Tr r ro o ou u ub b bl l le e es s sh h ho o oo o ot t ti i in n ng g g 3 3 37 7 7 5 1 Introduction 37 5 2 Troubleshooting Tips 37 A A A S S Sp p pe e ec c ci i if f fi i ic c ca a at t ti i io o on n ns s s 3 3 39 9 9 B B B E E Et t th h he e er r rn n ne e et t t S S Se e et t tu u up p p 4 4 43 3 3 B 1 Network Card Setup 43 B 1 1 Wired Configuration Static IP Addres...

Page 7: ...h to write custom programs or label formats a copy of the DPL Programmer s Manual is also included on the Accessories CD ROM or the manual can be downloaded from our website 1 1 1 2 2 2 U U Un n np p pa a ac c ck k ki i in n ng g g t t th h he e e P P Pr r ri i in n nt t te e er r r After removing the printer from the packaging material check the contents of the box In addition to the printer the ...

Page 8: ...2 Chapter 1 Getting Started ...

Page 9: ... 2 1 Power Connections The printer is powered by an external auto ranging power supply which connects between the printer and an electrical outlet Ensure that the operating ranges of the power supply are compatible with your electrical service see Appendix A for details then connect power as follows Before connecting power to the printer ensure that the Power Switch is in the OFF O position 1 Conn...

Page 10: ...IEEE 1284 compliant cable and supporting host software is used The Ethernet Port optional supports Wired LAN communications see Appendix B for information The Serial Port supports RS 232C communications via a DB 9 connector with specific pin outs interface cable part numbers and pin outs are given below contact your reseller to order Serial port settings are menu selectable and must match the host...

Page 11: ...ed with this type of sensor proceed to Section 4 4 2 3 1 Loading Roll Media Load media as follows 1 Slide the Media Guides outward 2 Slide the Media Hangers outward and insert the Roll Media as shown Allow the Media Hangers to retract and grasp the media roll 312 Media Hangers Media Guides Roll Media 3 Pull out enough media to exit the front of the printer Adjust the Media Guides so they are light...

Page 12: ... close the printer s Cover and press downward until latched 312 Cover 5 Press the button several times to advance the media if the Fault Light is on see Section 3 7 The printer is factory set to use gap media If using another media type for example continuous media printer setup must be reconfigured see Section 3 4 ...

Page 13: ...ard 2 Slide the Media Hangers outward and install the two Media Chute Guides into the Media Hangers Media Chute Guides Media Hangers External Media Guide 3 Position the Media Hangers to match the width of the media being used Slide the Hanger Lock against the Media Hanger to hold this position Media Hangers Hanger Lock ...

Page 14: ...l Media Slot Media Guides External Media Supply 5 If using Thermal Transfer media ribbon proceed to Section 2 4 Loading Ribbon Otherwise close the printer s Cover and press downward until latched 6 Press the button several times to advance the media if the Fault Light is on see Section 3 7 The printer is factory set to use gap media If using another media type for example continuous media printer ...

Page 15: ...behind the Peel Roller and Peeler Door as shown below 312 Media Backing Peeler Door Platen Roller Peel Bar Peel Roller 4 Close the Peeler Door 5 If using Thermal Transfer media ribbon proceed to Section 2 4 Loading Ribbon Otherwise close the printer s Cover and press downward until latched 6 Press the button several times to advance the media if the Fault Light is on see Section 3 7 7 The printer ...

Page 16: ...ss downward until latched 4 Press the button several times to advance the media if the Fault Light is on see Section 3 7 The printer will now cut each label as it exits from the printer 7 The printer will now peel each label and present it to the operator for removal If the printer is equipped with the Present Sensor Option the indicator light will flash orange and the next label will not feed pri...

Page 17: ...Ribbon Core Adapters see section 2 4 1 Ribbon Core Width 1 0 4 3 inches 25 110mm Centered on Ribbon Core Adapters Ribbon Width 1 0 4 3 inches 25 110mm Centered on core Load ribbon as follows If equipped with the thermal transfer option the printer is factory set to use ribbon see Section 3 4 to change this setting if using direct thermal media 1 Determine the type of ribbon C S I or C S O you are ...

Page 18: ...a Bouncer may need to be pushed out of the way 3 Once the Supply Roll is loaded slide the Ribbon Handler Latch downward to unlatch the Ribbon Handler Assembly 312 Supply Roll Supply Hub Media Bouncer Ribbon Handler Latch Ribbon Handler Assembly 4 Push out the Take up Hub and load an empty Ribbon Core into the printer as shown 312 Ribbon Core Take up Hub ...

Page 19: ...er of the ribbon to the Ribbon Core using Tape Rotate the Take up Hub Wheel several times to secure the ribbon 312 Ribbon Core Tape Take up Hub Wheel 7 Raise and latch the Ribbon Handler Assembly Close the cover and press the button several times to advance the media if the Fault Light is on see Section 3 7 312 Ribbon Handler Assembly Cover ...

Page 20: ...he leader positioned as shown above onto a Core Adapter Slide an empty Ribbon Core onto the remaining Core Adapter 312 Core Adapter Ribbon Roll Ribbon Core 2 If using a narrow ribbon position the Ribbon Roll so that it is centered on the Core Adapter The Core Adapters are marked in both inches and centimeters to aid in proper positioning 312 Core Adapter Ribbon Roll ...

Page 21: ...llowing sections 312 Green Orange Status LED Red Error LED Multi function Button 3 3 3 2 2 2 L L LE E ED D D I I In n nd d di i ic c ca a at t to o or r rs s s Two LED indicator lights provide a quick visual reference of printer operations and conditions as defined below LED 1 LED 2 Color Green Orange Red Solid Ready to print Paused or Present Sensor is blocked TOF sensing error Next TOF not Found...

Page 22: ...links orange Prints Network Report Label Cancel Batch Cancel Batch Press and hold for 10 seconds release when LED blinks green Performs the Quick Media Calibration Performs the Quick Media Calibration Performs the Quick Media Calibration Press and hold for 15 seconds release when LED blinks red Resets the printer s parameters to the stored Dealer Settings Resets the printer s parameters to the sto...

Page 23: ... pages that can be accessed with any web browser via the optional Ethernet port Easy to use Printer can be configured from any host connected to the network regardless of physical location or host operating system No additional software required Printer must be equipped with an Ethernet option Depending on the complexity of the network initial connection may not be possible until network parameter...

Page 24: ...atamax oneil com Be sure your printer s firmware version is 9 04 or greater Firmware is available from our website for the latest version please visit our web site at http www datamax oneil com USB and Parallel Port Connection Requirements Using Netira CT with an USB or parallel port connection requires a Windows driver to be installed and the driver to be set to Print directly to the printer Othe...

Page 25: ...allel Connections Close the Open a configuration file dialogue box a In the toolbar from the drop down menu box select the appropriate port Then click on the Query Printer Icon For Ethernet Connections Close the Open a configuration file dialogue box a In the toolbar Click on the TCP IP Configuration Icon b In the TCP IP Configuration dialogue box enter the IP address of the printer Port 9100 and ...

Page 26: ...ake any changes necessary to the printer configuration 4 Once complete send the new settings to the printer using the Send button Note When sending the changes to the printer only the changes displayed on the current page will be sent You must click the Send button for each page that has been modified ...

Page 27: ...eb site at http www datamax oneil com Be sure your printer s USB Mode is set to Printer This mode can be viewed changed via the printer s front panel menu under Communications USB Port USB Device Class Installing the Windows Driver 1 Place the Accessories CD ROM included with your printer into your computers CD ROM drive 2 Once the CD ROM starts select your printer model then Install Driver from t...

Page 28: ...tock setting matches the size of the label you are using If you cannot find a match for your label click New and enter the dimensions of your label Options Tab Print Speed Printhead Temperature These two settings will have the greatest effect on print quality Some label stocks will require more heat and slower print speeds to generate a quality image The Windows application software used to create...

Page 29: ...edure see section 3 7 2 3 7 1 Quick Calibration The Quick Media Calibration can be performed using the NETira CT configuration utility see section 3 5 for more information on NETira CT Launch the NETira CT configuration utility and query connect to the printer 1 Click on the Sensor Calibration printer component 2 Install your media in the printer and click the Quick Media button 3 The printer will...

Page 30: ...calibration is needed to set either the black mark or the gap value of the media sensor on the printer The Manual Media Calibration can be performed using the NETira CT configuration utility see section 3 5 for more information on NETira CT Launch the NETira CT configuration utility and query connect to the printer Procedure for Gap Type Media 1 Click on the Sensor Calibration printer component 2 ...

Page 31: ...and place backing over the sensor and close the door then click OK 6 Remove Stock Remove all media from printer close the door then click OK 7 NETira CT will display a message indicating the process has finished In case of any error a FAILED CALIBRATION message will be displayed Repeat the process ...

Page 32: ...mation including the printer firmware version memory allocations enabled options and label counter data Print a Database Configuration Label as follows 1 Load with media 4 inch wide and ribbon if printing with thermal transfer media 2 Turn the printer on 3 When the left LED is on solid red press and hold the button until the left LED turns solid green and then release The Database Configuration La...

Page 33: ... cotton swab to clean the printhead from end to end After every roll of media Platen Roller Turn OFF the printer Rotate the platen roller and clean it thoroughly with solvent applied with a cotton swab After every roll of media Peel Off Roller Rotate the peel off roller and clean it thoroughly with solvent applied with a cotton swab After every roll of media Media Path Solvent After every roll of ...

Page 34: ...eaning methods are recommended Streaks can indicate a dirty or a faulty printhead Proper cleaning is critical To maintain peak performance of the printer Datamax O Neil offers a complete line of cleaning products including pens cards films and swabs To learn more visit our website Cotton Swab Procedure If printing with direct thermal media or thermal transfer media with wax ribbon clean the printh...

Page 35: ...is completes cleaning Cleaning Film Procedure If printing with thermal transfer media and resin ribbon when printing with a Heat Value of 22 or higher or when other methods prove unsuccessful clean the printhead as follows 1 Open the printer Wait briefly for the Printhead to cool 2 Remove media and ribbon then place a sheet of Cleaning Film under the Printhead part number 70 2087 01 3 Close the co...

Page 36: ... printers equipped with the thermal transfer option allows the optimum amount tension to be supplied by the ribbon supply hub Adjust the ribbon tension as follows 1 Turn off the printer 2 Hold the ribbon ribbon hub to prevent it from turning Then push in and rotate the Ribbon Tension Adjustment Knob to the position that matches the core size of the ribbon in use 312 Ribbon Handler Ribbon Tension A...

Page 37: ...inuous Die Cut Center of the Label Gap Notched Center of the Notch Reflective Center of the Mark Reflective Position the AMS as follows 1 On the Bottom AMS Sensor identify the proper Indicator for use with your media Gap or Notch Indicator Reflective Mark Indicator Lock Release 2 Depress the Lock Release and slide the Bottom AMS sensor so the Indicator is in line with the center of the notch gap o...

Page 38: ...w proper Electro Static Discharge procedures when replacing the printhead 1 Turn OFF the printer and remove the ribbon if installed 2 Lower the Ribbon Handler Assembly 3 Press outward on the two Printhead Carrier Tabs and rotate the Printhead Carrier down 312 Ribbon Handler Printhead Assembly Tabs Printhead Carrier 4 Press inward on the two Printhead Shield Tabs and rotate the Printhead Shield dow...

Page 39: ...head Screw Printhead Printhead Cable Sensor Installation 1 Carefully connect the Printhead Cable to the new Printhead 2 Position the Printhead in the Printhead Carrier and tighten the Printhead Screw 3 Ensure the Sensor properly seated and rotate the Printhead Shield upward until it snaps into place 4 Rotate the Printhead Carrier upward until it snaps into place ...

Page 40: ...ly removed for cleaning replacement or clearing media jams 1 Turn OFF the printer and remove the media if installed 2 Lift up on the two Platen Roller Tabs 312 Platen Roller Tabs 3 Remove the Platen Roller Assembly from the printer 312 Platen Roller Assembly Installation 1 Position the Platen Roller Assembly into the printer 2 Rotate the two Platen Roller Tabs downward until they snap into place ...

Page 41: ... the Tools Upgrade Firmware Select the binary file BIN file 4 Click the Send button to start the firmware update 4 7 1 Boot 1 and Boot 2 Boot Loaders 1 Connect the printer to your PC using a serial cable 2 Launch the NETira CT configuration utility and query connect to the printer see section 3 5 for more information on NETira CT It is recommended that the configuration be saved before downloading...

Page 42: ...36 Chapter 4 Maintenance Adjustments ...

Page 43: ...the media being used Use the software program or DPL commands adjust the Heat Setting and Print Speed A mismatched incorrect ribbon media combination is being used Check the types being used Faulty printhead Replace it see Section 4 5 or call for service The printer does not print or prints several labels at once The labels are incorrectly loaded See the loading instructions on the inside cover of...

Page 44: ...es before a fault indication The ribbon may be incorrectly installed Ensure that the inked side of the ribbon faces the labels With most ribbons this can be verified by rubbing paper against the ribbon the ink should smudge the paper Or if using label stock the sticky side of a label will pull off the ink A mismatched ribbon paper combination is resulting in an insufficient amount of friction betw...

Page 45: ...ght 5 25 pounds 2 4 kg Operating Temperature 40 to 95 F 4 to 35 C AC Input Voltage Power Supply 105 VAC to 250 VAC 50 60 Hz Printing Print Method Direct Thermal Thermal Transfer optional Print Speed Basic Models 2 4 IPS 50 8 101mm s Advanced Models 2 5 IPS 50 8 127mm s Resolution 203 DPI Models 203 DPI 8 dots mm 300 DPI Models 300 DPI 11 8 dots mm Tear Bar Tear up DRAM Memory 32MB FLASH Memory 64M...

Page 46: ... Range Core Ribbons Ribbon Core Width 4 3 inches 110mm Ribbon Width 1 0 4 3 inches 25 110mm Centered on core 1 Core Ribbons with Ribbon Core Adapters see section 2 4 1 Ribbon Core Width 1 0 4 3 inches 25 110mm Centered on Ribbon Core Adapters Ribbon Width 1 0 4 3 inches 25 110mm Centered on core Ribbon Roll Capacity 0 5 13mm core with 361 110m long ribbon or 1 25mm core with 984 300m long ribbon C...

Page 47: ...ength 24 3 25 4 E Total thickness 010 6 0025 F Notch opening width 20 G Distance from the center of the media to the center of media sensor aperture 1875 with the Adjustable Media Sensor option Adjustable across full media width H Reflective mark width 2 4 4 50 I Distance between reflective marks 24 3 25 5 J Reflective mark length 25 10 1 Units of measure are in inches 2 The reflective black mark ...

Page 48: ...42 Appendix A Specifications ...

Page 49: ...er Allow up to 90 seconds for the printer to retrieve an IP address 3 At this point it is recommended to print a Network Report This Network Report is generated by the printer and lists important default information such as the IP and MAC Addresses To print the Network Report Press and hold the button for 5 seconds release when LED blinks orange 4 Verify the printer has obtained a valid IP address...

Page 50: ...nt 2 Change or confirm the following parameter settings DHCP Enable Static Static IP address According to your network IP range Static Subnet mask According to your network subnet mask 3 After updating the New Value column click the Send button to send these changes to the printer The printer will reset and will connect to your network with the values you specified Once the previous steps have bee...

Page 51: ...ar on the left hand side The Generic Network Settings and Wired Ethernet Settings pages contain many items associated with the setup of the network card The following tables provide information on each of the items listed on these pages You must provide a password to change any settings the default password is sysadm After changes are sent to the printer on all web pages the printer must be reset ...

Page 52: ...P LPD Print Services LPD Print Services Enables the Line Printer Daemon LPD Service Disables the Line Printer Daemon LPD Service HTTP WWW Services HTTP WWW Services Allows HTTP WWW protocol to transfer data where Enables HTTP Disables HTTP Gratuitous ARP Gratuitous ARP Minutes Disabled 0 Sets time interval for ARP transmission packets where 0 2048 minutes the default is Disabled ...

Page 53: ...rver Primary WINS Server Secondary DNS Server Ethernet Port Connection Settings Duplex Capability Allows the User to specify the line duplex and speed of the wired Ethernet connection Auto Negotiate default 10 BaseT Full Duplex 100 BaseT Full Duplex 10 BaseT Half Duplex 100 BaseT Half Duplex Printers DNS Name Printers DNS Name Sets the DNS name of the printer NetBIOS Settings NetBIOS Enable Enable...

Page 54: ...s Add Printer Wizard The following screen should appear and then click Next 2 Make sure that Local Printer is selected and then click Next 3 Select Create a new port and then select Standard TCP IP Port from the drop down menu Click Next 4 Click Next 5 In the Printer Name or IP Address field enter the IP address of your printer The Port Name field does not need to be changed When finished click Ne...

Page 55: ...and select whether or not it is to be your default printer then click Next 14 Select whether or not to share this printer on your network Then click Next 15 Select No then Click Next 16 Confirm your settings and then click Finish 17 If prompted with the Digital Signature Not Found window click Yes to continue installation 18 Your computer will now copy the necessary files from the CD ROM The drive...

Page 56: ...50 Appendix B Ethernet Setup ...

Page 57: ... media roll cutter A mechanical device with a rotary or guillotine type blade used to cut labels or tags following printing defaults The functional setting values returned following a factory reset of the printer diagnostics Programs used to locate and diagnose hardware problems die cut media Media that has been cut into a pattern using a press where the excess paper is removed leaving individual ...

Page 58: ...acking and or label material to facilitate their separation Also referred to as perf print speed The speed at which the media moves under the printhead during the printing process reflective media Media imprinted with carbon based black marks on the underside of the material which is used to signal the top of form when the reflective sensor is enabled registration Repeatable top to bottom alignmen...

Reviews: