INSTALLATION
2
2 INSTALLATION
Rhino-NET™ has been designed for fast and easy mechanical installation.
Rhino-NET™ can be mounted either to the roof, to the floor or to the side of a fork-lift. In
addition, it can be rotated in order to obtain the best display viewing position.
2.1 REQUIRED MOUNTING MATERIAL
•
Rhino-NET™
•
ST-222 Terminal Support Bracket (included)
•
ST-247 Counter Bracket (used optionally) (included)
•
4 to 6 screws,
ø
= 8 mm with corresponding flat and lock washers and nuts (not included)
•
Power supply cable (included)
•
Two knobs with corresponding flat and lock washers (included)
•
One set pin screw with locking washer (included)
2.2 MOUNTING TO FORKLIFT ROOF
Follow these instructions as general guidelines:
1 Find the most suitable place on the forklift roof to mount Rhino-NET™: it should be as
protected as possible against water and dust, and it should not be an obstacle to the
operator's movements.
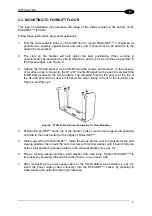
2 The slots on the bracket will help obtain the best positioning. When working in
environments characterized by strong vibrations, set the screws as close as possible to
the bracket edges, see Figure 3.
3 Tighten the ST-222 bracket to the forklift using the screws and washers. In the absence
of a surface area to mount to, the ST-247 Counter Bracket can be used to sandwich the
forklift frame between the two brackets. The threaded hole for the set pin at the bottom
of the ST-222 should be at user's right hand side when facing in front of the terminal, see
Figure 3 and Figure 4.
Figure 3 – ST222 Bracket Screw Positioning for Roof Mounting
1
since screw length depends on each situation, they are not included in the package. It is
recommended to use non-corrosive materials.
5


