background image

Manual Datafox PZE-MasterIV Basic

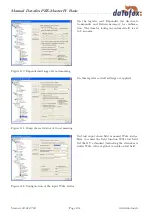
On this page all settings are applied.

Figure 107: Jump characteristics of Reason

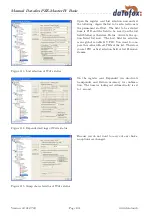
The next field is named Good morning. You set the
field description Name. That way the field Name
of the data record PZE-booking is filled. Again you
need the field function Select from list. The other
settings can be applied.

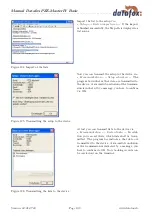
Figure 108: Configuration of the input Good morning

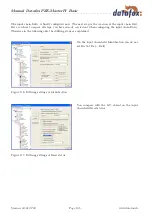
Open the register card List selection now and set
the permanent staff list as list to be selected from.
The field to be saved/selected from is our list field
Name. The first field for selection is the GV: PID.
You want to compare this variable with all PIDs
of the list. Therefore you set PID as first selection
field of list Personalstamm.

Figure 109: List selection of Good morning

Version: 04.01.07.00

Page

102

www.datafox.de

Summary of Contents for PZE-MasterIV

Page 1: ...Manual Datafox PZE MasterIV Basic Datafox PZE MasterIV Basic Flexible data collection with method Version 04 01 07 00 Page 1 www datafox de ...

Page 2: ...al data 18 3 2 Connection 19 3 2 1 Power supply 20 3 2 2 Ethernet interface 20 3 3 Commissioning 21 3 4 Operation 21 3 4 1 Keyboard 22 3 4 2 Key sequences 22 3 5 Menu structure and menu navigation at the display 23 3 5 1 System menu bios 23 3 6 Communications 24 3 6 1 Communication via RS232 25 3 6 1 1 Requirement 25 3 6 1 2 Connection 25 3 6 1 3 Conversion of RS232 to RS485 26 3 6 2 Communication...

Page 3: ...age 52 4 5 8 Read global variables 52 4 5 9 System variables of the signal processing 53 4 5 10 Work through batches 54 4 5 11 Device configuration BIOS 54 4 5 12 Settings 54 4 6 Menu Extra 57 5 DatafoxStudioIV Setup 58 5 1 Basics 58 5 1 1 Planning 58 5 2 Functions of a setup 60 5 2 1 Basic settings 60 5 2 2 Global variables 61 5 2 3 Transponder 63 5 2 3 1 Transponder reading systems 64 5 2 3 2 Fu...

Page 4: ...7 1 Connection Timeboy 87 5 2 7 2 Setting of timers 87 5 2 7 3 Setting of timers 87 5 2 8 Mathematical operations 87 5 3 Creating setups 88 5 3 1 Setup for labour time collect entry exit order check offline 88 5 3 1 1 General 88 5 3 1 2 Basic settings of the setup 89 5 3 1 3 Creating the data record description 91 5 3 1 4 Creating the lists 93 5 3 1 5 Definition of the device operation 95 5 3 1 6 ...

Page 5: ...ole document or parts of it require written consent of Datafox GmbH The assertion of all rights in this respect is reserved to Datafox GmbH especially in case of the grant of a patent The handover of this documentation does not establish a claim to the licence or the use the soft and hardware Copies of the diskettes and CDs may only be made for the purpose of data backup Every unauthorized copy of...

Page 6: ... file archive dfz 1 3 1 Description Device files hex of the MasterIV devices are delivered in a common device file archive It has the file extension dfz stands for Datafox Zip Now simply the device file archives are indicated instead of the device files hex This applies to the DatafoxStudioIV and DLL The indication of device files hex is still possible 1 3 2 Function of the archive The transmissio...

Page 7: ...Basic SoftwareV ersion pdf file names Setup edit a path via a program menu at DatafoxStudioIV communication a single menu item FW abbreviation for firmware software in the device from FW V 3 1 5 shows that this function is supported from the firmware version 3 1 5 onwards SW abbreviation for software HW abbreviation for hardware from HW V 2 0 shows that this option is available from the hardware v...

Page 8: ...m do fulfil the system requirements after all because then the development effort will be reduced to a minimum With some exercise it will be possible to compile a complete entry within half an hour If you need functions that are not available we should get into contact If you need support at the compilation of setups we offer you our services Because of our wide experience in dealing with the setu...

Page 9: ...improvements Our general terms and conditions of business apply Note Because of the DatafoxStudioIV the Datafox devices have many functions and com bination of functions therefore it is not possible to test all functions and their com binations in case of updates This applies especially to all the setups you created as a customer Before updating your device please test if your individual setup wor...

Page 10: ... device After switching on the current firmware ver sion is shown on the display The firmware can be transmitted to the device with DatafoxStudioIV At delivery a demo setup is at the device The description of the demo setup you will find in chapter 5 3 1 It is advisable to go through the example at first comparing the process with the setup That way a quick introduction to the configuration is pos...

Page 11: ... functions The manual version and the appropriate DatafoxStudioIV always have the same index It is impossible to configure a firmware with a DatafoxStudioIV version that is older than the firmware Recommendation If possible use the appropriate DatafoxStudioIV version This version always has to be the version of the firmware The data file PZE MasterIV Basic SoftwareV ersionen Stand xxx pdf shows wh...

Page 12: ... software version list whether there are any version dependencies that must be kept For example when changing from version 04 00 xx to version 04 01 xx there must be a version 04 00 23 769 or higher as minimum requirement to carry out the update to version 04 01 xx successfully 2 2 2 Firmware downgrade Caution When carrying out a firmware downgrade the firmware always has to be transmitted to the ...

Page 13: ...used as basis for own programs Devices for c programming are delivered without the standard firmware and only in connection with an instruction 2 3 2 Communication There are 4 possibilities available for communication data transmission 1 Setup and communication program The setup and communication program supports both the setting of the device settings and the important possibilities of data trans...

Page 14: ...ng with programs designed under Unix or Linux is also possible Figure 3 Implementation via C Sourcecode 4 Datafox Talk Via Datafox Talk data transmission with Datafox AEIII Timeboy and the MasterIV series is possible on file and database layer Therefore it is an alternative to communication via DLL An advantage of this method is that no installation is necessary The data are taken over and display...

Page 15: ...g setup to the devices Setting a clock Transmitting lists to the devices Reading out of data Writing log files and error lists where nec essary Filing of data as ASCII file Excel file Dbase File or ACCESS database The actions are applied as batch and carried out according to the settings of the timing Timing allows the permanent collection of data polling and the collection at any time The setting...

Page 16: ...Manual Datafox PZE MasterIV Basic Figure 5 System structure Version 04 01 07 00 Page 16 www datafox de ...

Page 17: ...n of the device Caution Pleas keep in mind that MasterIV terminals use a flash memory According to the manufacturer each memory sector 512 byte can be written to a maximum of 100 000 times The firmware of the terminals distributes the access to the memory sectors this technique is called wear levelling Bad blocks in case of write or read failures are not used anymore However despite this technique...

Page 18: ...length x width x depth 237mm x 130mm x 55mm Weight without power supply 650 g Environment factors Environment temperature 20 bis 70 C Protection class IP54 in mountet position Software Configuration program Setup program for arrangement witout programming Communication tools Communication DLL Data transfer RS232 RS485 RS232 und RS485 in basic unit TCP IP option TCP IP use via integrated TCP IP sta...

Page 19: ...on You can find a drilling template that helps mounting the device in the appendix of the manual 1 1 LCD Modul 320x240 Pixel 2 2 Transponder reader inte grated in the terminal 3 3 3 3 Three eves for the wall fastening screws are enclosed 4 4 Connection for a power supply unit 24 V AC 300 mA Datafox Item no 105108 If the de vice is mounted on a patress box and there is only one screw ter minal avai...

Page 20: ... 300 mA power supply unit by the Molex connector 1 in figure 6 Caution In principle only one voltage source may be connected to the PZE MasterIV Basic Use a 24 V 300 mA AC DC power supply unit for this 3 2 2 Ethernet interface Caution Power over Ethernet PoE describes a process with which network compatible de vices can be energised via the 8 core Ethernet wire The internal TCP IP module of the PZ...

Page 21: ... Now the PZE MasterIV Basic is ready for use Only use power supply units with appropriate power to establish the power supply see chapter 3 2 1 On delivery the device is set for a communication over an RS 232 connection with 38400 Baud In chapter 3 5 1 you can find a description how to change these settings Note Before changing the communications read the corresponding paragraph in chap ter 3 6 3 ...

Page 22: ...You reach the BIOS via the key sequence or from FW V 04 01 01 on also via ESC From FW V 04 01 01 on you can reach the transponder menu via ESC F1 In older FW V it is a sub point in the BIOS Use the keys and the menu navigation to select functions Confirm with the key If you press ESC a return takes place in accordance with the settings in the setup program In order to select a list entry scroll wi...

Page 23: ... directly different basic settings at the terminal via the system menu All settings except the communications and the bus number can also be made through the DatafoxStudioIV In order to enter the system menu BIOS press a key sequence see chapter 3 4 2 If you have a password for the system menu enter it via the or keys and confirm it with the key Bios is displayed in line 2 of the main menu In orde...

Page 24: ...t 9600 19200 or 38400 as baud rates timeout 100 Here you can select a period of time for the communication in ms that constitutes the waiting time till the output of an error message The range of values is between 100 and 2000 The input will be rounded down to 10 TCP IP Not all displayed values can be changed You can find a further description of the parameters in chapter 3 6 3 If you press the ES...

Page 25: ...ated Permitted baud rates are 9600 19200 and 38400 The timeouts have to be between 100 and 2000 When you select RS232 for communication the timeout is set on 100 by default 3 6 1 2 Connection A single device can be connected to the PC directly via the RS232 interface po sition 2 in figure 6 The cable must not be longer than 15 m Use a RS232 cable with a 1 1 configuration corresponding to Datafox i...

Page 26: ...her the wiring of the RS485 bus from the following examples Caution Pay attention to the hardware version given in the examples It is a precondition for the prevailing example Figure 10 RS232 auf RS485 Bus Connect the converter to the PC with a Sub D 9 pole 1 1 cable as shown in figure 9 The converter replaces the PZE MasterIV Basic Figure 11 RS485 Bus über Stiftleisten RS485A HW V 2 0 PIN 1 4 in ...

Page 27: ...timeout should be set The modem to which the terminal is to be connected has to be configured via the COM interface of a PC The steps listed below refer to the tested and recommended Devolo MicroLink 56k Fun II modem 3 6 2 2 Connection The analogous modem is connected to the COM interface of the PZE MasterIV Use a Null modem adaptor or another cable that is assembled corresponding to the figure No...

Page 28: ...22m RS232 Port Baud 9600 Datenbit 8 Parität N Stoppbit 1 ISDN terrestrial network to mobile communications modem Wiring of the Null modem adaptor see figure 13 All Terminals on 9600 baud and RS232 RS232 Nullmodem Adapter MC35i Terminal Art 25104 AT F ATE0 ATS0 1 AT D0 AT C0 ATS7 60 AT CBST 71 0 1 AT CRC 1 AT IPR 9600 AT CSNS 4 AT W0 ATS MSO Mobilnetz ISDN ISDN Modem ATE0 ATS0 0 ATS31 2 ATS51 0 AT ...

Page 29: ...It becomes active when the connected modem has contacted another modem It indicates the PC that a connection is established and data can be sent DTR The computer signals his ready status e g at a direct connection DSR As response to DTR at crossed lines RTS Becomes active when the terminal is ready to send data CTS Becomes active when the terminal is ready to receive data RI Is produced by a conne...

Page 30: ...tion via the DatafoxStudioIV Open the communication dialogue via the DatafoxStudioIV menu item setup device maintenance via modem connection to establish a connection between a PZE MasterIV Basic and a PC DatafoxStudioIV In dependence on the selected modem type you additionally have to set the COM interface baud rate PIN and phone number of the remote station Parameters that are not needed are dea...

Page 31: ... Use the func tions of the DFComDLL dll to establish a connection between a PC and the device Proceed as it is shown in the figure below Figure 16 Course of the communication via DFComDLL dll You can find a more detailed description of the functions and parameters in the documentation or help to the DFComDLL dll Version 04 01 07 00 Page 31 www datafox de ...

Page 32: ...vice Then TCP IP settings are only available at the terminal itself The settings for the remote access yes no in the BIOS can only be changed if the BIOS is protected by a password This means that after a firmware update it is necessary to transfer a setup with a BIOS password before the settings can be changed This additional protection is necessary because a change of this setting remote access ...

Page 33: ... COM server has to be used The COM server serves as converter Figure 18 TCP IP to RS232 The necessary settings of the COM server will be explained using the W T COM server as example The COM server can be configured easily via the Wutility exe program 1 Open the W T program 2 Open inventory and then scan local network 3 Mac address is displayed at the menu click on it 4 Adjust IP address via Confi...

Page 34: ...cription You can request it from us or download it from our homepage Please note that the bus number has to be set directly at the terminal see chapter 3 5 1 The network structure is a bus The bus cable is looped through from one device to the other Branching is not allowed The PC can be connected at the beginning the end or somewhere in the middle of the network The total length of the bus cable ...

Page 35: ... and that you have to pay attention to the compatibility to the present network topology You have to set the IP addresses in the system menu bios of the PZE MasterIV Basic and the WLAN router in accordance with the network class of the present network Figure 21 Connection of a PZE MasterIV Basic via WLAN router to a WLAN network of a company Version 04 01 07 00 Page 35 www datafox de ...

Page 36: ...of the bar code reader 4 5 GND Masse 6 24V 24 V supply 100 mA at most solder bridge on edge connector necessary 7 8 9 5V 5V Supply 150 mA at most Table 5 Bar code reader over RS232 We use bar code readers of the company Datalogic by default and already make the right settings at delivery You can find the corresponding bar code readers with the suitable cables in the price list Basic setting of the...

Page 37: ...e Caution If there are different versions of the DFComDLL dll on the PC where the program DatafoxStudioIVis run it can lead to malfunctions because possibly a wrong ver sion of the DLL is loaded by the program Therefore always pay attention to the software version and compatibility see chapter 2 1 User interface Description of the main menu items File Open save create setup file View Hide and unhi...

Page 38: ...you make in the setup mask dialogue are only applied to the dialogue interface If you close the dialogue via the OK key all settings will be applied to the setup without further queries If you close the dialogue via the cross you will be asked if the changes shall be applied to the setup Only if you answer this query with JA yes the changes are applied to the setup As long as the setup mask dialog...

Page 39: ...rther Such functions are for example Speichern for saving changes 4 3 1 Creating a new setup file You can create a new setup file via Datei Neu A new client window will be opened in the DatafoxStudioIV After creating a setup file you should save it under the name of your choice After successfully saving the setup file the new file name will be displayed in the title bar of the client window With t...

Page 40: ...rsion AESetup 4 4 Menu Setup 4 4 1 Edit Via the menu item Setup Editieren you reach the domain of the DatafoxStudioIV where you can edit a setup You can find a more detailed description of the procedure in chapter 5 Note By double clicking on the white surface of the window this menu order is carried out as well 4 4 2 Import lists Achtung All lists must be provided with the sign coding ISO 8859 1 ...

Page 41: ...saved You can define if an existing file should be over written or if the data shall be added to the file Furthermore you can set the output format and define if and how field names should be used in the data files in order to be able to identify the field values more easily Figure 25 Configuration of the data storage Caution If you read out data from several terminals and want to unite them into ...

Page 42: ...t is important that this is done before the firmware update otherwise the wrong firmware wrong access series could be installed Before transmitting the Einstellungen 3 for the com munication kind of communication timeout etc should be checked If all settings are correct the update can be started via the button Update 4 Figure 26 Firmware update dialogue Caution Please note at all costs the informa...

Page 43: ...update with direct connection to a PC Therefore it is possible to transmit data to the device or read them from the device via a modem connection 1 2 3 4 5 Figure 27 Device maintenance via modem connection All settings to take here except for the PIN and phone number refer to the configuration of the modem at you PC That means the external modem at the terminal has already to be configured for suc...

Page 44: ... read from the device and written into the ini file Write GPRS configuration data Select the configuration file GPRS ini that contains the desired settings via the button 5 Read write system variables for signal processing A selection dialogue opens where you can select the desired system variables of the digital inputs and then read or write them See chapter 4 5 9 Import and load Timeboy lists Th...

Page 45: ...ated now a new linguistic file for the firmware with the ending dfl If you have generated a new file the right side of the list is empty Figure 29 User Text Datendatei Erstellen bzw Öffnen Innerhalb der Liste arbeiten Sie nur mit einfachen Mausklicks KEINE Doppelklicks Selectieren Sie mit einem einfachen Klick eine Zeile aus der Liste Version 04 01 07 00 Page 45 www datafox de ...

Page 46: ...V Basic Figure 30 Zeile auswählen With the next single click in the column of user description or user message you put the cursor in this field Figure 31 Zelle zum Bearbeiten auswählen Version 04 01 07 00 Page 46 www datafox de ...

Page 47: ...he column default description is taken over Figure 33 Änderungen übernehmen You can change this text now in the column user description To transfer user to text data they store all changes It is available to you a full text search Give the text and choose the column which you would like to search for the text Version 04 01 07 00 Page 47 www datafox de ...

Page 48: ... are managed via the DatafoxStudioIV Pay particularly attention to the IP address of the device to which you want trans mit the setup The device is only ready for operation with a com pletely transmitted setup If the transmission is aborted early the device cannot be put into oper ation In this case a possibly existing disturbance source has to be eliminated and the transmission must be repeated F...

Page 49: ...meboy lists via the function Kommunikation Timeboylisten importieren und laden Here at first you select the path to the desired Timeboy setup 1 and then the path to the Timeboy lists 2 The lists whose information matches the list description of the Timeboy setup are displayed now 3 You can define the Group ID 4 via the additional parameters and thus assign the special lists e g for certain fields ...

Page 50: ... Talk is advisable Please not chapter 2 3 2 The respective formats and options for the filing of data in the ASCII file are set via Setup Dateiablage konfigurieren as described in chapter 4 4 3 Caution In a network the option Add data to file if this file already exists has to be activated Otherwise at the download the data are overwritten by the following devices and only the data from the last d...

Page 51: ... current date in the file prefix you create a history of the data backup The date in the form yymmdd e g PZE MIV 02 060514 would result in a chronological ordered back up of the files If a file is newly selected or created a query appears whether you want to use this file as standard filing for the data After opening the file a dialogue for reading out the data records appears Via this dialogue th...

Page 52: ...n Nachricht senden In the DatafoxStudioIV this function is used for example to point out the transmission of new data to the user e g in order to prepare for the transmission of an updated setup As shown in the figure the text that is to be set consists of two headers a title and the message Figure 38 Send a message 4 5 8 Read global variables Via the function Read global variable you can check wh...

Page 53: ...r Signalverarbeitung By clicking on Read you can read out the counter divisor timeouts and cycles of the digital inputs Then you can change the information by ticking it and apply it to the device firmware by clicking on Write You should note that if the value of a system vari able is set on 0 the settings from the setup of the PZE MasterIV Basic are used Otherwise the entered value Figure 41 Dial...

Page 54: ... opened the right setup an error in the list processing occurs All other options are executed faultless Figure 42 Work through batches 4 5 11 Device configuration BIOS The function Kommunikation Ger atekonfiguration Bios is relevant for Datafox devices that have no display For this reason this function will not be explained here further 4 5 12 Settings Via the function Kommunikation Einstellungen ...

Page 55: ...tion if no data arrive have to be set Figure 43 Settings of the RS232 communication For a communication via a RS485 converter in addition to the information of the RS232 communication you have to set if one or several devices should be activated For a communication with only one device the bus number of the device is set Several devices can only be activated in a consecutive order of bus numbers s...

Page 56: ... TCP IP the parameter have to be set and addi tionally it has to be set if one or several devices should be activated For a communication with only one device the bus number of the device is selected Several devices can only be activated in a consecutive order of bus numbers starting with bus number 1 and by giving the bus number of the last device Figure 46 Settings of the TCP IP communication vi...

Page 57: ...nu Extra Note You can and should check all displayed communication parameters at each dialogue that opens with one of the following function calls and adjust them via the button Settings if necessary Version 04 01 07 00 Page 57 www datafox de ...

Page 58: ...setup structure should be planned Only a few steps are necessary to do that If you do the preparations carefully you can create the setup very fast On the graphic you can see the connections between parameterisation and result data You may find secondary project support in the form of models on the Datafox CD Figure 47 System relations Version 04 01 07 00 Page 58 www datafox de ...

Page 59: ...ps or jumps labels necessary Are global variables necessary Are depending lists necessary E g projects with specific occupations if the project is selected only the appropriate occupations can be chosen Should the device switch off automatically after entering a data record Note If the tree structure is very large it might be arduous to open all the structures by clicking on it with the mouse By u...

Page 60: ...ettings of the device can be defined 1 2 3 Activating the online operation is combined with a wait input lock after each input booking record for the set period of time in ms Under Device settings the display and the acoustics are defined In order to secure the configuration you can set up a password for the system menu BIOS see chapter 3 5 1 Bios Figure 48 Basic settings depending on the device T...

Page 61: ...nd how much for lists 5 2 2 Global variables Global variables are used as buffers within the device and do not depend on a data type That way it is possible to transmit values created within an input chain to another input chain for reprocessing At most 8 global variables can be defined in the PZE MasterIV Basic Already while defining the global variables can be preallocated with values in the bas...

Page 62: ...cters are inadmissible Figure 50 Setting of global variables data formats are set in advance Note When you transmit a new setup it is possible to delete global variables and their values In order to do this you have to activate the appropriate option If you want to reset one or all GVs to a defined value e g at clocking off you have to create an input chain with the appropriate fields Use the func...

Page 63: ...ponder Frequency Type Module Fields on the transponder Comment 125 KHz Unique TMR33 ProxLine MCR PHG Voxio oder Relino Switch over in DatafoxStudioIV Fixed 13 digit number Only reading possible 125 KHz Hitag1 64 segments each 4 byte 0 Fixed number only reading 1 to 31 Passwords 32 to 63 available The available segments can be used e g to save a firm identification a card number an account for cant...

Page 64: ...48 125 kHz TSR32 HitagS H56 125 kHz TSR32 Titan EM 4450 125 kHz TSR30 TSR32 Table 8 Transponder write TMR33 supported by GIS Unique Serial number Hitag1 max 3 segments Hitag S H32 max 1 segments Hitag S H48 max 3 segments Hitag S H56 max 3 segments Hitag2 max 3 segments EM4450 max 3 segments Please note the following when using Mifare The value format is not supported You can only read the data fo...

Page 65: ...or concurrent processing You can select them in the DatafoxS tudioIV under Transponder via the segment number Via the filing format you set how the 32bit value is used When you select Fixed length the read card value is cut to the set number of digits and is filled up with zeros 0 left sided if necessary Figure 53 Hitag1 transponder For the writing of the cards an initial value per each segment ca...

Page 66: ...You can activate the option Autoincrement value behind the current initial value Then the current segment value is increased by the value indicated under Autoincrement value after every write operation The initial values of the segments can be edited in the device BIOS The set autoincrement value is only displayed in the device BIOS and cannot be changed on the device itself The writing of cards c...

Page 67: ...find the serial number in segment 32 For the writing of the cards an initial value per each segment can be set You can activate the option Autoincrement value behind the current initial value Then the current segment value is increased by the value indicated under Autoincrement value after every write operation The initial values of the segments can be edited in the device BIOS The set autoincreme...

Page 68: ...he Access Conditions Bits of the sector trailer in the BIOS menu are logged For the ASCII format the value with the given length is written on the card a zero termination is not written on the card If there are any zeros within the given length they are written on the card For the ASCII format the value with the given length is read from the card a zero termination is added after the given length ...

Page 69: ...block format and the access rights of the block of a sector The Value format is not supported by the firmware but this can be set optionally You should pay special attention to the Access Condition B3 because the settings of the sector Trailer cannot be changed afterwards it is write protected then If you are not sure you should use the default settings of the producer Caution The Access Condition...

Page 70: ... 1 and a data range for fingerprint in the sectors 2 to 10 The range for the ID number uses the password group 1 with key A reading key and key B writing key the range for the finger print uses the password group 2 also with key A reading key and key B writ ing key In that case the ACBs have to be changed Figure 60 Example of a card The ACBs Access Condition Bits should have a value of 78778869 Fi...

Page 71: ... and writing key Via the transponder menu the card can be set newly but the formatting sec tor has to be activated The ID can be set via Write data on card the field Finger print via Fingerprint sector trailer Now the card possesses different reading and writing passwords for fingerprint and ID that are only known to you and the ter minal Figure 62 Password definition Version 04 01 07 00 Page 71 w...

Page 72: ...The page Expanded has the same structure as the one for field function Normal 5 2 3 2 5 Transponder menu The transponder menu is different only on the register card Mifare The function Formatting sector was added to the hitherto existing functions menu items The activation of this new function causes that a card with key Ax and key Bx and its current ACBs is overwritten with the values of key A an...

Page 73: ... 0 and further available segments You may find information about number size and function in table 6 There is the possibility to use different segments So you have several possibilities to use them with PZE and ZK In the following you may find 2 examples for the possible use of PZE and ZK as well as the advantages and disadvantages Note You recommend the safer method with lists in the terminal Whe...

Page 74: ... permanent staff lists as standard with Unique Advantages The process is absolute safe because the well defined serial number is used The setup does not need to be adjusted to each costumer i e the same setup can be used for various projects costumers The cards do not need to be programmed All free fields are available for other uses canteen drinks dispenser firm equipment etc While bookings are c...

Page 75: ...ating new data record descriptions under the element Data records please proceed as follows Select the element Data records in the tree structure it is highlighted in blue then Via the button Paste a new data record description is created the tree structure is expanded to a new entry If several data records exist you can set the position of the new data record via the button Paste between Figure 6...

Page 76: ...sible per each list description Numeric character fields and ASCII fields with a firmware release smaller than 04 01 03 are limited to 20 characters the following firmware versions can save up to 40 characters in the fields The total length of a data record is limited to 242 byte At most 20 list descriptions can be created Creating and defining list descriptions with data fields is carried out ana...

Page 77: ...be available as ASCII file or as text file Note If you want to import a list as txt file the beginning of the file has to correspond to the name of the list description in the setup If they do not correspond the txt file is not identified as list In order to differentiate several lists you can expand the file name e g list description in the setup is Gehtgrund and the name of the list file is Geht...

Page 78: ...nd to transmit the lists again to the device together with the setup after editing a setup 5 2 6 Creating a user guidance The creating and editing of the user guidance operation of the PZE MasterIV Basic is carried out analogously to the creating and editing of data records and lists At first you create the elements via Paste or rather Paste between Then you edit the details of the elements select...

Page 79: ...ut chains can be created optionally In the structure depth at most two submenus can be created i e main menu menu item submenu 1 submenu item 1 submenu 2 submenu item 2 input chain 1 with fields input chain 2 As explained above a menu item represents a booking record For this reason it is possible to create a password for each menu item in addition to its displayed text This password protects agai...

Page 80: ...er to do this you have to tick off 4 If this option is activated you can return to the beginning of the input chain by pressing the ESC without saving the data The reaction 5 of the device can be set depending on the ENTER ESC key You can define for each key where the device jumps to after keypress Possible jump targets are the menu and the data fields of the input chains That way loops can be cre...

Page 81: ...rd description field description according to the data record description Figure 73 Defining input chain fields Via the top line on the display further information can be provided to the user see also chapter 5 2 6 2 You have to select from the name of the input field and all defined GVs 2 displayed with their values DThe value written on this field while entering can be copied to a GV In order to...

Page 82: ... by position in form of a confirmation is pasted see also the notes in the caution box in chapter 5 2 6 2 Copy global variable to field The value of the current global variable is copied into this field Copy field into global variable Apply serial number 10 digit number Apply analogous measurement Apply digital measurement 16 digit number Apply counter reading Apply function value Apply threshold ...

Page 83: ...Via the item Field to be selected from 2 the display is set You set which data are saved via the item Field to be saved or rather Field to be compared with bar code 3 Figure 74 List selection Depending on the chosen method further settings might be necessary 1 Simple list selection by scrolling arrow keys and selection via ENTER This method is suited to the manual selection of failure reasons etc ...

Page 84: ...e PZE mode 2 is activated via the time zones b Via the option Skip input field the input field is skipped and no data record field is filled The input chain is not interrupted here c Via the option Display all inputs the user gets the possibility to select an input from the list manually by scrolling arrow keys 5 2 6 5 Expanded Often several information are logged in a bar code or transponder to r...

Page 85: ...6 Reaction on list selection If you tick off Return necessary for confirmation the list is displayed until a selection is made in case of a list selection no tick Timeout 0 The first found list input is applied without being displayed Please be careful in this case no tick Timeout 0 The list is displayed You can select a list input by scrolling and apply it via ENTER If no acceptance occurs via EN...

Page 86: ...can jump back field by field via ESC A jump target is also precondition to terminate a loop That way it is possible to define also complicated processes Figure 76 Defining jumps Various loops can be created in form of different input chains The PZE mode also corresponds to a loop which is always run through from the beginning By comparing the input with a given string or with the content of a glob...

Page 87: ...stop timer or automatically after starting the PZE MasterIV Basic An input chain can be as signed to each timer It is called up after the time out was reached and then if set cyclically Figure 78 Setting of timers 5 2 7 3 Setting of timers 5 2 8 Mathematical operations The mathematical operator can carry out addition subtraction comparison equal not equal greater less than and negation No The oper...

Page 88: ...can be convert between hexadecimal strings and dezimal strings or between dezimal strings and hexadecimal strings You can set a mask of zero sign to get a constant length of string The maximum mask length is 16 characters The max resolution of operands is 8 Byte 64bit Example Value in GV 0000290A should be convert to a dezimal value 9994 with a mask of 00000000 The result is 00009994 5 3 Creating ...

Page 89: ...meout value can remain on the default values in this case But you should check the concurrence of the settings via the system menu BIOS of the PZE MasterIV under communication If they are not concurrent you have to adapt the parameters via terminal or DatafoxStudioIV Confirm all changes via OK Figure 80 Setting of the device type and the communication parameters Via Datei Speichern unter you can s...

Page 90: ...n in chapter 5 2 1 You set the operating mode to PZE Mode 2 and define if re quired the time zones The timeout for key shift and the time for anti repeat lock for bookings is set to 10 seconds The duration of the field function Confirmation is set to 5 seconds Figure 81 Basic settings of the device setup Version 04 01 07 00 Page 90 www datafox de ...

Page 91: ...tion of global variables In this example you use a transponder of the type Unique The card number is 40bit 5 Byte with the filing format Decimal at most 13 digits Figure 83 Transponder selection 5 3 1 3 Creating the data record description In order to create a data record description you should exactly know which data have to be created Example While a PZE booking record a data record should be cr...

Page 92: ...time The dialogue for editing the setup is opened via a double click on the client range of the DatafoxS tudioIV or via Setup Editieren Mark the input Data records on the left side of the tree and then click on Paste Under Data records an entry Datensatz1 is created Mark this entry and you can edit its characteristics on the right side Please enter the name PZE booking there and mark the entry aga...

Page 93: ... setting which data shall be created you have to consider which information are necessary for that purpose All staff members are provided with name and card number in the permanent staff list The possible short business trips with identification and designation must also be provided via a list These two lists are defined in the Studio appropri ately For this mark the entry Lists in the tree of the...

Page 94: ...r e g Microsoft Editor and saved with the appropriate name as a txt Another possibility is the creating of lists via an own software The fields of the lists are separated via a tabulator Comment lines start with a semicolon Liste Personalstamm PID Name Status 1234567890123 Arbeiter1 0 1212121212123 Arbeiter2 0 2525252525250 Arbeiter3 1 Liste Dienstgang Kennung Bezeichnung 1 Arbeitsbeginn 2 Arbeits...

Page 95: ...r bar code can be an input For this you have decide at first which booking records shall be carried out In our example a staff mem ber shall carry out an Entry booking at clocking on an Exit booking at clocking off and an Entry Exit booking for a short business trip while working time So you have to create 3 booking records At first you have to create the main menu The display text can be defined ...

Page 96: ...ey the booking record is initialized Figure 90 Creating an input chain The input chain can be configured on the right side Entering a name Entry and assigning a data record description which data record shall be cre ated In our example you assign PZE booking Confirming the input is not necessary because the booking record shall be automated The following two options are also unnecessary in our exa...

Page 97: ... next field and name it Read card Set the field ID as field description according to the data record description Select the field function Normal value transmission via transponder At last you have to select the variable GV_PID under Write value on global variable to buffer the read ID Figure 93 Configuration of the input Card please On the page Expanded transponder as permitted input source has t...

Page 98: ...rom list You want to save the read value on the global variable Status so you have to set the appropriate settings Figure 96 Configuration of the input Read status On the register card List selection you have to set the following settings The list to be selected from is the permanent staff list The field to be selected from is Status and the field to be saved on the global variable Status is also ...

Page 99: ...ndant for inequality In case of inequality you have to set a jump target under Branch to Because the person is authorized to carry out bookings you branch to Date_Time and skip the error message already attendant that way Figure 99 Jump characteristics of Read status The fourth field is our error message in case of a double Entry booking Here you have to select a significant name because this is t...

Page 100: ... activate the option Compare with global variable and compare with the GV attendant But this time compare for equality In case of a positive comparison you set Menue under Branch to That way creating a data record is avoided Figure 102 Jump characteristics of Already attendant The next data field is named Date_Time Select the field function Current date_time Then the field description switches to ...

Page 101: ...ist whose data shall be displayed in this case it is Desig nation The information of this field shall also be saved In order to carry out the list selection you use the value of the GV Start Then you compare this value with each value of the list field Identifi cation The other settings can be applied without any changing Figure 105 List selection of Reason On the register card Expanded you deacti...

Page 102: ...he other settings can be applied Figure 108 Configuration of the input Good morning Open the register card List selection now and set the permanent staff list as list to be selected from The field to be saved selected from is our list field Name The first field for selection is the GV PID You want to compare this variable with all PIDs of the list Therefore you set PID as first selection field of ...

Page 103: ...ettings of Good morning On this register card all settings are applied Figure 111 Jump characteristics of Good morning Out last input chain field is named Write status Here you need the field function Write list field Set the GV attendant indicating the attendance under Write value of global variable on list field Figure 112 Configuration of the input Write status Version 04 01 07 00 Page 103 www ...

Page 104: ...al variable GV PID You want to com pare this value with all PIDs of the list Therefore you set PID as first selection field of list Personal stamm Figure 113 List selection of Write status On the register card Expanded you deactivate transponder and Return necessary for confirma tion The time for fading out automatically is set to 1 second Figure 114 Expanded settings of Write status Because you d...

Page 105: ...arried out when configuring the input chain Entry Therefore in the following only the differing steps are explained On the input chain field Identification you do not set En but Ex Exit Figure 116 Differing settings of Identification You compare with the GV absent on the input chain field Read status Figure 117 Differing settings of Read status Version 04 01 07 00 Page 105 www datafox de ...

Page 106: ... GV attendant Figure 118 Differing settings of Not attendant Under List selection of Reason you have to set GV Stop instead of GV Start as first field for selec tion Figure 119 Differing settings of the list selection of Reason Under Write status you write the GV absent on the list field Figure 120 Differing settings of Write status Version 04 01 07 00 Page 106 www datafox de ...

Page 107: ...om a list and to be confirmed via ENTER within one booking process At first you paste a submenu under F3 Short business trip The display text can be defined freely In our example you enter Exit Entry for line 3 and With reason for line 4 Figure 121 Creating a submenu Add 2 menu items to this submenu Menu item 1 is named Entry and menu item 2 is named Exit Create an input chain within each menu ite...

Page 108: ...hrough all the steps the setup is finished now In order to check the booking records setup and lists have to be transmitted to the terminal of the PZE MasterIV Basic Connect the device terminal to the PC according to the selected communication type see figure 43 Make sure that the PC interface is configured correctly e g the baud rate number of data bits parity and stop bits of the COM interface h...

Page 109: ... of the transmis sion is indicated by a message you have to confirm via OK Figure 125 Transmitting the setup to the device At last you can transmit lists to the device via Kommunikation Listen laden In addi tion you can set there which lists shall be trans mitted The progress bar indicates that data are transmitted to the device A successful conclusion of the transmission is indicated by a message...

Reviews: