background image

Datacard CE870 User Reference Guide


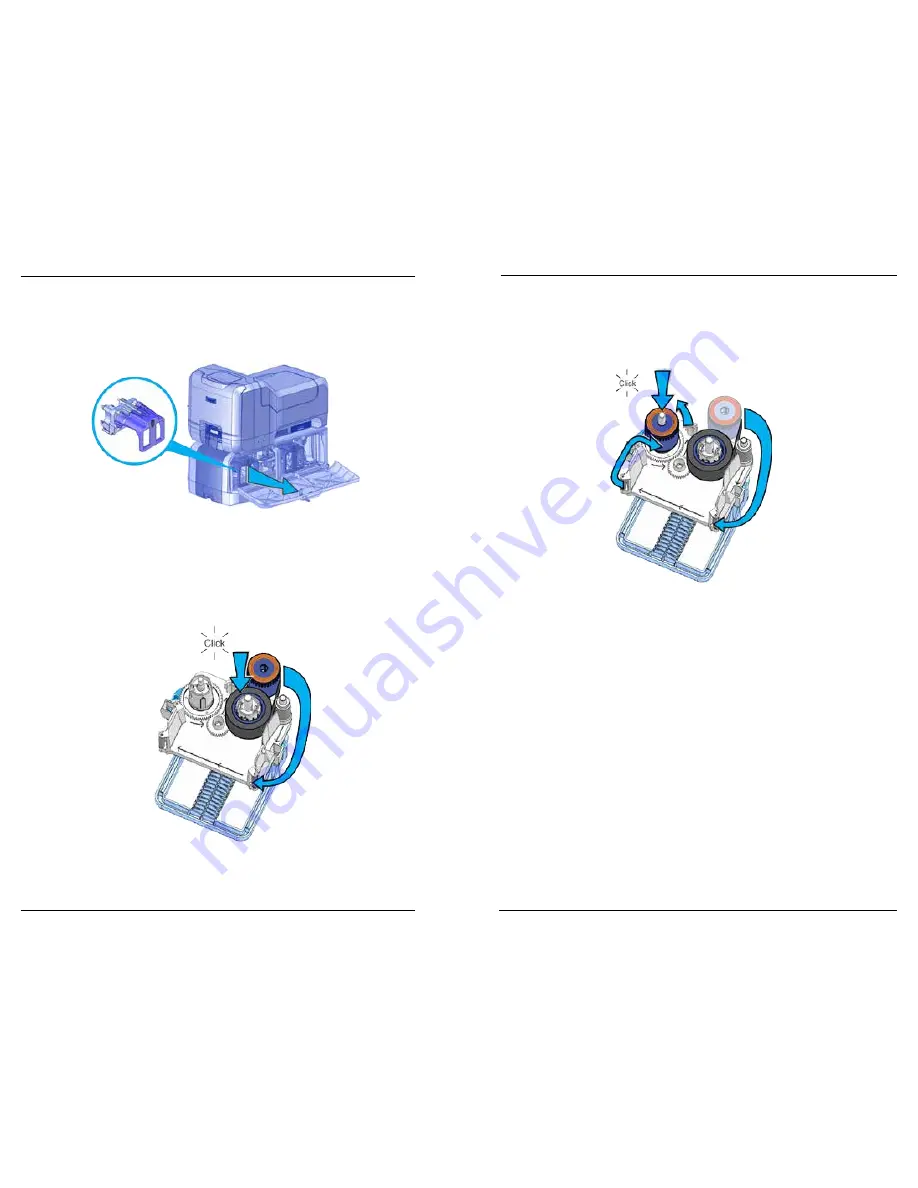
Load the Topping Foil

 17

16

Load the Topping Foil

1.  Unlock and open the embosser supplies door.
2.  Remove the topping foil cartridge and place it on a flat surface with the 

spindles facing up.

3.  Remove the new topping foil from its package.
4.  Match the keyed pattern of the blue supply spool hub with the right side 

spindle.

5.  Push the supply spool into the spindle until it clicks securely into place. 
6.  Roll out and route the foil around the cartridge rollers. Follow the diagram on 

the topping foil cartridge.

7.  Match the keyed pattern of the silver take-up spool hub with the left side 

spindle.

8.  Push the take-up spool into the spindle until it clicks securely into place.
9.  Turn the take-up spool counterclockwise one full turn to eliminate slack. 

10.  Replace the topping foil cartridge.

i. 

Align the cartridge with the guides inside the embosser.

ii.  Slide the cartridge in until it clicks and stops.

11.  Close and lock the embosser supplies door.

Summary of Contents for CE870

Page 1: ...Datacard CE870 Instant Issuance System User Reference Guide September 2015 527488 001 Rev A Single Hopper Printer Multi Hopper Printer...

Page 2: ...per shutdown 9 Clean the Printer 10 Prepare the Printer for Cleaning 10 Clean the Printer 11 Clean the Multi Hopper Rollers 12 Load Cards 13 Load the Indent Ribbon 14 Load the Topping Foil 16 Load the...

Page 3: ...c stripe data written to the card 1 Use magnetic stripe cards that match the printer settings 2 Make sure that the cards are placed in the printer correctly 3 Press the USER button on the printer and...

Page 4: ...eject card tray 3 Close and lock the embosser The reject card tray holds five cards Empty it regularly Refer to Empty the Reject Card Tray on page 20 for more information 134 Indent ribbon low Cause T...

Page 5: ...rmation 150 Print while unlocked Cause The printer is unlocked The card will be canceled Make sure that all access doors are closed and locked securely Refer to Close the Printer Doors on page 21 for...

Page 6: ...e the ribbon cartridge and close the swingarm 5 Open the input hopper and remove unprinted cards 6 Remove the cleaning card from its package 7 Load the cleaning card s in the input hopper s 8 Close th...

Page 7: ...ISO magnetic stripe cards with the stripe facing down and to the right Insert smart cards with the chip facing up and toward the back of the hopper Note A diagram inside the hoppers shows the correct...

Page 8: ...he blue supply spool 6 Roll up one full turn of indent ribbon on the silver take up spool 7 Roll out a slack length of indent ribbon from the supply spool 8 Route the ribbon around cartridge rollers F...

Page 9: ...he spindle until it clicks securely into place 6 Roll out and route the foil around the cartridge rollers Follow the diagram on the topping foil cartridge 7 Match the keyed pattern of the silver take...

Page 10: ...e cleaning sleeve Refer to Replace the Cleaning Sleeve on page 19 8 Replace the print ribbon cartridge 9 Close the printer swingarm and close the supplies door on the multi hopper and lock the printer...

Page 11: ...rd tray Close the Printer Doors The printer cannot process cards while any access doors are open Make sure that all printer and embosser doors are closed and locked Note Press down on the cover ridges...

Page 12: ...s Make sure that all power cables are securely connected Printer Power Connections Embosser Power Connections Check Data Connections Make sure that all data cables are securely connected Network Conne...

Page 13: ...1187 Park Place Shakopee Minnesota 55379 952 933 1223 952 933 7971 Fax www datacard com id 2015 Entrust Datacard Corporation All rights reserved September 2015 527488 001 Rev A...

Reviews: