background image

Recording your SCSI configuration

3-14

014–002250–01

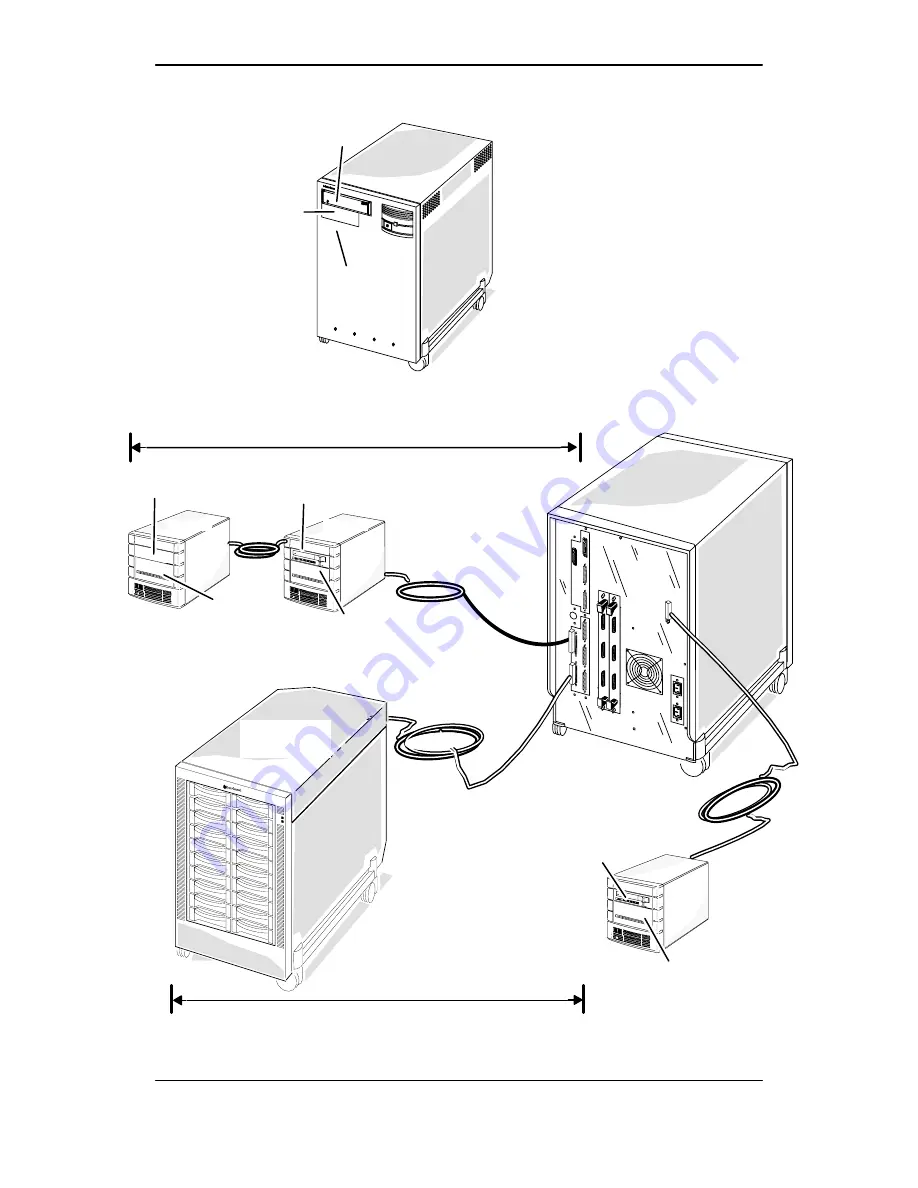
Internal

CD ROM drive

SCSI ID 3

Internal

disk drive

SCSI ID 0

Internal

DAT drive

SCSI ID 4

AViiON 5500
(front view)

CLARiiON disk

array storage

system

Tape drive

SCSI ID 4

Disk drive
SCSI ID 0

Disk drive
SCSI ID 1

Disk drive
SCSI ID 2

Singled–ended expansion bus < 6 m (19.65 feet)

5 ft.

5 ft.

2.75 ft.

2.75 ft.

Differential expansion bus < 25 m (82 feet)

QIC tape

drive

SCSI ID 5

Disk drive
SCSI ID 1

AViiON 5500
(rear view)

Integrated bus < 6 m (19.65 feet)

Figure 3–4

Sample SCSI configuration

Summary of Contents for AViiON 5500 Series

Page 1: ...P R O D U C T L I N E Installing Expanding and Maintaining AViiON 5500 and 550 Series Computers 014 002250 01 Customer Documentation...

Page 2: ......

Page 3: ...ng and Maintaining AViiON 5500 and 550 Series Computers 014 002250 01 Copyright Data General Corporation 1993 1994 All Rights Reserved Printed in the United States of America Rev 01 February 1994 Orde...

Page 4: ...OXI SWAT TRENDVIEW and WALKABOUT are U S registered trademarks of Data General Corporation and AOSMAGIC AOS VSMAGIC AROSE PC ArrayGUIde ArrayPlus AV Image AV Imagizer Toolkit AV SysScope BaseLink Busi...

Page 5: ...ges or modifications to this unit not expressly approved by the party responsible for compliance could void the user s authority to operate the equipment This device complies with Part 15 of the FCC r...

Page 6: ......

Page 7: ...sets up and maintains AViiON computer system hardware Although it addresses readers with some computer hardware experience you do not need specific knowledge of AViiON or RISC based computer technolog...

Page 8: ...refers to Chapter 4 for prerequisite information Appendix A Lists physical environmental and electrical specifications for base hardware and optional components Appendix B Provides a list of Customer...

Page 9: ...wer up and maintain the Model 6690 CD ROM drive Installing and Operating the Model 6691 Stand Alone Cartridge Tape Drive 014 002158 Describes how to install and operate the Model 6691 stand alone cart...

Page 10: ...the curved arrow symbol for the New Line key A format line shows how to structure a command it shows the variables that must be supplied and the available options A syntax line is a fragment of progra...

Page 11: ...touch with a member of Data General s telephone assistance staff who can answer your questions For telephone assistance outside the United States or Canada ask your Data General sales representative...

Page 12: ...Joining our users group x 014 002250 01...

Page 13: ...ON 550 2 4 Connecting the keyboard AViiON 550 2 6 Connecting the mouse AViiON 550 2 7 Connecting a local area network cable 2 8 Connecting an AV Alert modem AViiON 5500 and other asynchronous serial d...

Page 14: ...omputer unit 4 7 Removing the chassis cover 4 7 Installing the chassis cover 4 10 Chapter 5 Adding or replacing internal mass storage devices Mass storage device locations 5 1 Removing a drive assembl...

Page 15: ...s A 2 Expansion CPU complex board optional A 3 Expansion input output board optional A 3 Graphics controller board AViiON 550 series A 3 VMEbus backplane and options A 4 Integrated I O connectors and...

Page 16: ...ault device names 3 7 6 1 AViiON 5500 and 550 series ECC memory modules 6 1 6 2 Valid configurations of 4 16 and 32 megabyte memory modules 6 4 A 1 Asynchronous port signals A 5 A 2 Synchronous SYNC p...

Page 17: ...orts 2 11 2 9 Connecting a synchronous device to the computer unit 2 13 2 10 Connecting a parallel printer to the computer unit 2 14 2 11 VMEbus card cage 2 15 2 12 Installing the SCSI bus terminator...

Page 18: ...PU expansion board screws 7 2 7 3 Installing a CPU expansion board 7 4 7 4 Securing CPU expansion boards to the system board 7 4 7 5 Location of external I O option slots 7 6 7 6 Releasing the I O exp...

Page 19: ...g cables into the system board 8 13 9 1 Removing the fan assembly power cable 9 1 9 2 Releasing the fan assembly from the computer unit 9 2 9 3 Installing the fan assembly 9 3 9 4 Plugging the fan ass...

Page 20: ...signals A 6 A 3 Printer connector pin numbering and cable signal routing A 7 A 4 LAN connector pin numbering A 8 A 5 SCSI connector position numbers A 9 A 6 SCSI expansion bus connector position numbe...

Page 21: ...variety of configurations AViiON 5500 series computers function primarily as the basis of multiuser or server systems AViiON 550 workstations add graphics options to the same basic computer system Fig...

Page 22: ...etwork LAN interface compatible with thin or thick Ethernet networks transceiver not included Three asynchronous RS 232 C communications ports One integrated RS 232 C port for synchronous communicatio...

Page 23: ...r distributed data interface LAN controller D VSC 3i Three line VME synchronous controller RS232 RS422 X 25 D VAC 16 VME Asynchronous Controller that provides as many as 16 ports for asynchronous devi...

Page 24: ...identifies the position and SCSI ID of your internal drives External mass storage options The SCSI bus connector s on the computer unit rear panel allow you to connect external SCSI based mass storag...

Page 25: ...5 25 inch diskette drive D 600 Mbyte CD ROM disk drive D 4 mm digital audio tape DAT drive Stand alone drives In addition to drives installed in a storage subsystem you may also have stand alone desk...

Page 26: ...how to connect the graphics display to the computer Brightness Contrast Degauss Monitor Brightness and Degauss Switch Figure 1 2 Color graphics monitor and controls IMPORTANT Over time the monitor scr...

Page 27: ...position ABORT sends a CPU interrupt without resetting hardware the result is software dependent Consult your system software documentation LED Power switch Computer unit front Computer unit back Abor...

Page 28: ...ut output data via an asynchronous interface for a third asynchronous device SYNC Couples input output data via a synchronous interface LAN Couples input output data via an Ethernet local area network...

Page 29: ...A OP CON Synchronous device connector SYNC Integrated SCSI bus connector Terminator or external cable must be installed Computer unit power connector AV Alert modem connector RS232 B SERVICE Parallel...

Page 30: ...t asynchronous serial device connector OP CON RS 232 A Synchronous serial device connector SYNC Computer unit power cord connector NOT USED Second asynchronous serial device connector SERVICE RS 232 B...

Page 31: ...em console storage units and communications devices D A reserved telephone line for AV Alert Service support AViiON 5500 D A desk or cleared work surface to position peripherals at a comfortable heigh...

Page 32: ...ment contact Data General as described in the Preface 3 Verify that the voltage for the power cords you received is appropriate for your site by examining their model numbers as seen in Table 1 3 Tabl...

Page 33: ...slip then create a cable inventory for your system Cables may be together in one accessories box or packaged separately with the device Table 1 5 lists those cables for both AViiON 5500 and 550 series...

Page 34: ...32 male to male DB25 to DB25 10 ft 005 36256 15369E010 AViiON 5500 only j Graphics monitor 6 ft 13W 3 pin to 3 BNC 118 17552 Cable Description Part Model Illustration AViiON 550 only j Keyboard G6488...

Page 35: ...005 36256 15369E010 j 15 ft EIA RS 232 005 36257 15369E015 j 25 ft EIA RS 232 005 36258 15369E025 DB25 male to DB25 male DB25 male to 36 position CHAMP DB25 male to DB25 male DB25 male to DB25 male Pa...

Page 36: ...izes what you need to set up and start your computer system for the first time Your software Release Notices itemize the documentation and media necessary to complete the installation of software pack...

Page 37: ...roceed with this chapter to begin your system installation In many cases this chapter describes all the hardware installation procedures you need in order to set up and install your entire system Wher...

Page 38: ...nal as the system console for an AViiON 550 workstation instead of the graphics monitor and keyboard you must disconnect the graphics keyboard from its computer unit connector and connect the terminal...

Page 39: ...your firmware and the DG UX operating system require that your system console have the following characteristics 9600 baud 8 data bits no parity ANSI character set Set the terminal to select these ch...

Page 40: ...r cord Complete the following steps to connect the graphics monitor 1 Place the monitor on top of your work surface Make sure that the monitor power switch is in the off position as shown in Figure 2...

Page 41: ...ock them in place 3 Plug the holes in the other end of the monitor cable into the graphics board connector pins on the back of the computer unit Figure 2 3 shows the 8 bit graphics controller base con...

Page 42: ...nit Reverse the order of these instructions to remove a faulty keyboard in order to replace it 1 Position the computer unit so that you have access to the rear panel connectors 2 Place the keyboard on...

Page 43: ...Reverse the order of these instructions to remove a faulty mouse in order to replace it 1 Position the computer unit so that you have access to the rear panel connectors 2 Align the holes in the mous...

Page 44: ...RTANT Your AViiON 550 or 5500 series system may include optional VME LAN controllers installed in the rear panel VME card cage Refer to Setting Up and Installing VMEbus Options in AViiON Systems for i...

Page 45: ...can pass through as seen in Figure 2 7 B Then push the cable firmly into the connector 3 Once the cable and clip mounts are secured to the connector slide the clip down using a screwdriver or a compa...

Page 46: ...ed to support a DG UX terminal On systems running the DG UX operating system the system console OP CON port RS 232 A is factory enabled for devices requiring Data Carrier Detect DCD signal transmissio...

Page 47: ...f the computer unit as seen in Figure 2 8 IMPORTANT On AViiON 5500 systems the SERVICE port is reserved for an AV Alert modem and the OP CON port is reserved for the system console AViiON 550 workstat...

Page 48: ...onous ports prior to shipment 2400 baud 8 data bits No parity IMPORTANT If you need to change the default characteristics refer to the manual Operating AViiON 5500 and 550 Series Systems for informati...

Page 49: ...to connect your device to the computer unit rear panel Reverse the order of these steps to remove or replace the synchronous device 1 Plug one end of the synchronous communication cable into the SYNC...

Page 50: ...rder of these steps to remove or replace the printer cable 1 Plug the 25 pin end of the printer cable into the parallel printer connector on the back of the computer unit as shown in Figure 2 10 Attac...

Page 51: ...Setting UP and Installing VMEbus Options in AViiON Systems for information on connecting external devices to your system s VMEbus option boards Computer Unit Rear Panel VMEbus card cage Figure 2 11 V...

Page 52: ...g subsection Your internal tape and disk drives will not operate correctly unless the bus is properly terminated IMPORTANT In most cases your computer is shipped with the internal SCSI bus terminator...

Page 53: ...ORTANT With external devices installed the SCSI bus speed must be configured for SLOW operation For guidelines on setting up and configuring a SCSI bus or to connect devices to an expansion SCSI bus r...

Page 54: ...of your P S style cable in the rear panel integrated SCSI connector as seen in Figure 2 13 Computer Unit Rear Panel Figure 2 13 Connecting external cabling to the internal SCSI bus connector 4 Secure...

Page 55: ...teps to disconnect the computer unit power cord 1 Locate the computer unit power cord It shipped with the computer unit Refer to Table 1 3 in Chapter 1 to be sure you are using a cord with proper volt...

Page 56: ...ers to D ensure that your computer system starts properly D become familiar with powerup procedures D verify that the computer system hardware passes all powerup diagnostic tests Or you can Proceed di...

Page 57: ...ternal SCSI storage subsystems or stand alone SCSI devices you probably do not need the information in this chapter However you do need to terminate the internal SCSI bus at the computer unit as descr...

Page 58: ...er on the system board This bus is set to a single ended interface by default it supports internal drives plus optionally a limited number of external drives Your system may also include one or two op...

Page 59: ...ller is factory specified as Controller 0 system software knows the controller by its device name ncsc 0 The optional SCSI buses are factory specified as Controller 1 and Controller 2 first expansion...

Page 60: ...st be SLOW You view or set the SCSI bus speed using an SCM System Control Monitor configuration menu Refer to the manual Operating AViiON 5500 and 550 Series Computers for instructions Calculating SCS...

Page 61: ...The controller ID parameter is used in configurations where a SCSI bus is shared by more than one host or dual initiated Refer to your Operating manual for information about a dual initiated SCSI bus...

Page 62: ...0 to the system root disk Unless you manually change the automatic boot path this disk will boot automatically when you power up the computer system Default SCSI ID assignments Components purchased to...

Page 63: ...5 5 0 1 st ncsc 0 7 5 st ncsc 1 7 5 Third tape or 2nd CD ROM or 5th disk on first bus Third tape or 2nd CD ROM or 5th disk on third bus 6 6 0 2 sd ncsc 0 7 6 sd ncsc 2 7 6 The default controller ID p...

Page 64: ...rovides terminator power rather than the drives themselves Some devices specify this option as SCSI pin 26 ON or power from interface cable pin 26 D Set any drive that offers these options to enable p...

Page 65: ...to AViiON and DG UX System Documentation for each bus component Connecting an external SCSI bus cable to the computer unit Before you begin physically installing your SCSI bus cable and SCSI devices...

Page 66: ...005 Part Number 50 line male CHAMP to 50 pin male P S 15396E010 Model Number 2 5 ft cable adapter 005 39975 68 pin male P S to 50 pin female P S 20 ft cable 005 39720 40 ft cable 005 39721 15396E020 1...

Page 67: ...nded or differential bus interface Do not attempt to use single ended devices or terminators on a differential bus or vice versa Each expansion SCSI controller is labeled Singled Ended or Differential...

Page 68: ...evice on the bus as described in the documentation that came with the external device IMPORTANT You do not need to terminate any unused SCSI connectors on expansion IOC board s 6 Repeat steps 1 throug...

Page 69: ...of the last unit Do not terminate any of the SCSI devices within an external subsystem IMPORTANT You do not need to terminate any unused SCSI connectors on expansion I O board s To locate the SCSI bu...

Page 70: ...w CLARiiON disk array storage system Tape drive SCSI ID 4 Disk drive SCSI ID 0 Disk drive SCSI ID 1 Disk drive SCSI ID 2 Singled ended expansion bus 6 m 19 65 feet 5 ft 5 ft 2 75 ft 2 75 ft Differenti...

Page 71: ...3 SCSI ID Internal Drives Drive description Drive description SCSI ID External Drives external connector integrated bus Slot top to bottom Cable Length Total Cable Length 1 2 3 4 5 x x x 4mm DAT 600...

Page 72: ...pansion controller bus number ____ Cable Length Single ended bus Differential bus Total Cable Length Worksheet Expansion SCSI bus configuration Expansion SCSI I O adapter board first second X X X 1 2...

Page 73: ...SCSI Configuration Worksheet Integrated SCSI Bus 4 5 SCSI ID Internal Drives Drive description External Drives external connector integrated bus Slot top to bottom Cable Length 1 2 3 4 5 Controller b...

Page 74: ...second Single ended bus Differential bus SCSI ID Expansion controller bus number ____ Description subsystem drive external cable Drive description subsystem drive external cable SCSI ID Cable Length...

Page 75: ...you need to perform routine maintenance on your computer system Most often however maintenance for your AViiON 550 or 5500 series system involves replacing a component that has failed We refer to the...

Page 76: ...e components and system options that reside within your computer unit they include D mass storage devices D the system board D the power supply D the fan assembly D memory modules D an optional expans...

Page 77: ...en located at the bottom of the computer unit chassis as seen in Figure 4 1 Vacuum hose Airflow grate Figure 4 1 Cleaning the grates in the airflow screen CAUTION Be sure to follow the procedures in i...

Page 78: ...m packaging foam cups cellophane wrappers and similar materials D Do not remove replacement or upgrade subassemblies from their antistatic packaging until the exact moment that you are ready to instal...

Page 79: ...g place one hand firmly on an unpainted metal surface of the chassis and at the same time pick up the replacement or upgrade subassembly while it is still sealed in the antistatic bag Once you have do...

Page 80: ...e manuals Release Notice s Updates and application documentation This documentation can provide valuable information you need before you install any new system components A review of your system docum...

Page 81: ...ystem Refer to the manual Operating AViiON 550 and 5500 Series Computers for the proper procedure to power down the computer system WARNING To avoid electrical shock or equipment damage always power d...

Page 82: ...pening and closing the computer unit 4 8 014 002250 01 Figure 4 2 Loosening the back cover fastener 5 Lift the cover away from the computer as shown in Figure 4 3 Figure 4 3 Removing the chassis cover...

Page 83: ...mputer unit 4 9 014 002250 01 6 Put on the ESD wrist strap and attach the ESD clip to any unpainted metal surface of the chassis as shown in Figure 4 4 ESD wrist strap ESD clip Figure 4 4 Attaching th...

Page 84: ...of the computer unit as shown in Figure 4 5 until the front edge of the top cover is flush with the rear edge of computer unit 4 Using a coin or screwdriver tighten the fastener by turning it one quar...

Page 85: ...ing and closing the computer unit 4 11 014 002250 01 Figure 4 6 Connecting the computer unit s power cord 8 Plug the other end of the power cord into the installation site s ac power outlet End of Cha...

Page 86: ...Opening and closing the computer unit 4 12 014 002250 01...

Page 87: ...u will need device specific information not provided in this manual Make certain you have the appropriate documentation to set jumpers and operating parameters on each individual drive you need to con...

Page 88: ...drive as described in this chapter 4 Install the drive assembly in the computer unit as described in this chapter 5 Attach cables as described in this chapter and in the drive manual To replace a fail...

Page 89: ...nents in the system To remove the drive assembly from the computer unit follow the steps below A drive assembly consists of one half height drive with mounting brackets and slide mount hardware 1 Unpl...

Page 90: ...of drive Figure 5 3 Releasing the drive mounting lock 3 Slide the drive assembly toward the front of the computer as seen in Figure 5 4 Figure 5 4 Removing a drive assembly from the computer unit 4 Pu...

Page 91: ...e that mounting hardware before proceeding four metal EMI clips and four slide mount screws Complete these steps to prepare a drive before you install it IMPORTANT You will need a 3 8 inch nutdriver o...

Page 92: ...om the computer chassis Half height filler panel Drive cage opening Figure 5 6 Removing a filler panel from the computer chassis front drive cage Completing the drive assembly installation After you p...

Page 93: ...er unit frame then slide the drive into its slot as shown in Figure 5 7 Figure 5 8 Installing a drive assembly in the computer unit 3 Push the drive all the way in Make sure the drive mounting lock co...

Page 94: ...ibbon cable Locate the power cable and bus connector with the best reach to the new drive s slot The power cables are numbered PS4 PS8 Power supply SCSI bus ribbon cable Drive power cables 5 Slot 5 Sl...

Page 95: ...e is keyed Drive SCSI cable Power cable Rear panel SCSI connector Power supply Figure 5 11 Installing the SCSI bus ribbon cable and drive power cable 6 You should now remove the ESD wrist strap reinst...

Page 96: ...Installing a drive assembly 5 10 014 002250 01...

Page 97: ...r Checking and Correction ECC rather than byte parity error detection Each base system includes a standard configuration of either 32 or 64 Mbytes CAUTION Attempting to use improper memory modules may...

Page 98: ...in a connector on the system board There are three banks of four modules each as shown in Figures 6 1 and 6 2 System board memory module connectors SIMM modules installed in first bank Bank 0 Figure 6...

Page 99: ...r leave a connector empty in a four SIMM bank D All four connectors in a bank must be filled with the same SIMM type 4 16 or 32 Mbyte D Only the third bank of connectors Bank 2 can hold 32 Mbyte SIMMs...

Page 100: ...4 4 96 16 16 16 16 16 16 16 16 128 16 16 16 16 16 16 16 16 4 4 4 4 144 16 16 16 16 16 16 16 16 16 16 16 16 192 4 4 4 4 4 4 4 4 32 32 32 32 160 4 4 4 4 16 16 16 16 32 32 32 32 208 16 16 16 16 16 16 16...

Page 101: ...ne you are replacing For example to remove a Bank 0 module you must remove the Bank 1 module next to it 1 To release the memory module from the connector start with the locking tab at the top of the c...

Page 102: ...g bag 3 Do one of the following D If you removed a failed memory module insert it in an antistatic bag and return it to Data General Contact the Customer Support Center as described in the Preface for...

Page 103: ...bag and packing materials in case you need to return the module CAUTION If you need to set the memory module down put it back inside the antistatic shipping bag 2 If you are installing a memory modul...

Page 104: ...ure 6 7 SIMM SIMM connector Post Locking tab Figure 6 7 Securing a memory module in its connector with locking tabs 6 Repeat steps 3 through 5 to install or reinstall any remaining memory module s 7 I...

Page 105: ...ansion board to an AViiON 5500 or 550 series computer and how to replace a failed expansion CPU board NOTE You will need these instructions to temporarily remove a CPU expansion board if you need to r...

Page 106: ...CPU expansion board you must prepare your worksite remove the computer unit cover and attach the ESD wrist strap as described in Chapter 4 CAUTION Unless you are properly grounded you can discharge s...

Page 107: ...oard Otherwise continue to the next section Installing a CPU expansion board Installing a CPU expansion board Before you can install a CPU expansion board you must remove the computer unit cover and a...

Page 108: ...rd connector Figure 7 3 Installing a CPU expansion board 2 Secure the CPU expansion board to the system board with three screws as shown in Figure 7 4 CPU expansion board System board Figure 7 4 Secur...

Page 109: ...O expansion boards An I O expansion board plugs into interboard connectors on the system board it is secured via system board and computer rear panel screws Your configuration can include any combina...

Page 110: ...LAN or SCSI connectors as described in Chapter 2 Figure 7 5 illustrates the two option slot locations First option slot Second option slot Figure 7 5 Location of external I O option slots 2 Remove th...

Page 111: ...ents on the board 5 Lift the board away from the system board and place it in an antistatic bag 6 If you removed the I O board to replace it with a new board proceed to the next section Installing an...

Page 112: ...xpansion board follow the steps in this section You will need a medium Phillips screwdriver Proceed as follows D To install a new I O expansion board in a system that previously had none start with st...

Page 113: ...and requirements The orientation of logic boards on the expansion board determines singled ended or differential bus operation for each port Labels etched on each logic board identify the two port co...

Page 114: ...logic board and gently rock the board vertically to loosen its connection Initially this motion may require firm pressure CAUTION Be careful not to move the logic boards in a left to right motion hor...

Page 115: ...iguration 6 Reconnect each logic board onto the set of two sets interboard connectors on the SCSI expansion board Press the interboard connectors together to create a firm connection CAUTION If you ca...

Page 116: ...he expansion board so that its external I O connectors fit inside the opening in the computer unit bulkhead as seen in Figure 7 12 External I O connectors Expansion board bracket Computer bulkhead ope...

Page 117: ...rd connectors together to create a firm connection If you cannot press the connectors together easily make sure that the connectors are aligned correctly then try pressing them together again Interboa...

Page 118: ...o the computer unit bulkhead 11 Reinstall the cover as described in Chapter 4 To connect an Ethernet transceiver cable to a LAN I O expansion board controller refer to Chapter 2 To set up an external...

Page 119: ...ard these same interboard connectors are used for optional expansion I O boards as described in the next section If your workstation uses an 8 bit graphics controller one option slot remains for an I...

Page 120: ...components in the system To remove an I O expansion board complete the following steps You will need a medium Phillips screwdriver 1 Disconnect the external monitor and mouse cables attached to the gr...

Page 121: ...7 18 ilf you have the 24 bit board 3 Remove the one screw that secures the graphics board to the system board 4 Separate the interboard connectors on the back of the graphics board from the connectors...

Page 122: ...a new board proceed to the next section Installing an I O expansion board If you removed a failed board insert it in an antistatic bag and return it to Data General Contact the Customer Support Cente...

Page 123: ...the steps below You will need a medium Phillips screwdriver Proceed as follows D To install a new graphics board in a system that previously had none start with step 1 D To install a replacement grap...

Page 124: ...igure 7 21 if you have a 24 bit controller 3 Position the graphics board so that its external I O connectors fit inside the lower slot opening in the computer unit bulkhead 4 Align the interboard conn...

Page 125: ...Adding or replacing a graphics controller 550 series 7 21 014 002250 01 24 bit graphics board Interboard connectors Figure 7 21 Installing the 24 bit graphics controller...

Page 126: ...24 bit controller only Figure 7 22 Securing the I O expansion board to the computer unit bulkhead 7 Reinstall the cover as described in Chapter 4 Expanding and maintaining your computer system To con...

Page 127: ...eplacement system board assembly D memory modules D optional second CPU complex D graphics controller AViiON 550 D optional expansion LAN and or SCSI boards D System ID PROM programmable read only mem...

Page 128: ...Remove each SIMM as described in Chapter 6 D Remove the CPU complex board s as described in Chapter 7 D Remove the graphics controller AViiON 550 as described in Chapter 7 D Remove any expansion I O...

Page 129: ...ystem board screws 5 If you do not have a second CPU option remove the two remaining screws as seen in Figure 8 4 Skip this step if your configuration includes a CPU option board 6 Grasp the the syste...

Page 130: ...tion Figure 8 4 Dislodging the system board from the computer chassis 7 Slide the system board to the left rear corner of the chassis until the board s connectors can clear the rear panel bulkhead Sys...

Page 131: ...her end of the System ID PROM component as shown in Figure 8 6 System board System ID PROM Figure 8 6 Removing the System ID PROM component 11 Once the PROM component is loose enough to remove by hand...

Page 132: ...em board does not have a PROM component installed If the replacement system board has a PROM component already installed remove that component from the replacement system board Using a flat blade scre...

Page 133: ...tem ID PROM component 5 Gently push on one side and then the other side to seat the PROM component in the socket Next verify that configuration jumpers on the system board are positioned correctly for...

Page 134: ...r Detect DCD jumpers for the asynchronous serial ports P8 P9 and P2 These jumpers enable or disable ASCII terminal operation for the three asynchronous ports To use an asynchronous port for ASCII term...

Page 135: ...ectly with DG UX 5 4 Release 3 00 or greater you must change the default jumper configuration By default jumpers are installed on P3 and P6 To use the synchronous port with DG UX 5 4 Release 3 00 or g...

Page 136: ...rd connectors Grasp board here Grasp board here Align screw holes with retaining posts 12 in all Figure 8 11 Aligning the system board before installing 2 Slide the board toward the left rear corner o...

Page 137: ...connectors into the rear panel bulkhead space to create an exact fit 4 Align the two interboard pin connectors and the system board screw holes with the connectors on the metal computer unit chassis a...

Page 138: ...screws Figure 8 13 Securing the system board to the computer unit 7 If your configuration includes an optional second CPU board skip to step 8 now IMPORTANT Some of the screws that secure the system b...

Page 139: ...ption will NOT go here Figure 8 14 Securing additional system board screws 8 Plug the SCSI bus and four power supply cables into the system board as shown in Figure 8 15 CPU complex board Fan PS2 PS3...

Page 140: ...he PROM from the replacement system board you should insert this PROM on the failed system board as described in steps 2 through 5 of this section 11 Insert the failed system board in an antistatic ba...

Page 141: ...d in the Opening and closing the computer unit section of Chapter 4 WARNING Always unplug the power cord from the ac power outlet and from the receptacle on the back of the computer unit before removi...

Page 142: ...t from the computer unit 4 Return the failed fan assembly to Data General Contact the Customer Support Center as described in the Preface for information on returning the faulty part To install a new...

Page 143: ...sembly to the computer unit with the two screws and washers shown in Figure 9 3 3 Plug the fan assembly power cable into the fan s power supply connector as shown in Figure 9 4 Fan assembly power cabl...

Page 144: ...y storage subsystems peripheral housing units and other peripherals Then start the computer unit according to the instructions in your hardware operating manual and your operating system software docu...

Page 145: ...puter unit and remove the computer unit cover as described in the Opening and closing the computer unit section of Chapter 4 To remove the speaker and front panel LED assembly follow the steps in this...

Page 146: ...r and let the LED hang freely inside the computer chassis while you remove the rest of the assembly 4 Remove the nuts that attach the speaker to the computer unit as seen in Figure 9 6 Remove two nuts...

Page 147: ...nt angle Front view cover off Figure 9 7 Disconnecting the fan assembly power cable 7 Using a flathead screwdriver or comparable tool press the plastic connector tabs on the fan assembly power connect...

Page 148: ...cable from the system board 10 Reinstall the cover as described in the section Opening and closing the computer unit in Chapter 4 After closing the computer unit power up any storage subsystems periph...

Page 149: ...down the computer unit and remove the computer cover as described in the Opening and closing the computer unit section of Chapter 4 Follow these steps to remove the power supply You will need a mediu...

Page 150: ...power connectors from the rear of each installed disk or tape drive as seen in Figure 10 2 cables are numbered PS4 PS8 Power supply Left side view Drive power cable Push clips in to release con nector...

Page 151: ...ground cable b Remove the two screws that secure the power switch to the front of the computer unit c Remove the two washers and nuts that secure the safety switch to the front of the computer unit d...

Page 152: ...the computer unit rear panel 5 Lift the power supply up and then out of the computer unit Make sure the power cords come away from the computer unit along with the power supply Return the failed power...

Page 153: ...er supply from its package Save the packing materials to use if you have to return the power supply 2 Insert the power supply through the left side of the computer the side opposite the system PCB boa...

Page 154: ...002250 01 4 Plug in the tape disk power cables for each installed drive as shown in Figure 10 6 Power supply Left side view Drive power cable Push clips in to release con nector Figure 10 6 Connectin...

Page 155: ...y 10 7 014 002250 01 5 Plug in the system board ac power cables PS1 PS2 and PS3 to the power supply as shown in Figure 10 7 System board Fan already installed PS2 PS3 PS1 Figure 10 7 Connecting the sy...

Page 156: ...ground wire Power supply safety switch Power switch Ground cable Secure ground cable Install screws Install screws Figure 10 8 Connecting the front panel power switch assembly 7 Reinstall the side co...

Page 157: ...ckpanel printed circuit board with VMEbus AViiON 550 only D One 8 bit or optional 24 bit color graphics controller D IBM PC AT style keyboard D Mouse D 17 or 19 inch color graphics display monitor Sec...

Page 158: ...th single and double bit error detection single bit error correction Minimum 32 megabytes Maximum 256 megabytes SCSI bus Maximum of five buses per system one integrated on system board up to four on o...

Page 159: ...e 8 or 24 bit pixel color graphics subsystem board provides high resolution display The following summarizes some features of both controllers D 32 bit wide address data bus D 70 Hz refresh D 1280 x 1...

Page 160: ...buted Asynchronous Host Adapter VDA 255 D VMEbus Synchronous Controller VSC 3i D VMEbus Terminal Controller VTC D VMEbus Ethernet LAN Controller VLCi D VMEbus Token Ring Controller VTRC D VMEbus Fiber...

Page 161: ...RCD In 4 Request to Send RTS Out 5 Clear to Send CTS In 6 Data Set Ready DSR In 7 Signal Ground SG Both 9 19 Not used n a 8 Data Carrier Detect DCD Out 20 Data Terminal Ready DTR Out 22 Ring Indicato...

Page 162: ...lists the signals 14 13 1 25 female connector Figure A 2 Synchronous serial port connector signals Table A 2 Synchronous SYNC port signals Pin Signal Direction 1 Chassis Ground n a 2 Transmit Data TxD...

Page 163: ...strates the pin numbering and shows the 25 to 36 pin conversion accomplished by the parallel printer cable DB25 Connector CHAMP 36 Connector to Parallel Printer Cable Signal Pins DB25 Connector CHAMP...

Page 164: ...er and the medium dependent interface MDI for connection to the physical network The MAU provides electrical isolation between the AUI cable and the physical network You can attach the Ethernet interf...

Page 165: ...O S data out shield 12 Receive DI B data in B 13 12 V VP voltage plus 14 Ground VS voltage shield 15 No Connection CO B control out B Shell Ground PG protective ground Integrated SCSI 2 bus connector...

Page 166: ...tegrated SCSI bus connector signals Connector contact number Signal 1 11 Ground 12 Reserved 13 TERMPWR Termination Power 14 Reserved 15 25 Ground 26 Data Bus 0 DB 0 27 Data Bus 1 DB 1 28 Data Bus 2 DB...

Page 167: ...ndard describes two types of pin assignments one for devices that use single ended drivers and another for devices that use differential drivers Your expansion buses may be configured for either singl...

Page 168: ...ound ACK high Acknowledge 24 Ground RST high Reset 25 Ground MSG high Message 26 Ground SEL high Select 27 Ground C D high Control Data 28 Ground REQ high Request 29 Ground I O high Input Output 30 Gr...

Page 169: ...Signal Differential Signal Single ended Contact number 51 TERMPWR TERMPWR 52 TERMPWR TERMPWR 53 RESERVED RESERVED 54 GROUND ATN 55 ATN GROUND 56 GROUND BSY 57 BSY ACK 58 ACK RST 59 RST MSG 60 MSG SEL...

Page 170: ...sh French French Canadian German Italian Japanese Norwegian Spanish Swedish Finnish Swiss United Kingdom and United States The keyboard cable includes a 5 pin DIN connector that plugs into the AViiON...

Page 171: ...with EIA RS 232 C interface 1200 baud asynchronous serial D Uses power from RS 232 C interface D Maximum current 15 milliamps Maximum voltage 13 2 volts ac D 1000 miles 621 4 km Both the 8 and 24 bit...

Page 172: ...sed Graphics I O connector Both the 8 and 24 bit graphics controller contain a single piece 13W3 DB10 3 COAX female video connector to the computer unit rear panel bulkhead Table A 9 lists the RGB pin...

Page 173: ...ignal RS 343 compatible composite R G B analog sync on green 75 ohms 15pf for R and B signal 75 ohms 20pf for G signal Signal timing Pixel Frequency 125 megahertz Clock 8 nS Horizontal Frequency 75 12...

Page 174: ...t signal Analog video RS343 A 0 7Vpp R G B analog sync on green Signal timing Pixel Frequency 125 megahertz Horizontal Frequency 75 12 kilohertz Period 13 312 uS 1664 cl Front Porch 0 512 uS 64 cl Syn...

Page 175: ...FCC Class A VCCI Class 1 UL 1950 CSA 950 and IEC 950 EN 60950 CISPR 22 EN55022 Class A UDE Class A and TUV standards Temperature Operating 50 through 100 4 F 10 through 38 C Storage 40 through 149 F...

Page 176: ...le phase Voltage options 120 volts ac 15 percent 15 percent 220 240 volts ac 10 percent 15 percent Maximum current 110 120 Vac 6 5 amperes 220 240 Vac 3 25 amperes Ac output line Maximum current 110 1...

Page 177: ...005 039613 Drives internal half height 520 Mbyte disk 118 15462 y 1 Gbyte disk 2 Gbyte disk 118 16263 118 15789 1 44 Mbyte diskette 2 Gbyte DAT 118 16580 118 10958 Ethernet LAN expansion option board...

Page 178: ...Japan 120 V ac computer unit 109 000996 U S Canada Japan 120 V ac monitor 109 000249 Australia 240 V ac 109 000809 Denmark 220 V ac 109 000815 Europe 1 220 V ac 109 000812 Italy 220 V ac 109 000811 Sw...

Page 179: ...nents 1 2 See also system console product overview 1 1 1 10 rear panel connectors figure 1 9 AViiON System Diagnostics 1 16 avoiding electrostatic discharge damage ESD 4 4 4 5 B baud rate serial ports...

Page 180: ...PROM component from system board 8 5 system board 8 2 8 5 computer installing periphals 2 1 2 20 system board 8 10 8 14 configuration planning 4 6 configuration SCSI bus worksheets expansion bus 3 18...

Page 181: ...faulty part 4 1 4 2 list of B 1 B 2 ordering B 1 B 2 part numbers B 1 B 2 D Data General contacting ix default characteristics OP CON 2 3 serial ports B and C 2 12 degauss switch monitor 1 6 device I...

Page 182: ...7 installing 9 2 9 8 power cable connection to power supply 10 1 power supply connector 9 7 removing 9 1 9 2 replacing 9 1 9 4 FCC Class A rating A 19 flow control serial ports B and C 2 12 system co...

Page 183: ...1 10 related documentation vii signals A 8 A 9 LAN controller expansion installing 6 8 6 22 removing 6 5 6 7 language keyboard 1 13 LED front panel cable connections 9 5 logic power cable connection t...

Page 184: ...mentation vii pin numbers graphics connector A 16 keyboard connector A 14 A 15 LAN connector A 8 A 9 mouse connector A 15 A 18 parallel printer connector A 7 A 8 SCSI bus connector expansion A 11 A 14...

Page 185: ...nchronous A 5 synchronous A 6 RS 232 connectors 2 11 S SCSI bus cable connecting to expansion bus 3 12 connecting to integrated bus 3 11 connecting to the computer unit 2 17 cable lengths 3 4 3 5 conf...

Page 186: ...13 daughter boards 6 1 6 22 installing 8 10 8 14 location 8 1 memory modules installing 6 7 6 8 removing 6 5 6 6 optional components 1 3 preparing replacement 8 6 8 9 PROM component installing 8 6 8 9...

Page 187: ...ne the charge for UPS shipping and handling check the total quantity of units in your order and refer to the following chart Shipping Handling Charge Total Quantity UPS Airborne Overnight 1 5 Items 5...

Page 188: ......

Page 189: ...SS NO PO BOXES CITY STATE ZIP TIPS ORDER FORM Mail To Data General Corporation Attn Educational Services TIPS A131 4400 Computer Drive Westboro MA 01581 9973 Authorized Signature of Buyer Title Date A...

Page 190: ...ED INCLUDING BUT NOT LIMITED TO WARRANTIES OF MERCHANTABILITY AND FITNESS FOR PARTICULAR PURPOSE ON ANY OF THE PUBLICATIONS CLI MACROS OR MATERIALS SUPPLIED HEREUNDER 6 LIMITATION OF LIABILITY A CUSTO...

Page 191: ......

Page 192: ...Cut here and insert in binder spine pocket Installing Expanding and Maintaining AViiON 5500 and 550 Series Computers 014 002250 01...

Reviews: