background image

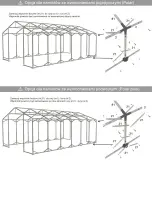
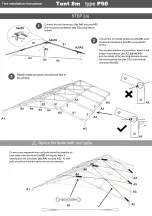
Option for tents with single reinforcements (Polar)

Option for tents with double reinforcements (Polar plus)

 (Polar)

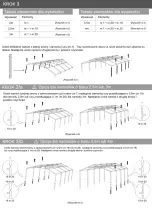
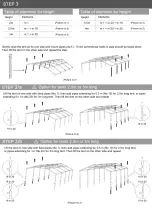
Option for tents higher than 2m  (Polar plus)

 (Polar)

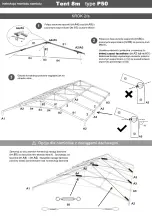
Attach the side cantilevers (no.21) with vertical pipe (no.1), and roof pipe (no.81)

1

1

87

87

81

1

81

21

1

81

21

21

Connect the two reinforcements (no.21) with a vertical pipe (no.1), and the roof pipe (no.81)

For tent higher than 2m polar plus 

install horizontal brackets (no.87) 

on entrances. Brackets attach to 

the chalise of horizontal, lifting 

pipe.

Summary of Contents for P50

Page 1: ...www dascompany com biuro dascompany com 1 2 0 PL EN Instrukcja montażu Namiotu Instrukcja montażu namiotu Tent 8m type P50 ...

Page 2: ...ym że towar nie będzie posiadać właściwości o których Das Company zapewniał lub jeżeli towar lub jego element będą uszkodzone Das Company usunie na własny koszt i we własnym zakresie wskazane usterki w terminie 30 dni od daty otrzymania uwzględnionego zgłoszenia gwarancyjnego Das Company ma prawo przedłużenia tego terminu do maksymalnie 60 dni od daty otrzymania uwzględnionego zgłoszenia gwarancyj...

Page 3: ...e defect is result of the fact that the product has no properties mentioned by Das Company or if the product or its item are damaged Das Company will fix it at its own expense and on its own within 30 days after receiving the warranty claim Das Company has the right to extend this period to a maximum of 60 days from the date after receiving the warranty claim Das Company will notify in writing the...

Page 4: ...tania z hali Ubezpieczenie hali w szczególności ubezpieczenie OC spoczywa na Użytkowniku 14 W przypadku gdy towar jest wysyłany na adres Kupującego za pośrednictwem przewoźnika przejście na Kupującego korzyści i ciężarów związanych z rzeczą oraz niebezpieczeństwo przypadkowej utraty lub uszkodzenia towaru następuje w momencie wydania towaru Przewoźnikowi Jeśli w momencie odbioru towaru od przewoźn...

Page 5: ...Pamiętaj o usuwaniu zbierającej się na bieżąco wody 13 Zachowaj odpowiednią dylatację Pozwoli to wodzie oraz nagromadzonemu śniegowi swobodnie spadać z namiotu 14 W okresie zimowy spadający śnieg może gromadzić się na dachu Pamiętaj o usuwaniu śniegu z namiotu co uchroni go przed uszkodzeniem 15 Na użytkowniku namiotu spoczywa odpowiedzialność za odpowiednie zabezpieczenie go przed uszkodzeniami a...

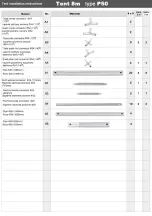
Page 6: ...6 4 4 4 5 4 2 1 2 16 17 18 3 4 7 8 12 14 10 11 9 13 15 6 5 Stopa na wjazdach Śledź 8x300mm Śledź 6x180mm Linka Śledź 4x180mm Śruba M6x35 Śruba M8x50 Śruba M8x70 Oczko do mocowania wjazdu 2 Stopa Obrazek Stężenie dachowe Φ25 320mm 2 6 2 6 14 48 2 10 12 2 10 12 12 64 20 72 Instrukcja montażu namiotu Tent 8m type P50 Pipe Φ50 1890mm Pipe Φ38 1920mm Pipe Φ38 930mm Triple roof connector Φ54 Quad roof c...

Page 7: ...tal connector Φ25 Roof vertical connector Φ25 710mm Pipe Φ38 1855mm Pipe Φ50 935mm 2 2 6 3 2 10 4 4 20 5 5 2 2 2 2 1 1 1 1 1 1 4 4 Tent installation instructions Tent 8m type P50 Łącznik potrójny narożny Φ54 1100 Łącznik potrójny narożny Φ54 1100 Łącznik poczwórny boczny Φ54 1100 Łącznik potrójny szczytowy dachowy Φ54 1400 Łącznik poczwórny szczytowy dachowy Φ54 1400 Rura Φ50 1960mm Stężenie dacho...

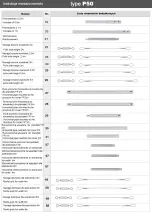
Page 8: ...enia poziome na wjazdach dla szerokości 8m Rura pozioma mocowana do konstrukcji dla plandeki FR 1m Wzmocnienie 25 26 27 28 Horizontal pipe mounted to the structure for cover FR 2m 29 21 23 19 20 22 24 30 31 57 67 87 48 58 68 88 Instrukcja montażu namiotu type P50 Increase of 0 5m Increase of 1m Reinforcement Pulls side height 2m Pulls side height 2 5m Pulls side height 3m pulls side height 3 5m pu...

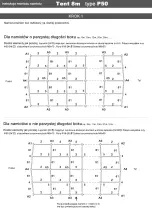
Page 9: ...81 81 81 81 81 81 81 81 81 81 81 81 81 81 81 81 81 81 81 81 81 81 81 81 81 81 81 81 81 81 81 D l a n a m i o t ó w o n i e p a r z y s t e j d ł u g o ś c i b o k u np 9m 11m 13m 21m 31m Rozłóż elem enty jak poniżej Łączniki nr 5 mają być zwrócone dłuższym końcem w stronę łącznika nr A 3 Połącz wszystkie rury Φ50 nr 2 z łącznikami za pomocą śrub M8x70 Rury Φ38 nr 81 skręć za pomocą śrub M8x50 A1 A...

Page 10: ...ionowego nr 82 Zamontuj po obu stronach konstrukcji naciągi dachowe nr 88 co dwa pola 4m tworząc literę X Zaczynając od łącznika nr A 4 i nr A 2 Wszystkie naciągi dachowe powinny zostać zamontowane nad konstrukcją dachową Gotowa konstrukcja powinna wyglądać jak na obrazku obok Połącz dachowe łączniki nr A4 oraz nr A 5 z poziomymi wspornikami nr 10 śrubami M6x35 3 2 1 84 84 83 A4 A5 A2 A3 A4 A5 10 ...

Page 11: ...miotów o boku 2 5m lub 3m KROK 3 b Opcja dla namiotów o boku 3 5m lub 4m Wysokość 2m nr 1 nr 1 nr 19 nr 1 nr 20 2 5m 3m Elementy Tabela elementów dla wysokości Wysokość nr 1 nr 20 nr 19 nr 1 nr 20 nr 20 3 5m 4m Elementy Tabela elementów dla wysokości Unieś namiot z jednej strony z zamocowanymi już rurami nr 19 lub nr 20 następnie zamontuj rury przedłużające o 0 5m nr 19 lub rury przedłużające o 1m...

Page 12: ... stopy nr 9 i połącz je z stopami narożnymi rurą nr85 Stopy namiotu przymocuj stabilnie do podłoża 1 86 4 9 9 Połącz ze sobą rurę nr 1 oraz rurę nr 86 gotowe elementy połącz ze stopami nr 9 oraz łącznikami nr 4 Połączenie z łącznikiem nr 4 powinno być od wewnętrznej strony namiotu Opcja dla namiotów z naciągami bocznymi KROK 4 KROK 5 Zamontuj po obu stronach konstrukcji naciągi boczne co dwa pola ...

Page 13: ... Polar plus Polar Połącz wzmocnienie nr 21 z rurą pionową nr 1 oraz rurą dachową nr 81 1 1 87 87 81 1 81 21 1 81 21 21 Połącz po dwa wzmocnienia nr 21 z rurą pionową nr 1 oraz rurą dachową nr 81 Dla namiotów powyżej 2m w wersji Polar Plus montujemy poziome wsporniki nr 87 na wjazdach Wsporniki przymocuj do kielicha rury poziomej podnoszącej namiot ...

Page 14: ...trony namiotu Zamocuj wsporniki boczne nr 21 do rury nr 1 i rury nr 2 Wsporniki powinny być zamocowane po obu stronach rury nr 1 i rury nr 2 Opcja dla namiotów ze wzmocnieniami pojedynczymi Polar Opcja dla namiotów ze wzmocnieniami podwójnymi Polar plus 21 2 2 81 21 21 21 1 21 2 2 81 21 21 21 21 21 21 21 1 ...

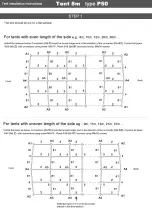
Page 15: ...1 81 81 81 81 81 81 81 81 81 81 81 81 81 81 81 81 81 81 81 81 81 81 81 81 81 81 F o r t e n t s w i t h u n e v e n l e n g t h o f t h e s i d e e g 9 m 11 m 1 3 m 2 1 m 3 1 m Unfold the itmes as below Connectors no 6 should be turned longer end in the direction of the connector no A 3 Connect all pipes Φ50 no 2 with connectors using screw M8x70 Pipes Φ38 no 81 connect using M8x50 screws A1 A1 A2...

Page 16: ...very two segments 4m roof pulls should be installed on both sides of the structure no 68 forming the letter X Starting from the connector no A 4 and no A 2 All roof pulls should be mounted above the roof construction Ready made structure should look like in the picture Connect the roof connectors no A 4 and no A 5 with horizontal cantilevers no 10 using M6x35 screws 3 2 1 84 84 83 A4 A5 A2 A3 A4 A...

Page 17: ... or 3m long STEP 3 b Option for tents 2 5m or 3m long Height 2m nr 1 nr 1 nr 19 nr 1 nr 20 2 5m 3m Elements Table of elements for height Height nr 1 nr 20 nr 19 nr 1 nr 20 nr 20 3 5m 4m Elements Table of elements for height Lift the tent on one side with fixed pipes No 1 then add pipes extending for 0 5 m No 19 for 2 5m long tent or pipes extending for 1m No 20 for 3m long tent Then lift the tent ...

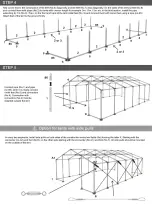
Page 18: ...and connect them with corner feet using a pipe no 45 Attach feet of the tent to the ground firmly 1 86 4 9 9 Connect pipe No 1 and pipe no 86 when it is ready connect it with feet No 9 and connectors No 4 Connection with connectors No 4 must be installed outside the tent Option for tents with side pulls STEP 4 STEP 5 In every two segments install side pulls on both sides of the construction every ...

Page 19: ...r plus Polar Attach the side cantilevers no 21 with vertical pipe no 1 and roof pipe no 81 1 1 87 87 81 1 81 21 1 81 21 21 Connect the two reinforcements no 21 with a vertical pipe no 1 and the roof pipe no 81 For tent higher than 2m polar plus install horizontal brackets no 87 on entrances Brackets attach to the chalise of horizontal lifting pipe ...

Page 20: ... of the tent Attach the side cantilevers no 21 to the pipe No 1 and the pipe No 2 Cantilevers should be install on both side of pipe no 1 and pipe no 2 Option for tents with single reinforcements Polar Option for tents with double reinforcements Polar plus 21 2 2 81 21 21 21 1 21 2 2 81 21 21 21 21 21 21 21 1 ...

Reviews: