background image

24

RM 50


4.4

 Programs

4.4.1

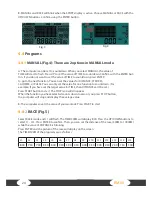
 MANUAL (Fig.4): There are 2 options in MANUAL mode.

A. The computer can be set to countdown. When you select MANUAL, the value of

TIME will start to flash. Press UP to set the value of TIME to countdown. Confirm with the ENTER but-

ton. If you do not want to set the value of TIME to countdown, press ENTER

to go to the next function. You can set the values for DISTANCE, STROKES,

CALORIES, or PULSE. You can only set the value for one function to countdown. (For

example, if you have set the target value for TIME, then DISTANCE can’t be set.)

Press START button to start. The STOP icon will disappear.

When the function you have selected counts down to zero or you press STOP button,

the computer will stop and display the average value.

B. The computer counts the value of your workout. Press START to start.

4.4.2 

RACE (Fig.5)

Select RACE mode and L1 will flash. The TIME/500M will display 8:00. Press the UP/DOWN buttons to 

select L1 - L15. Press ENTER to confirm. Then, you can set the distance of the race (500M to 10000M) 

while the value of DISTANCE is blinking. 

Press ENTER and the picture of the race will display on the screen.

The TIME/500M of the programs are as follows:

L1

L2

L3

L4

L5

L6

L7

L8

L9

L10

L11

L12

L13

L14

L15

8:00 7:30 7:00 6:30 6:00 5:30 5:00 4:30 4:00 3:30 3:00 2:30 2:00 1:30 1:00

3.

 MANUAL and RACE will blink when the SPORT display is active. Choose MANUAL or RACE with the 

UP/DOWN buttons. Confirm using the ENTER button.


     Fig. 3


          Fig. 4

Summary of Contents for RM 50

Page 1: ...DARWIN RM 50 Art No DF RM50 Assembly and operating instructions D A R W IN FITN E S S GERMANY DFRM50 01 03 ...

Page 2: ...2 RM 50 ...

Page 3: ...t these instructions and its content in advance In case of doubt a responsible person must supervise the use of the equipment This equipment has been manufactured according to the latest safety knowledge As far as possible potential safety hazards which could cause injury have been eliminated Make sure to follow the instructions carefully and that all parts are securely in place If required read t...

Page 4: ...age contents 11 3 2 Assembly instructions 12 4 OPERATING INSTRUCTIONS 21 4 1 Console display 21 4 2 Button functions 21 4 3 Turning on and setting up the machine 23 4 4 Programs 24 4 4 1 Manual program 24 4 4 2 Race program 24 4 4 3 Recovery program 25 4 5 Heart rate measuring 26 5 WARRANTY INFORMATION 28 6 DISPOSAL 30 7 ORDERING ACCESSORIES 30 8 ORDERING SPARE PARTS 31 8 1 Service hotline 31 8 2 ...

Page 5: ...er of training programs 3 Manual program 1 RACE program 1 RECOVERY program 1 Weight and dimensions Article weight gross including packaging 47 kg Article weight net without packaging 37 kg Packaging dimensions L x W x H 114 5 cm x 57 cm x 52 cm Set up dimensions L x W x H 205 cm x 56 cm x 95 cm Maximum user weight 135 kg ...

Page 6: ... of the equipment s functions and setting options Have an expert explain the correct usage of the product to you Make sure that nobody is in the range of motion of the equipment while exercising Keep your hands feet and other body parts hair clothing jewelry and other objects well clear of moving parts During use wear suitable sports clothing rather than loose or baggy clothing When selecting spor...

Page 7: ...tion in which to place the equipment such that there is enough free space clearance to the front the rear and to the sides of the equipment at least 1 50 m Furthermore the equip ment should not be set up in main entrances or on escape routes No objects of any type should be inserted into the openings of the equipment The equipment should be placed on a level and solid surface any unevenness in the...

Page 8: ...nderlay mat or on the cardboard packaging in order to avoid damage to the equipment and to the floor scratches Before starting assembly all individual parts should be placed on the floor next to each other Read the assembly instructions carefully and assemble the equipment according to the illustra tions Proceed carefully and cautiously First loosen all parts and check for their correct fitting Th...

Page 9: ...e of other electrical devices might be a problem Place your rowing machine where no other electrical devices are close to it 5 Check the functionality of the chest strap by testing it with another equipment at your contract partner or at a gym 6 Contact your contract partner to check the compatibility of your chest strap When you have still not found a solution contact your contract partner PROBLE...

Page 10: ...hlor 90 chlorine or chlorine bleach The use of such products voids the warranty and causes damages to the machine Clean regularly the tank Do NOT use any methylated spirit chlorates bleach or ammonia based liquids The use of inappropriate cleaning agents voids the warranty and causes damages to the machine Clean the wheels on the rail with an absorbent cloth Please make sure that the ATTENTION sti...

Page 11: ...ntained The list of contents is shown below Please contact your vendor should a part be missing or is damaged NO 1 NO 2 NO 4 NO 3 NO 25 NO 26 NO 36 NO 46 5 75 S13 17 1pc 74 S5 1pc 66M8 15 4pcs 67M6 10 2pcs 58M8 15 4pcs 60M8 15 16pcs 71OD20 ID8 5 1 5 20pcs 68 M4 12 2pcs 35 Limit pad 1pc ...

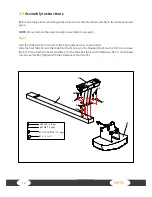
Page 12: ...1 Turn the Slide Rail No 3 and Seat No 36 upside down as shown below Slide the Seat No 36 onto the Slide Rail No 3 Screw in the Stopper No 35 with 2 Flat Cross Screws No 67 Then attach the Rear Stand No 4 to the Slide Rail No 3 with 4 Washers No 71 and 4 Outer Hex Screws No 66 Tighten with the Screwdriver Tool No 75 66 4 66 67 M6 10 2pcs 71 OD20 ID8 5 1 5 4pcs 66 M8 15 4pcs 75 S 13 17 71 71 3 36 6...

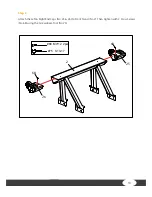
Page 13: ...13 Step 2 Attach the Left Right End Caps No 25 26 to Front Stand No 2 Then tighten with 2 Cross Screws No 68 using the Screwdriver Tool No 75 26 68 2 25 68 75 S13 17 68 M4 12 2pc s ...

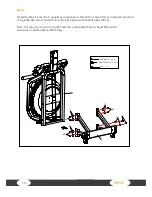
Page 14: ...ain Frame No 1 using 8 Washers No 71 and 8 Screws No 60 Tighten with the Allen Key No 74 Note You can put 3 4 screws into the holes first and tighten them by hand After all the screws are in tighten them with the key 2 71 60 1 6 0 M8 15 8p cs 7 4 S 5 7 1 OD 20 ID8 5 1 5 8p cs 60 60 60 71 71 71 ...

Page 15: ... during assembly Attach the Slide Rail No 3 to the Main Frame No 1 using 4 Washers No 71 4 Screws No 60 and 4 Flat Screws No 58 Insert all 8 screws partially into the holes first and then tighten with the Allen Key No 74 6 0 M8 15 4pcs 7 4 S5 7 1 OD 20 I D8 5 1 5 4pcs 5 8 M8 15 4pcs 58 58 71 60 71 60 60 71 60 71 1 36 3 ...

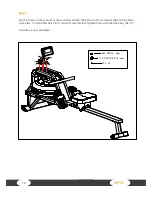
Page 16: ...und as shown below Attach the frame for the computer No 5 to the Main Frame No 1 with 4 Washers No 71 and 4 Screws No 60 Tighten them with the Allen Key No 74 Assembly is now complete 60 71 71 60 5 60 M8 15 4pcs 74 S5 71 OD20 ID 8 5 1 5 4pcs ...

Page 17: ...ter off of the frame NOTE Fill the tank only with tap water Add 1 water purification tablet Never use pool chlorine or chlorine bleach This will damage the tank and will void the warranty Add a water purification tablet every 6 months or as needed If water remains cloudy replace the water in the tank Water from the tank is not suitable for consumption Dispose the water after pumping it out of the ...

Page 18: ...t size To adjust the pedal strap remove the Velcro end of the strap from the mesh side by pulling it upward then outwards Once removed you may increase the opening of the pedal strap by pulling the strap over the foot up and inwards To tighten pull the Velcro end of the pedal strap upward then inwards and down to secure it to the mesh side of the strap Moving the machine To move the machine lift u...

Page 19: ...und With the wheels on the ground you can transport the rower to the desired location with ease Levelling the machine Adjust the End Caps on the Rear Stand No 4 of the machine if the machine is unbalanced during use CAUTION Moving parts such as the seat can cause injuries Keep hands clear of the Slide rail during use 4 ...

Page 20: ...the rower to vertical position If the rower will not be used for more than a month empty the tank before storing CAUTION Move with caution when you raise the rower up as you can hit your head with the Rear Stand No 4 CAUTION Move the Seat No 36 to the front of the Slide Rail No 3 first or it will slide down when raising the rower up ...

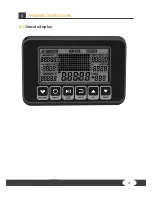
Page 21: ...21 4 OPERATING INSTRUCTIONS 4 1 Console display ...

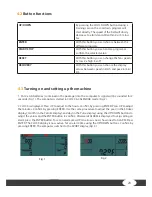
Page 22: ...oal with the UP DOWN buttons 110 to 9990 Cal in 10 Cal increments HRC Pulse Shows your heart rate In manual mode adjust the Heart rate goal with the UP DOWN buttons 30 to 240 BPM in 1 BPM Beats per Minute increments HRC is shown in the upper section of the display The computer displays the Heart Rate during the training session When the goal is reached PULSE is displayed and a signal is heard unti...

Page 23: ... batteries contained in the package into the computer A signal will be sounded for 2 seconds Fig 1 The computer is started in CLOCK CALENDAR mode Fig 2 2 CLOCK is displayed Press UP to adjust to the hours Confirm by pressing ENTER Press UP to adjust the minutes Confirm by pressing ENTER Use the same procedure to adjust the year in the Strokes display month in the Calorie display and day in the Pul...

Page 24: ...on you have selected counts down to zero or you press STOP button the computer will stop and display the average value B The computer counts the value of your workout Press START to start 4 4 2 RACE Fig 5 Select RACE mode and L1 will flash The TIME 500M will display 8 00 Press the UP DOWN buttons to select L1 L15 Press ENTER to confirm Then you can set the distance of the race 500M to 10000M while...

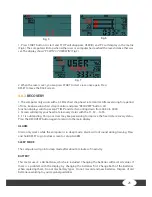
Page 25: ...n will display your heart rate recovery status with the F1 F2 to F6 3 F1 is outstanding F6 is poor User may keep exercising to improve the heart rate recovery status Press the RECOVERY button again to return to the main display ALARM Alarm only works while the computer is in sleep mode Alarm will not sound during training Press and hold RESET to go to clock screen to set up ALARM SLEEP MODE The co...

Page 26: ...rder to allow for a precise measuring you should moisten the rubber electrodes This is best done with a special chest strap contact gel which is also used for ultrasound scans Note If you have not been active in doing sports for a longer period of time you should first go to your physician in order to discuss your training with them You should also contact your physician in advance in the event of...

Page 27: ...s at approximately 96 beats min 220 age x 0 55 The cardio target zone 75 is at approximately 131 beats min 220 age x 0 75 The maximum heart rate for an anaerobic load training 90 is at approximately 157 beats min 220 age x 0 9 20 80 100 120 140 160 180 200 220 65 70 60 55 50 45 40 35 25 30 200 195 190 185 180 175 170 180 150 110 146 107 175 171 166 162 157 153 148 143 139 135 131 128 124 105 102 9...

Page 28: ...atutory rights are not affected Warrantee The warrantee is the first original buyer and or any person who received a newly purchased product as a gift from the original buyer Warranty periods The following warranty periods begin on delivery of the fitness equipment Model Usage Full warranty RM50 Home use 24 months Repair cost According to our choice there will either be a repair a replacement of i...

Page 29: ...ease make sure that you are able to provide the appropriate receipt when claiming on your warranty So that we can clearly identify the model of your equipment and for the purposes of our quality control you will need to give the serial number of your equipment when contacting the service team Where possible please have your serial number and your customer number ready when you call our service hot...

Page 30: ...f its operational life this equipment cannot be disposed of in normal household waste Instead it must be disposed of via an electricals recycling centre Further information can be obtained from your local authority s recycling service The materials can be recycled as per their symbols Through the reuse recycling of materials or other forms of recovery of old equipment you make an important contrib...

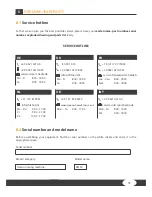
Page 31: ...number Brand category Model name Darwin rowing machine RM50 31 172 619961 info fitshop nl Ma Do 9 00 17 00 Vr 9 00 21 00 Za 10 00 17 00 33 0 172 770033 49 4621 4210 933 service france sport tiedje fr Lun Ven 8 00 18 00 Sam 9 00 18 00 80 90 16 50 49 4621 4210 945 info t fitness dk Ma Fr 8 00 18 00 Lø 9 00 18 00 44 141 876 3972 orders powerhousefitness co uk Mon Fri 9 00 17 00 49 4621 4210 0 service...

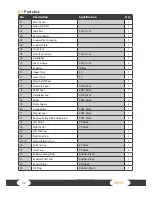
Page 32: ...14 Mesh Belt Wheel 1 15 Decorate Cover HIPS black 1 16 Belt Wheel POM black 1 17 Handlebar Seat HIPS black 1 18 Roller POM black 3 19 Roller Spacer 3 20 Guide Roller POM black 1 21 Magnet Seat POM black 1 22 Bungee Pulley with 608 bearing POM black 4 23 Left Pedal PP black 1 24 Right Pedal PP black 1 25 Left End Cap 1 26 Right End Cap 1 27L R Adjustable End Cap 2 28 Rail End Cap PP black 1 29 Oval...

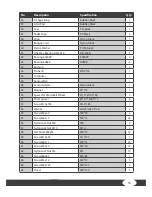
Page 33: ...6 0 40 1 46 Computer 1 47 Sensor Wire 1 48 Sensor Holder Nylon black 1 49 Magnet Ø10 5 1 50 Spacer for Mesh Belt Wheel Ø16 Ø10 2 69 2 51 Short Spacer Ø12 7 Ø8 2 13 6 52 Screw M10x185 M10 185 1 53 Washer OD25 ID10 5 2 0 2 54 Screw M8x30 M8 30 4 55 Screw M6x15 M6 15 16 56 Nylon Lock Nut M8 M8 9 57 Nylon Lock Nut M10 M10 2 58 Flat Screw M8x55 M8 15 12 59 Screw M10x55 M10 55 1 60 Screw M8x15 M8 15 20 ...

Page 34: ...SPHC T 3 0 1 79 Plastic Bushing Ø27 Ø8 2 10 4 80 Sensor Bracket L SPHC T 2 0 1 81 Sensor Bracket R SPHC T 2 0 1 82 Screw M8x75 M8 75 1 83 Sealing Ring for Upper Tank Rubber black 1 84 Stainless Washer M3 M3 24 85 Spacer for Belt Wheel 1 86 Steel Sleeve 1 87 Cross Screw M6x15 M6 15 2 88 Hex Nut M10 M10 2 89 Hook Pad PP W25 black 1 90 Screw M8 60 2 91 Stainless Washer Ф35 Ф20 2 1 0 1 92 Aluminium Cl...

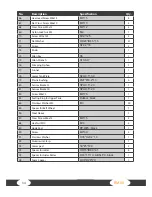
Page 35: ...35 No Description Spezification Qty 97 Taper Roller Bearing HK2010 2 98 Upper pad 25 25 T2 0 4 99 Bolt M8 130 1 100 Nut M6 2 101 Adjust bolt M6 30 2 102 PC board 1 ...

Page 36: ... 68 26 24 70 37 28 71 66 27 72 4 27 72 66 71 67 35 3 67 35 71 60 71 60 23 70 65 55 18 19 43 71 56 55 36 62 62 13 11 30 12 31 61 61 7 58 58 42 20 42 59 55 55 58 60 71 71 60 51 10 10 33 34 29 29 32 40 49 71 76 77 74 75 73 54 22 56 60 60 71 71 71 71 78 71 56 71 60 79 81 79 79 82 79 80 57 83 84 84 84 85 86 88 88 96 95 92 97 97 91 98 93 94 94 94 94 89 90 56 56 90 94 94 94 94 43 51 99 100 101 100 101 10...

Page 37: ...37 Notes ...

Page 38: ...38 RM 50 Notes ...

Page 39: ... address and opening hours for all specialist fitness stores of the Sport Tiedje Group in Germany and abroad on the following website www sport tiedje com filialen CONTACT Company head office Sport Tiedje GmbH Flensburger Str 55 24837 Schleswig 31 172 619961 info fitshop nl 33 0 172 770033 49 4621 4210 933 service france sport tiedje fr 80 90 16 50 49 4621 4210 945 info t fitness dk 44 141 876 398...

Page 40: ...DARWIN RM 50 D A R W IN FITN E S S GERMANY ...

Reviews: