7
Installation
Remove all packing materials from the PDU-10. Check that all foam and plastic padding is removed.
Screw the equipment into a 19" rack. Connect all cables.
Always disconnect from electric mains power supply before cleaning or servicing.
Damages caused by non-observance are not subject to warranty.
Set Up and Operation
Before plugging the unit in, always make sure that the power supply matches the product specification
voltage. Do not attempt to operate a 120V specification product on 240V power, or vice versa.
Install this device on a flat surface, not bending or curved.
Do not supply power before
all components of the system are
set up and connected properly.
Changing the fluorescent Bulb
The 4 watt fluorescent bulb in your PDU-10 is rated to deliver approximately 3000 hours of operation, so
eventually you will have to replace it. The fluorescent bulb is ready available in most hardware stores and
electrical supply houses. The type number is F4T5/D 4W and you can replace it yourself.
1.
Unplug your PDU-10 and then unplug all other deveices connected to the outlets on the PDU-10.
2.
Remove the PDU-10 from your rack.
3.
Use both fingers to push the two “push” squares on the
slide out drawer(6)
.
4.
With the drawer extended, turn the PDU-10 upside down.
5.
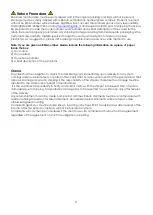
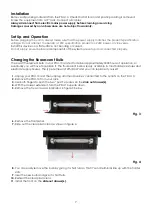
Remove the four screws as indicated in figure 3 below.
Fig. 3
6.
Remove the frontpanel.
7.
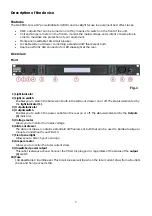
Slide out the clear plastic lens as shown in figure 4.
Fig. 4
8.
You can easily remove the bulb by giving it a half turn so that it’s end terminals line up with the holder
slots.
9.
Inser the new bulb and give it a half turn.
10.
Reinsert the clear plastic lens.
11.
Install the front on the
slide out drawer(6)
.
Summary of Contents for PDU-10
Page 1: ...PDU 10 ORDERCODE D1908 ...
Page 11: ...2010 Dap Audio ...


