background image


6


CD-player                                              


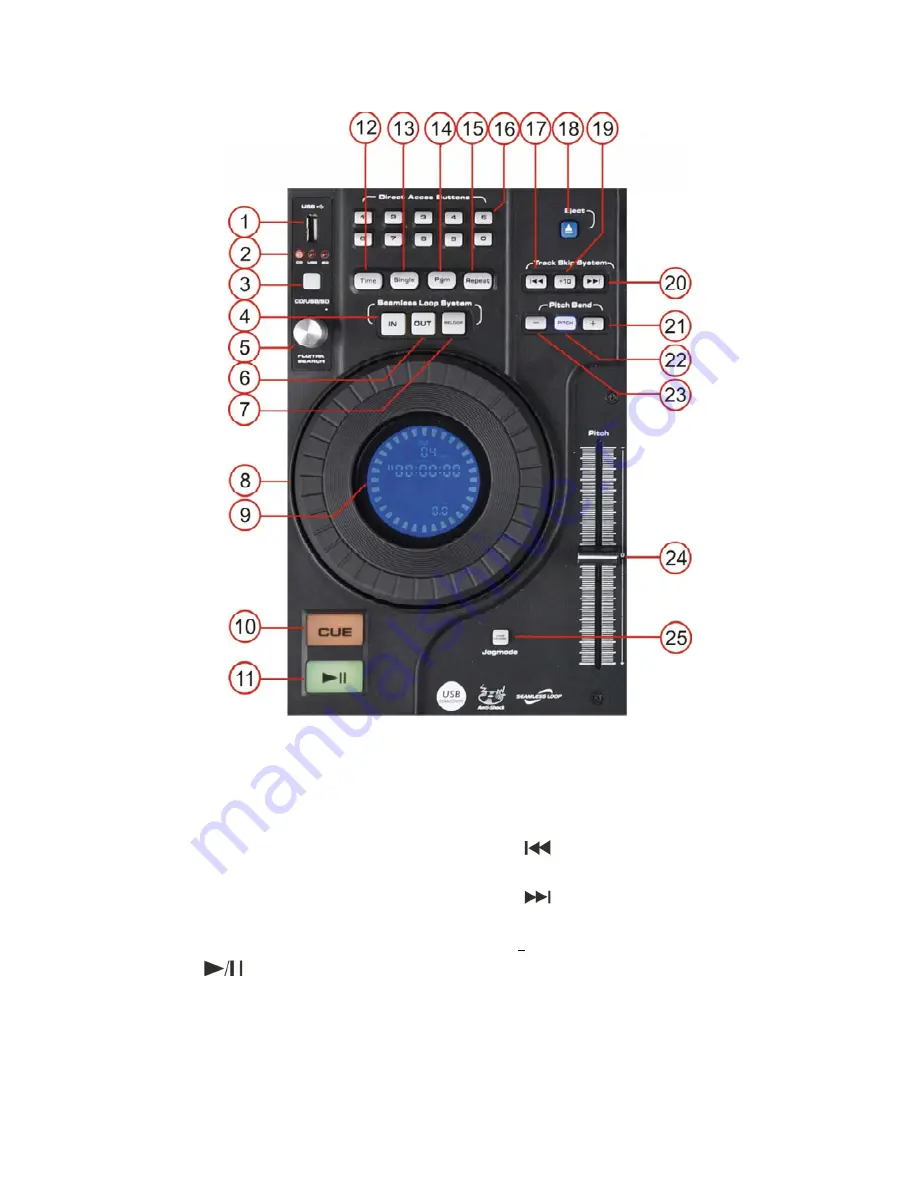
Fig. 2  

  1) USB Slot      

14) Program     

2) CD/USB/SD  LED     

15) Repeat    

3) CD/USB/SD  Button     

16) Direct Acces Buttons     

  4) Loop In      

17) B.Skip 


  5) FLD/ TRK Search C ontrol    

18) Eject  

  6) Loop Out      

19) + 10 (Track +10) 

  7) Reloop      

20) F.Skip 

  8) Shuttle Wheel     

21) Pitch +     

  9) LCD Display     

22) Pitch  

10) Cue      

23) Pitch 


11) Play/Pause      

24) Fader  

12) Time      

25) Jog Mode 

13) Single                  

Summary of Contents for DS-CDJ-250 MKII

Page 1: ...DS CDJ 250 MKII V2 ORDERCODE D1226...

Page 2: ...DAP Audio for more excellent audio products We design and manufacture professional audio equipment for the entertainment industry New products are being launched regularly We work hard to keep you our...

Page 3: ...Mixer functions Front functions Back functions Operations Opening and closing of the disc holder Selecting tracks using the FLD TRK encoder Selecting Tracks using the Skip buttons Selecting folders S...

Page 4: ...ealer and do not use the system To maintain perfect condition and to ensure a safe operation it is absolutely necessary for the user to follow the safety instructions and warning notes written in this...

Page 5: ...ng frequency ranges instead This way you avoid causing the next piece of equipment in your sound path to overdrive You also preserve valuable dynamic reserve Avoid ground loops Always be sure to conne...

Page 6: ...r please include the following information on a piece of paper inside the box 1 Your name 2 Your address 3 Your phone number 4 A brief description of the symptoms Claims The client has the obligation...

Page 7: ...ice Features The DS CDJ 250 MKII is a DJ Workstation from DAP Audio Twin CD player with antishock LCD Display with blue backlight for fast control mm faders card reader Overview Top Fig 1 1 CD player...

Page 8: ...eat 3 CD USB SD Button 16 Direct Acces Buttons 4 Loop In 17 B Skip 5 FLD TRK Search Control 18 Eject 6 Loop Out 19 10 Track 10 7 Reloop 20 F Skip 8 Shuttle Wheel 21 Pitch 9 LCD Display 22 Pitch 10 Cue...

Page 9: ...2 Input Selector 28 Cue Volume 38 Channel 2 Gain 29 Channel 1Gain 39 Channel 2 High 30 Channel 1 Mic Volume 40 Channel 2 Mid 31 Channel 1High 41 Channel 2 Low 32 Master Volume 42 VU Meter 33 Channel...

Page 10: ...l 2 Level Selector 52 Fuse 500mA 250V 60 Channel 2 RCA Input 53 Power ON OFF 61 Channel 1 RCA input 54 115V 230V Switch 62 Channel 1 Level Selector 55 Headphone 63 GND 56 Master Balanced Out L R 64 Mi...

Page 11: ...f the loop 5 FLD TRK search control Depending on track or folder mode you can use the encoder to select a certain track or folder Confirm by pressing the encoder 6 Loop OUT Press this button to set th...

Page 12: ...the jog wheel is in pitch bend mode Blinking of the jogmode button indicates that the Shuttle Wheel is in Scratch mode Mixer Functions 26 Channel Cue Selector This selector allows you to choose which...

Page 13: ...ing SD MMC c ard The c ontacts of the card must point downwards The unit c annot read c ards with a c apacity of more than 4GB The unit is not c ompatible to SDHC c ards and only supports the MP3 form...

Page 14: ...2 seconds and the first track automatically CAUTION Disc Holder at a time Do not push the Disc holder in manually when the power is off as this may result in malfunction and damages the player 3 Sele...

Page 15: ...rns to the cue point and enters pause condition NOTE During cue mode if the Cue button is pressed and hold playbac k will start from the cue point when the button is released the player will return to...

Page 16: ...release the Shuttle wheel the CD will return to the BPM set by the pitch slider 15 Program Play 1 Stop playback and press the Pgm button The player will enter the program mode 2 Select the desired tra...

Page 17: ...he new Crossfader into the cable D and place the new Crossfader back in the mixer 3 Screw the Crossfader into the mixer using the fader plate screws 4 Replace the fader knob Fig 8 Before switching off...

Page 18: ...e device does not operate properly unplug the device 2 Check power from the wall all cables connections etc 3 If all of the above appears to be O K plug the unit in again 4 If nothing happens after 30...

Page 19: ......

Reviews: