Danze Orrington DC013230 Installation Instructions Manual Download Page 5

7

8

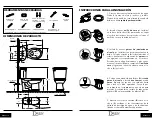
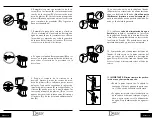
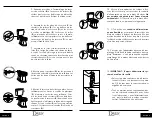
15. Adjust water level in toilet tank (

B

) to marked 

water line. Turn the water level adjustment screw 
(

J

) to move the float cup (

K

) up or down.

16.  Check  action  and  nut  tightness  (left  hand 
thread) of toilet tank lever (

L

). Also, check loose-

ness of flapper chain (there should be slight slack 
in chain when at rest) and seal of flush valve flap-
per.

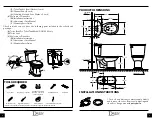
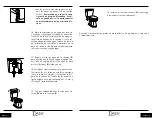
17. Carefully place the toilet tank cover (

M

) onto 

the top of the toilet tank (

B

). 

18.  Install  toilet  seat  (

N

)  per  manufacturer’s  in-

structions.

Please refer to Homeowner Care Manual for troubleshooting, care and mainte-
nance information. 

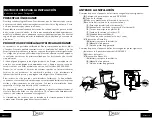
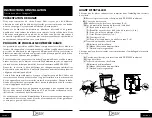
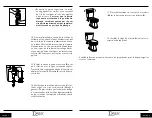
12. Make sure refill tube adaptor (

I

) is attached 

to the top of the flush valve overflow tube. Note: 
Flow from the refill tube must be positioned di-
rectly over the overflow tube.

13. 

IMPORTANT:  Always  clear  sand  and  rust 

from system.

•  Remove valve top by lifting arm and rotat-

ing top 1/8 turn counterclockwise.

•  While  holding  a  container  over  the  un-

capped  valve  to  prevent  splashing,  turn 
water supply on and off a few times. Leave 
water supply off.

•  Replace top by engaging lugs and rotating 

1/8  turn  clockwise. 

Make  certain  top  is 

turned to the locked position. Valve may 
not turn on if the top is not fully turned 
to the locked position.


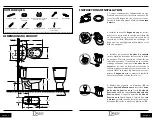
14. Turn on water supply to the toilet and check 
for leakage. Inspect connection points of the wa-
ter supply line to the toilet tank fill valve, water 
supply line to water supply valve, the bottom of 
the  toilet  tank  mounting  area,  and  around  the 
base of the toilet bowl (

A

). Carefully tighten any 

connections that are leaking.  

Summary of Contents for Orrington DC013230

Page 1: ...VISIT WWW DANZE COM 2007 DANZE INC ALL RIGHTS RESERVED Espa ol p gina Espa ol 1 Fran ais page Fran ais 1 Pub No IM DC013230 DC012223 08 07 01 Installation Instructions Orrington Collection Two Piece T...

Page 2: ...site www danze com or call our technical service center during business hours at 888 328 2383 Danze Inc reserves the right to make product specification changes and to change or discontinue models wit...

Page 3: ...V Welcome to Danze Kit W Installation Instructions X Homeowner Care Manual Y Warranty Parts Guide Check to make sure you have the following parts included in the toilet bowl package A Toilet Bowl For...

Page 4: ...lt in over tightening and breakage 2 Install new wax ring not included on the bot tom of the toilet bowl A making sure not to cover the toilet bowl outlet Alternate Method The wax ring may also be pla...

Page 5: ...Note Flow from the refill tube must be positioned di rectly over the overflow tube 13 IMPORTANT Always clear sand and rust from system Remove valve top by lifting arm and rotat ing top 1 8 turn counte...

Page 6: ...obligaci n en Norteam rica Este inodoro ha sido pensado para instalarse f cilmente Se han utilizado conexiones convencionales de manera que se comprendan f cilmente las piezas activas y el funcionami...

Page 7: ...una arandela de pl stico O en cada perno del suelo e instale una tuerca en cada perno Apriete las tuercas con cuidado hasta que est n s lo bien apretadas Corte la par te sobrante de los pernos con un...

Page 8: ...que salpique el agua y abra y cierre varias veces la alimentaci n de agua Deje la alimentaci n de agua cer rada 6 Ensamble los pernos de instalaci n de la cis terna C en la cisterna B con las arandela...

Page 9: ...l inodoro A Apriete cuidadosamente las conexiones que tengan fugas 15 Regule el nivel de agua de la cisterna B para que llegue a la l nea de agua marcada Gire el tornillo de reglaje del nivel de agua...

Page 10: ...raccords conventionnels utilis s tout au long de l installation le fonctionnement de cet appareil et des pi ces mobiles est facile comprendre Chaque installa tion doit tre effectu e en respectant les...

Page 11: ...la toilette A et la tourner l g rement pour com primer la bague de cire et assurer l tanch it entre la cuvette de toilette A et le sol 4 Mettre une rondelle en plastique O sur chaque boulon de fixati...

Page 12: ...alimentation en eau ferm e 5 Avant de proc der l assemblage du r ser voir de toilette B la cuvette de toilette A v rifier que les crous de blocage du robinet de chasse et du robinet flotteur sont bie...

Page 13: ...s ervoir ainsi qu autour de la base de la cuvette de toilette A Serrer avec pr caution tout raccord qui fuit 15 R gler le niveau d eau du r servoir B pour qu il co ncide avec la ligne servant de rep r...

Reviews: