AUSTRALIA: Unit 6, 4-6 Aquatic Dr, Frenchs Forest NSW 2086
USA:
17531 Metzler Lane, Huntington Beach, CA 92647
EUROPE: Niasstraat 1, 3531 WR Utrecht, The Netherlands.
www.ddtech.com
LLDINSTR004PA
6/7/20
a
b
# 2
Y
Z1
Z2
M
M
M
WARNING:
Using LokkLatch
®
DELUXE on pool gates is permissible in North
America but
NOT
in Australia-New Zealand.
NOTE:
If installing the LokkLatch
®
DELUXE to a gate leading to a swimming
pool or spa, consult your local building official for child safety Code
requirements in your area.
MAINTENANCE:
REMOVE KEY/S FROM LOCK/S AFTER USE. Do not lubricate
the latch with petroleum-based lubricants at any time - use only powdered
graphite. Ensure all screws are tightened firmly and that the Latch Body and/
or Access Kit is kept free of dirt, sand and other debris which could impair
reliable performance.
ADVERTENCIA:
Usando LokkLatch DELUXE en cercas de piscina esta permisible en
America del Norte pero
NO
en Australia-NZ.
OBSERVACIÓN:
Si se está instalando LokkLatch
®
DELUXE en una puerta para
piscina o alberca o spa, consultar a su autoridad de construcción local sobre los
requisitos de código relacionados con la instalación y la altura.
MAINTENIMIENTO:
RETIRAR LA(S) LLAVE(S) DE LA CERRADURA DESPUÉS DE USAR.
No lubricar el cerrojo con lubricantes a base de petróleo en ningún momento. Usar
únicamente grafito en polvo. Asegurarse de que todos los tornillos se encuentren
ajustados firmemente y que la caja del cerrojo y/o el Juego de acceso no tengan
tierra, arena ni ningún escombro que podría impedir el funcionamiento correcto.
E S P A Ñ O L
(North America)
ENGLISH – International
FRANCAIS
AVERTISSEMENT
: Il est autorisé d’utiliser LokkLatch
®
DELUXE sur les portillons
de piscine en Amérique du Nord mais
PAS
en Australie-NZ.
REMARQUE
: Si vous installez le LokkLatch
®
DELUXE sur un portillon donnant sur
une piscine ou un spa, consultez le responsable local des services de l’urbanise pour
connaître le code du bâtiment de votre région.
ENTRETIEN
: RETIREZ LA OU LES CLÉS DU VERROU APRÉS UTILISATION. Ne
lubrifiez jamais le verrou avec des lubrifiants à base de pétrole, utilisez uniquement
de la poudre de graphite. Assurez-vous que les vis sont fermement serrées et que le
corps de verrou et/ou le kit d’accès sont propres et sans poussière, sable et autres
débris qui pourraient avoir un impact sur les performances.
Apply glue completely around edges
of PVC tube on both sides of fence post
Aplicar pegamento completamente alrededor de los
bordes del tubo PVC en ambos lados del poste de la cerca.
Appliquez de la colle tout autour des bords du tube
de PVC des deux côtés du poteau de la clôture.
Usar el agujero #2 en la guía para encajar K para
postes de cercas de madera solamente cuando se
requiere el empotrado de la patas de fijación laterales
del cerrojo.
PVC tube* protects push-rod & locks in
vinyl and wood fence posts.
El tubo *PVC protege el pasador de empuje y traba
en los postes para cerca de vinilo y madera.
Le tube* en PVC protège la tige et les verrous pour
les poteaux en vinyle et en bois.
5/32” (4mm)
5
/
8
” (16mm) drill
or spade bit.
Insert PVC tube M for vinyl and
wood fence posts.
Insertar el tubo M de PVC para postes de
vinilo y madera.
Insérez le tube en PVC ‘M’ pour les poteaux
en vinyle et en bois.
5
/
8
”
(16mm)
Utilisez le trou de gabarit No 2 pour les poteaux en
bois seulement lorsque les pattes de fixation latérales
doivent être encastrées.
* PVC tube not supplied, or required, for
Australian-New Zealand version of this product.
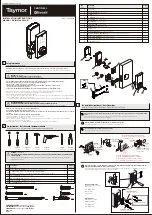
LIST OF COMPONENTS
LISTA DE PARTES
LISTE DES PIÈCES
* PVC tube ‘M’ not supplied, or required, for
Australian-New Zealand version of this product.
Q: I’m unable to lock/unlock my latch; what could be causing that?
A1:
Check the push rod has been cut to correct length – see step ‘7’ over page.
A2:
Check that the push-rod has been fitted to the lock-tail horizontally – see step ‘5’ over page.
A3:
Check that the screws holding on the main latch backing bracket are in the correct positions – see step ‘1’
A4:
Check that there is no debris restricting the movement of the push-rod or push-button.
A5:
Check that the holes in the post are in alignment – and level – and that the push-rod operates smoothly.
If you require additional push-rods or have damaged or missing components please telephone your local D&D Office for assistance:
North America:
1800 716 0888 or 714 677 1300,
Australia-New Zealand:
(02) 9454 7888,
Europe:
+31 (0)30 291 9847
TROUBLESHOOTING TIPS
TROUBLESHOOTING TIPS
Use hole # 2 on fitting jig K for wood fence
posts
ONLY
when recessing the side fixing
legs of the latch is required.
Note:
Screws supplied are self-drilling for
metal. See your hardware specialist for
correct wood screws.
A (x1)
B (x1)
C (x1)
D (x3)
E (x12)
F (x1)
H (x1)
G (x1)
Note:
Screws supplied
are self-drilling for
metal. See your
hardware specialist for
correct wood screws.
L (x1)
K (x1)
J (x2)
M (x1)


