background image

Dugan Model M User Guide

Theory of the Speech and Music Systems

13

Dugan Music System

Music System

The Music System is a soft-gating or ducking system with its threshold set by an audio
signal, typically from a mic measuring the ambient sound level. Each channel has a
2:1 expansion ratio below the floating threshold.

The Music System can also be used to duck an audience mix when the people on
stage talk, attenuating the sound of the PA in the room. Use an aux send of the stage
vocal mix to supply the threshold signal instead of a mic.

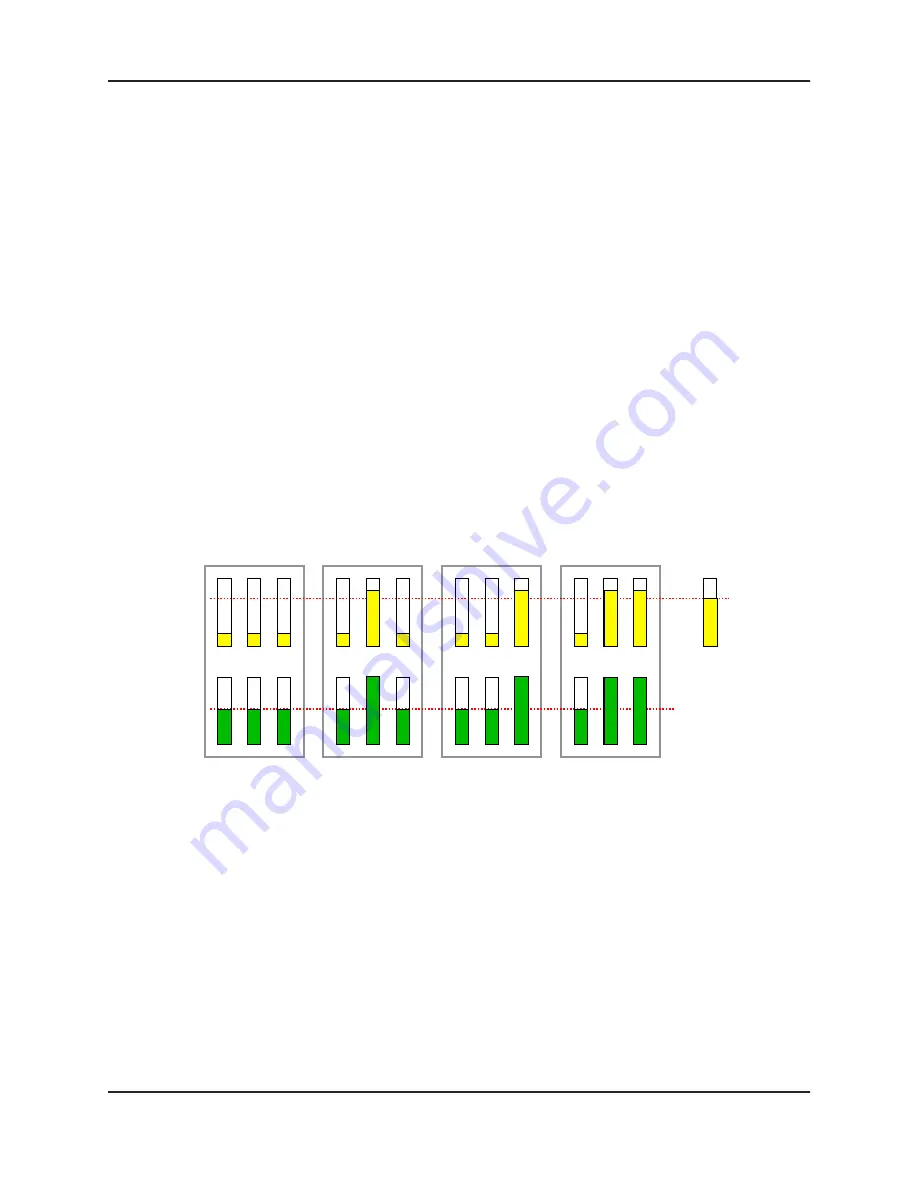
The following example (

Figure 2-3

) shows how the Music System works with three back-

ground vocalists.

Frame 1 shows no one singing. The system keeps all channels at a low gain.

Frame 2 shows one person singing. The system automatically fades his/her
gain to full, while the other two inputs stay low.

Figure 2-3 

Function of the Dugan Music System

Frame 3 shows a different person singing. The system automatically fades his/
her gain to full, while the previous singer’s mic and the other input stay low.

Frame 4 shows two people singing together. The system automatically gives
their channels full gain, while the other input stays low.

70

60

50

40

Sound 

at mics 

(dBSPL)

0

-10

-20

-30

Resulting 

automix 

gains (dB)

No one singing

Mic 2 singing

Mic 3 singing

Mics 2 & 3 singing

Music System

Threshold Input

Threshold

follows

audio level

Depth set to

-15 dB

Summary of Contents for Model M

Page 1: ...Dan Dugan Sound Design Model M Automatic Mixing Controller User Guide Release Date November 2015 Version 1 3 Author Rob Wenig ...

Page 2: ...ug A polarized plug has two blades with one wider than the other A grounding type plug has two blades and a third grounding prong The wide blade or the third prong are provided for your safety If the provided plug does not fit into your outlet consult an electrician for replacement of the obsolete outlet 11 Protect the power cord from being walked on or pinched particularly at plugs conve nience r...

Page 3: ...ocumentation or other than in accordance with industry standards Defects caused by unauthorized modifications misuse negligence act of God or accident are not covered by this warranty Software is provided as a convenience but due to the wide variety of computer systems cannot be guaranteed to work This Limited Warranty is exclusive and no other warranty is expressed or implied Dan Dugan Sound Desi...

Page 4: ......

Page 5: ...1 Insert Patching 12 Dugan Music System 13 Insert Patching 14 Chapter 3 Installation 17 Rack Mounting 17 Connections 18 Audio I O 18 MADI 18 ADAT 19 Unprocessed Outputs 19 Linking 19 Word Clock 20 Network 20 Power 20 Chapter 4 Connecting to a Computer 21 Establishing Network Connections 22 Manually Add Unit 23 Setting a Specific IP Address 24 ...

Page 6: ...s and Channels 27 Channel Pane 28 Level Indicator 28 Bypass 29 Channel Modes 29 Man 30 Auto 30 Mute 30 Preset 30 Channel Groups 31 Override 31 Meters 32 Weight Controls 32 Master Pane 35 Reset 36 Meters 36 Clock Source 36 System 37 Separating Systems 37 Selecting Units to Display 37 Group Master Controls 38 Override 38 Preset 38 Mute 38 ...

Page 7: ...ed Channels 42 Chapter 7 Dugan Music System and Gain Limiting 43 Dugan Music System 43 Meter 44 NOM Gain Limit 44 Music System Threshold Input Channel 44 Music System Threshold Input Level 44 Auto Mix Depth 44 Setting up the Music System 44 Controlling Ambience 46 Gain Limiting 46 Gain Limiting and the Music System 46 Gain Limiting and the Speech System 47 Musical Theater 47 ...

Page 8: ...k Selection 50 Top Row 50 Eight Channels Screen 51 Top Row 51 Channel Controls 52 Group Master Screen 53 Top Row 53 Group Master Controls 53 Menu Screen 53 MADI Configuration Screen 54 Network Configuration Screen 55 Scene Memory Screen 56 Chapter 9 Updates 57 Appendix A Specifications 59 ...

Page 9: ...s The Model M includes three patented automatic mixing algorithms Dugan Speech System for all dialog applications Dugan Music System for mixing a musical group Dugan Gain Limiting for reducing feedback when using the Music System The Model M can connect up to 64 channels MADI or 16 channels ADAT be remote controlled from the Dugan Control Panel for Java included and Dugan Control Panel for iPad so...

Page 10: ...ses of worship TV news and sports panels reality and game shows Wireless mics for theater Boardrooms and civic meeting rooms Teleconferencing and distance learning The Model M dramatically improves live mixing with multiple mics by eliminating late upcuts reducing PA feedback and studio noise reducing comb filtering from adjacent mics ...

Page 11: ... to equal one mic at full gain The result sounds like passing one mic around among the speakers When several people talk at once the gain is shared Figure 2 1 Four snapshots of a three mic system Figure 2 1 shows the Speech System in action with a three mic system The first frame shows no one speaking the sound levels at all mics are low The system fades all channels to medium gains that sum to th...

Page 12: ...sole channel is muted Most analog consoles only have pre fader inserts You can use Dugan auto mixing with these consoles but you must be careful to mute channels by muting on the Dugan not the console Pre compressor The Dugan Speech System works on the level differences between channels Compression reduces level differences between channels making automixing less effective It is OK to patch post c...

Page 13: ...Music System works with three back ground vocalists Frame 1 shows no one singing The system keeps all channels at a low gain Frame 2 shows one person singing The system automatically fades his her gain to full while the other two inputs stay low Figure 2 3 Function of the Dugan Music System Frame 3 shows a different person singing The system automatically fades his her gain to full while the previ...

Page 14: ...hreshold for automixing to remain stable while adjusting the mix with the faders Pre compressor The Dugan Music System works better with consistent ambience caused by bleed from neighboring voices and instruments It is OK to patch post compressor if only occasional peak limiting occurs However if compression is active during normal singing or playing better results will be obtained by patching the...

Page 15: ... the gain appropriately Figure 2 5 NOM and gain reduction NOM 1 left NOM 4 right Conventional automatic mixing implementations always assume an NOM of 1 The Dugan s unique implementation allows you to set the number of mics that will op erate at full gain before gain limiting occurs For example if there is enough gain be fore feedback to tolerate four open mics the gain limit can be set to 4 Gain ...

Page 16: ...Dugan Model M User Guide 16 ...

Page 17: ... are the same All half rack sized Dugans can be mounted side by side using the appropriate rack ear for each unit To rack mount a single unit attach one long and one short rack ear then mount in the rack To mount two units side by side 1 For the left unit remove the four screws from the right side of the top and bottom lids 2 Attach the top and bottom joining plates to the left unit 3 For the righ...

Page 18: ...el connectors The MADI ADAT switch selects whether the input is derived from the MADI up posi tion or ADAT down position connectors In the ADAT position the LINK connectors are re purposed to carry eight additional ADAT channels so linking multiple units is not possible see Linking on page 19 MADI MADI I O can use a dual SC optical cable for input and output or two BNC coaxial connectors for input...

Page 19: ...AT inputs 1 16 are mirrored to MADI outputs 1 16 Linking Up to eight Dugan units can be linked into a single automatic mixing system All dig ital Dugan models can be linked in any combination The audio I O for each must be configured and connected individually Linking passes only control information between Dugans not audio One unit must be set to be the master and the others slaves 1 Designate on...

Page 20: ...n all cases the Word Clock output is sent to WORD CLK OUT Network A network switch with three Ethernet connectors is provided as a convenience when connecting a computer and other devices into a network One connector accepts Power over Ethernet PoE Power A power connector accepts a locking power cable In an emergency the Model M can accept power supplies within the range 12 24 VDC 2 A minimum cent...

Page 21: ...t the Model M directly to a computer use one of the rear panel 10 100 1000 BASE T jacks An older PC may require a crossover cable Use a straight Ethernet cable to connect to a network Windows users must turn the Windows firewall off The Windows Firewall blocks port 9776 used by the Dugan software to communicate If you must leave the Win dows firewall on open this port We recommend turning off the ...

Page 22: ...st pane remains blank proceed to Manually Add Unit below If the list pane displays Dugan units continue 4 Click on the first unit in the list so it is highlighted The Network Parameters section displays information about that unit If Unit Reachable is YES you are ready to use the Dugan Control Panel with that unit If you have additional Dugan units to connect select the next unit in the list and r...

Page 23: ...st 13 Highlight the unit in the list pane again If Unit Reachable is YES this unit is ready to use with the Dugan Control Panel If you have additional Dugan units to connect select the next unit in the list and repeat Step 4 If you are finished with installation proceed to Chapter 5 Dugan Control Panel Software Manually Add Unit If the Dugan unit does not appear in the Dugan Utility list pane you ...

Page 24: ... list pane is blank click Refresh List If the list pane remains blank skip back to Manually Add Unit above If the list pane displays Dugan units continue 3 Click on the first unit in the list so it is highlighted The Network Parameters section displays information about that unit 4 If Use DHCP is selected de select it 5 Enter the desired IP address into the IP Address field 6 Click Send New Params...

Page 25: ...s in the iPad app are noted NOTE After configuring settings with the Dugan Control Panel it can be disconnected All set tings are retained and the unit continues to function on its own Figure 5 1 Dugan Control Panel Launch the Dugan Control Panel vxxx jar If this file is not available and you have an Internet connection you can obtain the latest version from http www dandugan com downloads ...

Page 26: ...f a unit may have fewer than eight channels Figure 5 2 Top Pane If all connected units do not appear in the Top Pane see Establishing Network Connec tions If the Top Pane is full a thin scroll bar appears along the bottom To display a unit s IP address hover the mouse over the unit s name To display a unit s IP address touch and hold the unit s name Top Pane icons for all connected Dugan units Cha...

Page 27: ...e slider track to raise or lower the value by 0 5 dB Ctrl click anywhere on the slider to reset its value to 0 touch and hold on iPad Naming Units and Channels Connected units are displayed in the top pane in alphabetical order If you wish to display them in your own order use numerical prefixes To name a unit and its channels 1 Select a unit in the top pane 2 Select the yellow text in the Master ...

Page 28: ... mode by pressing the individual mode buttons or the Master PRESET button Figure 5 3 shows a typical system channels 1 4 in auto with ambient noise and channels 5 8 in mute Figure 5 3 Channel Pane Level Indicator Each channel has a level LED that lights green when the audio level is adequate for automatic mixing It should remain green when no one is talking If the level indicator blinks raise the ...

Page 29: ...modes are similar bypass makes an instantaneous transition which can cause an audible click man performs a quick fade without sonic artifacts To deactivate bypass you can Click bypass again OR Click any of the three channel mode buttons Channel Modes There are three channel modes man auto and mute Changing modes initiates a half second fade to the new mode Like radio buttons you can only choose on...

Page 30: ...el mode settings which may be restored by pressing the Master PRESET button When the unit powers up the chan nels default to their preset modes To set channel presets 1 Click the channel preset button next to the desired channel mode button 2 For all unused channels click the preset button next to the mute button Figure 5 6 Channel preset left and Master PRESET right buttons The preset indicators ...

Page 31: ...button until the desired group letter appears The channel strip background is tinted green group b or blue group c group a is not tinted Figure 5 7 A set of OVERRIDE PRESET and MUTE buttons ap pears in the Master Pane for each group Figure 5 7 Channels in three groups Override Override can be used to instantly mute all mics except one the host or chairperson However any number of mics can be inclu...

Page 32: ...ntrols are balanced each mic has an equal opportunity to take over the system when one person talks into one mic he she gets all the auto mix gain and the others get turned down Figure 5 8 Weight controls The weight controls should be used to balance the channel auto mix gain indicators when no one is talking If a console preamp trimmer is turned down that channel s weight control can be turned up...

Page 33: ...l is not a gate threshold The following example illustrates how weight affects auto mix gain see Figure 5 9 Raising the weight control for one channel increases that channel s auto mix gain display during ambience and decreases it slightly for the others makes it more difficult for others to speak when someone speaks into the channel with the higher weight setting Figure 5 9 How changing one chann...

Page 34: ...en no one is talking Figure 5 10 Multiple mic ambience auto mix gain hovers around 9 dB for eight mics 6 dB for four mics You can perform the following functions using the weight controls If there is ongoing noise near one mic e g computer fan or air vent sup press it by reducing that channel s weight Of course you will hear that noise increase when that talker speaks To allow the chairperson to o...

Page 35: ...Dugan device selected In the figure below the selected device is a Model M The following version numbers are displayed below the Dugan logo the selected unit s firmware the currently running Control Panel CP J software This section documents the Master Pane s controls and indicators Figure 5 11 Master Pane with three groups ...

Page 36: ...meters have three display modes The default mode is auto mix gain which is the most useful display during normal operation The input and output meters are only used when setting or checking levels Table 5 2 Meter modes Click on the Master meters button to cycle through the three meter display modes Clock Source The clock source button displays the currently assigned source If Word Clock and any ot...

Page 37: ... which system a unit belongs to select it in the Top Pane and view its number on the system button Selecting Units to Display After dividing units into separate systems you may want to restrict the units shown in the Top Pane to those in your studio To do this 1 Hover the mouse cursor over the names of the units that you want to dis play and note their IP addresses 2 Ctrl click on the sign at the ...

Page 38: ...g their override button s Remove channel s from the override group by deactivating their override button s Preset Clicking the Master PRESET button sets the channel modes man auto mute to those shown on each channel s preset buttons Use these settings to store your favorite channel mode settings When the unit powers up the channels default to their pre set modes Mute Click the MUTE button to mute ...

Page 39: ...odel K Tactile Control Panel When they are paired selecting a block of eight channels on one also selects it on the other Figure 5 12 Model K panel Scenes Panel This panel lets you create recall save rename and delete scenes Scenes include all Model M parameters except the MADI and network configurations and the name of the unit Figure 5 13 Scene panel ...

Page 40: ... Save or Delete the Factory Defaults Scene To create a new Scene 1 Click the New button The Scene name dialog appears with an automatically generated name highlighted 2 If desired type a new name then press Enter To recall a Scene 1 Select a Scene from the list 2 Click the Recall button To save changes to the current Scene click the Save button To delete the current Scene click the Delete button T...

Page 41: ...ls Muting Channels Mics must be muted by using the mute buttons on the Dugan Control Panel Pulling a fader down on the console will not properly mute a channel Although that mic is no longer audible in the mix it still contributes to the gain computations and causes ambient noise fluctuation In the worst case this could cut off a speaker Figure 6 1 Insert points on most analog mixers are pre fader...

Page 42: ...cs OR Use the bypass button on the Dugan Control Panel with the console fader pulled down This keeps the mic instantly available on the fader but that channel is no longer in the control mix Be aware that bypass may generate a click if it interrupts room rumble whereas the mute button does a quick fade The mute button can be used with the fader up bypass is best used with the fader down Pre listen...

Page 43: ... from a sensing mic that measures the ambient sound level Each channel has a 2 1 expansion ratio below the floating threshold If at least one channel has an active music button the Dugan Music System panel can be opened by clicking the music tab on the right margin of the Master Pane If more than one group has a music channel additional columns will appear NOTE See Setting Controls on page 27 to l...

Page 44: ...llowing before placing the sensing mic Use the same type of mic for program and sensing applications Place the sensing mic in the same area and pointing in the same direction as the program mics This samples as closely as possible the ambient sound picked up by the program mics Do not place the sensing mic close to an individual voice or instrument Do not point the sensing mic at a pit orchestra D...

Page 45: ...channel 7 Enter the MADI channel number that you chose to use for the music sys tem threshold channel input for that group 8 If the meter is not set to Music System Threshold Input Level click the title to toggle it 9 Start with the music system threshold control s set to 0 dB default 10 On the Channel Pane start with all channel thresh controls at 0 dB de fault 11 Activate the auto buttons for al...

Page 46: ... Just a few dB of attenuation may suffice to reduce bleed or feedback Gain Limiting Gain Limiting and the Music System NOTE See Chapter 2 Theory of the Speech and Music Systems The Dugan s unique implementation lets you set the number of mics allowed at full gain before gain limiting occurs This can prevent feedback as the Music System turns on more mics NOTE Gain Limiting is the only automatic mi...

Page 47: ...ater When an actor sings and speaks like in musical theater it is best to switch between the Dugan Music and Speech Systems If your console allows separate pre and post fader insert points 1 Patch two channels on the Dugan for each singing speaking mic One pre fader for the Music System and the second for the Speech System post fader 2 To automate switching between singing and speaking use scenes ...

Page 48: ...Dugan Model M User Guide 48 ...

Page 49: ...m all operations of the Dugan Control Panel except editing names It has a display navigation arrow but tons and a dual function encoder knob that can be pushed or turned The cursor is a box around a selected item that is moved using the navigation arrow buttons NOTE Pressing the ENTER button or the knob performs the same function We will refer to the item which is easiest to use in the context ...

Page 50: ...desired block 2 Press the ENTER button or the knob to switch the display to that eight channel block Figure 8 1 All Channels screen Top Row Activating MENU or MASTER jumps to the MENU or Group Master screens respectively To change the meter display 1 Use the navigation arrow buttons to highlight the meter selection in the top row It will read GAINS INPUTS or OUTPUTS 2 To change the meter mode turn...

Page 51: ...nnels screen When the double arrows are highlighted rotating the knob selects the next or previ ous group of eight channels to display The double arrows are below the bottom but tons of the control panel NOTE Press the left and right arrow navigation buttons together to jump to the double arrows from anywhere on the screen Top Row MENU ALL CHAN and MASTER jump to their respective screens To change...

Page 52: ...the screen when that control is selected Figure 8 3 Channel controls detail To understand these controls see Chapter 5 Dugan Control Panel Software 3 level bypass meter weight speech thresh music group a b c music NOM override channel mode man auto mute man auto mute channel preset mode channel number channel name will appear in right side of display window ...

Page 53: ...ps exist To learn about these group controls see Master Pane on page 35 Menu Screen This screen provides access to less frequently used screens and to set the synchroni zation source Figure 8 5 Menu screen Select the desired Sync source and press ENTER or the knob to set Select 8 ch or 16 ch ADAT I O mode Note that when MADI is selected the ADAT out put channels mirror the first 8 or 16 MADI input...

Page 54: ...nd turn the knob to set that pa rameter The No of Channels automatically shows the number of available channels based on the current Start Channel No The No of Channels can be adjusted independently For example setting the Start Channel No to 8 sets the No of Channels to 56 Selecting Reset Factory sets the Start Channel No to 1 and No of Channels to the maxi mum allowed by the current sample rate ...

Page 55: ...CP which will supply valid IP Address Netmask and Gateway values automatically Those users familiar with network settings can enter them manually Navigate to the desired group field and turn the knob to change the value Click SET to activate your edited settings or CANCEL to discard changes Both options return to the Menu Screen See Chapter 5 Dugan Control Panel Software to troubleshoot network se...

Page 56: ...b to recall that Scene The Scene name stops blinking To save the current Scene 1 Navigate to the Save button 2 Press ENTER to update the Scene with the current state of the unit The Save button is inactive if the Scene has not been edited To create a new Scene 1 Navigate to the New button 2 Press ENTER to create a new Scene with the current state of the unit An automatically generated number is as...

Page 57: ...s After the download is complete the Internet connection is no longer nec essary 2 Unzip the software package It contains the Dugan Control Panel vxxx jar and Dugan Utility yyyymmdd jar The Dugan Utility contains the latest versions of both the firmware and the safety copy of the Dugan Control Panel that loads automatically into the unit To revert to a previous version use the older version of the...

Page 58: ...ons DHCP is not compatible with the firm ware update process 7 Click on Send New Params To Unit 8 Click Update Firmware The unit reboots after the update completes 9 Repeat steps 5 through 8 for each unit you wish to update NOTE To force an update when the Update Firmware button is not blue Ctrl click the button NOTE If the firmware update process fails your unit may not pass audio To recover from...

Page 59: ... Up to eight units can be linked into one system in an optical ring network Connectors Audio MADI SC DC BNC TOSLINK ADAT Word Clock BNC Linking TOSLINK Network Three RJ 45 Power Connector Coaxial with locking collar 5 5 mm o d 2 mm i d Electrical Nominal 12 VDC 1 5 A maximum accepts 12 24 VDC PoE 802 3at Type 2 25 5 W External Supply Input 100 240 VAC 50 60 Hz 30 W Output 18 VDC 1 33 A Approved UL...

Page 60: ......

Reviews: