dallmeier VideoNetBox eXd Commissioning Download Page 9

9

Remote Login

Commissioning

  ►

  Connect the recorder to the network.

  ►

  Connect the recorder and relevant peripherals to the voltage supply.

  ►

  Switch on the peripherals and the recorder.

The recorder is available for remote configuration with the software NetConfig 2 via Ethernet after the start (up to approx. 5 
minutes). Use the following access data:

Mode    

Group login

IP address


192.168.2.230 (can be changed with the software IP-Finder without login)

Password 

Serial number (e.g. DAE-12345678)

Note that the definition of the passwords and of the network parameters is necessary for remote access (e. g. Dallmeier 
PView 

7

).

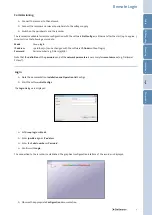
Login


  Note the documentation Installation and Operation NetConfig 2.


  Start the software NetConfig 2.

The 

Login

 dialogue is displayed.

  ►

  Observe the appropriate Configuration documentation.


 Set Group login as 

Mode

.


 Enter 192.168.2.230 as 

IP address

.


  Enter the Serial number as 

Password

.


  Confirm with 

Login

.

The connection to the recorder is established. The graphical configuration interface of the recorder is displayed.

Saf
ety

H

DD Moun

ting

Moun

ting

Login

C

onnec

tions

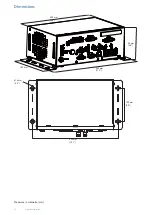
Dimensions

Summary of Contents for VideoNetBox eXd

Page 1: ...Dallmeier VideoNetBox eXd Commissioning 003579 Rev 1 0 0 English...

Page 2: ...y 2 Safety Instructions 3 HDD Mounting 4 Mounting 5 Connections 6 Login 8 Dimensions 10 Validity This documentation applies to the audio and video server VideoNetBox eXd It has been produced on basis...

Page 3: ...tions damages and data loss and can result in loss of warranty Documentation Carefully and completely read the documents included in delivery Always observe the contained instructions notes and warnin...

Page 4: ...ested and released for mounting by Dallmeier HDD whitelist in the Partner Forum all hard disk drives may not be formatted or partitioned Mounting Insert the HDD tray into the guide rail Slide the hard...

Page 5: ...holes appropriate for the designated anchors screws Use proper anchors appropriate for the condition of the mounting site Insert the anchors into the 4 drilled holes Mount the recorder with 4 screws C...

Page 6: ...for intercom D Status LED Power Q Audio OUT Blue The recorder is in operation 3 5 mm phone jack 1 kOhm 2 828 Vpp for intercom E Status LED Record R Video OUT VGA Green The recorder is recording Mini...

Page 7: ...r 1 2 Contact IN H and I Pin Assignment Function 3 Contact 1 Camera 1 Start recording 4 Contact 2 Camera 2 Start recording 5 Contact 3 Camera 3 Start recording 6 Contact 4 Camera 4 Start recording 7 C...

Page 8: ...of the passwords and of the network parameters is necessary for remote access e g Dallmeier PView 7 Left click the background The Recorder login dialogue is displayed Commissioning Connect the recorde...

Page 9: ...in Password Serial number e g DAE 12345678 Note that the definition of the passwords and of the network parameters is necessary for remote access e g Dallmeier PView 7 Login Note the documentation Ins...

Page 10: ...Measures in millimetre mm 280 mm 11 0 150 mm 95 mm 3 6 230 mm 9 0 100 mm 3 9 256 mm 10 1 4 mm 0 2 10 www dallmeier com Dimensions...

Page 11: ...11 Notes Safety HDD Mounting Mounting Login Connections Dimensions...

Page 12: ...the grant of a patent utility model or design We reserve the right to make technical modifications The manufacturer accepts no liability for damage to property or pecuniary damages arising due to mino...

Reviews: