


HDD Mounting
4 www.dallmeier.com
►
Ensure that the recorder is disconnected from the
power supply.
►
Unlock the HDD tray with the key.
►
Remove the HDD tray out of the housing.
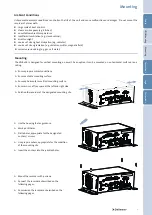
Requirements
The VNB eXd is designed for the recording on a hot-swap removable hard disk that can be evaluated independently with
the optional available Docking Station DS-1. The parallel recording on the internal hard disk ensures a comprehensive and
continuous surveillance even in the case of a hard disk exchange.
Note that ...
... the internal hard disk drive is mounted ex factory.
... optional 2.5" removable hard disk drive has to be mounted into the removable HDD tray.
... all hard disk drives must be tested and released for mounting by Dallmeier (HDD whitelist in the Partner Forum)!
... all hard disk drives may not be formatted or partitioned!
Mounting
►
Insert the HDD tray into the guide rail.
►
Slide the hard HDD tray carefully and completely into the
housing.
►
Make sure not to cant.
►
Do not use any force.
►
Ensure that HDD tray and housing is flush.
►
Lock the HDD tray holder with the key.
►
Use the HDD holders from the HDD tray.
►
Slide the HDD into both HDD holders.
►
Ensure that ...
... the distance to front and rear side is approx. 0.4" (1 cm) .
... the rubber nubs are aligned to the bottom of the HDD.
... the HDD holders lock into the boreholes of the HDD.
►
Slide the HDD into both HDD holders.
►
Ensure that the connections of the HDD are positioned at the rear side
of the HDD tray.
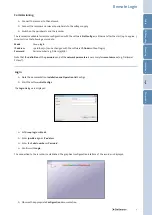
The mounted removable hard disk drive is initialised and taken into operation during the first start of the recorder.


