background image

Network and Communication Installation

13

Network Requirements

•  Existing Network
• 

Available network port, configured properly

•  PC 
•  Web browser

Configuration Steps Using IP Address

1� 

Connect a computer to the display.

2� 

Turn on the display.

3� 

Observe boot sequence–reconfigure computer to the same IP address range as the 

display and same subnet.

4� 

Manually enter display IP address in web browser followed by :85 (for example, 

http://169.254.13.87:85) to identify the correct connection port.

5� 

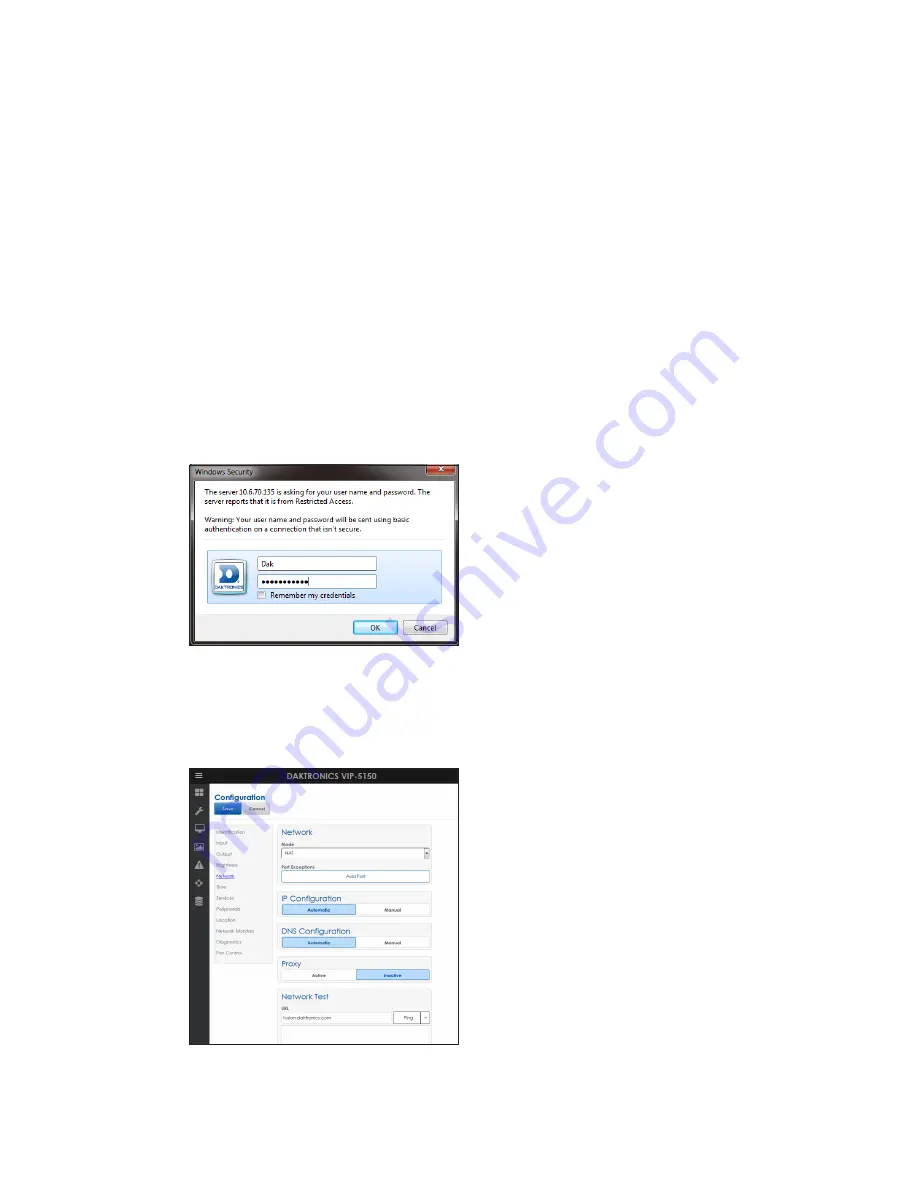
Enter 

Dak

 as the user name and 

DakPassword!

 as the password in the Windows 

Security window.

6� 

Click 

OK 

to connect to the display (refer to the help file for additional information 

about the configuration utility).

7� 

Click the 

Network

 tile.

8� 

Click 

Automatic

 under both the 

IP

 and 

DNS Configuration 

headings.

Summary of Contents for Galaxy GS6

Page 1: ...201 Daktronics Drive Brookings SD 57006 5128 www daktronics com support 800 325 8766 LARGE MATRIX GALAXY GS6 SERIES INSTALLATION AND OPERATION MANUAL P1874 DD3125389 Rev 14 22 April 2022...

Page 2: ...limits for a Class A digital device pursuant to part 15 of the FCC Rules These limits are designed to provide reasonable protection against harmful interference when the equipment is operated in a com...

Page 3: ...twork 12 Display Currently Configured For DHCP Default 12 Network Requirements 12 Installation Start up Steps 12 Display Configured For Static IP Address 12 Network Requirements 13 Configuration Steps...

Page 4: ...ion 37 Connecting A Display to A DHCP Network 37 Display Currently Configured for DHCP Default 37 Network Requirements 37 Installation Start up Steps 37 Display Configured For Static IP Address 37 Net...

Page 5: ...tem Refer to Daktronics Warranty and Limitation of Liability p 35 at the end of this manual for the full Daktronics Warranty and Limitation of Liability Contact Information For assistance before durin...

Page 6: ...o holes accidental or intentional that will allow water to enter the display Ensure all display modules are fully latched into the display cabinet Structure Requirements Support structure design depen...

Page 7: ...cialized tools needed to complete the installation Daktronics Provided Customer Provided Splice Wrench Hex Head Wrenches 1 8 and 3 16 Flathead and Phillips Head Screw Drivers Crane or Lift Truck Step...

Page 8: ...arge Matrix GS6 controller enclosure Do not block display ventilation system Do not use the lift eyes for display mounting Do not hang additional signage from Galaxy Large Matrix GS6 series display Di...

Page 9: ...Mount the display to the structure by welding or bolting all T clips to horizontal stringers Use all T clips when mounting the display Refer to the Shop Drawing for required T clip spacing 8 Remove cr...

Page 10: ...ame 4 Lift the display top section off the truck high enough to spin around 180 5 Starting at one end of the display use the splice tool to draw the top section into the bottom until the splice key is...

Page 11: ...he display submit detailed drawings for the proposed modifications to the Daktronics engineering staff for evaluation and approval or the warranty will be void Improper installation could result in se...

Page 12: ...rawing or label on the rear of the display 2 Route conduit from the main distribution panel disconnect to each display power entrance Each display section has a power entrance and requires a dedicated...

Page 13: ...pment must be electrically grounded Only qualified individuals may perform electrical work including verification of ground resistance Daktronics is not responsible for improper grounding or damage in...

Page 14: ...play to the Mirror display the fiber interconnect cable must be connected This cable typically comes attached to the rear of the display 1 Locate cable and unpackage 2 Connect one end of the cable to...

Page 15: ...and State MAC Address Configuration Port Status Port Management Port Used to Access Configuration Description Start Up Checklist Confirm power is correctly connected to the display Confirm there is su...

Page 16: ...c display configuration by the customer s network and eliminates manual configuration of the player When the display is connected to a network that supports DHCP a default DHCP name similar to DMP8 xx...

Page 17: ...IP address range as the display and same subnet 4 Manually enter display IP address in web browser followed by 85 for example http 169 254 13 87 85 to identify the correct connection port 5 Enter Dak...

Page 18: ...se Launch DisplayFind Double click the DisplayFind icon on your desktop Each item listed at the top of the DisplayFind utility should have a green check mark Refer to the explanations below for what e...

Page 19: ...listed in the bottom window of the utility 4 Click the desired display VIP5 xx xxx to launch the configuration utility within your web browser Note Refer to the configuration utility help file for ad...

Page 20: ...ter should time out searching for a DHCP server and fall back to auto IP addresses of 169 25x x x 4 Observe boot sequence reconfigure computer to same in the IP address range as the display and same s...

Page 21: ...an established link with the network 16 Turn on the display Display Configured For Static IP Address The following steps explain how to update the static IP address that is currently set on the displ...

Page 22: ...s Security window 6 Click OK to connect to the display refer to the help file for additional information about the configuration utility 7 Click the Network tile 8 Change the IP address settings to ne...

Page 23: ...required only for the first time login to VCS 4 Update the account information fields in the User Information and Additional Information sections and click Save Logging In Customer Local Hosted Server...

Page 24: ...tisers Users Lists current user profiles and allows users to update passwords or add new users Displays Lists all available displays and provides basic management tools including Devices for linking D...

Page 25: ...under the user name to open the contact information window Refer to Figure 17 If further assistance is required Daktronics Customer Service is available 7 a m to 7 p m CST Monday to Friday via telepho...

Page 26: ...sengage the tabs at the bottom of the module from the slots on the display s face sheet 4 Disconnect the SATA cables and unplug the power cable by squeezing the tabs on the sides of the plug head and...

Page 27: ...cold water Use one ounce of detergent to one gallon of cold water 3 Saturate a light medium duty cleaning brush with the soapy water 4 Use horizontal brush strokes to loosen and remove dirt and grime...

Page 28: ...the power entrance box on the rear of the display and travels to the Power Termination Panel 2 Power is distributed to Module Power Supplies 2a Controller Power Supply 2b Thermostat 2c and Fans 2d 3 D...

Page 29: ...troller from Fiber A to the PLR Port A 3 4 From SATA A on the PLR signal goes to the first module 4a and travels from module to module via SATA cables 4b finally returning to the PLR to SATA B 4c 5 Si...

Page 30: ...y To put the PLR into self test mode loop a SATA cable between ports A and B Then take a fiber cable and connect the fiber ports together Refer to Figure 24 Once the cables are connected cycle power t...

Page 31: ...conds Module Self Test If a module is blank but has power supplied to it perform a module self test to diagnose a module or signal cable failure To perform a self test follow these steps 1 Attach a si...

Page 32: ...module upward to disengage the tabs at the bottom of the module from the slots on the display s face sheet 5 Disconnect the SATA cables and unplug the power cable by squeezing the tabs on the sides of...

Page 33: ...re and tighten the screw 6 Reattach the cables to the bottom of the enclosure using the label as a guide 7 Reconnect controller fan power cable to jack J5 PLR Replacement The PLR is located behind the...

Page 34: ...received mail the old part to Daktronics If the replacement part fixes the problem send in the problem part which is being replaced a Package the old part in the same shipping materials in which the r...

Page 35: ...tem carefully to prevent damage during shipment Electronic components such as printed circuit boards should be placed in an antistatic bag before boxing 4 Enclose Your name Address Phone number The RM...

Page 36: ...This page intentionally left blank...

Page 37: ...ited States Canada 1 800 DAK TRON 325 8766 Outside the U S Canada 1 605 275 1040 Block Diagram Block Diagram GS6 13 03 Large Matrix w DMP DWG 3088134 Block Diagram GS6 SATA Routing 1 PLR Per Section D...

Page 38: ...This page intentionally left blank...

Page 39: ...Daktronics Warranty and Limitation of Liability 35 B Daktronics Warranty and Limitation of Liability This section includes the Daktronics Warranty Limitation of Liability statement SL 02374...

Page 40: ...This page intentionally left blank...

Page 41: ...ed For Static IP Address The following steps explain how to reconfigure a display for DHCP network when it has previously been configured for a static IP address Network Requirements Existing Network...

Page 42: ...ttp display IP address 85 5 Enter User Name Dak and Password DakPassword in the Windows Security window 6 Click Logon to connect to the display refer to the help file for additional information about...

Page 43: ...ed at the top of the DisplayFind utility should have a green check mark See the explanations below for what each item means If an item has a red X next to it click it for additional information or to...

Page 44: ...d in the bottom window of the utility 4 Click the desired display VIP5 xx xxx to launch the configuration utility within your web browser Note Refer to the configuration utility help file for addition...

Page 45: ...er for DHCP 3 Turn on the display Note Both the display and the computer should timeout searching for a DHCP server and fall back to auto IP addresses of 169 25x x x 4 Observe boot sequence reconfigur...

Page 46: ...Disconnect the computer from the display and connect display to the network 16 Ensure the display has an established link with the network 17 Turn on the display Display Configured For Static IP Addr...

Page 47: ...o Discover The Display p 39 section 5 Enter User Name Dak and Password DakPassword in the Windows Security window 6 Click the Configuration tab 7 Click eth0 8 Change the IP address settings to new val...

Reviews: