background image

Test and Remove Modules

10

5  Test and Remove Modules

Module Lanyard Attachment

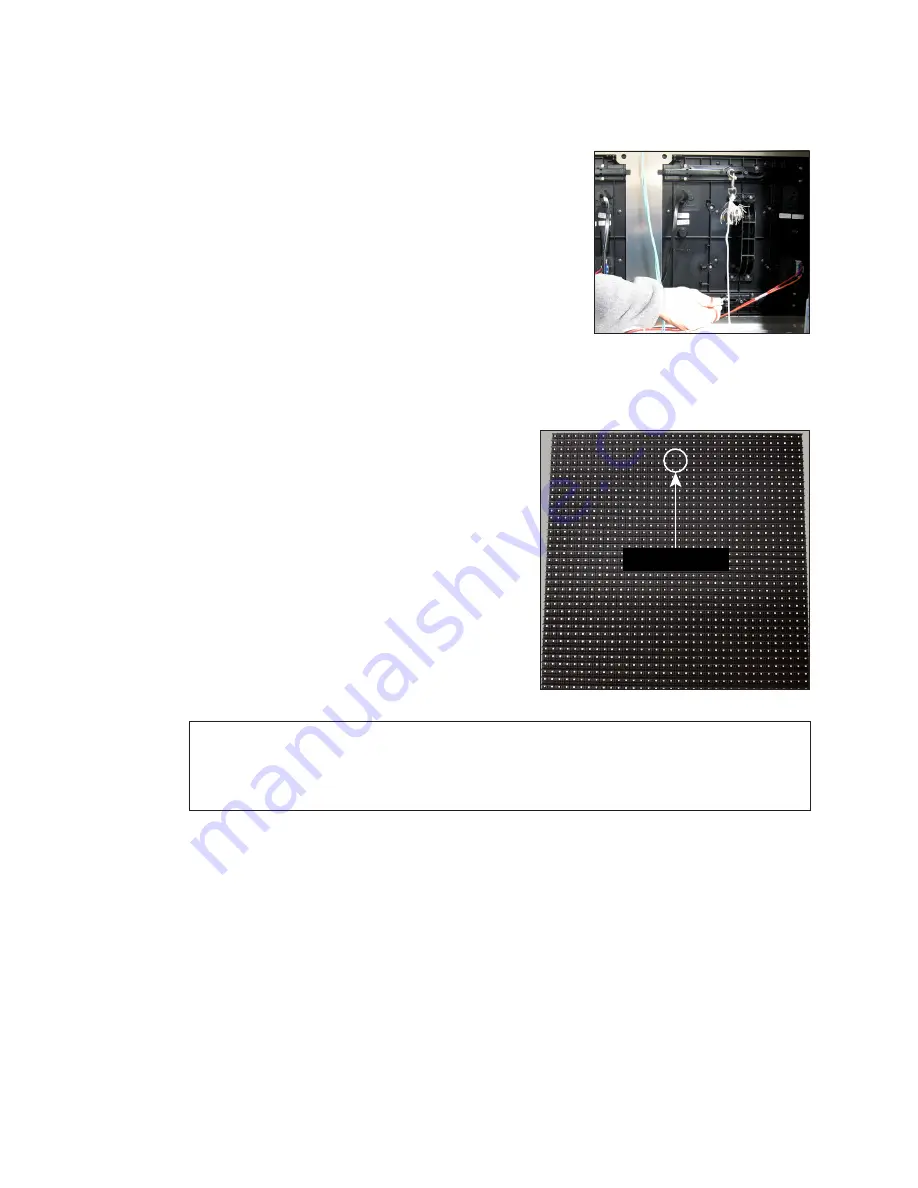
Attach a module lanyard (located in the spare parts 

rack) whenever removing a module. To attach a module 

lanyard, follow these steps: 

1� 

Attach one end of the lanyard to an attachment ring 

on the top of the of the module. Refer to 

Figure 11

.

2� 

Feed the lanyard over a wire rod or through a nearby 

upright. Do not anchor the module to another 

module.

3� 

Attach the other end of the lanyard to the 

attachment ring on the top of the module. 

Remove a Module (Front Access)

Required Tools:

 1/8" hex head wrench, module 

lanyard (from the spare parts rack)

1� 

Insert the 1/8" hex head wrench into the top 

access hole. Refer to 

Figure 12

2� 

Turn the latch release approximately a 

quarter-turn counterclockwise. You should feel 

the module release from the display face.

3� 

Pull the module from the display face just far 

enough to reach the back of the module.

4� 

Disconnect the power and SATA cables from 

the back of the module.

5� 

Gently place the module on a clean and dry 

surface.

Note: 

If there is no place to set the module, use a safety lanyard to hang the 

module from the rear of the display. Attach the safety lanyard in a way that 

takes up slack on the lanyard. Carefully let the module hang while ensuring it 

does not damage LEDs, louvers, or gasket.

Reinstall the Module (Front Access)

When installing new modules, place them in the outer ring of the display.

1� 

Reinstall the module by aligning it with the opening.

2� 

Reattach the power and SATA cables.

3� 

Carefully hook the module into the module sheet and rotate the module top to the 

module sheet. Verify that SATA and power cables are not being pinched between 

the module and display face.

4� 

Firmly press the upper half of the module against the display face.

5� 

Insert the 1/8" hex head wrench into the bottom access hole and turn approximately 

a quarter-turn clockwise or until you feel it latch in place.

Figure 11: 

Attach Safety Lanyard 

to Modules

Access Hole

Figure 12: 

Module Access Hole

Summary of Contents for DXB Series

Page 1: ...201 Daktronics Drive Brookings SD 57006 5128 www daktronics com support 800 325 8766 DXB SERIES DIGITAL BILLBOARD SERVICE MANUAL P2177 DD4140427 Rev 01 24 November 2021...

Page 2: ...he limits for a Class A digital device pursuant to part 15 of the FCC Rules These limits are designed to provide reasonable protection against harmful interference when the equipment is operated in a...

Page 3: ...d Remove Modules 10 Module Lanyard Attachment 10 Remove a Module Front Access 10 Reinstall the Module Front Access 10 Remove a Module Rear Access 11 Remove a Fan Plenum 11 Remove a Module from Behind...

Page 4: ...tLinkTM 19 Replace the Z Filter 20 Replace the Heater 20 Replace the Fan 20 8 Test and Replace Multi Direction Light Sensor 21 Test the MDLS 21 Replace the MDLS 21 9 Access and Troubleshoot the Webcam...

Page 5: ...Wide RMN Daktronics 0204 09 Manufactured in Sioux Falls SD 120 208 240 VAC Single Phase 60 HZ AMPS L1 L2 Total Watts Spare Parts Every Daktronics digital billboard is shipped with spare parts that inc...

Page 6: ...ntrol System FRUs ProLink Router Temperature Sensor Power Supply VIP 5160 2 Module Light Sensor MDLS Surge Suppressor Ethernet Switch 120 VAC 16 A Relay Mobotix Webcam 3 Pole Contactor iBoot Bar Axial...

Page 7: ...into the termination panel and is redistributed to the power supplies Refer to the layout drawing for display specific power distribution Display Signal Overview This section provides generic signal p...

Page 8: ...trol Overview 4 Odd x Even Module High Section Signal Path 1 PLR 1 Figure 4 Odd x Even Height Signal Routing Example Odd x Odd Module High Section Signal Path PLR 1 1 Figure 5 Odd x Odd Height Signal...

Page 9: ...relays Troubleshoot the Display Work with Daktronics help desk or experienced technicians to address display issues Refer to the following table for troubleshooting steps Issue Issue Image Troublesho...

Page 10: ...l drawing If not correct the signal path Display too bright 1 Immediately call Daktronics help desk and have them blank the display 2 Verify the Multi Direction Light Sensor MDLS is connected 3 Inspec...

Page 11: ...g Disconnect and reconnect power to the PLR 6 Verify there is power to that display section by checking module status indicators on multiple modules If there is no power check the breakers on that sec...

Page 12: ...le power indicator is on there is most likely a SATA cable issue If the module power indicator light is off check the power supplies for the modules at each end of the issue are on If not power or sig...

Page 13: ...tward so it clears the tab located on the display back sheet as shown in Figure 9 3 Lift the door upward to disengage its tabs from the slots on the display s back sheet as shown in Figure 10 4 Lower...

Page 14: ...of the module 4 Disconnect the power and SATA cables from the back of the module 5 Gently place the module on a clean and dry surface Note If there is no place to set the module use a safety lanyard...

Page 15: ...oximately a quarter turn clockwise to disengage the latch 6 With a 1 8 hex head wrench turn the top latch gear approximately a quarter turn clockwise to disengage the latch Note Maintain a firm grip o...

Page 16: ...le ensuring power and signal cables do not get pinched 5 Reverse Steps 1 4 to replace the term panel or ISP enclosure Remove the SmartLinkTM For Module Access The SmartLinkTM swings out of the way for...

Page 17: ...rd or cables do not pinch between the module and the display 3 After the module is in place use the bottom module lanyard rings or the lanyard to pull the module firmly against the face sheet 4 With a...

Page 18: ...the module is running a self test Remove the SATA cable and cycle power to the module to stop the self test For more information refer to Performing a Daktronics Digital Billboard Module Self Test DD1...

Page 19: ...dules change colors it shows they all work and that visually the display is fine but there could still be a signal failure that will not show up visually because of redundancy The Amber Yellow and Mag...

Page 20: ...e PLR Power Supplies 1 Disconnect the power coming from the term panel to the power supply 2 Disconnect any power cables to the power supply and from that power supply to the PLR 3 Pull the power supp...

Page 21: ...location within the ISP enclosure DMP 8000 The Digital Media Processor DMP receives the content from the Internet and sends it to the PLRs within the display and to the modules All of the connections...

Page 22: ...ply follow these steps 1 Disconnect any power cables to the power supply and from that power supply to the DMP VIP 2 Remove the nuts that hold the power supply in place Refer to Figure 33 3 Remove the...

Page 23: ...vious network switch Replace the SmartLinkTM 1 Turn off the SmartLinkTM breaker in the power entrance box 2 Wait for all LEDs in the SmartLinkTM to turn off This may take up to 8 minutes The extended...

Page 24: ...r to loosen and remove the mounting plate nuts Refer to Figure 39 3 Remove the heater assembly from the ISP enclosure 4 Use a Phillips screwdriver to remove the four heater mounting bolts that secure...

Page 25: ...y should dim within a couple of minutes Remove the fabric and verify the display returns to the brighter setting If possible work with the help desk and have them monitor the display IDM dimming level...

Page 26: ...to Figure 42 and the table below Issue Troubleshooting Steps Both LED indicators on the webcam are off Check Cat5e connections inside surge protector to ensure they are secure Verify M12 connection fo...

Page 27: ...osure Inspect the control system for damage Perform an inventory of the spare parts rack Have the help desk run a diagnostics check of the display Work with the help desk to repair any issues found du...

Page 28: ...splays a pixel is the smallest block of light emitting devices that can generate all available colors Power supply a display component that converts incoming AC line voltage to low DC voltage In the B...

Page 29: ...generic to Daktronics digital billboards Project specific documents take precedence over those listed in this section Reference Documents ProLink Router 6X5X Installation and Maintenance Manual DD1735...

Page 30: ...This page intentionally left blank...

Page 31: ...Daktronics Warranty and Limitation of Liability 27 B Daktronics Warranty and Limitation of Liability Click here to view the Daktronics Warranty Limitation of Liability statement SL 02374...

Page 32: ...This page intentionally left blank...

Reviews: