

Check out our instructional video online at
DakotaWineRacks.com
PLEASE FOLLOW WRITTEN INSTRUCTIONS CAREFULLY
1.
Find an open, flat area in which to work. Carefully remove all
components from the box. Check the parts list on back page to
verify package contents.
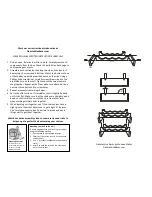
2.
Assemble each section by choosing two sides, 2 shelves (or 1
display top), 4 screws and 4 buttons. Match the bottom of one
of the shelves up with a predrilled notch on the side. Using a
Phillips head screwdriver, carefully screw threw side into the
predrilled hole on the shelf. Tighten until the two pieces are
snug together. Repeat until all four pieces are attached. Use a
hammer to tap buttons into screw holes.
3.
Repeat process for remaining shelves.
4.
Set rack on flat surface. If it wobbles, twist it slightly by hand
until it sits flat. Make sure that the shelves are straight up and
down so that it will line up with the slots from other racks
when stacking multiple units together.
5.
When stacking unit together, you’ll find that shelves have a
slight give to them that allows you to get a tight fit. If pieces
don’t match up exactly, don’t be afraid to tweak and bend
things a bit to get them together.
Watch our online assembly video to see more tips and tricks to
help you get a perfect fit when stacking your shelves.
shelf
side
90°
Dakota Wine Racks by Wooden Mallet
DakotaWineRacks.com
Attaching your rack to the wall
To avoid tipping attach your racking to the wall
using the following method.
1.
Put the rack in your desired location.
2.
Shim the front of the rack so it is even with
the back wall.
3.
Use “L” brackets (available at any hardware
store).
4.
Attach to both the rack and the wall in any
out of the way spot.
Planning to stain?
For best results we
recommend you stain or
finish your racking
BEFORE assembly.


