background image

PZX-7 

Ultrasonic Multi-Mode Thickness Gauge 


41 


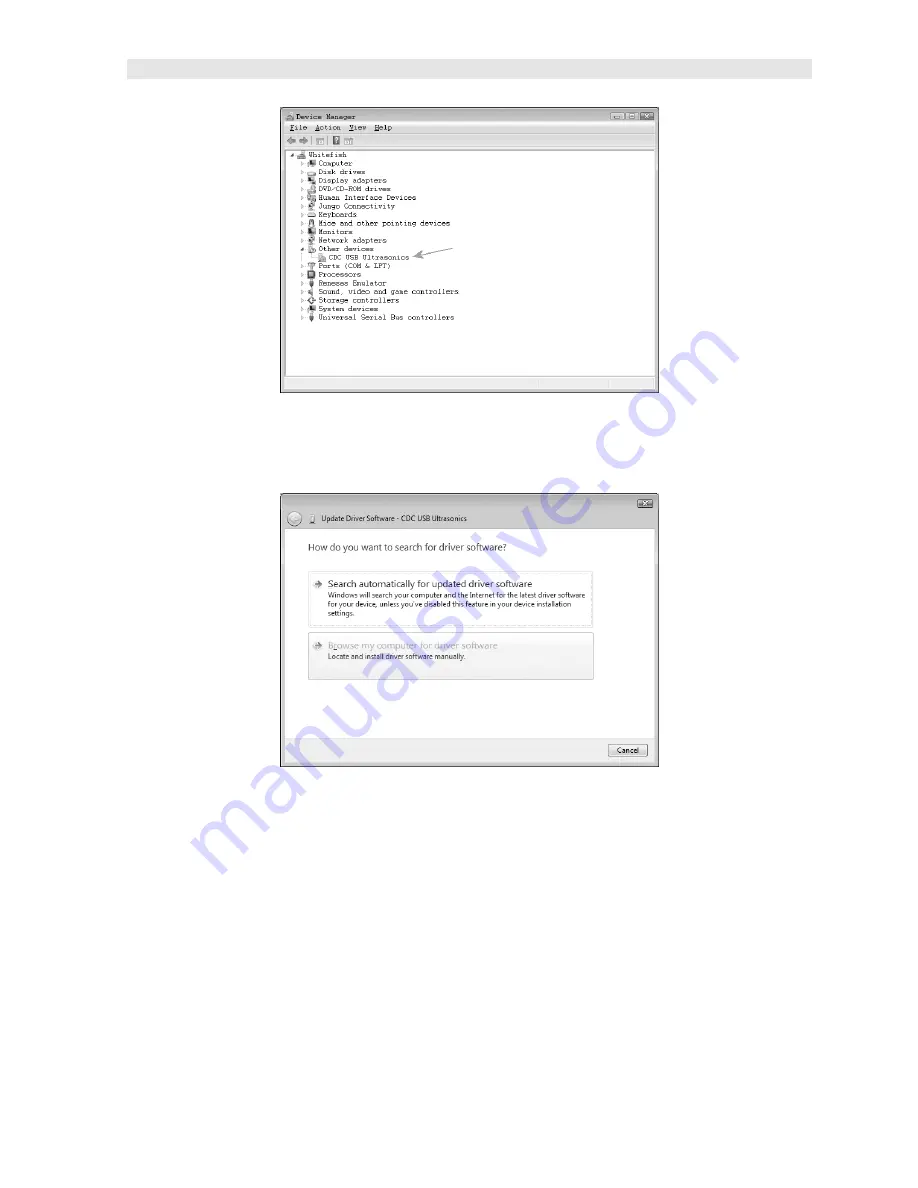
Right click on the CDC device as illustrated above, and select “update driver”.  The 
following window will appear: 


Select “browse my computer” and navigate to the directory where the driver was 
saved on your PC and install the driver.  When the installation is completed, the 
following window will be displayed: 
 

Summary of Contents for PZX-7

Page 1: ...OPERATION MANUAL DAKOTA ULTRASONICS P PZ ZX X 7 7 Precision Ultrasonic Thickness Gauge P N P 307 0002 Rev 1 00 January 2019 ...

Page 2: ......

Page 3: ...E VERSUS THICKNESS RELATIONSHIP 10 3 2 SUITABILITY OF MATERIALS 10 3 3 RANGE OF MEASUREMENT AND ACCURACY 10 3 4 COUPLANT 10 3 5 TEMPERATURE 11 3 6 MEASUREMENT MODES 11 CHAPTER FOUR SELECTING THE MEASUREMENT MODE 13 4 1 WHICH MODE TRANSDUCER DO I USE FOR MY APPLICATION 13 CHAPTER FIVE MAKING MEASUREMENTS 15 5 1 PROBE ZERO 15 5 2 MATERIAL CALIBRATION 16 CHAPTER SIX THROUGH PAINT MEASUREMENT MULTIMOD...

Page 4: ... 3 ALARM 31 8 4 DIFFERENTIAL 32 8 5 UNITS 33 8 6 LITE 34 8 7 BEEP 35 8 8 PROBE TYPE 36 8 9 VELOCITY VX 37 8 10 LOCK 38 8 11 FACTORY DEFAULTS 39 CHAPTER NINE CONNECTIVITY POWER 40 9 1 CONNECTIVITY 40 9 2 INSTALLING SERIAL DRIVER CDC 40 9 3 LINE POWER 42 APPENDIX A VELOCITY TABLE 43 APPENDIX B APPLICATION NOTES 45 ...

Page 5: ...er support resource in order to assist users with questions or difficulties not covered in this manual Customer support may be reached at any of the following Dakota Ultrasonics Corporation 1500 Green Hills Road 107 Scotts Valley CA 95066 Tel 831 431 9722 Fax 831 431 9723 www dakotaultrasonics com 1 1 Disclaimer While the PZX 7 is a basic digital instrument it is equipped with a number of measurem...

Page 6: ...the ENTER key similar to a computer keyboard This key will be used to select or set a menu option Note Unit will automatically power off when idle for 5 minutes All current settings are automatically saved prior to powering off 2 2 PRB 0 Key The PRB 0 key is used to zero the PZX 7 in much the same way that a mechanical micrometer is zeroed If the gauge is not zeroed correctly all of the measuremen...

Page 7: ...tings LOW MED HIGH for all other modes where automatic gain control is used Refer to page 29 for details regarding the gain feature 2 5 SCAN Key The PZX 7 offers a high speed scan feature This feature allows for scanning larger areas on a given test material while still offering reasonable representation of thickness over the area scanned Refer to page 30 for an explanation on the scan feature 2 6...

Page 8: ...c Off Off Plastic Off Stainless Options Options Options Options Contact Iron Set Lo Set Nominal Low Lo Options Plexiglass Set Hi High Med 125 PVC High 250 Plastic 375 Poly Urea 500 User 1 User 2 Diameter options are only available for contact transducers Here s a quick overview of navigating through the various features in MENU Navigating the Features in Menu 1 Press the key once to enter the sub ...

Page 9: ...y are in an edit mode to change a value or setting B Large 7 segment The thickness measurement velocity or alpha message will be displayed in this area C Measurement Modes This group of icons indicates which measurement mode the PZX 7 is currently using The modes are pulse echo echo echo interface echo and plastics PLAS D Stability Repeatability Indicator This is used in conjunction with the thick...

Page 10: ...ing J Units This combination of icons are illuminated in different sequences to inform the user what measurement units are currently being displayed in the large 7 segment area The plus minus icon is illuminated when the DIFF differential feature is activated K Small 14 Segment The material type is displayed in this area If it is set to a value of one of the materials in our material list it will ...

Page 11: ...ange for the versions Dakota commonly supply are from 10MHz to 20MHz The Delay line is fastened to the transducer with a retaining ring A drop of couplant is applied between the delay line and transducer body Refer to the diagram above The couplant should be checked on a regular basis to keep it from drying out To replenish unscrew the retaining ring counterclockwise separate the delay line from t...

Page 12: ...the material being measured Typically a single droplet of couplant is sufficient After applying couplant press the transducer wear face down firmly against the area to be measured The Stability Indicator should have six or seven bars darkened and a number should appear in the display If the PZX 7 has been properly zeroed see page 15 only if P E mode is currently selected and set to the correct sou...

Page 13: ... the batteries 2 AA cells When performing a manual probe zero function simply place the transducer on disk making firm contact Important Be sure the battery polarity is correct which can be found on the back label of the PZX 7 Note Rechargeable batteries can be used however they must be recharged outside of the unit in a standalone battery charger USB C Connector Refer to Diagram The USB C connect...

Page 14: ...nt is practical in a wide variety of materials including metals plastics and glass Materials that are difficult include some cast materials concrete wood fiberglass and some rubber 3 3 Range of measurement and accuracy The overall measurement capabilities based on the wide variety of materials are determined by the consistency of the material being measured homogeneity The range of thickness that ...

Page 15: ...rent measurements modes of the PZX 7 the transducers required and the reasons for using specific modes Pulse Echo P E Mode Pulse echo mode measures from the initial pulse sometimes referred to as an artificial zero to the first echo reflection In this mode a manual zero using the disk battery cover will need to be performed prior to calibrating the PZX 7 The transducer is placed on the reference d...

Page 16: ...cho The standard measuring range is approximately 0 060 up to 1 00 rated in steel and offers temperature compensation for the heating and cooling of the transducer itself Plastics PLAS Mode The plastics mode is a special setup for measuring thin plastics using a modified interface echo mode When the standard acrylic delay tip is similar in velocity to the plastic material measured a return echo is...

Page 17: ...material Since the velocity of the coating is approximately 3 times slower than that of steel pulse echo mode will produce an error if not removed However echo echo mode can be used with either delay line or contact style transducers to eliminate the error from the coating and measure only the base material High damped or high frequency transducers are most suitable for echo echo measurement mode ...

Page 18: ...ce echo modes If using a contact style transducer a high frequency option should be considered Restricted access Measuring materials with extreme curvatures or restricted access are best suited for higher frequencies and smaller diameter transducers or tip options ...

Page 19: ...ickness and one at the maximum limit In this case the reference disk is not used and considered a two point calibration described on page 19 5 1 Probe zero A probe zero is only necessary if a contact style transducer is used in pulse echo mode and the contact option is enabled in the menu A probe zero should be done prior to calibrating the instrument and done on a periodic basis when a temperatur...

Page 20: ...velocities For example the velocity of sound through steel is about 0 233 inches per microsecond versus that of aluminum which is about 0 248 inches per microsecond If the gauge is not set to the correct sound velocity all of the measurements the gauge makes will be erroneous by some amount The One Point calibration is the simplest and most commonly used calibration method optimizing linearity ove...

Page 21: ...ften times the exact sound velocity of a material is unknown However a sample with one or two known thicknesses can be used to determine the sound velocity As previously discussed the PZX 7 has a one or two point calibration option The one point calibration option is most suited for linearity over large ranges When using the one point option the calibration should be perform on the thickest side o...

Page 22: ...le and the repeatability indicator in the top left corner of the display is fully lit and stable 3 Press the key to enter the calibration edit screen displaying the current measurement value 4 Use the keys to scroll to the known thickness value Note The longer the keys are pressed and held the faster the value will increment decrement Note Pressing the key prior to pressing the key will abort the ...

Page 23: ...two point calibration at 080 2 03mm or something close to the min max values of the measurement range Note The PZX 7 also offers the capability of setting the probe zero to use any reference standard as the probe zero standard For clarification if it s desired to use a one inch reference of a specific material type as the zero reference performing the first point of a two point calibration sets th...

Page 24: ... Pressing the key prior to pressing the key will abort the cal routine without saving any changes 5 Once the known thickness value is being displayed press the key to display 1 of 2 which sets the zero value and returns to the measurement screen Note The internal zero of the PZX 7 is now set The procedure above can be used to set the internal zero of the PZX 7 to use any reference standard as the ...

Page 25: ... the thickness There are 9 common materials and 2 user programmable settings available It s important to note that these velocities will not always be an exact representation of the material being tested Use these values only if a close approximation is acceptable Follow the steps below to select a basic material type Selecting a Basic Material Type 1 Press the key to access the menu items feature...

Page 26: ...r to pressing the key will abort to the measurement screen without saving any changes 6 If USR1 or USR2 were selected the velocity edit screen will be displayed and edit icon illuminated and flashing 7 Use the keys to scroll to the desired material velocity Note The longer these keys are held the faster the velocity value is incremented 8 When the desired velocity setting is displayed press the ke...

Page 27: ...The multi echo measurement technique does have restrictions on the type of transducers it can use successfully The key requirement is that the transducers are high damped which refers to the duration of how long the transducer rings In order to improve the low end measurement range being able to measure thin materials the cycles of ring must be limited so they don t interfere with the internal gat...

Page 28: ...toggle between the measurement modes for a given transducer type contact or delay line to echo echo E E mode Note An icon will be illuminated in the top left portion of the display to indicate the measurement mode the PZX 7 is currently using ...

Page 29: ...h part and batch within a specified tolerance Using this feature will require calibration on a known thickness that will remain consistent at a specific location on a group of parts The test will always be performed at the same location for all parts in the group The velocity will be determined and either accepted or rejected depending on the specified tolerances The procedure for enabling this fe...

Page 30: ...ure 1 Physically measure an exact sample of the material or a location directly on the material to be measured using a set of calipers or a digital micrometer 2 Apply a drop of couplant on the transducer and place the transducer in steady contact with the sample or actual test material Be sure that the reading is stable and the repeatability indicator in the top left corner of the display is fully...

Page 31: ...value that was used to calibrate will be displayed in the top right corner of the display for confirmation 7 3 Calibration to a known velocity The velocity can also be directly edited and set to a target velocity value that was previously determined from a reference standard at an earlier time The procedure for directly entering the velocity is outlined below Calibration Known Velocity Note Be sur...

Page 32: ... s value The edit icon will be illuminated and flashing 3 Use the keys to scroll to the known velocity value Note Pressing the key prior to pressing the key will abort the cal routine without saving any changes 4 Once the known velocity value is being displayed press the key to display the calculated thickness based on known velocity 5 Press the key to return to the measurement screen and begin ma...

Page 33: ...standard However some applications may require the lower or higher gain settings When The low settings may be necessary for noisy or granular cast materials How do I know when to lower the gain If the reading becomes sporadic and won t settle down or resolve on a thickness value because the material is either very noisy or granular Setting the gain to a lower less sensitive level would potentially...

Page 34: ...o the measurement screen without saving changes 8 2 High Speed Scan The High Speed Scan feature of the PZX 7 increases the overall repetition rate to a maximum of 140Hz with a high speed screen refresh rate of 25 times a second This allows for making scanned passes over an arbitrary length of the test material while still maintaining a reasonable representation of thickness over the area or region...

Page 35: ...olerances The procedure to use the alarm feature is outlined below ALARM 1 Press the key to access the menu items features 2 Use the keys to scroll through the items features until the ALRM feature is being displayed 3 Press the key to edit the alarm status The edit icon will be illuminated and flashing 4 Use the keys to toggle alarm on off beep 5 When the desired ALRM status is displayed press th...

Page 36: ...pected thickness should be and measure the difference from the nominal value entered This feature is typically used in QA incoming inspections on pipes plate stock coils etc The steps below outline how to enable and enter the nominal value to use this feature Differential 1 Press the key to access the menu items features 2 Use the keys to scroll through the items features until the DIFF feature is...

Page 37: ...oth English inches or Metric millimeters units In either option the resolution RES can be set to LOW 001in 01mm or HIGH 0001in 001mm The procedure to select the units is outlined as below Units 1 Press the key to access the menu items features 2 Use the keys to scroll through the items features until the UNIT feature is being displayed 3 Press the key to edit the units setting The edit icon will b...

Page 38: ...ges 8 6 Lite The PZX 7 uses a custom glass segmented display that is equipped with a backlight for use in low light conditions The options are on off auto where the auto setting only lights the display when the gauge is coupled to the material and receiving a measurement The steps below outline how to toggle the options Backlight 1 Press the key to access the menu items features 2 Use the keys to ...

Page 39: ...e brightness and return to the measurement screen Note Pressing the key prior to pressing the key will abort to the measurement screen without saving changes 8 7 Beep The PZX 7 also has a feature to use the internal beeper most commonly used with the alarm feature for the key strokes on the keypad When enabled pressing any of the keys on the keypad will sound the beeper The procedure to enable the...

Page 40: ...pe The PZX 7 DL can use three different probe transducer styles for different application requirements The styles are CONTACT DELAY LINE and plastics PLAS The corresponding option must be selected to match the type of transducer connected to the PZX 7 DL in order for the gauge to operate correctly The procedure to select the probe type is outlined below Probe 1 Press the key to access the menu ite...

Page 41: ... to the measurement screen 8 9 Velocity VX When the velocity setting VX is enabled the PZX 7 will display will the material velocity as the primary measurement quantity instead of dimensional thickness The feature is generally used for basic nodularity testing as velocity is a key part of density for determining hardness An example might be casting manufacturers where the density hardness will det...

Page 42: ...ithout saving changes 5 When the desired VX setting is displayed press the key to set the status and return to the measurement screen 8 10 Lock The lock feature was built into the PZX 7 for the purpose of locking the operators out of editing any of the gauge settings for purposes of consistency between operators When the lock feature is enabled the gauge calibration functionality cannot be altered...

Page 43: ...1 Factory Defaults The PZX 7 can be reset to factory defaults at any time to restore the original gauge settings This should only be used if the gauge is not functioning properly or perhaps multiple features have been enabled and a clean start is needed The procedure to reset the gauge is outlined below Factory Reset 1 With the PZX 7 powered off press and hold down the and keys while powering the ...

Page 44: ... on the PC board of the PZX 7 Refer to our price list for additional information on communication module options and cables 9 2 Installing Serial Driver CDC When the PZX 7 is powered on and connected to the PC and no CDC driver was previously installed the following message will be displayed The driver file that needs to be installed can be downloaded directly from our website at www dakotaultraso...

Page 45: ...vice as illustrated above and select update driver The following window will appear Select browse my computer and navigate to the directory where the driver was saved on your PC and install the driver When the installation is completed the following window will be displayed ...

Page 46: ...ations capability can be used to connect to the PZX 7 and will capture the measurements to your PC when the ENTER key is pressed 9 3 Line Power The PZX 7 can be powered using the standard USB C to USB A data cable N 003 0330 by connecting directly to a USB port on your computer or using a standard cell phone power adapter directly to an outlet This is a convenient way to power the gauge for specif...

Page 47: ... 0 1280 3251 Inconel 0 2290 5817 Iron 0 2320 5893 Cast Iron 0 1800 approx 4572 Lead 0 0850 2159 Magnesium 0 2300 5842 Mercury 0 0570 1448 Molybdenum 0 2460 6248 Monel 0 2110 5359 Nickel 0 2220 5639 Nylon 0 1060 approx 2692 Platinum 0 1560 3962 Plexiglas 0 1060 2692 Polystyrene 0 0920 2337 PVC 0 0940 2388 Quartz glass 0 2260 5740 Rubber vulcanized 0 0910 2311 Silver 0 1420 3607 Steel 1020 0 2320 58...

Page 48: ...Dakota Ultrasonics 44 Tin 0 1310 3327 Titanium 0 2400 6096 Tungsten 0 2040 5182 Uranium 0 1330 3378 Water 0 0580 1473 Zinc 0 1660 4216 Zirconium 0 1830 4648 ...

Page 49: ...st be observed At temperatures above this point the change in sound velocity of the material being measured starts to have a noticeable effect upon ultrasonic measurement At such elevated temperatures it is recommended that the user perform calibration on a sample piece of known thickness which is at or near the temperature of the material to be measured This will allow the PZX 7 to correctly calc...

Page 50: ...imize error is another option An additional important consideration when measuring laminates is that many included air gaps or pockets which will cause an early reflection of the ultrasound beam This effect will be noticed as a sudden decrease in thickness in an otherwise regular surface While this may impede accurate measurement of total material thickness it does provide the user with positive i...

Page 51: ...th respect to this product Dakota Ultrasonics specifically disclaims any implied warranties of merchantability or fitness for a particular purpose Some states or provinces do not allow limitations on the duration of an implied warranty so the above limitation or exclusion may not apply to you However any implied warranty of merchantability or fitness is limited to the five year duration of this wr...

Reviews: