User Manual
DMOV-DWH7C
AU: SJE BY: SJE V1 REV: 01/12/24 Page 6 of 12
Event Trigger Wire Operations
Event Trigger Wire Color Guide
1.
Camera 1
–
Brown
2.
Camera 2
–
Yellow
3.
Camera 3
–
White
4.
Camera 4
–
Blue
Event Trigger Wires Explained
Event trigger wires can be attached to any 12v positive event. This will cause the monitor to change to that
camera, regardless of the state of the monitor (i.e. ON/OFF or channel selection). The most recent event
will be the primary display. So, if two (2) video channels (AV1 & AV2) are attached to an event output, the
event that happens last will change the monitor to its respective camera view.
The wires can be attached to any positive output 10.5v to 16.9v switch or supply to cause the monitor to
automatically switch the unit to its respective channel camera.
Example:
If you were to attach the AV1 wire
to a positive output from an unloading auger on a combine, the monitor would switch from channel 2 to
channel 1 when the auger is extended. The event circuit should be neutral in its normal state and change to
HIGH (+12v) when the event is considered to be active.
Monitor Operation
Setting Up/Pairing Your Camera
1.
Plug monitor into chosen power source. With no cameras connected, the monitor
will display “No
Signal” message.
2.
Have monitor show one camera image at a time
IMPORTANT: Camera will not pair in split screen or
SCAN mode.
3.
Plug 1 camera into the chosen power source.
4.
Press “MENU” button to enable menu selection.
IMPORTANT: Menu NOT accessible in split screen
mode.
5.
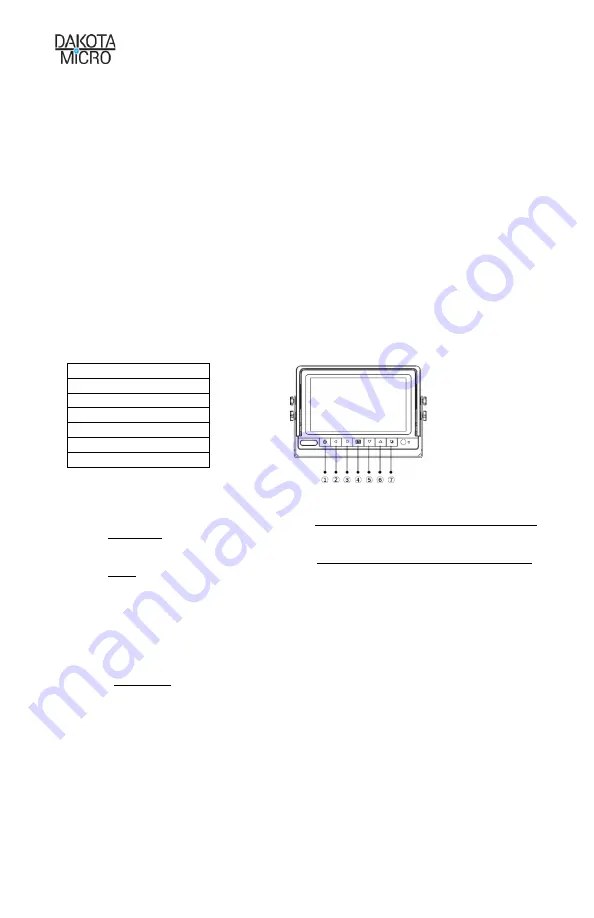
Use Left/Right arrows to select the “Pair” icon (pictured below)
6.
Press “OK” (7 on image above) button to select.
7.
Once selected, your monitor will display the message “
Please press pair key on Tx side 20
”, which
means your monitor will scan for available camera signals.
To Pair Additional Cameras
1.
Change the monitor to another video input and follow the above instructions for each additional
camera.
DISCLAIMER:
If camera signal cannot be found, unplug camera for 10 seconds and try again.
1.
Power
2.
Left (Volume -/Menu)
3.
Right (/Menu)
4.
Menu/Esc
5.
Down (CH switch)
6.
Up (CH switch)
7.
OK/Camera Toggle


