


6
MAN#650334:A
(Speedometer Setup Continued)
S SET
S SET
S SET
S SET
Miles to Next Service setup
The service mileage is a countdown mile meter. The service mile display can be disabled or can be set to
count down from 500 – 7500 miles. If the service mileage is enabled and it gets to 0 miles, it will display “
S -DvE
” each
time the key is turned on. If the push button switch is pressed and held while “
S
XXXX“ is displayed, the service miles
will be reset to your preset.
•
Press and release the switch until “
S
XXXX” is displayed, then press and hold the switch until “ – “ is displayed.
•
Release the switch. The current setting will be displayed, “
OFF
” or a mileage from
500
–
7500
.
•
Press and release the switch until the desired setting is displayed.
•
Press and hold the switch until “
-
” is displayed.
PERF
PERF
PERF
PERF
Performance menu setup
The performance readings can be turned on or off. When they are turned off the odometer will only toggle
through the mileage readings.
•
Press and release the switch until “
PErF
” is displayed, then press and hold the switch until “
-
“ is displayed.
•
Release the switch. The current setting will be displayed (
on
or
oFF
).
•
Press and release the switch until the desired setting is displayed.
•
Press and hold the switch until “
-
” is displayed.
odoMK
odoMK
odoMK
odoMK
Odometer preset
The odometer can be preset by the customer within the first 100 miles. Once the odometer
has more than 100 miles
the menu option will no longer be displayed. Make sure you have first calibrated the speedometer and correctly
selected the units to be either MPH or km/h first. The odometer will be set in the selected units. Once you have preset
the miles you cannot change it again.
WARNING!!: This only allows setting odometer to the nearest mile. Do not
use tenths! For example a mileage of 65432.1 should be set to “
065432
” using this method. If the tenths digit is
used, the odometer will read 10 times too high.
•
Press and release the switch until “
-odoMK
” is displayed, then press and hold the switch until “
-
“ is displayed.
•
The current miles will be displayed with the left most digit flashing.
•
Press and release the switch to increment the digit. Press and hold the switch to move to the next digit to the right.
•
Continue until the right most digit has been set. Press and hold the switch and the speed display will show “
No
“.
•
Press and hold the switch while “
no
” is displayed to go back and continue changing the odometer display. Turn the
key off to cancel any changes.
•
Press and release the switch to change to speed display to “
yes
”. Press and hold the switch while “
yes
” is
displayed to save the current odometer reading.
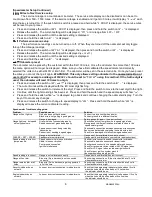
Speedometer Troubleshooting guide.
Problem
Possible cause
Solution
Gauge will not light up
Red wire does not have power.
Connect to a location that has power.
Black wire is not getting a good ground.
Connect ground to a different location.
Gauge is damaged.
Return gauge for repair. (see instructions)
Gauge lights up, but speed
Gray wire is not connected properly.
Check connection from gray wire to speed signal wire.
will only show zero.
Speed sensor not grounded properly.
Move ground to different location, preferable close to the
speedometer ground.
Speed sensor is not being turned by
Check cable connection between sensor and transmission.
transmission.
Sensor can be tested by spinning the cable with a drill.
Sensor is not sending a speed signal.
Check for a damaged or malfunctioning speed sensor.
Gauge is not calibrated
Gauge must be recalibrated (see instructions).
PLEASE – SET – SPEED
Speedometer not calibrated
Gauge must be calibrated to your vehicle (see instructions)
Speed reading is erratic or
Speed sensor wire is loose or broken.
Check all wire connections and inspect wire for breaks.
jumps around.
Cable is loose or broken.
Check cable between sensor and transmission.
Poor ground connection.
Check ground connection on speedometer and sensor.
Ignition Interference
Check for tachometer wires routed with VSS signal wires.
Check for VSS signal wires routed near ignition coils
Check for poor ignition system ground
Use suppression spark plug wires
Speed reading is incorrect.
Gauge is not calibrated correctly.
Gauge must be calibrated (see instructions).
Gauge will not dim.
Blue wire (2-pin harness) is not connected
Check wiring connections. Blue wire should have 12 volts
correctly.
when tachometer is dim.
Gauge remains dim at all
Blue wire (2-wire harness) is getting power all
Check wiring connections. Blue wire should have 0 volts
times.
all of the time.
when tachometer is bright.
Security indicator does
Loose or incorrect connection to indicator wire.
Check that the appropriate indicator wire has about 0 volts
not work.
when the it should be off and about 12 volts when
the indicator should be on.
Engine indicator does
Loose or incorrect connection to indicator wire.
Check that the appropriate indicator wire has about 12 volts
not work.
when the it should be off and about 0 volts when
the indicator should be on.


